10.1 账户激活
目前,用户注册后立即就能完全控制自己的账户(第 7 章)。本节,我们要添加一步,激活用户的账户,从而确认用户拥有注册时使用的电子邮件地址。为此,我们要为用户创建激活令牌和摘要,然后给用户发送一封电子邮件,提供包含令牌的链接。用户点击这个链接后,激活这个账户。
我们要采取的实现步骤与注册用户(8.2 节)和记住用户(8.4 节)差不多,如下所示:
用户一开始处于“未激活”状态;
用户注册后,生成一个激活令牌和对应的激活摘要;
把激活摘要存储在数据库中,然后给用户发送一封电子邮件,提供一个包含激活令牌和用户电子邮件地址的链接;[2]
用户点击这个链接后,使用电子邮件地址查找用户,并且对比令牌和摘要;
如果令牌和摘要匹配,就把状态由“未激活”改为“已激活”。
因为与密码和记忆令牌类似,实现账户激活(以及密码重设)功能时可以继续使用前面的很多方法,包括 User.digest、User.new_token 和修改过的 user.authenticated?。这几个功能(包括 10.2 节要实现的密码重设)之间的对比,如表 10.1 所示。我们会在 10.1.3 节定义可用于表中所有情况的通用版 authenticated? 方法。
表 10.1:登录,记住状态,账户激活和密码重设之间的对比
| 查找方式 | 字符串 | 摘要 | 认证 |
|---|---|---|---|
email | password | password_digest | authenticate(password) |
id | remember_token | remember_digest | authenticated?(:remember, token) |
email | activation_token | activation_digest | authenticated?(:activation, token) |
email | reset_token | reset_digest | authenticated?(:reset, token) |
和之前一样,我们要在主题分支中开发新功能。读到 10.3 节会发现,账户激活和密码重设需要共用一些电子邮件设置,合并到 master 分支之前,要把这些设置应用到这两个功能上,所以在一个分支中开发这两个功能比较方便:
$ git checkout master
$ git checkout -b account-activation-password-resets
10.1.1 资源
和会话一样(8.1 节),我们要把“账户激活”看做一个资源,不过这个资源不对应模型,相关的数据(激活令牌和激活状态)存储在用户模型中。然而,我们要通过标准的 REST URL 处理账户激活操作。激活链接会改变用户的激活状态,所以我们计划在 edit 动作中处理。[3]所需的控制器使用下面的命令生成:[4]
$ rails generate controller AccountActivations --no-test-framework
我们需要使用下面的方法生成一个 URL,放在激活邮件中:
edit_account_activation_url(activation_token, ...)
因此,我们需要为 edit 动作设定一个具名路由——通过代码清单 10.1 中高亮显示的那行 resources 实现。
代码清单 10.1:添加账户激活所需的资源路由
config/routes.rb
Rails.application.routes.draw do
  root                'static_pages#home'
  get    'help'    => 'static_pages#help'
  get    'about'   => 'static_pages#about'
  get    'contact' => 'static_pages#contact'
  get    'signup'  => 'users#new'
  get    'login'   => 'sessions#new'
  post   'login'   => 'sessions#create'
  delete 'logout'  => 'sessions#destroy'
  resources :users
 resources :account_activations, only: [:edit] end
接下来,我们需要一个唯一的激活令牌,用来激活用户。密码、记忆令牌和密码重设(10.2 节)需要考虑很多安全隐患,因为如果攻击者获取了这些信息就能完全控制账户。账户激活则不需要这么麻烦,但如果不哈希激活令牌,账户也有一定危险。[5]所以,参照记住登录状态的做法(8.4 节),我们会公开令牌,而在数据库中存储哈希摘要。这么做,我们可以使用下面的方式获取激活令牌:
user.activation_token
使用下面的代码认证用户:
user.authenticated?(:activation, token)
(不过得先修改代码清单 8.33 中定义的 authenticated? 方法。)我们还要定义一个布尔值属性 activated,使用自动生成的布尔值方法检查用户的激活状态(类似 9.4.1 节使用的方法):
if user.activated? ...
最后,我们还要记录激活的日期和时间,虽然本书用不到,但说不定以后需要使用。完整的数据模型如图 10.1 所示。
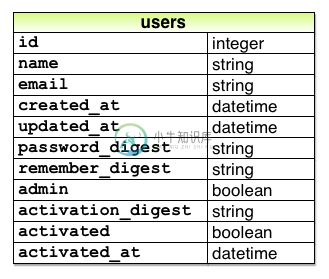 图 10.1:添加账户激活相关属性后的用户模型
下面的命令生成一个迁移,添加这些属性。我们在命令行中指定了要添加的三个属性:
$ rails generate migration add_activation_to_users \
> activation_digest:string activated:boolean activated_at:datetime
和 admin 属性一样(代码清单 9.50),我们要把 activated 属性的默认值设为 false,如代码清单 10.2 所示。
代码清单 10.2:添加账户激活所需属性的迁移
db/migrate/[timestamp]_add_activation_to_users.rb
class AddActivationToUsers < ActiveRecord::Migration
  def change
    add_column :users, :activation_digest, :string
 add_column :users, :activated, :boolean, default: false    add_column :users, :activated_at, :datetime
  end
end
然后像之前一样,执行迁移:
$ bundle exec rake db:migrate
因为每个新注册的用户都得激活,所以我们应该在创建用户对象之前为用户分配激活令牌和摘要。类似的操作在 6.2.5 节见过,那时我们要在用户存入数据库之前把电子邮件地址转换成小写形式。我们使用的是 before_save 回调和 downcase 方法(代码清单 6.31)。before_save 回调在保存对象之前,包括创建对象和更新对象,自动调用。不过现在我们只想在创建用户之前调用回调,创建激活摘要。为此,我们要使用 before_create 回调,按照下面的方式定义:
before_create :create_activation_digest
这种写法叫“方法引用”,Rails 会寻找一个名为 create_activation_digest 的方法,在创建用户之前调用。(在代码清单 6.31 中,我们直接把一个块传给 before_save。不过方法引用是推荐的做法。)create_activation_digest 方法只会在用户模型内使用,没必要公开。如 7.3.2 节所示,在 Ruby 中可以使用 private 实现这个需求:
private

  def create_activation_digest
    # 创建令牌和摘要
  end
在一个类中,private 之后的方法都会自动“隐藏”。我们可以在控制器会话中验证这一点:
$ rails console
>> User.first.create_activation_digest
NoMethodError: private method `create_activation_digest' called for #<User>
这个 before_create 回调的作用是为用户分配令牌和对应的摘要,实现的方法如下所示:
self.activation_token  = User.new_token
self.activation_digest = User.digest(activation_token)
这里用到了实现“记住我”功能时用来生成令牌和摘要的方法。我们可以把这两行代码和代码清单 8.32 中的 remember 方法比较一下:
# 为了持久会话,在数据库中记住用户
def remember
  self.remember_token = User.new_token
  update_attribute(:remember_digest, User.digest(remember_token))
end
二者之间的主要区别是,remember 方法中使用的是 update_attribute。因为,创建记忆令牌和摘要时,用户已经存在于数据库中了,而 before_create 回调在创建用户之前执行。有了这个回调,使用 User.new 新建用户后(例如用户注册后,参见代码清单 7.17),会自动赋值 activation_token 和 activation_digest 属性,而且因为 activation_digest 对应数据库中的一个列(图 10.1),所以保存用户时会自动把属性的值存入数据库。
综上所述,用户模型如代码清单 10.3 所示。因为激活令牌是虚拟属性,所以我们又添加了一个 attr_accessor。注意,我们还把电子邮件地址转换成小写的回调改成了方法引用形式。
代码清单 10.3:在用户模型中添加账户激活相关的代码 GREEN
app/models/user.rb
class User < ActiveRecord::Base
 attr_accessor :remember_token, :activation_token before_save   :downcase_email before_create :create_activation_digest  validates :name,  presence: true, length: { maximum: 50 }
  .
  .
  .
  private

    # 把电子邮件地址转换成小写
    def downcase_email
 self.email = email.downcase    end

    # 创建并赋值激活令牌和摘要
    def create_activation_digest
 self.activation_token  = User.new_token self.activation_digest = User.digest(activation_token)    end
end
在继续之前,我们还要修改种子数据,把示例用户和测试用户设为已激活,如代码清单 10.4 和代码清单 10.5 所示。(Time.zone.now 是 Rails 提供的辅助方法,基于服务器使用的时区,返回当前时间戳。)
代码清单 10.4:激活种子数据中的用户
db/seeds.rb
User.create!(name:  "Example  User",
             email: "[email protected]",
             password:              "foobar",
             password_confirmation: "foobar",
             admin:     true,
 activated: true, activated_at: Time.zone.now)
99.times do |n|
  name  = Faker::Name.name
  email = "example-#{n+1}@railstutorial.org"
  password = "password"
  User.create!(name:  name,
              email: email,
              password:              password,
              password_confirmation: password,
 activated: true, activated_at: Time.zone.now) end
代码清单 10.5:激活固件中的用户
test/fixtures/users.yml
michael:
  name: Michael Example
  email: [email protected]
  password_digest: <%= User.digest('password') %>
  admin: true
 activated: true activated_at: <%= Time.zone.now %>
archer:
  name: Sterling Archer
  email: [email protected]
  password_digest: <%= User.digest('password') %>
 activated: true activated_at: <%= Time.zone.now %>
lana:
  name: Lana Kane
  email: [email protected]
  password_digest: <%= User.digest('password') %>
 activated: true activated_at: <%= Time.zone.now %>
malory:
  name: Malory Archer
  email: [email protected]
  password_digest: <%= User.digest('password') %>
 activated: true activated_at: <%= Time.zone.now %>
<% 30.times do |n| %>
user_<%= n %>:
  name:  <%= "User #{n}" %>
  email: <%= "user-#{n}@example.com" %>
  password_digest: <%= User.digest('password') %>
 activated: true activated_at: <%= Time.zone.now %> <% end %>
为了应用代码清单 10.4 中的改动,我们要还原数据库,然后像之前一样写入数据:
$ bundle exec rake db:migrate:reset
$ bundle exec rake db:seed
10.1.2 邮件程序
写好模型后,我们要编写发送账户激活邮件的代码了。我们要使用 Action Mailer 库创建一个邮件程序,在用户控制器的 create 动作中发送一封包含激活链接的邮件。邮件程序的结构和控制器动作差不多,邮件模板使用视图定义。这一节的任务是创建邮件程序,以及编写视图,写入激活账户所需的激活令牌和电子邮件地址。
与模型和控制器一样,我们可以使用 rails generate 生成邮件程序:
$ rails generate mailer UserMailer account_activation password_reset
我们使用这个命令生成了所需的 account_activation 方法,以及 10.2 节要使用的 password_reset 方法。
生成邮件程序时,Rails 还为每个邮件程序生成了两个视图模板,一个用于纯文本邮件,一个用于 HTML 邮件。账户激活邮件程序的两个视图如代码清单 10.6 和代码清单 10.7 所示。
代码清单 10.6:生成的账户激活邮件视图,纯文本格式
app/views/user_mailer/account_activation.text.erb
UserMailer#account_activation

<%= @greeting %>, find me in app/views/user_mailer/account_activation.text.erb
代码清单 10.7:生成的账户激活邮件视图,HTML 格式
app/views/user_mailer/account_activation.html.erb
<h1>UserMailer#account_activation</h1>

<p>
  <%= @greeting %>, find me in app/views/user_mailer/account_activation.html.erb
</p>
我们看一下生成的邮件程序,了解它是如何工作的,如代码清单 10.8 和代码清单 10.9所示。代码代码清单 10.8 设置了一个默认的发件人地址(from),整个应用中的全部邮件程序都会使用这个地址。(这个代码清单还设置了各种邮件格式使用的布局。本书不会讨论邮件的布局,生成的 HTML 和纯文本格式邮件布局在 app/views/layouts 文件夹中。)代码清单 10.9 中的每个方法中都设置了收件人地址。在生成的代码中还有一个实例变量 @greeting,这个变量可在邮件程序的视图中使用,就像控制器中的实例变量可以在普通的视图中使用一样。
代码清单 10.8:生成的 ApplicationMailer
app/mailers/application_mailer.rb
class ApplicationMailer < ActionMailer::Base
  default from: "[email protected]"
  layout 'mailer'
end
代码清单 10.9:生成的 UserMailer
app/mailers/user_mailer.rb
class UserMailer < ActionMailer::Base

  # Subject can be set in your I18n file at config/locales/en.yml
  # with the following lookup:
  #
  #   en.user_mailer.account_activation.subject
  #
  def account_activation
 @greeting = "Hi"
 mail to: "[email protected]"  end

  # Subject can be set in your I18n file at config/locales/en.yml
  # with the following lookup:
  #
  #   en.user_mailer.password_reset.subject
  #
  def password_reset
 @greeting = "Hi"
 mail to: "[email protected]"  end
end
为了发送激活邮件,我们首先要修改生成的模板,如代码清单 10.10 所示。然后要创建一个实例变量,其值是用户对象,以便在视图中使用,然后把邮件发给 user.email。如代码清单 10.11 所示,mail 方法还可以接受 subject 参数,指定邮件的主题。
代码清单 10.10:在 ApplicationMailer 中设定默认的发件人地址
class ApplicationMailer < ActionMailer::Base
  default from: "[email protected]"
  layout 'mailer'
end
代码清单 10.11:发送账户激活链接
app/mailers/user_mailer.rb
class UserMailer < ApplicationMailer

 def account_activation(user) @user = user mail to: user.email, subject: "Account activation" end
  def password_reset
    @greeting = "Hi"

    mail to: "[email protected]"
  end
end
和普通的视图一样,在邮件程序的视图中也可以使用嵌入式 Ruby。在邮件中我们要添加一个针对用户的欢迎消息,以及一个激活链接。我们计划使用电子邮件地址查找用户,然后使用激活令牌认证用户,所以链接中要包含电子邮件地址和令牌。因为我们把“账户激活”视作一个资源,所以可以把令牌作为参数传给代码清单 10.1 中定义的具名路由:
edit_account_activation_url(@user.activation_token, ...)
我们知道,edit_user_url(user) 生成的地址是下面这种形式:
http://www.example.com/users/1/edit
那么,账户激活的链接应该是这种形式:
http://www.example.com/account_activations/q5lt38hQDc_959PVoo6b7A/edit
其中,q5lt38hQDc_959PVoo6b7A 是使用 new_token 方法(代码清单 8.31)生成的 base64 字符串,可安全地在 URL 中使用。这个值的作用和 /users/1/edit 中的用户 ID 一样,在 AccountActivationsController 的 edit 动作中可以通过 params[:id] 获取。
为了包含电子邮件地址,我们要使用“查询参数”(query parameter)。查询参数放在 URL 中的问号后面,使用键值对形式指定:[6]
account_activations/q5lt38hQDc_959PVoo6b7A/edit?email=foo%40example.com
注意,电子邮件地址中的“@”被替换成了 %40,也就是被转义了,这样,URL 才是有效的。在 Rails 中设定查询参数的方法是,把一个哈希传给具名路由:
edit_account_activation_url(@user.activation_token, email: @user.email)
使用这种方式设定查询参数,Rails 会自动转义所有特殊字符。而且,在控制器中会自动反转义电子邮件地址,通过 params[:email] 可以获取电子邮件地址。
定义好实例变量 @user 之后(代码清单 10.11),我们可以使用 edit 动作的具名路由和嵌入式 Ruby 创建所需的链接了,如代码清单 10.12 和代码清单 10.13 所示。注意,在代码清单 10.13 中,我们使用 link_to 方法创建有效的链接。
代码清单 10.12:账户激活邮件的纯文本视图
app/views/user_mailer/account_activation.text.erb
Hi <%= @user.name %>,

Welcome to the Sample App! Click on the link below to activate your account:

<%= edit_account_activation_url(@user.activation_token, email: @user.email) %>
代码清单 10.13:账户激活邮件的 HTML 视图
app/views/user_mailer/account_activation.html.erb
<h1>Sample App</h1>

<p>Hi <%= @user.name %>,</p>

<p>
Welcome to the Sample App! Click on the link below to activate your account:
</p>

<%= link_to "Activate", edit_account_activation_url(@user.activation_token,
                                                    email: @user.email) %>
若想查看这两个邮件视图的效果,我们可以使用邮件预览功能。Rails 提供了一些特殊的 URL,用来预览邮件。首先,我们要在应用的开发环境中添加一些设置,如代码清单 10.14 所示。
代码清单 10.14:开发环境中的邮件设置
config/environments/development.rb
Rails.application.configure do
  .
  .
  .
  config.action_mailer.raise_delivery_errors = true
  config.action_mailer.delivery_method = :test
  host = 'example.com'
  config.action_mailer.default_url_options = { host: host }
  .
  .
  .
end
代码清单 10.14 中设置的主机地址是 'example.com',你应该使用你的开发环境的主机地址。例如,在我的系统中,可以使用下面的地址(包括云端 IDE 和本地服务器):
host = 'rails-tutorial-c9-mhartl.c9.io'     # 云端 IDE
host = 'localhost:3000'                     # 本地主机
然后重启开发服务器,让代码清单 10.14 中的设置生效。接下来,我们要修改邮件程序的预览文件。生成邮件程序时已经自动生成了这个文件,如代码清单 10.15 所示。
代码清单 10.15:生成的邮件预览程序
test/mailers/previews/user_mailer_preview.rb
# Preview all emails at http://localhost:3000/rails/mailers/user_mailer
class UserMailerPreview < ActionMailer::Preview

  # Preview this email at
  # http://localhost:3000/rails/mailers/user_mailer/account_activation
  def account_activation
    UserMailer.account_activation
  end

  # Preview this email at
  # http://localhost:3000/rails/mailers/user_mailer/password_reset
  def password_reset
    UserMailer.password_reset
  end

end
因为代码清单 10.11 中定义的 account_activation 方法需要一个有效的用户作为参数,所以代码清单 10.15 中的代码现在还不能使用。为了解决这个问题,我们要定义 user 变量,把开发数据库中的第一个用户赋值给它,然后作为参数传给 UserMailer.account_activation,如代码清单 10.16 所示。注意,在这段代码中,我们还给 user.activation_token 赋了值,因为代码清单 10.12 和代码清单 10.13 中的模板要使用账户激活令牌。(activation_token 是虚拟属性,所以数据库中的用户并没有激活令牌。)
代码清单 10.16:预览账户激活邮件所需的方法
test/mailers/previews/user_mailer_preview.rb
# Preview all emails at http://localhost:3000/rails/mailers/user_mailer
class UserMailerPreview < ActionMailer::Preview

  # Preview this email at
  # http://localhost:3000/rails/mailers/user_mailer/account_activation
  def account_activation
 user = User.first user.activation_token = User.new_token UserMailer.account_activation(user)  end

  # Preview this email at
  # http://localhost:3000/rails/mailers/user_mailer/password_reset
  def password_reset
    UserMailer.password_reset
  end
end
这样修改之后,我们就可以访问注释中提示的 URL 预览账户激活邮件了。(如果使用云端 IDE,要把 localhost:3000 换成相应的 URL。)HTML 和纯文本邮件分别如图 10.2 和图 10.3 所示。
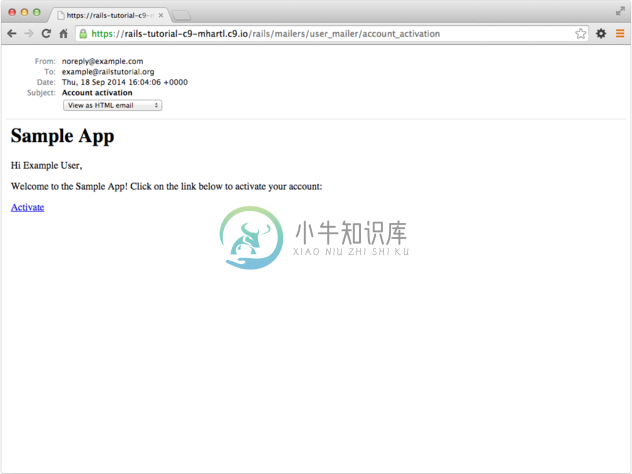 图 10.2:预览 HTML 格式的账户激活邮件
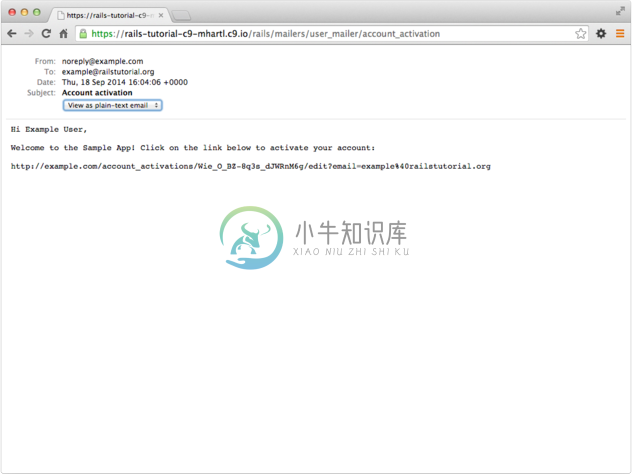 图 10.3:预览纯文本格式的账户激活邮件
最后,我们要编写一些测试,再次确认邮件的内容。这并不难,因为 Rails 生成了一些有用的测试示例,如代码清单 10.17 所示。
代码清单 10.17:Rails 生成的 UserMailer 测试
test/mailers/user_mailer_test.rb
require 'test_helper'

class UserMailerTest < ActionMailer::TestCase

  test "account_activation" do
    mail = UserMailer.account_activation
    assert_equal "Account activation", mail.subject
    assert_equal ["[email protected]"], mail.to
    assert_equal ["[email protected]"], mail.from
    assert_match "Hi", mail.body.encoded
  end

  test "password_reset" do
    mail = UserMailer.password_reset
    assert_equal "Password reset", mail.subject
    assert_equal ["[email protected]"], mail.to
    assert_equal ["[email protected]"], mail.from
    assert_match "Hi", mail.body.encoded
  end
end
代码清单 10.17 中使用了强大的 assert_match 方法。这个方法既可以匹配字符串,也可以匹配正则表达式:
assert_match 'foo', 'foobar'      # true
assert_match 'baz', 'foobar'      # false
assert_match /\w+/, 'foobar'      # true
assert_match /\w+/, '$#!*[email protected]'      # false
代码清单 10.18 使用 assert_match 检查邮件正文中是否有用户的名字、激活令牌和转义后的电子邮件地址。注意,转义用户电子邮件地址使用的方法是 CGI::escape(user.email)。[7](其实还有第三种方法,ERB::Util 中的 url_encode 方法有同样的效果。)
代码清单 10.18:测试现在这个邮件程序 RED
test/mailers/user_mailer_test.rb
require 'test_helper'

class UserMailerTest < ActionMailer::TestCase

  test "account_activation" do
    user = users(:michael)
    user.activation_token = User.new_token
    mail = UserMailer.account_activation(user)
    assert_equal "Account activation", mail.subject
    assert_equal [user.email], mail.to
    assert_equal ["[email protected]"], mail.from
    assert_match user.name,               mail.body.encoded
    assert_match user.activation_token,   mail.body.encoded
    assert_match CGI::escape(user.email), mail.body.encoded
  end
end
注意,我们在代码清单 10.18 中为用户固件指定了激活令牌,因为固件中没有虚拟属性。
为了让这个测试通过,我们要修改测试环境的配置,设定正确的主机地址,如代码清单 10.19 所示。
代码清单 10.19:设定测试环境的主机地址
config/environments/test.rb
Rails.application.configure do
  .
  .
  .
  config.action_mailer.delivery_method = :test
 config.action_mailer.default_url_options = { host: 'example.com' }  .
  .
  .
end
现在,邮件程序的测试应该可以通过了:
代码清单 10.20:GREEN
$ bundle exec rake test:mailers
若要在我们的应用中使用这个邮件程序,只需在处理用户注册的 create 动作中添加几行代码,如代码清单 10.21 所示。注意,代码清单 10.21 修改了注册后的重定向地址。之前,我们把用户重定向到资料页面(7.4 节),可是现在需要先激活,再转向这个页面就不合理了,所以把重定向地址改成了根地址。
代码清单 10.21:在注册过程中添加账户激活 RED
app/controllers/users_controller.rb
class UsersController < ApplicationController
  .
  .
  .
  def create
    @user = User.new(user_params)
    if @user.save
 UserMailer.account_activation(@user).deliver_now flash[:info] = "Please check your email to activate your account." redirect_to root_url    else
      render 'new'
    end
  end
  .
  .
  .
end
因为现在重定向到根地址而不是资料页面,而且不会像之前那样自动登入用户,所以测试组件无法通过,不过应用能按照我们设计的方式运行。我们暂时把导致失败的测试注释掉,如代码清单 10.22 所示。我们会在 10.1.4 节去掉注释,并且为账户激活编写能通过的测试。
代码清单 10.22:临时注释掉失败的测试 GREEN
test/integration/users_signup_test.rb
require 'test_helper'

class UsersSignupTest < ActionDispatch::IntegrationTest

  test "invalid signup information" do
    get signup_path
    assert_no_difference 'User.count' do
      post users_path, user: { name:  "",
                               email: "[email protected]",
                               password:              "foo",
                               password_confirmation: "bar" }
    end
    assert_template 'users/new'
    assert_select 'div#error_explanation'
    assert_select 'div.field_with_errors'
  end

  test "valid signup information" do
    get signup_path
    assert_difference 'User.count', 1 do
      post_via_redirect users_path, user: { name:  "Example User",
                                            email: "[email protected]",
                                            password:              "password",
                                            password_confirmation: "password" }
    end
 # assert_template 'users/show' # assert is_logged_in?  end
end
如果现在注册,重定向后显示的页面如图 10.4 所示,而且会生成一封邮件,如代码清单 10.23 所示。注意,在开发环境中并不会真发送邮件,不过能在服务器的日志中看到(可能要往上滚动才能看到)。10.3 节会介绍如何在生产环境中发送邮件。
代码清单 10.23:在服务器日志中看到的账户激活邮件
Sent mail to [email protected] (931.6ms)
Date: Wed, 03 Sep 2014 19:47:18 +0000
From: [email protected]
To: [email protected]
Message-ID: <[email protected]ail>
Subject: Account activation
Mime-Version: 1.0
Content-Type: multipart/alternative;
 boundary="--==_mimepart_5407704656b50_61d3fd1914f4cd02996a";
 charset=UTF-8
Content-Transfer-Encoding: 7bit

----==_mimepart_5407704656b50_61d3fd1914f4cd02996a
Content-Type: text/plain;
 charset=UTF-8
Content-Transfer-Encoding: 7bit

Hi Michael Hartl,

Welcome to the Sample App! Click on the link below to activate your account:

http://rails-tutorial-c9-mhartl.c9.io/account_activations/
fFb_F94mgQtmlSvRFGsITw/edit?email=michael%40michaelhartl.com
----==_mimepart_5407704656b50_61d3fd1914f4cd02996a
Content-Type: text/html;
 charset=UTF-8
Content-Transfer-Encoding: 7bit

<h1>Sample App</h1>

<p>Hi Michael Hartl,</p>

<p>
Welcome to the Sample App! Click on the link below to activate your account:
</p>

<a href="http://rails-tutorial-c9-mhartl.c9.io/account_activations/
fFb_F94mgQtmlSvRFGsITw/edit?email=michael%40michaelhartl.com">Activate</a>
----==_mimepart_5407704656b50_61d3fd1914f4cd02996a--
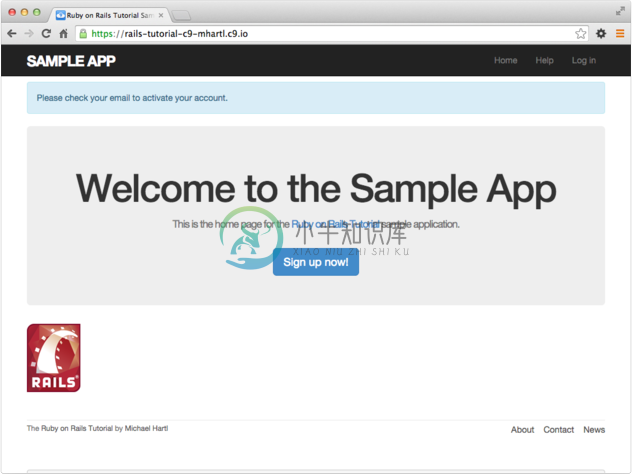 图 10.4:注册后显示的首页,有一个提醒激活的消息
10.1.3 激活账户
现在可以正确生成电子邮件了(代码清单 10.23),接下来我们要编写 AccountActivationsController 中的 edit 动作,激活用户。10.1.2 节说过,激活令牌和电子邮件地址可以分别通过 params[:id] 和 params[:email] 获取。参照密码(代码清单 8.5)和记忆令牌(代码清单 8.36)的实现方式,我们计划使用下面的代码查找和认证用户:
user = User.find_by(email: params[:email])
if user && user.authenticated?(:activation, params[:id])
(稍后会看到,上述代码还缺一个判断条件。看看你能否猜到缺了什么。)
上述代码使用 authenticated? 方法检查账户激活的摘要和指定的令牌是否匹配,但是现在不起作用,因为 authenticated? 方法是专门用来认证记忆令牌的(代码清单 8.33):
# 如果指定的令牌和摘要匹配,返回 true
def authenticated?(remember_token)
  return false if remember_digest.nil?
  BCrypt::Password.new(remember_digest).is_password?(remember_token)
end
其中,remember_digest 是用户模型的属性,在模型内,我们可以将其改写成:
self.remember_digest
我们希望以某种方式把这个值变成“变量”,这样才能调用 self.activation_token,而不是把合适的参数传给 authenticated? 方法。
我们要使用的解决方法涉及到“元编程”(metaprogramming),意思是用程序编写程序。(元编程是 Ruby 最强大的功能,Rails 中很多“神奇”的功能都是通过元编程实现的。)这里的关键是强大的 send 方法。这个方法的作用是在指定的对象上调用指定的方法。例如,在下面的控制台会话中,我们在一个 Ruby 原生对象上调用 send 方法,获取数组的长度:
$ rails console
>> a = [1, 2, 3]
>> a.length
=> 3
>> a.send(:length)
=> 3
>> a.send('length')
=> 3
可以看出,把 :length 符号或者 'length' 字符串传给 send 方法的作用和在对象上直接调用 length 方法的作用一样。再看一个例子,获取数据库中第一个用户的 activation_digest 属性:
>> user = User.first
>> user.activation_digest
=> "$2a$10$4e6TFzEJAVNyjLv8Q5u22ensMt28qEkx0roaZvtRcp6UZKRM6N9Ae"
>> user.send(:activation_digest)
=> "$2a$10$4e6TFzEJAVNyjLv8Q5u22ensMt28qEkx0roaZvtRcp6UZKRM6N9Ae"
>> user.send('activation_digest')
=> "$2a$10$4e6TFzEJAVNyjLv8Q5u22ensMt28qEkx0roaZvtRcp6UZKRM6N9Ae"
>> attribute = :activation >> user.send("#{attribute}_digest") => "$2a$10$4e6TFzEJAVNyjLv8Q5u22ensMt28qEkx0roaZvtRcp6UZKRM6N9Ae"
注意最后一种调用方式,我们定义了一个 attribute 变量,其值为符号 :activation,然后使用字符串插值构建传给 send 方法的参数。attribute 变量的值使用字符串 'activation' 也行,不过符号更便利。不管使用什么,插值后,"#{attribute}_digest" 的结果都是 "activation_digest"。(7.4.2 节介绍过,插值时会把符号转换成字符串。)
基于上述对 send 方法的介绍,我们可以把 authenticated? 方法改写成:
def authenticated?(remember_token)
  digest = self.send('remember_digest')
  return false if digest.nil?
  BCrypt::Password.new(digest).is_password?(remember_token)
end
以此为模板,我们可以为这个方法增加一个参数,代表摘要的名字,然后再使用字符串插值,扩大这个方法的用途:
def authenticated?(attribute, token)
  digest = self.send("#{attribute}_digest")
  return false if digest.nil?
  BCrypt::Password.new(digest).is_password?(token)
end
(我们把第二个参数的名字改成了 token,以此强调这个方法的用途更广。)因为这个方法在用户模型内,所以可以省略 self,得到更符合习惯写法的版本:
def authenticated?(attribute, token)
  digest = send("#{attribute}_digest")
  return false if digest.nil?
  BCrypt::Password.new(digest).is_password?(token)
end
现在我们可以像下面这样调用 authenticated? 方法实现以前的效果:
user.authenticated?(:remember, remember_token)
把修改后的 authenticated? 方法写入用户模型,如代码清单 10.24 所示。
代码清单 10.24:用途更广的 authenticated? 方法 RED
app/models/user.rb
class User < ActiveRecord::Base
  .
  .
  .
  # 如果指定的令牌和摘要匹配,返回 true
  def authenticated?(attribute, token)
    digest = send("#{attribute}_digest")
    return false if digest.nil?
    BCrypt::Password.new(digest).is_password?(token)
  end
  .
  .
  .
end
如代码清单 10.24 的标题所示,测试组件无法通过:
代码清单 10.25:RED
$ bundle exec rake test
失败的原因是,current_user 方法(代码清单 8.36)和摘要为 nil 的测试(代码清单 8.43)使用的都是旧版 authenticated?,期望传入的是一个参数而不是两个。因此,我们只需修改这两个地方,换用修改后的 authenticated? 方法就能解决这个问题,如代码清单 10.26 和代码清单 10.27 所示。
代码清单 10.26:在 current_user 中使用修改后的 authenticated? 方法 GREEN
app/helpers/sessions_helper.rb
module SessionsHelper
  .
  .
  .
  # 返回当前登录的用户(如果有的话)
  def current_user
    if (user_id = session[:user_id])
      @current_user ||= User.find_by(id: user_id)
    elsif (user_id = cookies.signed[:user_id])
      user = User.find_by(id: user_id)
 if user && user.authenticated?(:remember, cookies[:remember_token])        log_in user
        @current_user = user
      end
    end
  end
  .
  .
  .
end
代码清单 10.27:在 UserTest 中使用修改后的 authenticated? 方法 GREEN
test/models/user_test.rb
require 'test_helper'

class UserTest < ActiveSupport::TestCase

  def setup
    @user = User.new(name: "Example User", email: "[email protected]",
                     password: "foobar", password_confirmation: "foobar")
  end
  .
  .
  .
 test "authenticated? should return false for a user with nil digest" do assert_not @user.authenticated?(:remember, '') end end
修改后,测试应该可以通过了:
代码清单 10.28:GREEN
$ bundle exec rake test
没有坚实的测试组件做后盾,像这样的重构很容易出错,所以我们才要在 8.4.2 节和 8.4.6 节排除万难编写测试。
有了代码清单 10.24 中定义的 authenticated? 方法,现在我们可以编写 edit 动作,认证 params 哈希中电子邮件地址对应的用户了。我们要使用的判断条件如下所示:
if user && !user.activated? && user.authenticated?(:activation, params[:id])
注意,这里加入了 !user.activated?,就是前面提到的那个缺失的条件,作用是避免激活已经激活的用户。这个条件很重要,因为激活后我们要登入用户,但是不能让获得激活链接的攻击者以这个用户的身份登录。
如果通过了上述判断条件,我们要激活这个用户,并且更新 activated_at 中的时间戳:
user.update_attribute(:activated,    true)
user.update_attribute(:activated_at, Time.zone.now)
据此,写出的 edit 动作如代码清单 10.29 所示。注意,在代码清单 10.29 中我们还处理了激活令牌无效的情况。这种情况很少发生,但处理起来也很容易,直接重定向到根地址即可。
代码清单 10.29:在 edit 动作中激活账户
app/controllers/account_activations_controller.rb
class AccountActivationsController < ApplicationController

  def edit
    user = User.find_by(email: params[:email])
    if user && !user.activated? && user.authenticated?(:activation, params[:id])
      user.update_attribute(:activated,    true)
      user.update_attribute(:activated_at, Time.zone.now)
      log_in user
      flash[:success] = "Account activated!"
      redirect_to user
    else
      flash[:danger] = "Invalid activation link"
      redirect_to root_url
    end
  end
end
然后,复制粘贴代码清单 10.23 中的地址,应该就可以激活对应的用户了。例如,在我的系统中,我访问的地址是:
http://rails-tutorial-c9-mhartl.c9.io/account_activations/
fFb_F94mgQtmlSvRFGsITw/edit?email=michael%40michaelhartl.com
然后会看到如图 10.5 所示的页面。
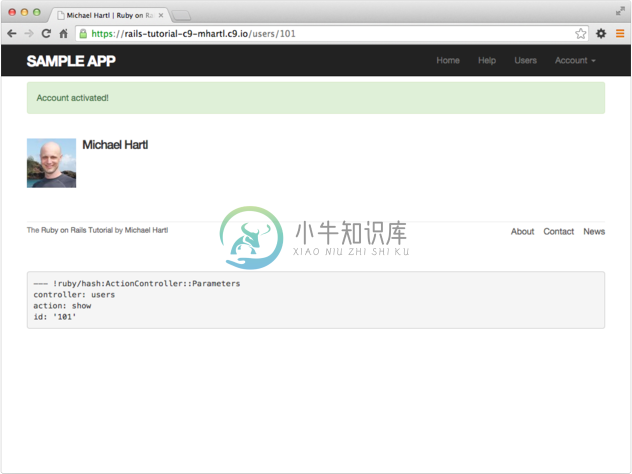 图 10.5:成功激活后显示的资料页面
当然,现在激活用户后没有什么实际效果,因为我们还没修改用户登录的方式。为了让账户激活有实际意义,只能允许已经激活的用户登录,即 user.activated? 返回 true 时才能像之前那样登录,否则重定向到根地址,并且显示一个提醒消息(图 10.6),如代码清单 10.30 所示。
代码清单 10.30:禁止未激活的用户登录
app/controllers/sessions_controller.rb
class SessionsController < ApplicationController

  def new
  end

  def create
    user = User.find_by(email: params[:session][:email].downcase)
    if user && user.authenticate(params[:session][:password])
 if user.activated? log_in user params[:session][:remember_me] == '1' ? remember(user) : forget(user) redirect_back_or user else message  = "Account not activated. " message += "Check your email for the activation link." flash[:warning] = message redirect_to root_url end    else
      flash.now[:danger] = 'Invalid email/password combination'
      render 'new'
    end
  end

  def destroy
    log_out if logged_in?
    redirect_to root_url
  end
end
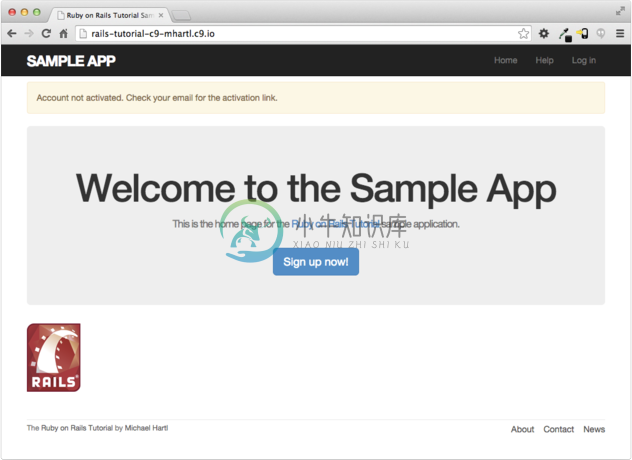 图 10.6:未激活用户试图登录后看到的提醒消息
至此,激活用户的功能基本完成了,不过还有个地方可以改进。(可以改进的是,不显示未激活的用户。这个改进留作练习。)10.1.4 节会编写一些测试,再做一些重构,完成整个功能。
10.1.4 测试和重构
本节,我们要为账户激活功能添加一些集成测试。我们已经为提交有效信息的注册过程编写了测试,所以我们要把这个测试添加到 7.4.4 节编写的测试中(代码清单 7.26)。在测试中,我们要添加好多步,不过意图都很明确,看看你是否能理解代码清单 10.31 中的测试。
代码清单 10.31:在用户注册的测试文件中添加账户激活的测试 GREEN
test/integration/users_signup_test.rb
require 'test_helper'

class UsersSignupTest < ActionDispatch::IntegrationTest

 def setup ActionMailer::Base.deliveries.clear end
  test "invalid signup information" do
    get signup_path
    assert_no_difference 'User.count' do
      post users_path, user: { name:  "",
                               email: "[email protected]",
                               password:              "foo",
                               password_confirmation: "bar" }
    end
    assert_template 'users/new'
    assert_select 'div#error_explanation'
    assert_select 'div.field_with_errors'
  end

 test "valid signup information with account activation" do    get signup_path
    assert_difference 'User.count', 1 do
 post users_path, user: { name:  "Example User",                               email: "[email protected]",
                               password:              "password",
                               password_confirmation: "password" }
    end
    assert_equal 1, ActionMailer::Base.deliveries.size
    user = assigns(:user)
    assert_not user.activated?
    # 尝试在激活之前登录
    log_in_as(user)
    assert_not is_logged_in?
    # 激活令牌无效
    get edit_account_activation_path("invalid token")
    assert_not is_logged_in?
    # 令牌有效,电子邮件地址不对
    get edit_account_activation_path(user.activation_token, email: 'wrong')
    assert_not is_logged_in?
    # 激活令牌有效
    get edit_account_activation_path(user.activation_token, email: user.email)
    assert user.reload.activated?
    follow_redirect!
    assert_template 'users/show'
    assert is_logged_in?
  end
end
代码很多,不过有一行完全没见过:
assert_equal 1, ActionMailer::Base.deliveries.size
这行代码确认只发送了一封邮件。deliveries 是一个数组,会统计所有发出的邮件,所以我们要在 setup 方法中把它清空,以防其他测试发送了邮件(10.2.5 节就会这么做)。代码清单 10.31 还第一次在本书正文中使用了 assigns 方法。8.6 节说过,assigns 的作用是获取相应动作中的实例变量。例如,用户控制器的 create 动作中定义了一个 @user 变量,那么我们可以在测试中使用 assigns(:user) 获取这个变量的值。最后,注意,代码清单 10.31 把代码清单 10.22 中的注释去掉了。
现在,测试组件应该可以通过:
代码清单 10.32:GREEN
$ bundle exec rake test
有了代码清单 10.31 中的测试做后盾,接下来我们可以稍微重构一下了:把处理用户的代码从控制器中移出,放入模型。我们会定义一个 activate 方法,用来更新用户激活相关的属性;还要定义一个 send_activation_email 方法,发送激活邮件。这两个方法的定义如代码清单 10.33 所示,重构后的应用代码如代码清单 10.34 和代码清单 10.35 所示。
代码清单 10.33:在用户模型中添加账户激活相关的方法
app/models/user.rb
class User < ActiveRecord::Base
  .
  .
  .
  # 激活账户
  def activate
 update_attribute(:activated,    true) update_attribute(:activated_at, Time.zone.now)  end

  # 发送激活邮件
  def send_activation_email
 UserMailer.account_activation(self).deliver_now  end

  private
    .
    .
    .
end
代码清单 10.34:通过用户模型对象发送邮件
app/controllers/users_controller.rb
class UsersController < ApplicationController
  .
  .
  .
  def create
    @user = User.new(user_params)
    if @user.save
 @user.send_activation_email      flash[:info] = "Please check your email to activate your account."
      redirect_to root_url
    else
      render 'new'
    end
  end
  .
  .
  .
end
代码清单 10.35:通过用户模型对象激活账户
app/controllers/account_activations_controller.rb
class AccountActivationsController < ApplicationController

  def edit
    user = User.find_by(email: params[:email])
    if user && !user.activated? && user.authenticated?(:activation, params[:id])
 user.activate      log_in user
      flash[:success] = "Account activated!"
      redirect_to user
    else
      flash[:danger] = "Invalid activation link"
      redirect_to root_url
    end
  end
end
注意,在代码清单 10.33 中没有使用 user。如果还像之前那样写就会出错,因为用户模型中没有这个变量:
-user.update_attribute(:activated,    true)
-user.update_attribute(:activated_at, Time.zone.now)
+update_attribute(:activated,    true)
+update_attribute(:activated_at, Time.zone.now)
(也可以把 user 换成 self,但 6.2.5 节说过,在模型内可以不加 self。)调用 UserMailer 时,还把 @user 改成了 self:
-UserMailer.account_activation(@user).deliver_now
+UserMailer.account_activation(self).deliver_now
就算是简单的重构,也可能忽略这些细节,不过好的测试组件能捕获这些问题。现在,测试组件应该仍能通过:
代码清单 10.36:GREEN
$ bundle exec rake test
账户激活功能完成了,我们取得了一定进展,可以提交了:
$ git add -A
$ git commit -m "Add account activations"

