
镜像制作
云联壹云 镜像市场提供部分提前制作好的虚拟机镜像,如镜像市场中的镜像不满足需求或用户有自定义设置镜像的需求,可通过本章节制作镜像。
镜像制作流程
- 提前准备好标准ISO镜像,支持用户从镜像市场-ISO界面导入或直接上传ISO镜像。
- 在虚拟机列表中新建虚拟机,选择“从ISO启动”并选择对应的ISO镜像,创建成功后,并通过VNC终端进行按照界面提示安装操作系统。
说明
- 推荐使用CentOS Minimal操作系统。
- Ubuntu/Debian镜像在安装过程中建议选择“No automatic updates”并安装OpenSSH Server软件。
- 根据镜像的操作系统类型进行不同的优化配置。
- CentOS镜像:请参考CentOS镜像优化章节。
- Ubuntu/Debian镜像:请参考Ubuntu/Debian镜像优化章节。
- Windows镜像:请参考Windows镜像优化章节。
- (可选)多平台通用镜像配置,如制作的镜像需要在公有云平台上使用,除上述优化配置外,还需要在Linux系统安装配置cloud-init,Windows系统安装配置Cloudbase-init。
- 镜像优化完成后,需要将虚拟机关机。
- 单击关机状态的虚拟机右侧操作列 “更多” 按钮,选择下拉菜单 “保存镜像” 菜单项,将虚拟机保存为系统镜像。
- 镜像保存完成后,用户可在虚拟机列表中新建虚拟机,选择“自定义镜像”并选择上一步骤保存的镜像,使用制作好的镜像创建虚拟机,验证镜像是否制作成功。
CentOS镜像优化
以CentOS 7 minimal镜像为例介绍镜像优化方法。
CentOS 7 Minimal操作系统安装完成后的虚拟机默认不能联网,需要修改/etc/sysconfig/network-scripts/ifcfg-eth0文件,将"ONBOOT=no"改为"ONBOOT=yes"。
# 请根据实际网卡名称修改对应的配置文件
$ vi /etc/sysconfig/network-scripts/ifcfg-eth0    # 请根据实际网卡名称修改对应的配置文件
# 修改配置文件内容
ONBOOT=yes
禁用selinux,修改/etc/selinux/config文件,将"SELINUX=enforcing"改为"SELINUX=disabled"。修改完成后,重启系统生效。
$ vi /etc/selinux/config
# 修改配置文件内容,修改完成后保存。
SELINUX=disabled
# 重启使配置生效
$ reboot
将必要的kernel module加入启动initram.img。
$ vi /etc/dracut.conf
# 修改配置文件,去掉add_drivers+前面#注释,并在引号中添加如下内容,修改完成后保存。
add_drivers+=" hpsa mptsas mpt2sas mpt3sas megaraid_sas mptspi virtio virtio_ring virtio_pci virtio_scsi virtio_blk vmw_pvscsi "
# 使配置生效
# dracut -f
关闭网卡持久化功能,保证CentOS 7中网卡名称为“eth0,eth1”形式。修改/etc/default/grub文件,在GRUB_CMDLINE_LINUX中添加"net.ifnames=0 biosdevname=0"参数。
$ vi /etc/default/grub
# 修改配置文件,修改完成后保存。
GRUB_CMDLINE_LINUX="crashkernel=auto rd.lvm.lv=centos/root rd.lvm.lv=centos/swap rhgb quiet net.ifnames=0 biosdevname=0"
# 使配置生效
$ grub2-mkconfig -o /boot/grub2/grub.cfg
根据需求安装常用软件。
# 仅为举例,请根据实际需求安装常用软件。
$ yum install net-tools git wget vim pcre-tools ntp epel-release -y
禁用firewalld和NetworkManager服务。
$ systemctl disable firewalld NetworkManager启用时间网络同步,支持使用ntp或chrony保持时间同步。
# 安装ntp或chrony软件
$ yum install ntp/chrony -y
# 启用ntp或chronyd服务
$ systemctl enable ntpd/chronyd
修改时区为CST。
$ timedatectl set-timezone Asia/Shanghai
# 查看当前时区
$ timedatectl status
ssh服务优化,修改/etc/ssh/sshd_config文件,将PermitRootLogin属性修改为yes 将UseDNS属性修改为no。
$ vi /etc/ssh/sshd_config

#分别找到PermitRootLogin属性和UseDNS属性
PermitRootLogin yes
UseDNS no
Ubuntu/Debian镜像优化
以ubuntu-16.04.6-server-amd64.iso为例,介绍Ubuntu和Debian镜像的优化方法。Ubuntu系统安装完成后,默认使用普通权限用户。
ssh服务优化,修改/etc/ssh/sshd_config文件,将PermitRootLogin属性修改为yes 将UseDNS属性修改为no,若没有上述属性,请添加属性。
$ sudo vi /etc/ssh/sshd_config
# 分别找到PermitRootLogin属性和UseDNS属性
PermitRootLogin yes
UseDNS no
在/etc/init.d/目录下创建一个名称为ssh-initkey的自启动脚本。
$ sudo touch /etc/init.d/ssh-initkey
$ sudo vi /etc/init.d/ssh-initkey
# 脚本内容如下:
#! /bin/sh
### BEGIN INIT INFO
# Provides:  ssh-initkey
# Required-Start:
# Required-Stop:
# X-Start-Before:    ssh
# Default-Start:     2 3 4 5
# Default-Stop:
# Short-Description: Init ssh host keys
### END INIT INFO

PATH=/sbin:/usr/sbin:/bin:/usr/bin
. /lib/init/vars.sh
. /lib/lsb/init-functions
do_start() {
    ls /etc/ssh/ssh_host_* > /dev/null 2>&1
    if [ $? -ne 0 ]; thendpkg-reconfigure openssh-server
    fi
}
case "$1" in
    start)
    do_start;;
    restart|reload|force-reload)echo "Error: argument '$1' not supported" >&2exit 3;;
    stop);;
    *)echo "Usage: $0 start|stop" >&2exit 3;;
esac
ssh-initkey脚本配置完成后,还需要增加可执行权限,并将脚本添加到系统启动脚本目录。
$ sudo chmod +x /etc/init.d/ssh-initkey$ sudo /usr/sbin/update-rc.d ssh-initkey defaults$ sudo /usr/sbin/update-rc.d ssh-initkey enable(Ubuntu 16.04以上版本设置)关闭网卡持久化功能,保证网卡名称为“eth0,eth1”形式。修改/etc/default/grub文件,在GRUB_CMDLINE_LINUX中添加"net.ifnames=0 biosdevname=0"参数。
$ sudo vi /etc/default/grub
# 配置GRUB_CMDLINE_LINUX参数
GRUB_CMDLINE_LINUX="net.ifnames=0 biosdevname=0"
# 使配置生效 $ sudo /usr/sbin/update-grub(若Ubuntu未关闭自动更新)关闭自动更新需要修改/etc/apt/apt.conf.d/10periodic文件,将文件中的"Update-Package-Lists"参数设置为0。
$ sudo vi /etc/apt/apt.conf.d/10periodic
# 配置修改
APT::Periodic::Update-Package-Lists "1";
至此,虚拟机优化完成。
Windows镜像优化
安装Virtio驱动
| 操作系统版本 | Virtio驱动中对应名称 |
|---|---|
| Windows XP | xp |
| Windows 7 | w7 |
| Windows 8 | w8 |
| Windows 8.1 | w8.1 |
| Windows 10 | w10 |
| Windows Server 2003 | 2k3 |
| Windows Server 2008 | 2K8 |
| Windows Server 2008 R2 | 2k8R2 |
| Windows Server 2012 | 2k12 |
| Windows Server 2012 R2 | 2k12R2 |
| Windows Server 2016 | 2k16 |
在镜像市场的ISO页面导入Virtio驱动,并挂载到虚拟机上。
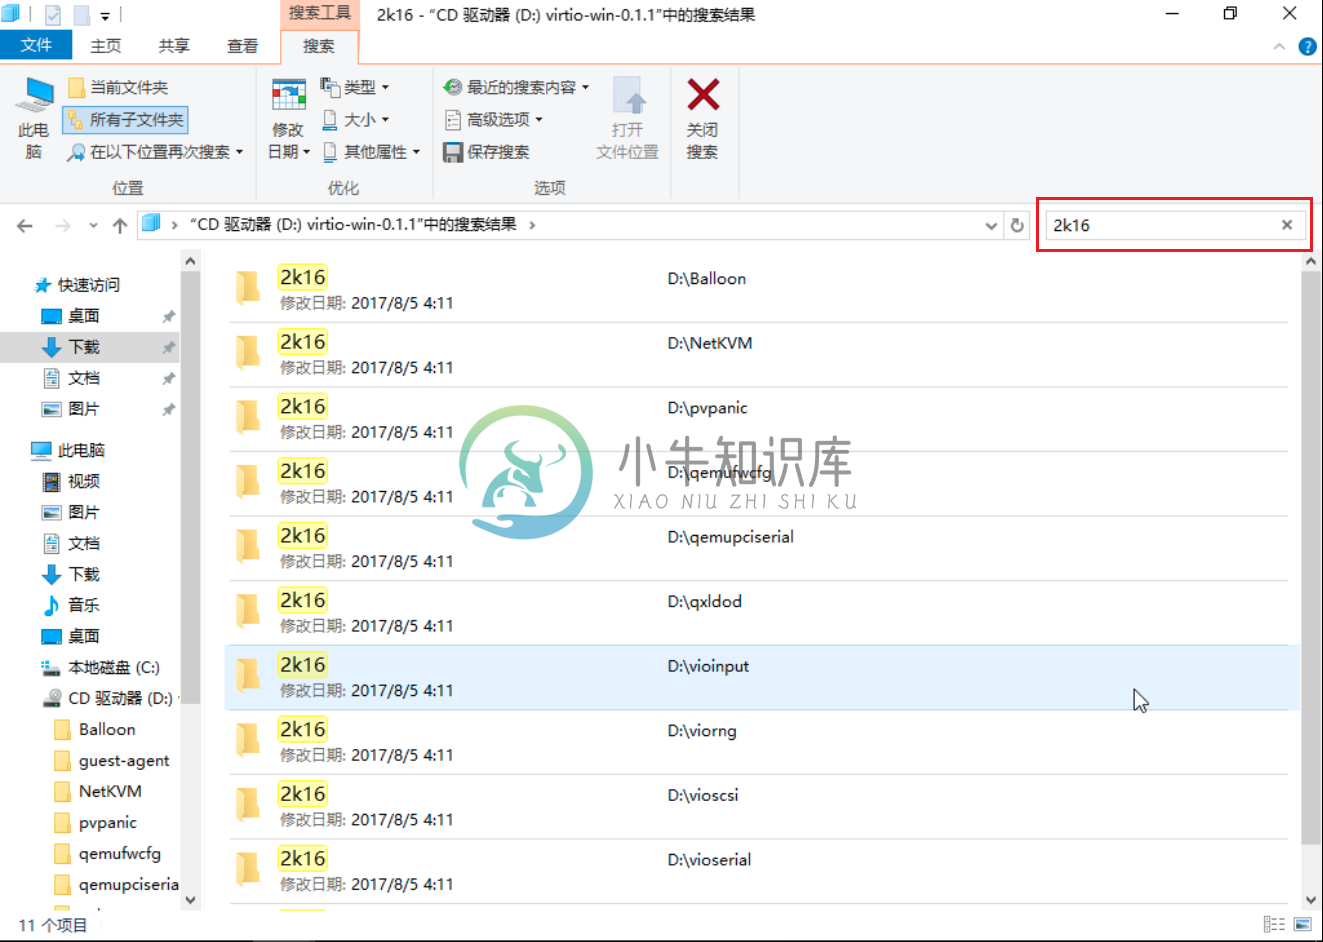
在虚拟机中打开挂载的驱动文件夹,根据虚拟机的操作系统版本(如本例为Windows server 2016),在驱动文件夹页面的搜索框中搜索“2k16”,并将所有包含2k16的文件夹复制到虚拟机的其他文件夹中(如文档文件夹)。
在文档文件夹中打开“2k16>amd64”文件夹,该文件夹中包含所有Windows Server 2016中的驱动文件。在该文件夹的地址显示框中输入cmd或同时按“shift”键和鼠标右键,在此处打开命令窗口,打开命令提示符对话框。
使用以下命令安装全部驱动。
pnputil -i -a *.inf
设置系统时间
Windows虚拟机上的时间默认会与北京时间差8个小时,需要对系统进行配置,将其显示为北京时间。
- 在运行栏中输入regedit,打开注册表。
- 在HKEY_LOCAL_MACHINE\SYSTEM\CurrentControlSet\Control\TimeZoneInformation下,鼠标右键新建DWORD(32-bit),命名为RealTimeIsUniversal,值设置为1。
禁用快速启动
(可选)若是Windows 10操作系统的虚拟机需要禁用快速启动。请参考禁用方法。
系统激活
请通过正规渠道激活Windows系统。
sysprep封装
运行sysprep,消除个性化信息。
- 打开%WINDIR%/system32/sysprep目录,并在目录下创建unattend.xml文件,内容如下:
<?xml version="1.0" encoding="utf-8"?>
<unattend xmlns="urn:schemas-microsoft-com:unattend">
    <settings pass="generalize"><component name="Microsoft-Windows-Security-SPP" processorArchitecture="amd64" publicKeyToken="31bf3856ad364e35" language="neutral" versionScope="nonSxS" xmlns:wcm="http://schemas.microsoft.com/WMIConfig/2002/State" xmlns:xsi="http://www.w3.org/2001/XMLSchema-instance"><SkipRearm>0</SkipRearm></component><component name="Microsoft-Windows-PnpSysprep" processorArchitecture="amd64" publicKeyToken="31bf3856ad364e35" language="neutral" versionScope="nonSxS" xmlns:wcm="http://schemas.microsoft.com/WMIConfig/2002/State" xmlns:xsi="http://www.w3.org/2001/XMLSchema-instance"><PersistAllDeviceInstalls>true</PersistAllDeviceInstalls><DoNotCleanUpNonPresentDevices>true</DoNotCleanUpNonPresentDevices></component>
    </settings>
    <settings pass="oobeSystem"><component name="Microsoft-Windows-Shell-Setup" processorArchitecture="amd64" publicKeyToken="31bf3856ad364e35" language="neutral" versionScope="nonSxS" xmlns:wcm="http://schemas.microsoft.com/WMIConfig/2002/State"><UserAccounts>    <AdministratorPassword><Value>123@yunion</Value><PlainText>true</PlainText>    </AdministratorPassword></UserAccounts><Display>    <ColorDepth>32</ColorDepth>    <HorizontalResolution>1024</HorizontalResolution>    <RefreshRate>60</RefreshRate>    <VerticalResolution>768</VerticalResolution></Display><OOBE>    <HideEULAPage>true</HideEULAPage>     <NetworkLocation>Work</NetworkLocation>    <ProtectYourPC>1</ProtectYourPC>    <SkipMachineOOBE>true</SkipMachineOOBE>    <SkipUserOOBE>true</SkipUserOOBE></OOBE></component>
    </settings>
</unattend>
说明
由于Windows系统只支持VNC连接,无法直接将内容拷贝到虚拟机,可通过发送文字功能,在虚拟机输入法处于英文模式的时候,发送上述内容。
- 在该目录的地址显示框中输入cmd或同时按“shift”键和鼠标右键,在此处打开命令窗口,打开命令提示符对话框。输入以下命令,执行sysprep封装并关闭虚拟机。
> sysprep /generalize /oobe /shutdown /unattend:unattend.xml
- 至此虚拟机优化完成。
Linux系统安装配置Cloud-init
Cloud-init用于为Linux操作系统的虚拟机做系统初始化配置。详细介绍内容请参考cloud-init官网。
安装cloud-init
在Linux操作系统中执行以下命令安装cloud-init。
$ apt-get/yum install cloud-init
离线安装方式请参考腾讯云文档中心-Linux系统安装cloud-init或阿里云文档中心-安装cloud-init等。
配置cloud-init
修改/etc/cloud/cloud.cfg文件,将disabled_root设置为0,ssh_pwauth设置为1。
$ vi /etc/cloud/cloud.cfg
# 修改配置文件,修改完成后保存。
disable_root: 0
ssh_pwauth:   1