第三天.UI事件处理与布局管理
第三天.UI事件处理与布局管理
2.1View与ViewGroup
2.1.1 Android界面元素
- View: 视图组件
- Layout: 布局组件
- Wigets: UI元素
- Menus: 菜单
2.1.2认识View
- 所有高级UI组件都继承View类而实现的
- 一个View在屏幕上占据一块矩形区域
- 负责渲染
- 负责处理发生的事件
- 设置是否可见
- 设置是否可以获得焦点等
2.1.3 认识ViewGroup
- ViewGroup对象是android.view.ViewGroup实例
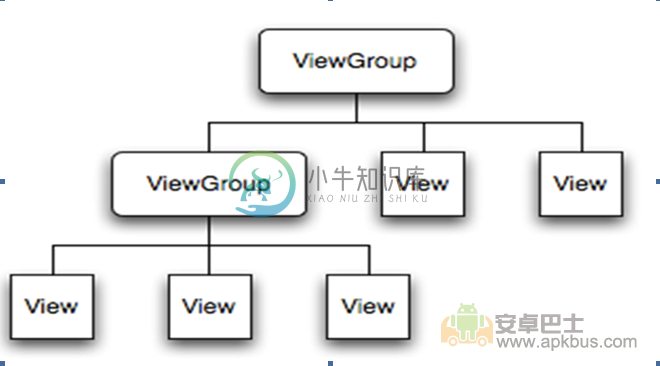
- ViewGroup是View的容器
- 负责对添加进ViewGroup的View进行布局
- 一个ViewGroup可以加入到另一个ViewGroup
2.1.4 View与ViewGroup的关系

2.2事件处理机制
控件事件通过设置其控件的监听器来监听并处理事件
- 按键按下事件:通过重写onKeyDown方法
- 按键弹起事件:通过重写onKeyUp方法
- 触笔点击事件:通过实现onTouchEvent方法
其他事件参考相应UI组件的Demo!!
2.2.1 Toast控件
在视图中给用户显示的短小的提示消息。
Toast.makeText(this, string, Toast.LENGTH_SHORT).show();
- LENGTH_LONG:长时间显示
- LENGTH_SHORT:短时间显示
2.2.2事件处理Demo
public class Activity01 extends Activity
{

        public void onCreate(Bundle savedInstanceState)
        {

                super.onCreate(savedInstanceState);

                setContentView(R.layout.main);
                //获得Button对象
                Button button_ok = (Button) findViewById(R.id.ok);
                //设置Button控件监听器
                button_ok.setOnClickListener(new Button.OnClickListener() {
                        public void onClick(View v)
                        {
                                //这里处理事件
                                DisplayToast("点击了OK按钮");
                        }
                });

        }
/* 按键按下所触发的事件 */
        public boolean onKeyDown(int keyCode, KeyEvent event)
        {
                switch (keyCode)
                {
                        case KeyEvent.KEYCODE_DPAD_CENTER:
                                DisplayToast("按下:中键");
                                break;
                        case KeyEvent.KEYCODE_DPAD_UP:
                                DisplayToast("按下:上方向键");
                                break;
                        case KeyEvent.KEYCODE_DPAD_DOWN:
                                DisplayToast("按下:下方向键");
                                break;
                        case KeyEvent.KEYCODE_DPAD_LEFT:
                                DisplayToast("按下:左方向键");
                                break;
                        case KeyEvent.KEYCODE_DPAD_RIGHT:
                                DisplayToast("按下:右方向键");
                                break;
                }
                return super.onKeyDown(keyCode, event);
        }
/* 按键弹起所触发的事件 */
        public boolean onKeyUp(int keyCode, KeyEvent event) {
                switch (keyCode) {
                        case KeyEvent.KEYCODE_DPAD_CENTER:
                                DisplayToast("弹起:中键");
                                break;
                        case KeyEvent.KEYCODE_DPAD_UP:
                                DisplayToast("弹起:上方向键");
                                break;
                        case KeyEvent.KEYCODE_DPAD_DOWN:
                                DisplayToast("弹起:下方向键");
                                break;
                        case KeyEvent.KEYCODE_DPAD_LEFT:
                                DisplayToast("弹起:左方向键");
                                break;
                        case KeyEvent.KEYCODE_DPAD_RIGHT:
                                DisplayToast("弹起:右方向键");
                                break;
                }

                return super.onKeyUp(keyCode, event);
        }

        public boolean onKeyMultiple(int keyCode, int repeatCount, KeyEvent event) {

                return super.onKeyMultiple(keyCode, repeatCount, event);
        }
/* 触笔事件 */
    public boolean onTouchEvent(MotionEvent event)
    {
            int iAction = event.getAction();
                if (iAction == MotionEvent.ACTION_CANCEL ||
                        iAction == MotionEvent.ACTION_DOWN ||
                        iAction == MotionEvent.ACTION_MOVE)
                {
                        return false;
                }
                //得到触笔点击的位置
                int x = (int) event.getX();
                int y = (int) event.getY();

                DisplayToast("触笔点击坐标:("+Integer.toString(x)+","+Integer.toString(y)+")");

                return super.onTouchEvent(event);
        }

        /* 显示Toast  */
        public void DisplayToast(String str)
        {
                Toast.makeText(this, str, Toast.LENGTH_SHORT).show();
        }
}
详情请参考DEMO
2.3 布界面布局方式
- LinearLayout(线性布局)
- AbsoluteLayout(绝对布局)
- RelativeLayout(相对布局)
- TableLayout(表格布局)
- FrameLayout(框架布局)
2.3.1LinearLayout(线性布局)
是常用的布局之一
一个组件一行的形式显示出来
分垂直(vertical)与水平(horizontal)两种。
main.xml: vertical
<LinearLayout xmlns:android="http://schemas.android.com/apk/res/android"
android:orientation="vertical"
android:layout_width="fill_parent"
android:layout_height="fill_parent">
        <TextView
            android:text="第一行”    android:gravity="center_vertical”            android:textSize="15pt"
            android:background="#aa0000”            android:layout_width="fill_parent"
            android:layout_height="wrap_content”    android:layout_weight="1"/>

        <TextView
            android:text="第二行”    android:textSize="15pt”    android:gravity="center_vertical"
            android:background="#00aa00”    android:layout_width="fill_parent"
            android:layout_height="wrap_content”    android:layout_weight="1"/>

        <TextView
            android:text="第三行”    android:textSize="15pt”    android:gravity="center_vertical"
            android:background="#0000aa”    android:layout_width="fill_parent"
            android:layout_height="wrap_content”    android:layout_weight="1"/>

        <TextView
            android:text="第四行”    android:textSize="15pt”    android:gravity="center_vertical"
            android:background="#aaaa00”    android:layout_width="fill_parent"
            android:layout_height="wrap_content”    android:layout_weight="1"/>
</LinearLayout>
main.xml: horizontal
<LinearLayout xmlns:android="http://schemas.android.com/apk/res/android"
android:orientation="horizontal"
android:layout_width="fill_parent"
android:layout_height="fill_parent">
<TextView
            android:text="第一列”    android:gravity="center_horizontal"
            android:background="#aa0000”    android:layout_width="wrap_content"
            android:layout_height="fill_parent”    android:layout_weight="1"/>

        <TextView
            android:text="第二列”    android:gravity="center_horizontal"
            android:background="#00aa00”    android:layout_width="wrap_content"
            android:layout_height="fill_parent”    android:layout_weight="1"/>

        <TextView
            android:text="第三列”    android:gravity="center_horizontal"
            android:background="#0000aa”    android:layout_width="wrap_content"
            android:layout_height="fill_parent”    android:layout_weight="1"/>

        <TextView
            android:text="第四列”    android:gravity="center_horizontal"
            android:background="#aaaa00”    android:layout_width="wrap_content"
            android:layout_height="fill_parent”    android:layout_weight="1"/></LinearLayout>
2.3.2AbsoluteLayout(绝对布局)
绝对布局根据设定好的坐标进行定位显示
AbsoluteLayout两个重要的属性:
- android:layout_x 组件在屏幕中的X坐标
- android:layout_y 组件在屏幕中的Y坐标
2.3.3RelativeLayout(相对布局)
是按照相对某个组件的位置来进行布局,也就是说参考某个组件,置于此组件的上、下、左、右
其中几个重要的属性:
- android:layout_below=“组件ID” 在某组件下面
- android:layout_above=“组件ID” 在某组件上面
- android:layout_toRightOf=“ID” 在某组件右边
- android:layout_toLeftOf=“ID” 在某组件左边
<RelativeLayout xmlns:android="http://schemas.android.com/apk/res/android"
    android:layout_width="fill_parent”   android:layout_height="fill_parent“>
    <TextView android:id="@+id/label"
        android:layout_width="fill_parent”  android:layout_height="wrap_content"
        android:text="请输入:"/>
    <EditText  android:id="@+id/entry"
        android:layout_width="fill_parent”   android:layout_height="wrap_content"
        android:background="@android:drawable/editbox_background"
        android:layout_below="@id/label"/>
    <Button      android:id="@+id/ok"
        android:layout_width="wrap_content”   android:layout_height="wrap_content"
        android:layout_below="@id/entry”    android:layout_alignParentRight="true"
        android:layout_marginLeft="10dip”   android:text="确定" />

    <Button   android:layout_width="wrap_content"
        android:layout_height="wrap_content”        android:layout_toLeftOf="@id/ok"
        android:layout_alignTop="@id/ok”        android:text="取消" />
</RelativeLayout>
RelativeLayout Demo
2.3.4TableLayout(表格布局)
是比较常用的布局,它是按照表格的方式来布局整个画面的
TableRow:TableLayout中需要嵌入行,然后将组件置于TableRow中才能显示成Table的形式
几个重要的属性:
- android:layout_weight:比重
- TableRow:行
<TableLayout xmlns:android="http://schemas.android.com/apk/res/android"
    android:layout_width="fill_parent"
    android:layout_height="fill_parent"
    android:stretchColumns="1">
    <TableRow>
        <TextView
            android:layout_column="1”            android:text="打开...”            android:padding="3dip" />
        <TextView
            android:text="Ctrl-O”            android:gravity="right”            android:padding="3dip" />
    </TableRow>
    <TableRow>
        <TextView
            android:layout_column="1”            android:text="保存...”            android:padding="3dip" />
        <TextView
            android:text="Ctrl-S”            android:gravity="right”            android:padding="3dip" />
    </TableRow>
    <TableRow>
        <TextView
            android:layout_column="1”            android:text="另存为...”            android:padding="3dip" />
        <TextView
            android:text="Ctrl-Shift-S”            android:gravity="right”            android:padding="3dip" />
    </TableRow>
    <View
        android:layout_height="2dip"
        android:background="#FF909090" />
    <TableRow>
        <TextView android:text="*” android:padding="3dip" />
        <TextView
            android:text="导入...” android:padding="3dip" />
    </TableRow>
    <TableRow>
        <TextView android:text="*” android:padding="3dip" />
        <TextView android:text="导出...” android:padding="3dip" />
        <TextView android:text="Ctrl-E” android:gravity="right” android:padding="3dip" />
    </TableRow>

    <View
        android:layout_height="2dip” android:background="#FF909090" />

    <TableRow>
        <TextView
            android:layout_column="1” android:text="退出"
            android:padding="3dip" />
    </TableRow>
</TableLayout>
TableLayout Demo
2.3.5FrameLayout(框架布局)
是一个比较特殊的布局
此布局一般放一个组件,并且这个组件是靠左上角显示,
如果加入多个组件,那将会显示最上层的一个组件。
<FrameLayout
        xmlns:android="http://schemas.android.com/apk/res/android"
        android:layout_width="fill_parent"
        android:layout_height="fill_parent"
        >
        <ImageView
                android:layout_width="fill_parent"
                android:layout_height="fill_parent"
                android:scaleType="center"
                android:src="@drawable/golden_gate"
                />
        <TextView
                android:layout_width="wrap_content"
                android:layout_height="wrap_content"
                android:layout_marginBottom="20dip"
                android:layout_gravity="center_horizontal|bottom"
                android:padding="12dip"
                android:background="#AA000000"
                android:textColor="#ffffffff"
                android:text="Golden Gate"
                />
</FrameLayout>
FrameLayout Demo
2.3.6布局之间的关系
LinearLayout、AbsoluteLayout、RelativeLayout、FrameLayout均是ViewGroup的子类
TableLayout则是LinearLayout子类,如果TableLayout中的组件没有放入TableRow中的话,那么就会按照LinearLayout显示
在Android中,布局是可以相互嵌套的,比如LinearLayout中能够嵌入TableLayout一样
2.4 样式和主题(style&theme)
android中的样式和CSS样式作用相似,都是用于为界面元素定义显示风格,它是一个包含一个或者多个view控件属性的集合。如:需要定义字体的颜色和大小。 在CSS中是这样定义的:
<style>
    .lxt{COLOR:#0000CC;font-size:18px;}
</style>
可以像这样使用上面的css样式:<div class=“lxt">lxt008</div> 在Android中可以这样定义样式: 在res/values/styles.xml文件中添加以下内容
<?xml version="1.0" encoding="utf-8"?>
<resources>
    <style name=“lxt”> <!-- 为样式定义一个全局唯一的名字-->
        <item name="android:textSize">18px</item> <!-- name属性为样式要用在的View控件持有的属性 -->
        <item name="android:textColor">#0000CC</item>
    </style>
</resources>
在layout文件中可以像下面这样使用上面的android样式:
<?xml version="1.0" encoding="utf-8"?>
<LinearLayout xmlns:android="http://schemas.android.com/apk/res/android" ....>
    <TextView style="@style/lxt"
        .....  />
</LinearLayout>
<style>元素中有一个parent属性。这个属性可以让当前样式继承一个父样式,当前样式可以继承到父样式的值。当然,如果父样式的值不符合你的需求,你也可以对它进行修改,如下:
<?xml version="1.0" encoding="utf-8"?>
<resources>
    <style name=“lxt">
        <item name="android:textSize">18px</item> <!-- name属性为样式要用在的View控件持有的属性 -->
        <item name="android:textColor">#0000CC</item>
    </style>
    <style name="sublxt" parent="@style/lxt">
        <item name="android:textColor">#FF0000</item>
    </style>
</resources>
android中主题也是用于为应用定义显示风格,它的定义和样式的定义相同,如下:
<?xml version="1.0" encoding="utf-8"?>
<resources>
<style name=“lxtTheme">
<item name=“android:windowNoTitle”>true</item> <!– 没标题
<item name=“android:windowFullscreen”>?android:windowNoTitle</item> <!– 全屏显示
</style>
</resources>
上面“?android:windowNoTitle”中的问号用于引用在当前主题中定义过的资源的值。 下面代码显示在AndroidManifest.xml中如何为应用设置上面定义的主题:
<application android:icon="@drawable/icon" android:label="@string/app_name"
     android:theme="@style/lxtTheme">
   ......
</application>
除了可以在AndroidManifest.xml中设置主题,同样也可以在代码中设置主题,如下:
setTheme(R.style.lxtTheme);
尽管在定义上,样式和主题基本相同,但是它们使用的地方不同。样式用在单独的View,如:EditText、TextView等;主题通过AndroidManifest.xml中的和用在整个应用或者某个 Activity,主题对整个应用或某个Activity存在全局性影响。如果一个应用使用了主题,同时应用下的view也使用了样式,那么当主题与样式属性发生冲突时,样式的优先级高于主题。 另外android系统也定义了一些主题,例如:<activity android:theme=“@android:style/Theme.Dialog”>,该主题可以让Activity看起来像一个对话框,如果需要查阅这些主题,可以在文档的reference:android-->R.style 中查看。

