
技巧: Todos - 你的第一个 Backbone.js 应用程序
Now that we’ve journeyed through the fundamentals, let’s move on to writing our first Backbone.js app - a Todo List application. Building a Todo List is a great way to learn about Backbone’s conventions. It’s a simple enough app, but contains enough interesting problems to be useful, such as binding, persisting model data, routing and template rendering.
For this chapter, we’re going to learn how to create the Backbone.js Todo app listed on TodoMVC.com.
Let’s think about what we need from a high level architectural standpoint.
- A
Todomodel to describe individual todo items - A
TodoListcollection to store and persist todos - A way of creating todos
- Listing todos
- Editing existing todos
- Completing todos
- Deleting todos
- A way to bookmark the items that have been completed or are remaining
Basically your classic CRUD methods. Let’s get started!
Index
The first step is to setup the basic application dependencies, which in this case will be: jQuery, Underscore, Backbone.js and the Backbone LocalStorage adapter. These will be loaded in our main (and only) HTML file, index.html:
<!doctype html>
<html lang="en">
<head>
  <meta charset="utf-8">
  <meta http-equiv="X-UA-Compatible" content="IE=edge,chrome=1">
  <title>Backbone.js • TodoMVC</title>
  <link rel="stylesheet" href="../../assets/base.css">
</head>
<body>
  <script src="../../assets/base.js"></script>
  <script src="../../assets/jquery.min.js"></script>
  <script src="js/lib/underscore-min.js"></script>
  <script src="js/lib/backbone-min.js"></script>
  <script src="js/lib/backbone-localstorage.js"></script>
  <script src="js/models/todo.js"></script>
  <script src="js/collections/todos.js"></script>
  <script src="js/views/todos.js"></script>
  <script src="js/views/app.js"></script>
  <script src="js/routers/router.js"></script>
  <script src="js/app.js"></script>
</body>
</html>
To help demonstrate how the various parts of our application can be split up, individual concerns are cleanly organized into folders representing our models, views, collections and routers. An app.js file is used to kick everything off.
Application HTML
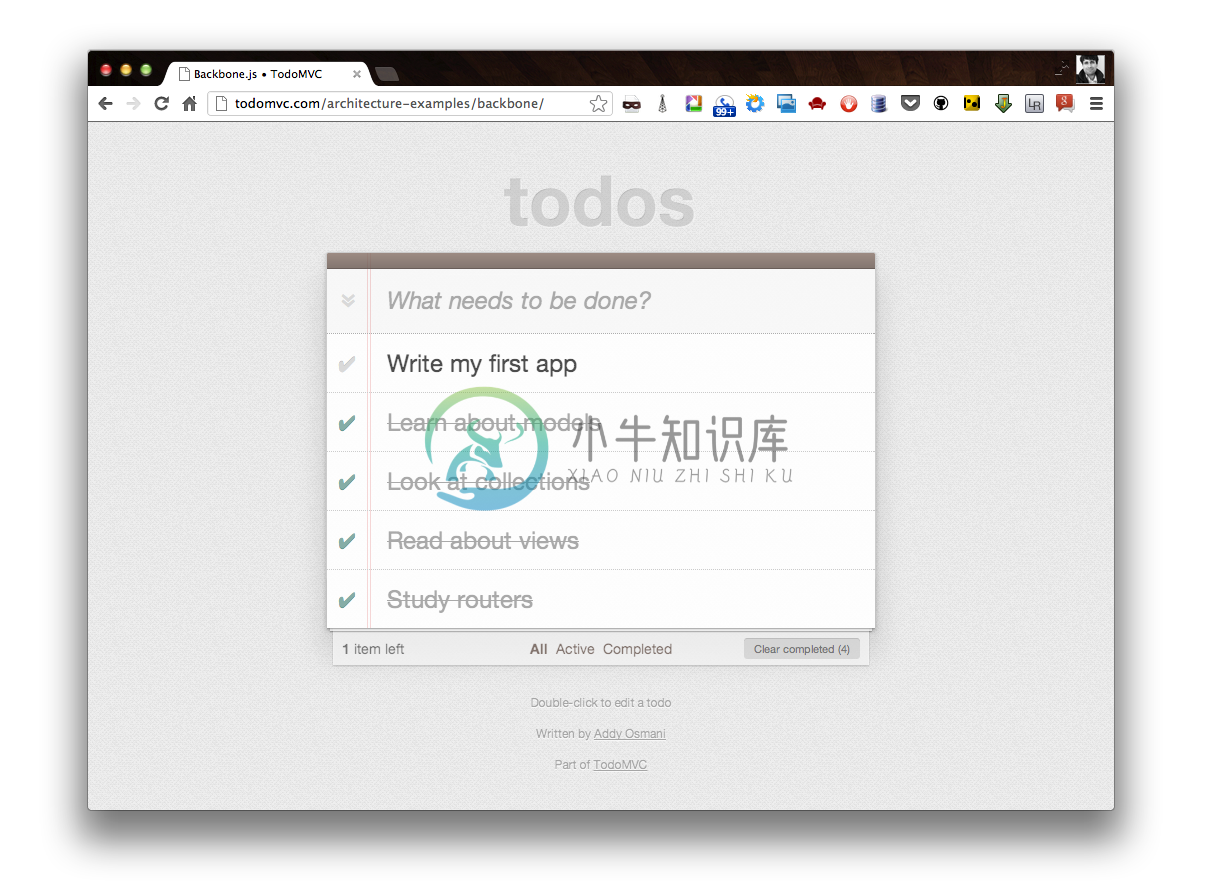
Now let’s take a look at our application’s static HTML. We’re going to need an <input> for creating new todos, a <ul id="todo-list" /> for listing the actual todos, and a section containing some operations, such as clearing completed todos.
  <section id="todoapp">
    <header id="header">
      <h1>todos</h1>
      <input id="new-todo" placeholder="What needs to be done?" autofocus>
    </header>
    <section id="main">
      <input id="toggle-all" type="checkbox">
      <label for="toggle-all">Mark all as complete</label>
      <ul id="todo-list"></ul>
    </section>
    <footer id="footer"></footer>
  </section>
  <div id="info">
    <p>Double-click to edit a todo</p>
    <p>Written by <a href="https://github.com/addyosmani">Addy Osmani</a></p>
    <p>Part of <a href="http://todomvc.com">TodoMVC</a></p>
  </div>
We’ll be populating our todo-list and adding a statistics section with details about what items are left to be completed later on.
So far so good. Now in order to tie this into our Backbone Todo app, we’re going to have to go back to the fundamentals - a Todo model.
Todo model
The Todo model is remarkably straightforward. Firstly a todo has two attributes, a title and a completed status that indicates whether it’s been completed. These attributes are passed as defaults, as you can see in the example below:
var app = app || {};

  // Todo Model
  // ----------
  // Our basic **Todo** model has `title`, `order`, and `completed` attributes.

  app.Todo = Backbone.Model.extend({

    // Default attributes for the todo
    // and ensure that each todo created has `title` and `completed` keys.
    defaults: {
      title: '',
      completed: false
    },

    // Toggle the `completed` state of this todo item.
    toggle: function() {
      this.save({
        completed: !this.get('completed')
      });
    }

  });
We also have a toggle() function which allows to set whether a Todo item has been completed.
Todo collection
Next we have our TodoList collection used to group our models. The collection is being extended by localStorage which automatically persists Todo records to HTML5 Local Storage via the Backbone LocalStorage adapter, so they’re saved between page requests.
We’ve then got some static methods, completed() and remaining(), which return an array of unfinished and finished todos respectively.
Finally we have a nextOrder() function, that keeps our Todo items in sequential order as well as a comparator() used to sort items by their insertion order.
  // Todo Collection
  // ---------------

  // The collection of todos is backed by *localStorage* instead of a remote
  // server.
  var TodoList = Backbone.Collection.extend({

    // Reference to this collection's model.
    model: app.Todo,

    // Save all of the todo items under the `"todos"` namespace.
    localStorage: new Store('todos-backbone'),

    // Filter down the list of all todo items that are finished.
    completed: function() {
      return this.filter(function( todo ) {
        return todo.get('completed');
      });
    },

    // Filter down the list to only todo items that are still not finished.
    remaining: function() {
      return this.without.apply( this, this.completed() );
    },

    // We keep the Todos in sequential order, despite being saved by unordered
    // GUID in the database. This generates the next order number for new items.
    nextOrder: function() {
      if ( !this.length ) {
        return 1;
      }
      return this.last().get('order') + 1;
    },

    // Todos are sorted by their original insertion order.
    comparator: function( todo ) {
      return todo.get('order');
    }
  });

  // Create our global collection of **Todos**.
  app.Todos = new TodoList();
Application View
So let’s look at the core of the application’s logic, the views. Since each todo has a fair bit of logic associated with it, such as edit in place, we’re going to use the element controller pattern - a pattern which consists of two views, one that controls a collection of items, and the other deals with each individual item.
In other words, we’re going to have one view AppView, which will be in charge creating new todos, and rendering the initial todo list. Then we’ll have another view called TodoView instances of which will be associated with an individual Todo record. Todo instances will be in charge of editing, updating and destroying their associated todo.
To keep thing simple, we’ll keep things read-only
at the moment, and won’t provide any functionality for creating, editing or deleting todos:
  // The Application
  // ---------------

  // Our overall **AppView** is the top-level piece of UI.
  app.AppView = Backbone.View.extend({

    // Instead of generating a new element, bind to the existing skeleton of
    // the App already present in the HTML.
    el: '#todoapp',

    // Our template for the line of statistics at the bottom of the app.
    statsTemplate: _.template( $('#stats-template').html() ),

    // At initialization we bind to the relevant events on the `Todos`
    // collection, when items are added or changed. Kick things off by
    // loading any preexisting todos that might be saved in *localStorage*.
    initialize: function() {
      this.input = this.$('#new-todo');
      this.allCheckbox = this.$('#toggle-all')[0];
      this.$footer = this.$('#footer');
      this.$main = this.$('#main');

      window.app.Todos.on( 'add', this.addAll, this );
      window.app.Todos.on( 'reset', this.addAll, this );
      window.app.Todos.on( 'all', this.render, this );

      app.Todos.fetch();
    },

    // Re-rendering the App just means refreshing the statistics -- the rest
    // of the app doesn't change.
    render: function() {
      var completed = app.Todos.completed().length;
      var remaining = app.Todos.remaining().length;

      if ( app.Todos.length ) {
        this.$main.show();
        this.$footer.show();

        this.$footer.html(this.statsTemplate({
          completed: completed,
          remaining: remaining
        }));

      } else {
        this.$main.hide();
        this.$footer.hide();
      }

      this.allCheckbox.checked = !remaining;
    },

    // Add a single todo item to the list by creating a view for it, and
    // appending its element to the `<ul>`.
    addOne: function( todo ) {
      var view = new app.TodoView({ model: todo });
      $('#todo-list').append( view.render().el );
    },

    // Add all items in the **Todos** collection at once.
    addAll: function() {
      this.$('#todo-list').html('');
      app.Todos.each(this.addOne, this);
    }

  });
You can see we’ve got a couple of things going on, an el (element), a statsTemplate, a constructor function and several view specific methods. On the left of the el: key is a DOM element selector for the element with ID todoapp. The value of this is just a string and Backbone will create a reference pointing to any element matching the selector #todoapp, where here it will be the <section id=”todoapp /> element, defined in the HTML section earlier.
In a nutshell this means we can now refer to this.el in our controller, which points to the <section class="todoapp" /> element. As you can see, we’re referring to el in the addOne() function, appending an element to the list.
Now let’s take a look at the constructor function. It’s binding to several events on the Todo model, such as add, reset and all. Since we’re delegating handling of updates and deletes to the TodoView view, we don’t need to to worry about that here. The two pieces of logic are:
When a new todo is created, the
addevent will be fired, callingaddAll(). This iterates over all of the Todos currently in our collection and firesaddOne()for each item.addOne()instantiates the TodoView view, rendering it and appending the resultant element to our Todo list.When a
resetevent is called (i.e. we wish to update the collection in bulk such as when the Todos have been loaded from Local Storage),addAll()is similarly called again.
We can then add in the logic for creating new todos, editing them and filtering them based on whether they are complete.
- events: We define an events hash containing declarative callbacks for our DOM events.
createOnEnter(): When a user hits return inside the<input/>field, this creates a new Todo item and resets the main<input/>field value to prepare it for the next entry.clearCompleted(): Removes the items in the todo list that have been marked as completedtoggleAllComplete(): Allows a user to set all of the items in the todo list to completed.initialize(): We bind a callback for a change:completed event, letting us know a change has been made as well to an existing todo item We also bind a callback for a filter event, which works a little similar to addOne() and addAll(). It’s responsibility is to toggle what todo items are visible based on the filter currently selected in the UI (all, completed or remaining) through filterOne() and filterAll().render(): We add some conditional CSS styling based on the filter currently selected so that the route that has been selected is highlightedcreateOnEnter(): Creates a new Todo model which persists in localStorage when a user hits return. This creates the model via newAttributes(), which is an object literal composed of the title, order and completed state of the new item being added.clearCompleted(): Clears all the todo items that have been marked as complete
// The Application
  // ---------------

  // Our overall **AppView** is the top-level piece of UI.
  app.AppView = Backbone.View.extend({

    // Instead of generating a new element, bind to the existing skeleton of
    // the App already present in the HTML.
    el: '#todoapp',

    // Our template for the line of statistics at the bottom of the app.
    statsTemplate: _.template( $('#stats-template').html() ),

    // Delegated events for creating new items, and clearing completed ones.
    events: {
      'keypress #new-todo': 'createOnEnter',
      'click #clear-completed': 'clearCompleted',
      'click #toggle-all': 'toggleAllComplete'
    },

    // At initialization we bind to the relevant events on the `Todos`
    // collection, when items are added or changed. Kick things off by
    // loading any preexisting todos that might be saved in *localStorage*.
    initialize: function() {
      this.input = this.$('#new-todo');
      this.allCheckbox = this.$('#toggle-all')[0];
      this.$footer = this.$('#footer');
      this.$main = this.$('#main');

      window.app.Todos.on( 'add', this.addAll, this );
      window.app.Todos.on( 'reset', this.addAll, this );
      window.app.Todos.on('change:completed', this.filterOne, this);
      window.app.Todos.on("filter", this.filterAll, this);

      window.app.Todos.on( 'all', this.render, this );

      app.Todos.fetch();
    },

    // Re-rendering the App just means refreshing the statistics -- the rest
    // of the app doesn't change.
    render: function() {
      var completed = app.Todos.completed().length;
      var remaining = app.Todos.remaining().length;

      if ( app.Todos.length ) {
        this.$main.show();
        this.$footer.show();

        this.$footer.html(this.statsTemplate({
          completed: completed,
          remaining: remaining
        }));

        this.$('#filters li a')
          .removeClass('selected')
          .filter('[href="#/' + ( app.TodoFilter || '' ) + '"]')
          .addClass('selected');
      } else {
        this.$main.hide();
        this.$footer.hide();
      }

      this.allCheckbox.checked = !remaining;
    },

    // Add a single todo item to the list by creating a view for it, and
    // appending its element to the `<ul>`.
    addOne: function( todo ) {
      var view = new app.TodoView({ model: todo });
      $('#todo-list').append( view.render().el );
    },

    // Add all items in the **Todos** collection at once.
    addAll: function() {
      this.$('#todo-list').html('');
      app.Todos.each(this.addOne, this);
    },

    filterOne : function (todo) {
      todo.trigger("visible");
    },

    filterAll : function () {
      app.Todos.each(this.filterOne, this);
    },

    // Generate the attributes for a new Todo item.
    newAttributes: function() {
      return {
        title: this.input.val().trim(),
        order: app.Todos.nextOrder(),
        completed: false
      };
    },

    // If you hit return in the main input field, create new **Todo** model,
    // persisting it to *localStorage*.
    createOnEnter: function( e ) {
      if ( e.which !== ENTER_KEY || !this.input.val().trim() ) {
        return;
      }

      app.Todos.create( this.newAttributes() );
      this.input.val('');
    },

    // Clear all completed todo items, destroying their models.
    clearCompleted: function() {
      _.each( window.app.Todos.completed(), function( todo ) {
        todo.destroy();
      });

      return false;
    },

    toggleAllComplete: function() {
      var completed = this.allCheckbox.checked;

      app.Todos.each(function( todo ) {
        todo.save({
          'completed': completed
        });
      });
    }
  });
Setup
So now we have two views: AppView and TodoView. The former needs to get instantiated when the page loads, so some code actually gets run. You can do this simply enough, by using jQuery’s ready() utility, which will execute a function when the DOM’s loaded.
var app = app || {};
var ENTER_KEY = 13;

$(function() {

  // Kick things off by creating the **App**.
  new app.AppView();

});
Creating new todos
It’s all very good creating todos from the console, but we can hardly expect our users to do that. Let’s hook up the todo creation section to provide a better interface. All the HTML is already there (in index.html); all we have to do is add some event listeners to that section, creating some todos.
Let’s look at the TodoView view. This will be in charge of individual Todo records, making sure the view updates then the todo does.
  // Todo Item View
  // --------------

  // The DOM element for a todo item...
  app.TodoView = Backbone.View.extend({

    //... is a list tag.
    tagName:  'li',

    // Cache the template function for a single item.
    template: _.template( $('#item-template').html() ),

    // The DOM events specific to an item.
    events: {
      'dblclick label': 'edit',
      'keypress .edit': 'updateOnEnter',
      'blur .edit':   'close'
    },

    // The TodoView listens for changes to its model, re-rendering. Since there's
    // a one-to-one correspondence between a **Todo** and a **TodoView** in this
    // app, we set a direct reference on the model for convenience.
    initialize: function() {
      this.model.on( 'change', this.render, this );
    },

    // Re-render the titles of the todo item.
    render: function() {
      this.$el.html( this.template( this.model.toJSON() ) );
      this.input = this.$('.edit');
      return this;
    },

    // Switch this view into `"editing"` mode, displaying the input field.
    edit: function() {
      this.$el.addClass('editing');
      this.input.focus();
    },

    // Close the `"editing"` mode, saving changes to the todo.
    close: function() {
      var value = this.input.val().trim();

      if ( value ) {
        this.model.save({ title: value });
      }

      this.$el.removeClass('editing');
    },

    // If you hit `enter`, we're through editing the item.
    updateOnEnter: function( e ) {
      if ( e.which === ENTER_KEY ) {
        this.close();
      }
    }
  });
In the initialize() constructor, we’re setting up a listener to the todo model’s change event. In other words, when the todo updates, we want to re-render the view to reflect its changes.
In the render() method, we’re rendering an Underscore.js JavaScript template, called #item-template, which we’ve previously compiled into this.template using Underscore’s _.template() method. This returns a piece of HTML that we’re using to replace the view’s current element. In other words, the rendered template is now present under this.el, and can be appended to the todo list.
Our events hash includes three callbacks:
edit(): Changes the current view into editing mode when a user double-clicks on an existing item in the todo list. This allows them to change the existing value of the item’s title attributeupdateOnEnter(): checks that the user has hit the return/enter key and executes the close() function.close(): This trims the value of the current text in our<input/>field, ensuring that we don’t process it further if it contains no text (e.g ‘’). If a valid value has been provided, we save the changes to the current todo model and close editing mode, by removing the corresponding CSS class.
In action
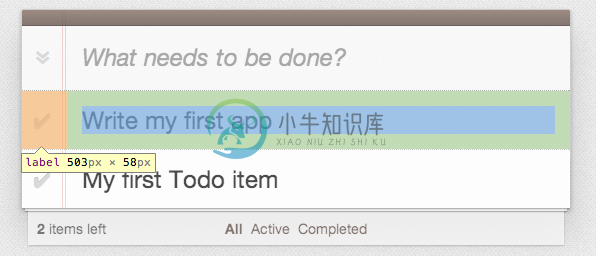
Now we’ve gone far enough without checking that things work as they should. Open up index.html and, if everything’s going to plan, you shouldn’t see any errors in the console. The todo list will be blank (we haven’t created any todos yet), and the todo-list won’t work, as we haven’t yet hooked it up. However, we can create a Todo from the console.
Type in: window.app.Todos.create({ title: ‘My first Todo item}); and hit return.
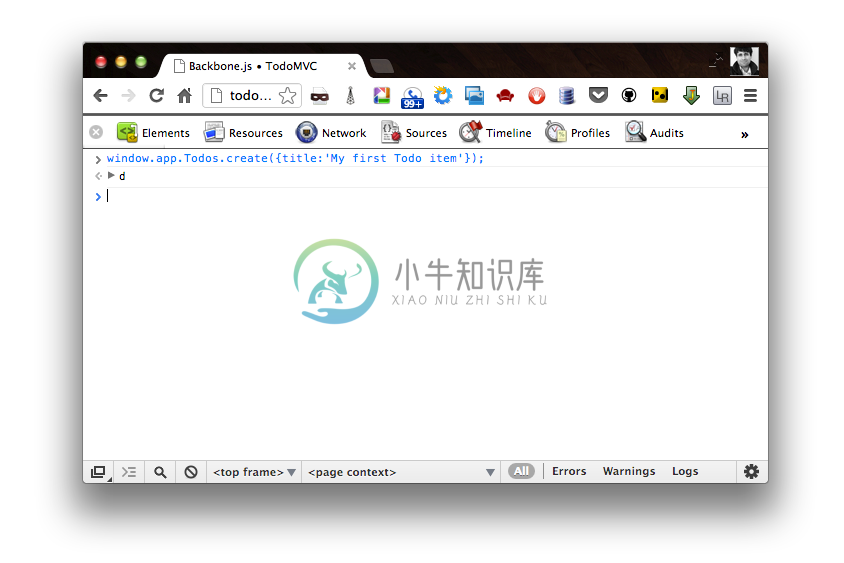
Once you’ve run the above in the console, we should be looking at a brand new todo in the list of todos. Notice that if you refresh the page, the todo still persists using Local Storage.
Templates
The #item-template used in the TodoView view needs defining, so let’s do that. One way of including templates in the page is by using custom script tags. These don’t get evaluated by the browser, which just interprets them as plain text. Underscore micro-templating can then access the templates, rendering pieces of HTML.
  <script type="text/template" id="item-template">
    <div class="view">
      <input class="toggle" type="checkbox" <%= completed ? 'checked' : '' %>>
      <label><%- title %></label>
      <button class="destroy"></button>
    </div>
    <input class="edit" value="<%- title %>">
  </script>
The template tags demonstrated above, such as <%= , are specific to Underscore.js, and documented on the Underscore site. In your own applications, you have a choice of template libraries, such as Mustache or Handlebars. Use whichever you prefer, Backbone doesn’t mind.
Now when _.template( $('#item-template').html() ) is called in the TodoView view our template will render correctly.
We also need to define #stats-template template we use to display how many items have been completed, as well as allowing the user to clear these items.
  <script type="text/template" id="stats-template">
    <span id="todo-count"><strong><%= remaining %></strong> <%= remaining === 1 ? 'item' : 'items' %> left</span>
    <ul id="filters">
      <li>
        <a class="selected" href="#/">All</a>
      </li>
      <li>
        <a href="#/active">Active</a>
      </li>
      <li>
        <a href="#/completed">Completed</a>
      </li>
    </ul>
    <% if (completed) { %>
    <button id="clear-completed">Clear completed (<%= completed %>)</button>
    <% } %>
  </script>
In action
Now refresh index.html to see the fruits of our labour. We should be able to type a todo name, and press return to submit the form, creating a new todo.
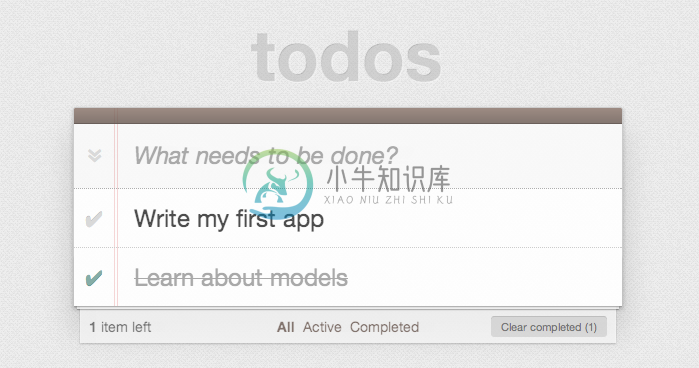
Excellent, we’re making great progress, but how about completing and deleting todos?
Completing & deleting todos
So the next part of our tutorial is going to cover completing and deleting todos. These two actions are specific to each Todo item, so we need to add this functionality to the TodoView view.
The key part of this is the two event handlers we’ve added, a togglecompleted event on the todo’s checkbox, and a click event on the todo’s <button class="destroy" /> button.
The checkbox’s togglecompleted event invokes the toggle() function, which toggles the todos’s completed status, then resaving the todo - very straightforward! The button’s click event invokes clear(), which will simply destroy the todo.
That’s all there is to it. Since we’re binding to the change event, whenever the todo changes the view will automatically be re-rendered, checking or un-checking the checkbox as appropriate. Similarly, when the todo is destroyed, the model’s destroy() function will be called, removing the todo from the view as we’re binding to the destroy event too.
One more piece to mention is that we’ve also binded to a visible event to handle the visibility state of the todo item. This is used in conjunction with the filtering in our routes and collections so that we only display an item if its completed state falls in line with the current filter.
This tutorial is long enough as is, so we won’t go into in-place editing or updating. If you want an example of that, see the complete source.
  // Todo Item View
  // --------------

  // The DOM element for a todo item...
  app.TodoView = Backbone.View.extend({

    //... is a list tag.
    tagName:  'li',

    // Cache the template function for a single item.
    template: _.template( $('#item-template').html() ),

    // The DOM events specific to an item.
    events: {
      'click .toggle':  'togglecompleted',
      'dblclick label': 'edit',
      'click .destroy': 'clear',
      'keypress .edit': 'updateOnEnter',
      'blur .edit':   'close'
    },

    // The TodoView listens for changes to its model, re-rendering. Since there's
    // a one-to-one correspondence between a **Todo** and a **TodoView** in this
    // app, we set a direct reference on the model for convenience.
    initialize: function() {
      this.model.on( 'change', this.render, this );
      this.model.on( 'destroy', this.remove, this );
      this.model.on( 'visible', this.toggleVisible, this );
    },

    // Re-render the titles of the todo item.
    render: function() {
      this.$el.html( this.template( this.model.toJSON() ) );
      this.$el.toggleClass( 'completed', this.model.get('completed') );

      this.toggleVisible();
      this.input = this.$('.edit');
      return this;
    },

    toggleVisible : function () {
      this.$el.toggleClass( 'hidden',  this.isHidden());
    },

    isHidden : function () {
      var isCompleted = this.model.get('completed');
      return ( // hidden cases only
        (!isCompleted && app.TodoFilter === 'completed')
        || (isCompleted && app.TodoFilter === 'active')
      );
    },

    // Toggle the `"completed"` state of the model.
    togglecompleted: function() {
      this.model.toggle();
    },

    // Switch this view into `"editing"` mode, displaying the input field.
    edit: function() {
      this.$el.addClass('editing');
      this.input.focus();
    },

    // Close the `"editing"` mode, saving changes to the todo.
    close: function() {
      var value = this.input.val().trim();

      if ( value ) {
        this.model.save({ title: value });
      } else {
        this.clear();
      }

      this.$el.removeClass('editing');
    },

    // If you hit `enter`, we're through editing the item.
    updateOnEnter: function( e ) {
      if ( e.which === ENTER_KEY ) {
        this.close();
      }
    },

    // Remove the item, destroy the model from *localStorage* and delete its view.
    clear: function() {
      this.model.destroy();
    }
  });
Todo routing
Finally, we move on to routing, which will allow us to easily bookmark the list of items that are active as well as those which have been completed. We’ll be supporting the following routes:
#/ (all - default)
#/active
#/completed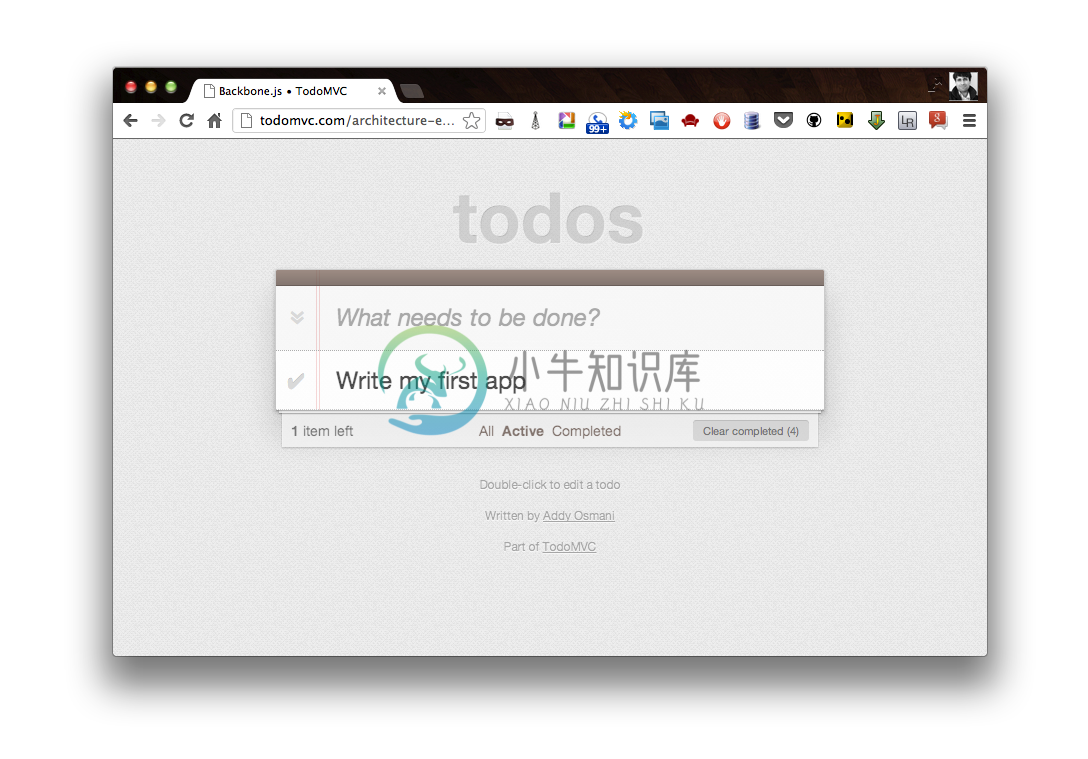
When the route changes the todo list will be filtered on a model level and the selected class on the filter links will be toggled. When an item is updated while in a filtered state, it will be updated accordingly. E.g. if the filter is active and the item is checked, it will be hidden. The active filter is persisted on reload.
  // Todo Router
  // ----------

  var Workspace = Backbone.Router.extend({
    routes:{
      '*filter': 'setFilter'
    },

    setFilter: function( param ) {
      // Set the current filter to be used
      window.app.TodoFilter = param.trim() || '';

      // Trigger a collection filter event, causing hiding/unhiding
      // of Todo view items
      window.app.Todos.trigger('filter');
    }
  });

  app.TodoRouter = new Workspace();
  Backbone.history.start();
As we can see in the line window.app.Todos.trigger('filter'), once a string filter has been set, we simply trigger our filter at a collection level to toggle which items are displayed and which of those are hidden.
Finally, we call Backbone.history.start() to route the initial URL during page load.
总结
We’ve now learned how to build our first complete Backbone.js application. The app can be viewed online at any time and the sources are readily available via TodoMVC.
Later on in the book, we’ll learn how to further modularize this application using Require.js, swap out our persistence layer to a database back-end and finally unit test the application with a few different testing frameworks.