⚠️
IMPORTANT
THIS REPO / PACKAGE HAS BEEN DEPRECATED
Please use new @angular-extensions/modelpackage / repo which is a combination of both the model library and related schematics which renders this package uselsess. On the other hand, feel free to keep using ngx-model if it suits your needs, it will not be deleted, but there will be no further development. Please, have a look into migration section in the new documentation.
The Angular Model - ngx-model
by @tomastrajan
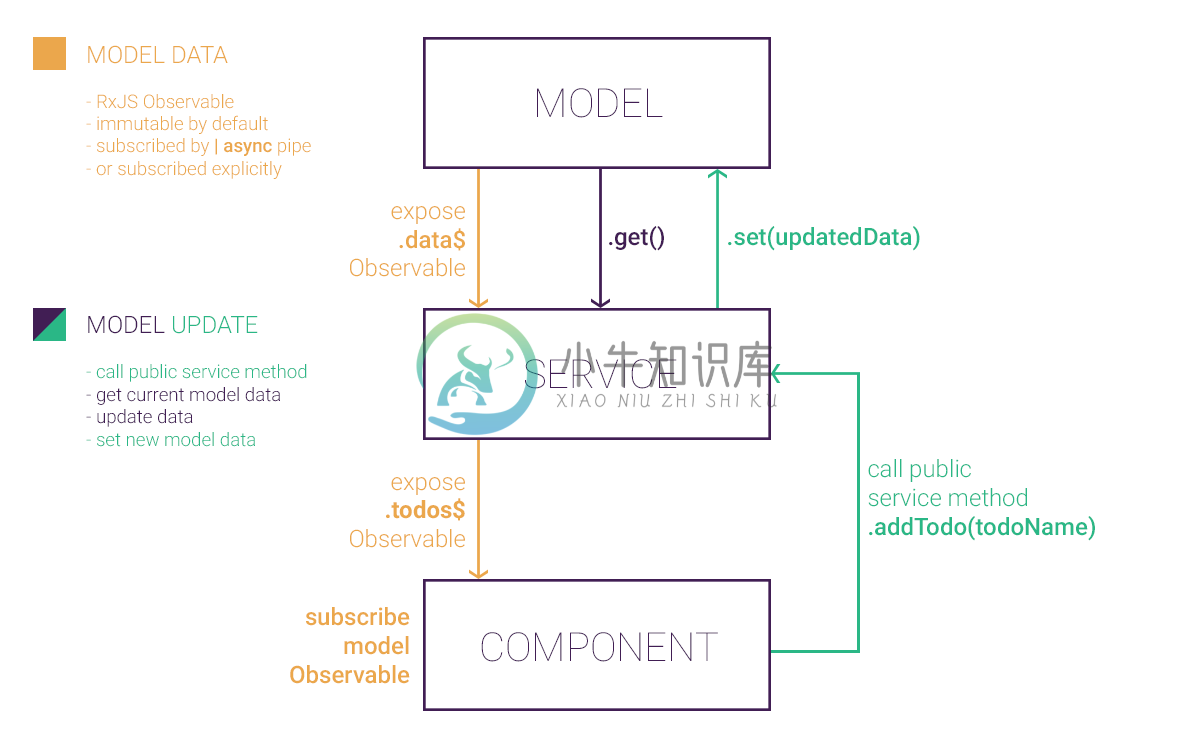
Simple state management with minimalistic API, one way data flow,multiple model support and immutable data exposed as RxJS Observable.
Documentation
- StackBlitz Demo
- Demo & Documentation
- Blog Post
- Changelog
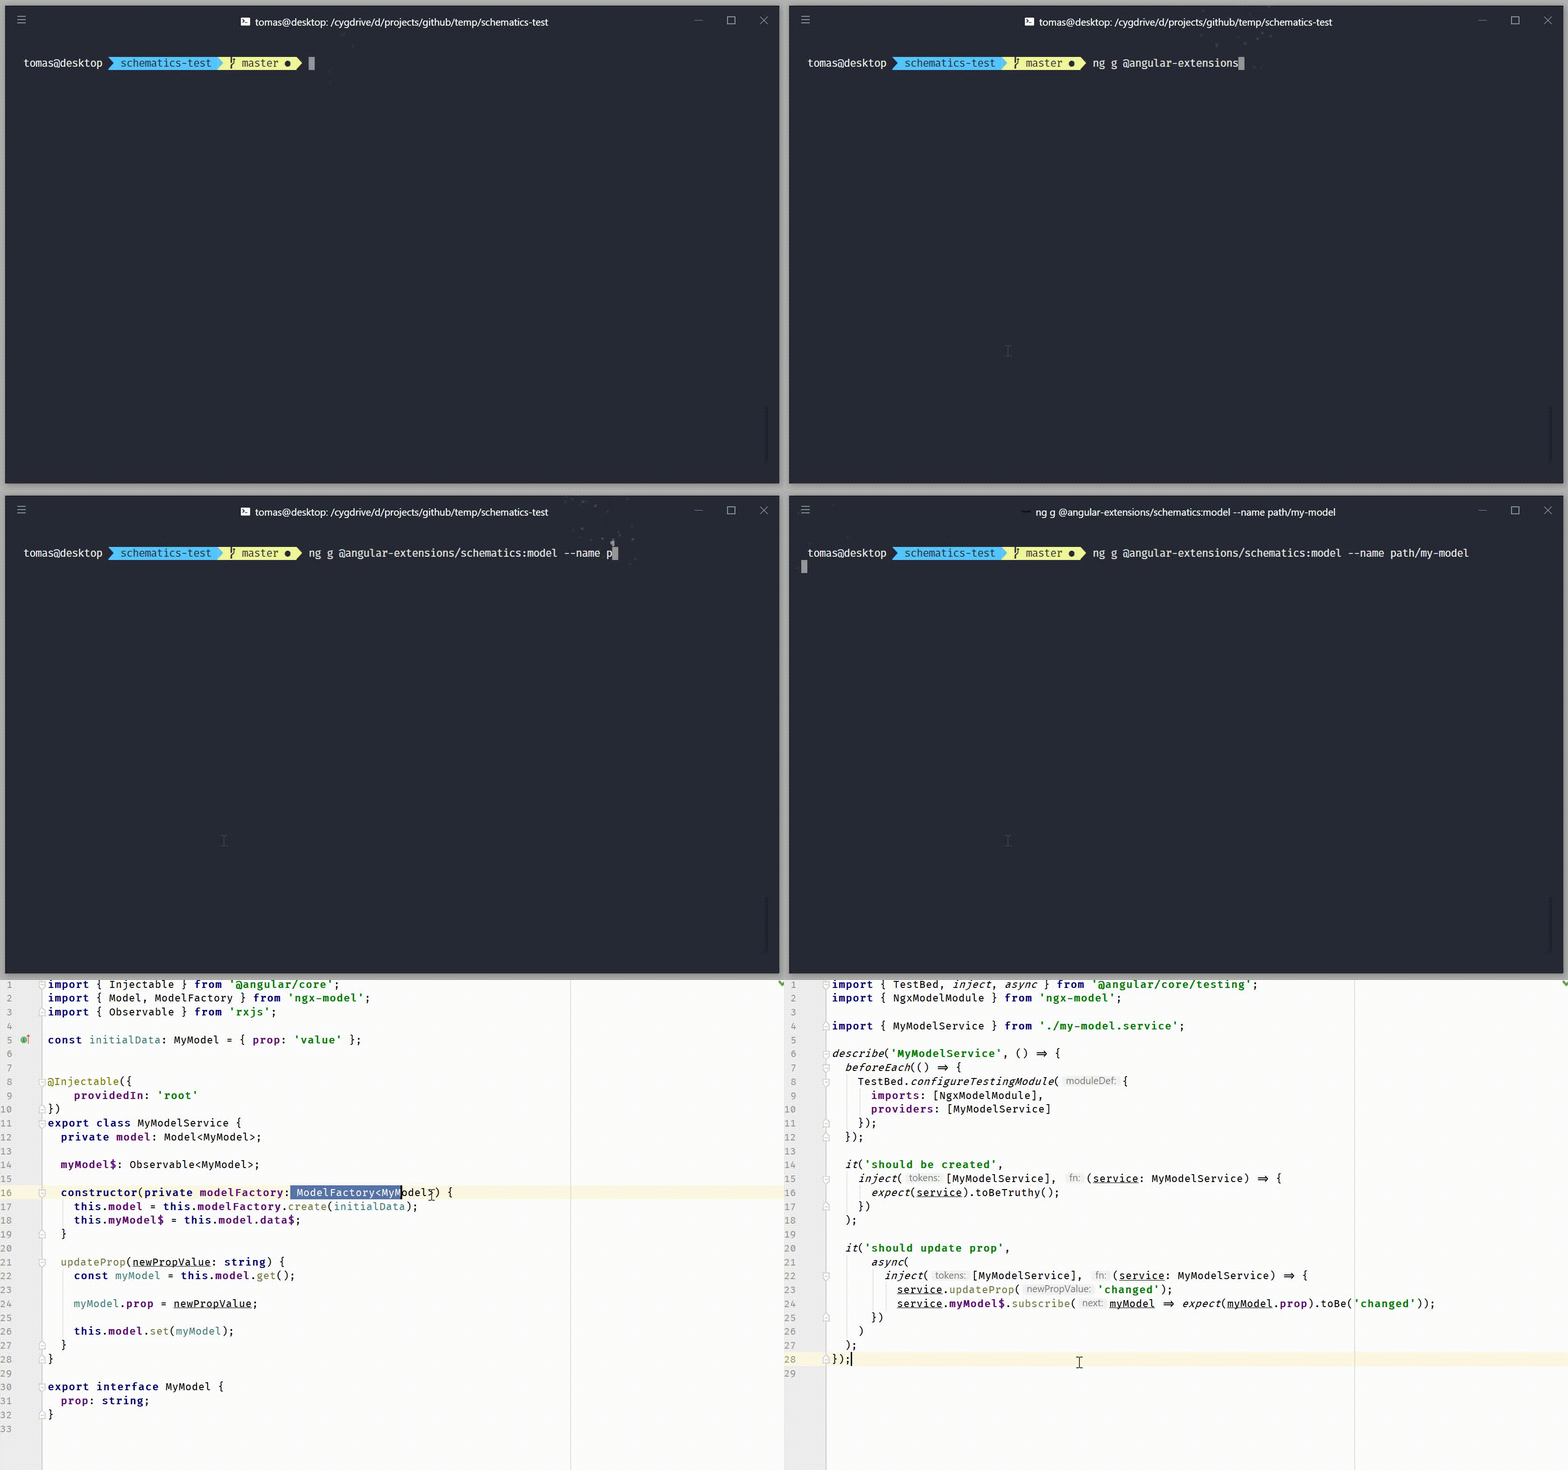
- Schematics - generate
ngx-modelservices using Angular CLI schematics!
Getting started
Install
ngx-modelnpm install --save ngx-modelor
yarn add ngx-modelImport and use
NgxModelModulein youAppModule(orCoreModule)import { NgxModelModule } from 'ngx-model'; @NgModule({ imports: [ NgxModelModule ] }) export class CoreModule {}
Import and use
ModelandModelFactoryin your own services.import { Injectable } from '@angular/core'; import { Observable } from 'rxjs'; import { ModelFactory, Model } from 'ngx-model'; @Injectable() export class TodosService { private model: Model<Todo[]>; todos$: Observable<Todo[]>; constructor(private modelFactory: ModelFactory<Todo[]>) { this.model = this.modelFactory.create([]); // create model and pass initial data this.todos$ = this.model.data$; // expose model data as named public property } toggleTodo(id: string) { // retrieve raw model data const todos = this.model.get(); // mutate model data todos.forEach(t => { if (t.id === id) { t.done = !t.done; } }); // set new model data (after mutation) this.model.set(todos); } }
Use service in your component. Import and inject service into components constructor.Subscribe to services data in template
todosService.todos$ | asyncor explicitlythis.todosService.todos$.subscribe(todos => { /* ... */ })import { Component, OnInit, OnDestroy } from '@angular/core'; import { Subject } from 'rxjs'; import { TodosService, Todo } from './todos.service'; @Component({ selector: 'ngx-model-todos', templateUrl: ` /* ... */ <h1>Todos ({{count}})</h1> <ul> <!-- template subscription to todos using async pipe --> <li *ngFor="let todo of todosService.todos$ | async" (click)="onTodoClick(todo)"> {{todo.name}} </li> </ul> `, }) export class TodosComponent implements OnInit, OnDestroy { private unsubscribe$: Subject<void> = new Subject<void>(); count: number; constructor(public todosService: TodosService) {} ngOnInit() { // explicit subscription to todos to get count this.todosService.todos .pipe( takeUntil(this.unsubscribe$) // declarative unsubscription ) .subscribe(todos => this.count = todos.length); } ngOnDestroy(): void { // for declarative unsubscription this.unsubscribe$.next(); this.unsubscribe$.complete(); } onTodoClick(todo: Todo) { this.todosService.toggleTodo(todo.id); } }
Available Model Factories
Models are created using model factory as shown in above example this.model = this.modelFactory.create([]);.Multiple model factories are provided out of the box to support different use cases:
create(initialData: T): Model<T>- create basic model which is immutable by default (JSONcloning)createMutable(initialData: T): Model<T>- create model with no immutability guarantees (you have to make sure that model consumers don't mutate and corrupt model state) but much more performance because whole cloning step is skippedcreateMutableWithSharedSubscription(initialData: T): Model<T>- gain even more performance by skipping both immutability and sharing subscription between all consumers (eg situation in which many components are subscribed to single model)createWithCustomClone(initialData: T, clone: (data: T) => T)- create immutable model by passing your custom clone function (JSONcloning doesn't support properties containing function or regex so custom cloning functionality might be needed)
Relationship to Angular Model Pattern
This is a library version of Angular Model Pattern.All the original examples and documentation are still valid. The only difference is thatyou can install ngx-model from npm instead of having to copy model patternimplementation to your project manually.
Check out the Blog Post andAdvanced Usage Patternsfor more how-tos and examples.
Getting started with Schematics
- make sure you're using this in project generated with Angular CLI.
- install dependency with
npm i -D @angular-extensions/schematics - generate model services with
ng g @angular-extensions/schematics:model --name path/my-model - or with
ng g @angular-extensions/schematics:model --name path/my-model-collection --itemsform model of collection of items - add your own model service methods and tests
-
背景介绍 之前写了一篇 《如何优雅的使用 Angular 表单验证》,结尾处介绍了统一验证反馈的类库 ngx-validator ,由于这段时间一直在新模块做微前端以及相关业务组件库,工具等开发,一直拖到现在,目前正式版 1.0 终于可以发布了。 可能有些人没有阅读过那篇博客,我这里简单介绍下 ngx-validator 主要的功能。 统一验证规则和错误反馈策略,通过响应式(配置的方式)设置每个元
-
1、 下载安装插件 如果使用的是angular2, 不是angular4 那么安装 ngx-clipboard@7.x.x版本,如果是ng4安装最新版本。 npm install ngx-clipboard@7.0.1 --save 2、module.ts文件中引入 ... import {ClipboardModule} from 'ngx-clipboard'; @NgModule({
-
1.碰到一个问题,因为用的 Bootstrap 中的model 组件,弹窗显示 1.如果第一次点击页面按钮A,弹出 弹窗B,在B中再点击按钮,弹出弹窗C,这时B弹窗会被关闭,当关闭C时(或保存、确定、取消),都会直接返回了页面而非是上一个弹窗B页面。 2.解决的方案是当关闭C时,再次执行打开B弹窗,但是会有一个问题,页面数据的渲染更新可能会不执行 3.例:权限选择,点击B弹窗的按钮,弹出C
-
转载请注明出处:https://blog.csdn.net/l1028386804/article/details/80086911 ngx_http_core_module 模块在处理请求时,会有大量的变量,这些变量可以通过访问日志来记录下来,也可以用于其它nginx 模块。在我们对请求做策略如改写等等都会使用到一些变量,顺便对 ngx_http_core_module 模块提供的变量总结了下,
-
1、先来个官方的ngx.re.match location /ngx_re_match { default_type text/html; content_by_lua_block { local m, err = ngx.re.match("/live/4001493201083.m3u8", "[0-9]+") if m then --
-
ngx-weui 是一个使用 Angular 构建的 WeUI 组件。 在线示例以及API文档。
-
ngx-fastdfs 是 nginx + lua +fastdfs 实现分布式图片实时动态压缩。 install 进入docker目录docker build -t fastdfs:dev . 使用 docker -idt -p 80:80 fastdfs:dev /bin/bash进入容器执行/etc/rc.local 测试 进入容器执行test目录下的./test.sh或者直接执行下面脚本
-
ngx-markdown ngx-markdown is an Angular library that combines... Marked to parse markdown to HTML Prism.js for language syntax highlight Emoji-Toolkit for emoji support KaTeX for math expression rende
-
ngx-admin Who uses ngx-admin?| Documentation | Installation Guidelines | Angular templates New! Material theme for ngx-admin Material admin theme is based on the most popular Angular dashboard templat
-
@sweetalert2/ngx-sweetalert2 Official SweetAlert2 integration for Angular This is not a regular API wrapper for SweetAlert (which already works very well alone), it intends to provide Angular-esque ut
-
ngx-dropzone A lightweight and highly customizable Angular dropzone component for file uploads. For a demo see DEMO. And the CODE for the demo. Install $ npm install --save ngx-dropzone Usage // in ap


