
react-native-app-intro
react-native-app-intro is a react native component implementing a parallax effect welcome page using base on react-native-swiper , similar to the one found in Google's app like Sheet, Drive, Docs...
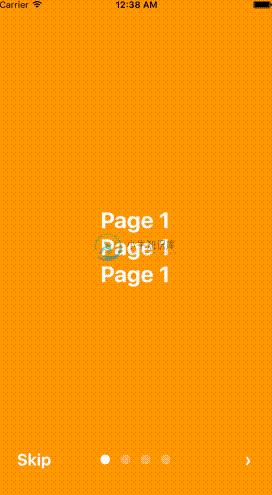
react-native-app-intro Screen Capture
Support ios、android

Installation
$ npm i react-native-app-intro --save
Basic Usage
You can use pageArray quick generation your app intro with parallax effect. With the basic usage, the Android status bar will be updated to match your slide background color.

import React, { Component } from 'react';
import { AppRegistry, Alert } from 'react-native';
import AppIntro from 'react-native-app-intro';

class Example extends Component {
  onSkipBtnHandle = (index) => {
    Alert.alert('Skip');
    console.log(index);
  }
  doneBtnHandle = () => {
    Alert.alert('Done');
  }
  nextBtnHandle = (index) => {
    Alert.alert('Next');
    console.log(index);
  }
  onSlideChangeHandle = (index, total) => {
    console.log(index, total);
  }
  render() {
    const pageArray = [{
      title: 'Page 1',
      description: 'Description 1',
      img: 'https://goo.gl/Bnc3XP',
      imgStyle: {
        height: 80 * 2.5,
        width: 109 * 2.5,
      },
      backgroundColor: '#fa931d',
      fontColor: '#fff',
      level: 10,
    }, {
      title: 'Page 2',
      description: 'Description 2',
      img: require('../assets/some_image.png'),
      imgStyle: {
        height: 93 * 2.5,
        width: 103 * 2.5,
      },
      backgroundColor: '#a4b602',
      fontColor: '#fff',
      level: 10,
    }];
    return (
      <AppIntro
        onNextBtnClick={this.nextBtnHandle}
        onDoneBtnClick={this.doneBtnHandle}
        onSkipBtnClick={this.onSkipBtnHandle}
        onSlideChange={this.onSlideChangeHandle}
        pageArray={pageArray}
      />
    );
  }
}

AppRegistry.registerComponent('Example', () => Example);
Advanced Usage
If you need customized page like my Example, you can pass in View component into AppIntro component and set level. Remember any need use parallax effect component, Need to be <View level={10}></View> inside.
import React, { Component } from 'react';
import {
  AppRegistry,
  StyleSheet,
  Text,
  View,
} from 'react-native';
import AppIntro from 'react-native-app-intro';

const styles = StyleSheet.create({
  slide: {
    flex: 1,
    justifyContent: 'center',
    alignItems: 'center',
    backgroundColor: '#9DD6EB',
    padding: 15,
  },
  text: {
    color: '#fff',
    fontSize: 30,
    fontWeight: 'bold',
  },
});

class Example extends Component {

  render() {
    return (
      <AppIntro>
        <View style={[styles.slide,{ backgroundColor: '#fa931d' }]}>
          <View level={10}><Text style={styles.text}>Page 1</Text></View>
          <View level={15}><Text style={styles.text}>Page 1</Text></View>
          <View level={8}><Text style={styles.text}>Page 1</Text></View>
        </View>
        <View style={[styles.slide, { backgroundColor: '#a4b602' }]}>
          <View level={-10}><Text style={styles.text}>Page 2</Text></View>
          <View level={5}><Text style={styles.text}>Page 2</Text></View>
          <View level={20}><Text style={styles.text}>Page 2</Text></View>
        </View>
        <View style={[styles.slide,{ backgroundColor: '#fa931d' }]}>
          <View level={8}><Text style={styles.text}>Page 3</Text></View>
          <View level={0}><Text style={styles.text}>Page 3</Text></View>
          <View level={-10}><Text style={styles.text}>Page 3</Text></View>
        </View>
        <View style={[styles.slide, { backgroundColor: '#a4b602' }]}>
          <View level={5}><Text style={styles.text}>Page 4</Text></View>
          <View level={10}><Text style={styles.text}>Page 4</Text></View>
          <View level={15}><Text style={styles.text}>Page 4</Text></View>
        </View>
      </AppIntro>
    );
  }
}
AppRegistry.registerComponent('Example', () => Example);
And in Android, image inside view component, view need width、height.
<View style={{
  position: 'absolute',
  top: 80,
  left: 30,
  width: windows.width,
  height: windows.height,
}} level={20}
>
  <Image style={{ width: 115, height: 70 }} source={require('./img/1/c2.png')} />
</View>
Properties
| Prop | PropType | Default Value | Description |
|---|---|---|---|
| dotColor | string | 'rgba(255,255,255,0.3)' | Bottom of the page dot color |
| activeDotColor | string | '#fff' | Active page index dot color |
| rightTextColor | string | '#fff' | The bottom right Text Done、> color |
| leftTextColor | string | '#fff' | The bottom left Text Skip color |
| onSlideChange | (index, total) => {} | function to call when the pages change | |
| onSkipBtnClick | (index) => {} | function to call when the Skip button click | |
| onDoneBtnClick | func | function to call when the Done button click | |
| onNextBtnClick | (index) => {} | function to call when the Next '>' button click | |
| doneBtnLabel | string、Text element | Done | The bottom right custom Text label |
| skipBtnLabel | string、Text element | Skip | The bottom left custom Text label |
| nextBtnLabel | string、Text element | › | The bottom left custom Text label |
| pageArray | array | In the basic usage, you can input object array to render basic view example: [[{title: 'Page 1', description: 'Description 1', img: 'https://goo.gl/uwzs0C', imgStyle: {height: 80 * 2.5, width: 109 * 2.5 }, backgroundColor: '#fa931d', fontColor: '#fff', level: 10 }] , level is parallax effect level ,if you use pageArray you can't use custom view |
|
| defaultIndex | number | 0 | number of the index of the initial index |
| showSkipButton | bool | true | a boolean defining if we should render the skip button |
| showDoneButton | bool | true | a boolean that defines if we should render the done button |
| showDots | bool | true | a boolean that defines if we should render the bottom dots |
Children View Properties
| Prop | PropType | Default Value | Description |
|---|---|---|---|
| level | number | parallax effect level |
-
前言 我最近在研究新版taro的原理,其中就有使用该库制作自定义渲染器。一起学习下吧。 老版taro原理到时候会专门写个文章手写下。已经整理完成。 react-reconciler 这个是react抽离的协调器逻辑,用于编写自定义渲染器。 https://www.npmjs.com/package/react-reconciler const Reconciler = require('react
-
转载链接: http://www.ncloud.hk/%E6%8A%80%E6%9C%AF%E5%88%86%E4%BA%AB/react-native-learning-resources/ 这是我觉得比较有用的学习资源(要多练习多理解): 一、 1.react-native 官方api文档:http://facebook.github.io/react-native/docs/gettin
-
import React, { Component } from 'react' import { Text, View, TextInput, // input 表单组件 TouchableOpacity, // 手指触摸透明度变化。用于封装视图,使其可以正确响应触摸操作。当按下的时候,封装的视图的不透明度会降低。不透明度的变化是通过把子元素封装在一个Animated
-
前言 从2017年初开始到现在,使用React-Native做项目已经一年了。我们做的是一款IM软件,嵌入在一个手机游戏平台的工程内部。之所以要采用react-native(后文简称RN)框架重构它,是因为现在游戏大厅上的所有游戏都是热更新的,为了也能让这个IM软件实现实时更新,减少IPA升级的次数,RN当然是不错的选择。 经过一个同事将近一年的预研以后,2017年我们全面开启项目重构。奔着热更新
-
本文出处: http://blog.csdn.net/chichengjunma/article/details/52920137 React Native 项目常用第三方组件汇总: react-native-animatable 动画 react-native-carousel 轮播 react-native-countdown 倒计时 react-native-device-i
-
转载链接: http://www.ncloud.hk/%E6%8A%80%E6%9C%AF%E5%88%86%E4%BA%AB/react-native-learning-resources/ 这是我觉得比较有用的学习资源(要多练习多理解): 一、 1.react-native 官方api文档:http://facebook.github.io/react-native/docs/gettin
-
react-navigation 做 TarBar 布局和导航非常简单方便,最好用的导航了http://www.jianshu.com/p/2ce08b92cf60 https://reactnavigation.org/docs/intro/ 常用布局一般是首页 4 个 TabBar 布局,直接用 TabNavigator 就行 import {StackNavigator, TabNaviga
-
react-native-dribbble-app 是 Facebook 员工使用 React Native 构建的 Dribbble 应用。
-
Create React Native App The fastest way to create universal React Native apps npx create-react-native-app Once you're up and running with Create React Native App, visit this tutorial for more informat
-
因此,我使用react-native init[项目名称]创建了一个react-native项目。它安装了最新版本的native 0.60。然后我安装了react原生应用程序auth。 之后,我使用react-local start启动了metro服务器。但是当我运行react-local run-android时,编译器给了我一些错误。 任务:react-nate-app-auth:compil
-
一、前言 Facebook提供了“Integrating with Existing Apps”方案,但是需要使用pod install, 会出现版本更新不及时。那么如何手动集成到Native代码中去呢?这里提供一个简单的Demo供参考。 二、构建步骤 1. 创建 React Native项目,目的是获取最新的React Native包 $ react-native init test 2
-
问题内容: 我遇到过几种专门针对ios和Android的解决方案,以防止屏幕捕获和截屏。但是我如何在React Native中禁用屏幕捕获? 问题答案: 安卓系统 内 您可以添加以下几行。通过setFlag阻止捕获屏幕,使用以下代码作为示例: 稍后当您想删除安全标志时 iOS 中的重叠屏幕,请看以下示例:
-
我正在使用React native和Android。如何在应用程序中更新版本号?因为我得到了这个错误。 我正在根据这个url https://facebook.github.io/react-native/docs/signed-apk-android.html生成文件 我尝试过修改AndroidManifest.xml文件,但是在构建它之后,该文件会自动被修改回来。