
React Native Wrapper for Latest Google Sign-In SDK
https://github.com/devfd/react-native-google-signin is not working and is not being maintained anymore (See Issue), so I created this one myself.It uses the latest Google Sign-In SDK.
For LinkedIn SDK, check out joonhocho/react-native-linkedin-sdk
Getting started
Tested with React Native 0.39 and 0.40. Also, see Tested Environments.Let me know if some instructions are missing.
$ react-native install react-native-google-sign-in
Android
Follow Google's official instructions for Android.
Follow everything from the instructions with the following modifications.Some of the following modifications should be done by react-native install automatically. If not, do it yourself:
Move
google-services.jsonto{YourApp}/android/app/google-services.json.Add to your
{YourApp}/android/settings.gradle:
include ':react-native-google-sign-in'
project(':react-native-google-sign-in').projectDir = new File(rootProject.projectDir, '../node_modules/react-native-google-sign-in/android')
- Modify your
{YourApp}/android/build.gradle:
dependencies {
    classpath 'com.android.tools.build:gradle:2.2.3' // This may need to be updated to >= 2.2.3.
    classpath 'com.google.gms:google-services:3.0.0' // Add this
}
- Modify your
{YourApp}/android/app/build.gradle:
dependencies {
    compile(project(":react-native-google-sign-in")) { // ADD this
        exclude group: "com.google.android.gms"
    }
    ...your modules...
    compile "com.google.android.gms:play-services-auth:10.0.1" // Add this, not 9.8.0 (from instructions).
    compile "com.facebook.react:react-native:+"
}

apply plugin: "com.google.gms.google-services" // Add this after dependencies.
- Modify your
{YourApp}/android/app/src/main/java/com/{YourApp}/MainApplication.java:
import com.reactlibrary.googlesignin.RNGoogleSignInPackage; // Add this.

...in your class MainApplication...
        @Override
        protected List<ReactPackage> getPackages() {
            return Arrays.<ReactPackage>asList(
                    new MainReactPackage(),
                    new RNGoogleSignInPackage(), // Add this.
                    ...other packages...
            );
        }
iOS
(prerequisite) Setup Swift Bridging Header
- Make sure you have a Swift Bridging Header for your project. Here's how to create one if you don't.

Manually download and install Google SignIn SDK (Without CocoaPods)
At the time of writing,
Google Sign-In SDK 4.1.0is the latest.Follow Google's official instructions, Install Google SDK WITHOUT CocoaPods. I could not get it working with CocoaPods.
It's important to follow every instruction!
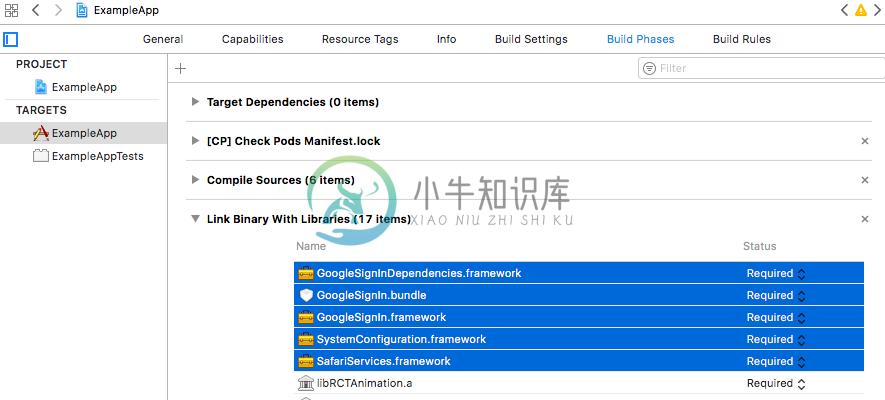
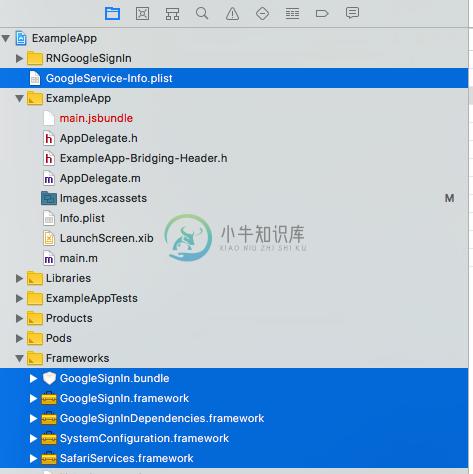
Make sure to properly add the following frameworks according to the Google's instructions:
- GoogleSignIn.bundle
- GoogleSignIn.framework
- GoogleSignInDependencies.framework
- SystemConfiguration.framework
- SafariServices.framework
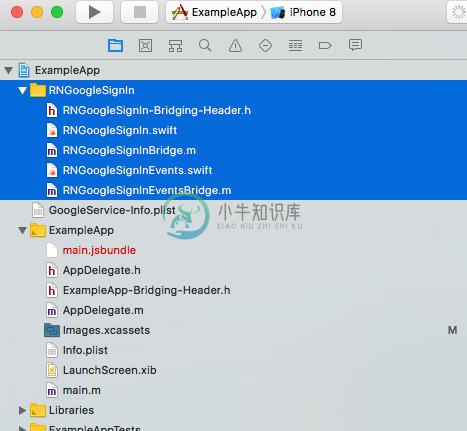
Here are some screenshots that shows proper installations (Refer to ExampleApp):
Open up your project in xcode and right click the package.
Click
Add files to '{YourApp}'.Select to
{YourApp}/node_modules/react-native-google-sign-in/ios/RNGoogleSignIn.Click 'Add'.
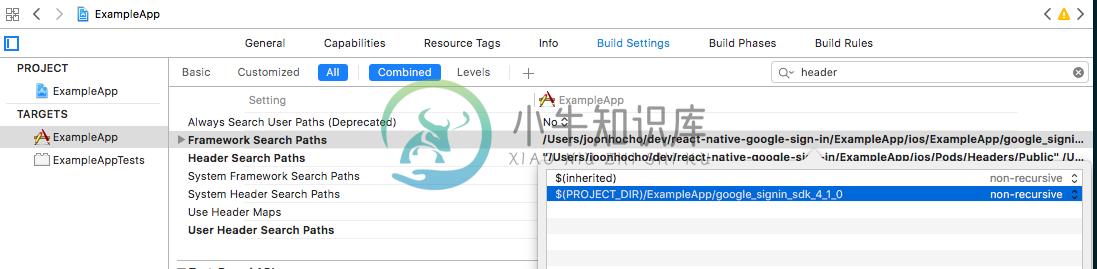
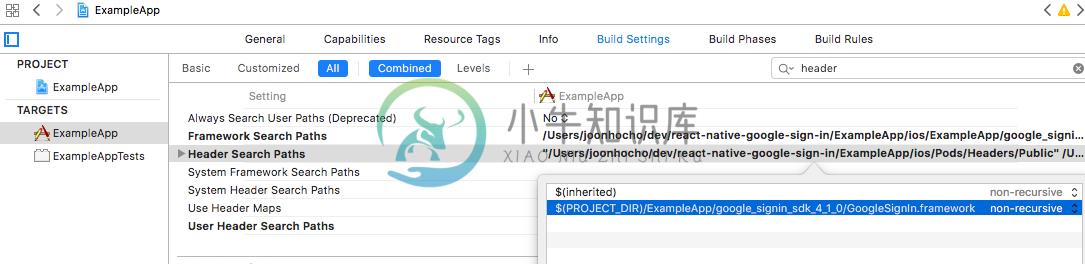
Click your project in the navigator on the left and go to
Build Settings.Search for
Header Search Paths.Double click on the value column.
Add
$(SRCROOT)/../node_modules/react-native-google-sign-in/ios/RNGoogleSignIn.Screenshots:
Add to your {YourApp}/ios/{YourApp}/AppDelegate.m:
- (BOOL)application:(UIApplication *)application didFinishLaunchingWithOptions:(NSDictionary *)launchOptions
{
  // ADD THE FOLLOWING CODE
  NSString *filePath = [[NSBundle mainBundle] pathForResource:@"GoogleService-Info" ofType:@"plist"];
  NSDictionary *plistDict = [NSDictionary dictionaryWithContentsOfFile:filePath];
  [GIDSignIn sharedInstance].clientID = [plistDict objectForKey:@"CLIENT_ID"];
  // ADD THE ABOVE CODE
  ...your code
}

- (BOOL)application:(UIApplication *)application
            openURL:(NSURL *)url
            options:(NSDictionary<UIApplicationOpenURLOptionsKey,id> *)options {
  // ADD THE FOLLOWING CODE
  BOOL handled = [[GIDSignIn sharedInstance] handleURL:url
                                     sourceApplication:options[UIApplicationOpenURLOptionsSourceApplicationKey]
                                            annotation:options[UIApplicationOpenURLOptionsAnnotationKey]];
  return handled;
  // ADD THE ABOVE CODE
}

- (BOOL)application:(UIApplication *)application
            openURL:(NSURL *)url
  sourceApplication:(NSString *)sourceApplication
         annotation:(id)annotation {
  // ADD THE FOLLOWING CODE
  if ([[GIDSignIn sharedInstance] handleURL:url
                          sourceApplication:sourceApplication
                                 annotation:annotation]) {
    return YES;
  }
  // ADD THE ABOVE CODE
  return YES;
}
Add to your {YourApp}/ios/{YourApp}/AppDelegate.h:
#import <GoogleSignIn/GoogleSignIn.h>
Add to your Swift Bridging Header, {YourApp}/ios/{YourApp}-Bridging-Header.h:
#import <React/RCTBridgeModule.h>
#import <React/RCTViewManager.h>
#import <React/RCTEventEmitter.h>
#import <GoogleSignIn/GoogleSignIn.h>
Or, if you are using RN <= 0.39:
#import "RCTBridgeModule.h"
#import "RCTViewManager.h"
#import "RCTEventEmitter.h"
#import <GoogleSignIn/GoogleSignIn.h>
Usage
import GoogleSignIn from 'react-native-google-sign-in';

// later in your code...
async yourMethod() {
  await GoogleSignIn.configure({
    // iOS
    clientID: 'yourClientID',

    // iOS, Android
    // https://developers.google.com/identity/protocols/googlescopes
    scopes: ['your', 'requested', 'api', 'scopes'],

    // iOS, Android
    // Whether to request email and basic profile.
    // [Default: true]
    // https://developers.google.com/identity/sign-in/ios/api/interface_g_i_d_sign_in.html#a06bf16b507496b126d25ea909d366ba4
    shouldFetchBasicProfile: boolean,

    // iOS
    // https://developers.google.com/identity/sign-in/ios/api/interface_g_i_d_sign_in.html#a486c8df263ca799bea18ebe5430dbdf7
    language: string,

    // iOS
    // https://developers.google.com/identity/sign-in/ios/api/interface_g_i_d_sign_in.html#a0a68c7504c31ab0b728432565f6e33fd
    loginHint: string,

    // iOS, Android
    // https://developers.google.com/identity/sign-in/ios/api/interface_g_i_d_sign_in.html#ae214ed831bb93a06d8d9c3692d5b35f9
    serverClientID: 'yourServerClientID',

    // Android
    // Whether to request server auth code. Make sure to provide `serverClientID`.
    // https://developers.google.com/android/reference/com/google/android/gms/auth/api/signin/GoogleSignInOptions.Builder.html#requestServerAuthCode(java.lang.String, boolean)
    offlineAccess: boolean,

    // Android
    // Whether to force code for refresh token.
    // https://developers.google.com/android/reference/com/google/android/gms/auth/api/signin/GoogleSignInOptions.Builder.html#requestServerAuthCode(java.lang.String, boolean)
    forceCodeForRefreshToken: boolean,

    // iOS
    // https://developers.google.com/identity/sign-in/ios/api/interface_g_i_d_sign_in.html#a211c074872cd542eda53f696c5eef871
    openIDRealm: string,

    // Android
    // https://developers.google.com/android/reference/com/google/android/gms/auth/api/signin/GoogleSignInOptions.Builder.html#setAccountName(java.lang.String)
    accountName: 'yourServerAccountName',

    // iOS, Android
    // https://developers.google.com/identity/sign-in/ios/api/interface_g_i_d_sign_in.html#a6d85d14588e8bf21a4fcf63e869e3be3
    hostedDomain: 'yourHostedDomain',
  });

  const user = await GoogleSignIn.signInPromise();

  console.log(user);
}
See js/GoogleSignIn.ios.js for supported iOS APIs.
See js/GoogleSignIn.android.js for supported Android APIs.
Tested Environments
I only tested with the following environments:
- Swift version 3.0.2 (swiftlang-800.0.63 clang-800.0.42.1) / Target: x86_64-apple-macosx10.9
- Xcode Version 8.2.1 (8C1002)
- Android Studio 2.2.3 / Build #AI-145.3537739, built on December 2, 2016 / JRE: 1.8.0_112-release-b05 x86_64 / JVM: OpenJDK 64-Bit Server VM by JetBrains s.r.o
LICENSE
The MIT License (MIT)

Copyright (c) 2017 Joon Ho Cho

Permission is hereby granted, free of charge, to any person obtaining a copy
of this software and associated documentation files (the "Software"), to deal
in the Software without restriction, including without limitation the rights
to use, copy, modify, merge, publish, distribute, sublicense, and/or sell
copies of the Software, and to permit persons to whom the Software is
furnished to do so, subject to the following conditions:

The above copyright notice and this permission notice shall be included in all
copies or substantial portions of the Software.

THE SOFTWARE IS PROVIDED "AS IS", WITHOUT WARRANTY OF ANY KIND, EXPRESS OR
IMPLIED, INCLUDING BUT NOT LIMITED TO THE WARRANTIES OF MERCHANTABILITY,
FITNESS FOR A PARTICULAR PURPOSE AND NONINFRINGEMENT. IN NO EVENT SHALL THE
AUTHORS OR COPYRIGHT HOLDERS BE LIABLE FOR ANY CLAIM, DAMAGES OR OTHER
LIABILITY, WHETHER IN AN ACTION OF CONTRACT, TORT OR OTHERWISE, ARISING FROM,
OUT OF OR IN CONNECTION WITH THE SOFTWARE OR THE USE OR OTHER DEALINGS IN THE
SOFTWARE.
-
react-native —— 在Windows下搭建React Native Android开发环境 在Windows下搭建React Native Android开发环境 前段时间在开发者头条收藏了 @天地之灵_邓鋆 分享的 React Native 项目运行在 Web 浏览器上面 React Native 的出现,让前端工程师拥有了使用 JavaScript 编写原生 APP 的能力.相比之
-
Facebook登录 import { AccessToken, LoginManager } from 'react-native-fbsdk-next'; const facebookLogin = ()=>{ LoginManager.logInWithPermissions(['public_profile', 'email', 'user_birthday', 'user_gender
-
需要的工具 Android Studio:这个是针对安卓原生开发的编译工具 genymotion :这个是安卓模拟器 Xcode :这个是iOS开发的编译工具 webstorm :一个自己喜欢的代码编译工具(当然你也可以选择自己喜欢的编译工具,个人比较喜欢这个) 推荐学习网站 react native 中文网站 :环境配置和常用组件,api 都很详细 RN路由react navigation :你
-
brew install node #node -v brew install watchman #watchman -v java 8的安装:卸载 安装node 安装python2 npm设置镜像: npm config set registry https://registry.npm.taobao.org --global npm config set disturl https://n
-
背景 由于业务需求,要求使用原生的ViewPager2在rn中实现tab侧滑功能,而tab页面中会有水平滑动的FlatList列表,这样就会造成滑动冲突的情况。 解决思路:因为ViewPager2被声明为final的,所以只能从FlatList去动手,于是本文基于谷歌官方的NestedScrollableHost进行改造。 步骤 改造NestedScrollableHost给rn使用 用isFro
-
React Native Mapping Integration 这个包提供了一个兼容React Native,并且可以使用相同的JavaScript API在iOS和Android平台上运行的谷歌地图UI组件。 安装 npm install --save react-native-maps-google
-
在本章中,我们将了解如何使用带有Gradle构建的Spring Boot应用程序添加Google OAuth2登录。 首先,在构建配置文件中添加Spring Boot OAuth2安全依赖项,下面给出了构建配置文件。 buildscript { ext { springBootVersion = '1.5.8.RELEASE' } repositories {
-
react-native-google-place-picker React Native Wrapper of Google Place Picker for iOS + Android. iOS Android Table of contents Install iOS Android Usage Example Response object Install npm install reac
-
本文向大家介绍react-native 启动React Native Packager,包括了react-native 启动React Native Packager的使用技巧和注意事项,需要的朋友参考一下 示例 在最新版本的React Native上,无需运行打包程序。它将自动运行。 默认情况下,这将在端口8081上启动服务器。要指定服务器所在的端口
-
InAppBrowser for React Native Provides access to the system's web browser and supports handling redirects Chrome Custom Tabs for Android & SafariServices/AuthenticationServices for iOS. Who is using I
-
百度移动统计SDK支持使用react native框架的H5页面统计,封装好的插件已经在github上开源,相关用法具体请参考:https://github.com/BaiduMobileAnalysis/baidumobstat-react-native。