
WPF实现背景灯光随鼠标闪动效果
本文实例为大家分享了WPF实现背景灯光随鼠标闪动的具体代码,供大家参考,具体内容如下
实现效果如下:
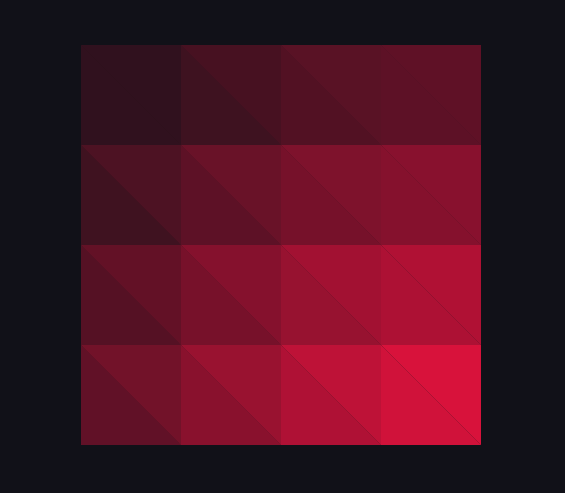
思路:将容器分割成组合三角形Path,鼠标移动时更新每个三角形的填充颜色。
步骤:
1、窗体xaml
只需放置一个Canvas。
<Canvas x:Name="container" Width="400" Height="400"></Canvas>
2、交互逻辑
/// <summary>
/// MainWindow.xaml 的交互逻辑
/// </summary>
 public partial class MainWindow : Window
 {
  private Point lastMousePosition = new Point(0, 0);//鼠标位置
  private int triangleLength = 100;//三角形边长

  public MainWindow()
  {
   InitializeComponent();
   this.Loaded += MainWindow_Loaded;
   CompositionTarget.Rendering += UpdateTriangle;
   this.container.PreviewMouseMove += UpdateLastMousePosition;
  }

  private void MainWindow_Loaded(object sender, RoutedEventArgs e)
  {
   //将长方形容易划分成组合三角形
   int horizontalCount = (int)(this.container.ActualWidth / triangleLength);
   int verticalCount = (int)(this.container.ActualHeight / triangleLength);
   for (int i = 0; i < horizontalCount; i++)
   {
    for (int j = 0; j < verticalCount; j++)
    {
     Path trianglePath1 = new Path();
     var g1 = new StreamGeometry();
     using (StreamGeometryContext context = g1.Open())
     {
      context.BeginFigure(new Point(i * triangleLength, j * triangleLength), true, true);
      context.LineTo(new Point(i * triangleLength, (j + 1) * triangleLength), true, false);
      context.LineTo(new Point((i + 1) * triangleLength, (j + 1) * triangleLength), true, false);
     }
     trianglePath1.Data = g1;
     trianglePath1.Fill = new SolidColorBrush(Color.FromArgb(255, 247, 18, 65));
     this.container.Children.Add(trianglePath1);

     Path trianglePath2 = new Path();
     var g2 = new StreamGeometry();
     using (StreamGeometryContext context = g2.Open())
     {
      context.BeginFigure(new Point(i * triangleLength, j * triangleLength), true, true);
      context.LineTo(new Point((i + 1) * triangleLength, j * triangleLength), true, false);
      context.LineTo(new Point((i + 1) * triangleLength, (j + 1) * triangleLength), true, false);
     }
     trianglePath2.Data = g2;
     trianglePath2.Fill = new SolidColorBrush(Color.FromArgb(255, 247, 18, 65));
     this.container.Children.Add(trianglePath2);
    }
   }
  }

  private void UpdateTriangle(object sender, EventArgs e)
  {
   //获取子控件
   List<Path> childList = GetChildObjects<Path>(this.container);
   for (int i = 0; i < childList.Count; i++)
   {
    for (int j = 1; j < childList.Count; j++)
    {
     string si = childList[i].Data.ToString();
     string si1 = MidStrEx(si, "M", "L");
     string si2 = MidStrEx(si, "L", " ");
     string si3 = MidStrEx(si, " ", "z");
     string sj = childList[j].Data.ToString();
     string sj1 = MidStrEx(sj, "M", "L");
     string sj2 = MidStrEx(sj, "L", " ");
     string sj3 = MidStrEx(sj, " ", "z");
     //左右三角形判断
     if (si1 == sj1 && si3 == sj3)
     {
      double x = childList[i].Data.Bounds.X + (1 - Math.Pow(2, 0.5) / 2) * triangleLength - lastMousePosition.X;
      double y = childList[i].Data.Bounds.Y + (1 - Math.Pow(2, 0.5) / 2) * triangleLength - lastMousePosition.Y;
      double rRadio = 1 - Math.Pow(x * x + y * y, 0.5) / Math.Pow(this.container.ActualWidth * this.container.ActualWidth + this.container.ActualHeight * this.container.ActualHeight, 0.5);
      childList[j].Fill = new SolidColorBrush(Color.FromArgb((byte)(255 * rRadio), 247, 18, 65));
      x = childList[j].Data.Bounds.TopRight.X - (1 - Math.Pow(2, 0.5) / 2) * triangleLength - lastMousePosition.X;
      rRadio = 1 - Math.Pow(x * x + y * y, 0.5) / Math.Pow(this.container.ActualWidth * this.container.ActualWidth + this.container.ActualHeight * this.container.ActualHeight, 0.5);
      childList[i].Fill = new SolidColorBrush(Color.FromArgb((byte)(255 * rRadio), 247, 18, 65));
      break;
     }
    }
   }
  }

  private void UpdateLastMousePosition(object sender, MouseEventArgs e)
  {
   lastMousePosition = e.GetPosition(this.container);
  }

  /// <summary>
  /// 获得所有子控件
  /// </summary>
  private List<T> GetChildObjects<T>(System.Windows.DependencyObject obj) where T : System.Windows.FrameworkElement
  {
   System.Windows.DependencyObject child = null;
   List<T> childList = new List<T>();
   for (int i = 0; i < VisualTreeHelper.GetChildrenCount(obj); i++)
   {
    child = VisualTreeHelper.GetChild(obj, i);
    if (child is T)
    {
     childList.Add((T)child);
    }
    childList.AddRange(GetChildObjects<T>(child));
   }
   return childList;
  }

  /// <summary>
  /// 截取两个指定字符中间的字符串
  /// </summary>
  public static string MidStrEx(string sourse, string startstr, string endstr)
  {
   string result = string.Empty;
   int startindex, endindex;
   try
   {
    startindex = sourse.IndexOf(startstr);
    if (startindex == -1)
     return result;
    string tmpstr = sourse.Substring(startindex + startstr.Length);
    endindex = tmpstr.IndexOf(endstr);
    if (endindex == -1)
     return result;
    result = tmpstr.Remove(endindex);
   }
   catch (Exception ex)
   {
   }
   return result;
  }
}
说明:当组合三角形过多时,会有明显卡顿,需要优化色彩更新方法。
以上就是本文的全部内容,希望对大家的学习有所帮助,也希望大家多多支持小牛知识库。
-
本文向大家介绍使用css实现闪光的霓虹灯文字效果相关面试题,主要包含被问及使用css实现闪光的霓虹灯文字效果时的应答技巧和注意事项,需要的朋友参考一下 链接
-
本文向大家介绍JavaScript实现鼠标移动粒子跟随效果,包括了JavaScript实现鼠标移动粒子跟随效果的使用技巧和注意事项,需要的朋友参考一下 本文实例为大家分享了JavaScript实现鼠标移动粒子跟随效果的具体代码,供大家参考,具体内容如下 ※ 如上图是最终显示效果,跟随鼠标的移动,生成的粒子跟随。 需要用到的js库:Underscore。Underscore是一个JavaScript
-
本文向大家介绍简单实现js鼠标跟随效果,包括了简单实现js鼠标跟随效果的使用技巧和注意事项,需要的朋友参考一下 本文实例为大家分享了js鼠标跟随效果展示的具体代码,供大家参考,具体内容如下 以上就是本文的全部内容,希望对大家的学习有所帮助,也希望大家多多支持呐喊教程。
-
自动关闭背光灯 于一定时间内没有操作后,会自动关闭液晶画面的背光灯以节省电力。关闭背光灯后,屏幕会整个变黑。 关 不自动关闭背光灯。 2分后 1分钟以后让画面变暗,再过1分钟后关闭背光灯。 5分后 1分钟以后让画面变暗,再过4分钟后关闭背光灯。 10分后 1分钟以后让画面变暗,再过9分钟后关闭背光灯。 提示 于进行以下操作时,自动关闭背光灯机能可能会暂时失效。 播放影像时 播放幻灯片秀时 聆听网上
-
自动调整背光灯 设定是否要配合影像自动调整画面的光亮度。 关 不调整画面的光亮度。 开 调整画面的光亮度以节省电力。 提示 设定为[开]时,某些影像可能会出现画像纷乱的情形。此时请设定为[关]。
-
本文向大家介绍WPF实现简单的跑马灯效果,包括了WPF实现简单的跑马灯效果的使用技巧和注意事项,需要的朋友参考一下 最近项目上要用到跑马灯的效果,和网上不太相同的是,网上大部分都是连续的,而我们要求的是不连续的。 也就是是,界面上就展示4项(展示项数可变),如果有7项要展示的话,则不断的在4个空格里左跳,当然,衔接上效果不是很好看。 然后,需要支持点击以后进行移除掉不再显示的内容。 效果如下: 思