
Android实现底部弹出的对话框功能

环境:
- 主机:WIN10
- 开发环境:Android Studio 2.2 Preview 3
说明:
两种方法实现底部弹出的对话框:
- Dialog
- DialogFragment
推荐用DialogFragment
效果图:
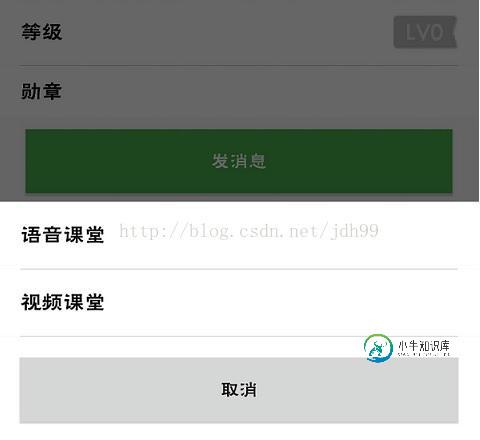
布局文件dialog_select_call.xml:
<?xml version="1.0" encoding="utf-8"?>
<LinearLayout xmlns:android="http://schemas.android.com/apk/res/android"
  android:orientation="vertical" android:layout_width="match_parent"
  android:layout_height="match_parent">

  <RelativeLayout
    android:id="@+id/layout_voice"
    android:layout_width="match_parent"
    android:layout_height="wrap_content"
    android:background="@color/white">

    <TextView
      android:layout_width="wrap_content"
      android:layout_height="wrap_content"
      android:layout_alignParentStart="true"
      android:layout_centerInParent="true"
      android:textSize="16sp"
      android:textColor="@color/black"
      android:layout_marginLeft="16dp"
      android:layout_marginRight="16dp"
      android:layout_marginTop="16dp"
      android:layout_marginBottom="16dp"
      android:text="语音课堂"/>
  </RelativeLayout>

  <View
    android:layout_width="fill_parent"
    android:layout_height="0.1dp"
    android:background="#b4b4b4"
    android:layout_marginLeft="16dp"
    android:layout_marginRight="16dp"/>

  <RelativeLayout
    android:id="@+id/layout_video"
    android:layout_width="match_parent"
    android:layout_height="wrap_content"
    android:background="@color/white">

    <TextView
      android:layout_width="wrap_content"
      android:layout_height="wrap_content"
      android:layout_alignParentStart="true"
      android:layout_centerInParent="true"
      android:textSize="16sp"
      android:textColor="@color/black"
      android:layout_marginLeft="16dp"
      android:layout_marginRight="16dp"
      android:layout_marginTop="16dp"
      android:layout_marginBottom="16dp"
      android:text="视频课堂"/>
  </RelativeLayout>

  <View
    android:layout_width="fill_parent"
    android:layout_height="0.1dp"
    android:background="#b4b4b4"
    android:layout_marginLeft="16dp"
    android:layout_marginRight="16dp"/>

  <RelativeLayout
    android:layout_width="match_parent"
    android:layout_height="wrap_content"
    android:background="@color/white">

    <Button
      android:id="@+id/cancel"
      android:layout_width="match_parent"
      android:layout_height="wrap_content"
      android:text="取消"
      android:layout_marginLeft="16dp"
      android:layout_marginRight="16dp"
      android:layout_marginTop="16dp"
      android:layout_marginBottom="16dp"/>
  </RelativeLayout>

</LinearLayout>
Dialog实现源码:
初始化:
private void dialogSelectCallInit() {
    dialogSelectCall = new Dialog(this, R.style.DialogPopBottom);
    View inflate = LayoutInflater.from(this).inflate(R.layout.dialog_select_call, null);
    dialogSelectCall.setContentView(inflate);

    Window dialogWindow = dialogSelectCall.getWindow();
    dialogWindow.setGravity(Gravity.BOTTOM);

    WindowManager.LayoutParams lp = dialogWindow.getAttributes();
    lp.x = 0;
    lp.y = 0;
    lp.width = getResources().getDisplayMetrics().widthPixels;
    dialogWindow.setAttributes(lp);

    RelativeLayout layoutVoice = (RelativeLayout) inflate.findViewById(R.id.layout_voice);
    RelativeLayout layoutVideo = (RelativeLayout) inflate.findViewById(R.id.layout_video);
    Button buttonCancel = (Button) inflate.findViewById(R.id.cancel);

    RxView.clicks(layoutVoice)
        .throttleFirst(2, TimeUnit.SECONDS)
        .compose(this.bindUntilEvent(ActivityEvent.DESTROY))
        .subscribe(v -> {
//          dialogSelectCall.cancel();
          VoiceSessionActivity.startActivityCallOut(this, userId);
        });

    RxView.clicks(layoutVideo)
        .throttleFirst(2, TimeUnit.SECONDS)
        .compose(this.bindUntilEvent(ActivityEvent.DESTROY))
        .subscribe(v -> {
//          dialogSelectCall.cancel();
//          VideoSessionActivity.startActivityCallOut(this, userId);
        });

    RxView.clicks(buttonCancel)
        .throttleFirst(2, TimeUnit.SECONDS)
        .compose(this.bindUntilEvent(ActivityEvent.DESTROY))
        .subscribe(v -> dialogSelectCall.cancel());

    RxView.touches(layoutVoice, motionEvent -> {
      dealLayoutTouch(layoutVoice, motionEvent);
      return false;
    }).compose(this.bindUntilEvent(ActivityEvent.DESTROY)).subscribe(motionEvent -> {});

    RxView.touches(layoutVideo, motionEvent -> {
      dealLayoutTouch(layoutVideo, motionEvent);
      return false;
    }).compose(this.bindUntilEvent(ActivityEvent.DESTROY)).subscribe(motionEvent -> {});
  }

  private void dealLayoutTouch(View v, MotionEvent event) {
    switch (event.getAction()) {
      case MotionEvent.ACTION_DOWN:
        v.setBackgroundColor(Color.rgb(200, 200, 200));
        break;
      case MotionEvent.ACTION_UP:
        v.setBackgroundColor(Color.WHITE);
        break;
    }
  }
显示对话框:
dialogSelectCall.show()
DialogFragment实现源码:
定义了一个类SelectCallDialog.Java继承DialogFragment
package com.bazhangkeji.classroom.common;

import android.app.Dialog;
import android.app.FragmentManager;
import android.graphics.Color;
import android.os.Bundle;
import android.support.annotation.NonNull;
import android.view.Gravity;
import android.view.LayoutInflater;
import android.view.MotionEvent;
import android.view.View;
import android.view.ViewGroup;
import android.view.Window;
import android.view.WindowManager;
import android.widget.Button;
import android.widget.RelativeLayout;

import com.bazhangkeji.classroom.R;
import com.bazhangkeji.classroom.session.VideoSessionActivity;
import com.bazhangkeji.classroom.session.VoiceSessionActivity;
import com.jakewharton.rxbinding2.view.RxView;
import com.trello.rxlifecycle2.android.FragmentEvent;
import com.trello.rxlifecycle2.components.RxDialogFragment;


import java.util.concurrent.TimeUnit;

public class SelectCallDialog extends RxDialogFragment {
  private Dialog dialog;
  private String userId;

  /**
   * 初始化.必须调用一次
   * @param userId: 目标用户id
   */
  public void init(String userId) {
    this.userId = userId;
  }

  @NonNull
  @Override
  public Dialog onCreateDialog(Bundle savedInstanceState) {
    dialog = new Dialog(getActivity(), R.style.DialogPopBottom);

    View inflate = LayoutInflater.from(getActivity()).inflate(R.layout.dialog_select_call, null);
    dialog.setContentView(inflate);
    dialog.setCanceledOnTouchOutside(true);

    Window window = dialog.getWindow();
    WindowManager.LayoutParams lp = window.getAttributes();
    lp.gravity = Gravity.BOTTOM;
    lp.width = WindowManager.LayoutParams.MATCH_PARENT;
    window.setAttributes(lp);

    RelativeLayout layoutVoice = (RelativeLayout) inflate.findViewById(R.id.layout_voice);
    RelativeLayout layoutVideo = (RelativeLayout) inflate.findViewById(R.id.layout_video);
    Button buttonCancel = (Button) dialog.findViewById(R.id.cancel);

    RxView.clicks(layoutVoice)
        .throttleFirst(2, TimeUnit.SECONDS)
        .compose(this.bindUntilEvent(FragmentEvent.DESTROY))
        .subscribe(v -> {
          dialog.cancel();
          VoiceSessionActivity.startActivityCallOut(getActivity(), userId);
        });

    RxView.clicks(layoutVideo)
        .throttleFirst(2, TimeUnit.SECONDS)
        .compose(this.bindUntilEvent(FragmentEvent.DESTROY))
        .subscribe(v -> {
          dialog.cancel();
          VideoSessionActivity.startActivityCallOut(getActivity(), userId);
        });

    RxView.clicks(buttonCancel)
        .throttleFirst(2, TimeUnit.SECONDS)
        .compose(this.bindUntilEvent(FragmentEvent.DESTROY))
        .subscribe(v -> dialog.cancel());

    RxView.touches(layoutVoice, motionEvent -> {
      dealLayoutTouch(layoutVoice, motionEvent);
      return false;
    }).compose(this.bindUntilEvent(FragmentEvent.DESTROY)).subscribe(motionEvent -> {});

    RxView.touches(layoutVideo, motionEvent -> {
      dealLayoutTouch(layoutVideo, motionEvent);
      return false;
    }).compose(this.bindUntilEvent(FragmentEvent.DESTROY)).subscribe(motionEvent -> {});

    return dialog;
  }

  private void dealLayoutTouch(View v, MotionEvent event) {
    switch (event.getAction()) {
      case MotionEvent.ACTION_DOWN:
        v.setBackgroundColor(Color.rgb(200, 200, 200));
        break;
      case MotionEvent.ACTION_UP:
        v.setBackgroundColor(Color.WHITE);
        break;
    }
  }
}
显示对话框前初始化参数:
selectCallDialog.init(userId);
显示对话框后:
selectCallDialog.show(getFragmentManager(), "");
以上就是本文的全部内容,希望对大家的学习有所帮助,也希望大家多多支持小牛知识库。
-
本文向大家介绍Android实现从底部弹出的Dialog示例(一),包括了Android实现从底部弹出的Dialog示例(一)的使用技巧和注意事项,需要的朋友参考一下 一.概述 先给大家看一下效果图: 点击中间的显示弹框按钮,从底部弹出来一个对话框,用户可以点击拍照或者从相册选择进行相应的操作,下面看看怎么实现。 二.代码实现 主页面布局文件,很简单,一个按钮,响应点击事件: 接下来看对话框的布局
-
本文向大家介绍Android实现底部弹窗效果,包括了Android实现底部弹窗效果的使用技巧和注意事项,需要的朋友参考一下 本文实例为大家分享了Android实现底部弹窗效果的具体代码,供大家参考,具体内容如下 源代码地址:https://github.com/luoye123/Box 东西很简单,我就直接亮代码了: 1、activity_main.xml 2、MainActivity.java
-
本文向大家介绍Android AlertDialog实现分享对话框/退出对话框/下载对话框,包括了Android AlertDialog实现分享对话框/退出对话框/下载对话框的使用技巧和注意事项,需要的朋友参考一下 一.摘要 弹窗通常用于提示用户进行某种操作,比如:点击分享按钮,弹窗分享对话框;双击返回按钮,弹窗退出对话框;下载文件,提示下载对话框等等,分享对话框/退出对话框/下载对话框,都可以直
-
本文向大家介绍Android仿QQ消息提示实现弹出式对话框,包括了Android仿QQ消息提示实现弹出式对话框的使用技巧和注意事项,需要的朋友参考一下 本文在《7种形式的Android Dialog使用实例》在这篇文章的基础进行学习,具体内容如下 1.概述 android原生控件向来以丑著称(新推出的Material Design当另说),因此几乎所有的应用都会特殊定制自己的UI样式。而其中弹
-
本文向大家介绍Android 自定义弹出菜单和对话框功能实例代码,包括了Android 自定义弹出菜单和对话框功能实例代码的使用技巧和注意事项,需要的朋友参考一下 Android 开发当中,可能会存在许多自定义布局的需求,比如自定义弹出菜单(popupWindow),以及自定义对话框(Dialog)。 话不多说,直接上图片。 先讲第一种,自定义PopUpWindow 1.popupWindow
-
本文向大家介绍Android实现网络加载时的对话框功能,包括了Android实现网络加载时的对话框功能的使用技巧和注意事项,需要的朋友参考一下 效果预览 简要说明 现在android程序网络请求操作是必不可少的,然而拥有好的交互体验的程序对网络耗时操作的处理尤为重要。 代码说明: dialog_loading.xml 这个布局就是我们自定义的显示布局,比较简单明了,最外层一个垂直排列的线性布局,里