
Android实现底部导航栏功能

本文实例为大家分享了Android实现底部导航栏功能的具体代码,供大家参考,具体内容如下
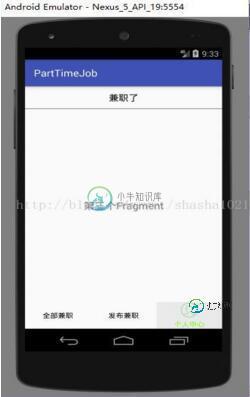
实验效果:
(1)在drawable文件夹下新建tab_menu_bg.xml文件,具体代码如下:
<?xml version="1.0" encoding="utf-8"?>
<selector xmlns:android="http://schemas.android.com/apk/res/android">
  <item android:state_selected="true">
    <shape>
      <solid android:color="@color/bg_gray"/>
    </shape>
  </item>
</selector>
(2)在drawable文件夹下新建tab_menu_text.xml文件,具体代码如下:
<?xml version="1.0" encoding="utf-8"?>
<selector xmlns:android="http://schemas.android.com/apk/res/android">
  <item android:color="@color/text_green" android:state_selected="true"/>
  <item android:color="@color/text_black" />
</selector>
(3)在drawable文件夹下新建tab_menu_personal.xml文件,具体代码如下:
<?xml version="1.0" encoding="utf-8"?>
<selector xmlns:android="http://schemas.android.com/apk/res/android">
  <item android:drawable="@mipmap/menu_personal_on" android:state_selected="true"/>
  <item android:drawable="@mipmap/menu_personal_off"/>
</selector>
(4)在drawable文件夹下新建tab_menu_send.xml文件,具体代码如下:
<?xml version="1.0" encoding="utf-8"?>
<selector xmlns:android="http://schemas.android.com/apk/res/android">
  <item android:drawable="@mipmap/menu_send_on" android:state_selected="true"/>
  <item android:drawable="@mipmap/menu_send_off"/>
</selector>
(5)在drawable文件夹下新建tab_menu_list.xml文件,具体代码如下:
<?xml version="1.0" encoding="utf-8"?>
<selector xmlns:android="http://schemas.android.com/apk/res/android">
  <item android:drawable="@mipmap/menu_send_on" android:state_selected="true"/>
  <item android:drawable="@mipmap/menu_send_off"/>
</selector>
(6)在layout文件夹下的activity_main.xml中具体代码如下:
<?xml version="1.0" encoding="utf-8"?>
<RelativeLayout xmlns:android="http://schemas.android.com/apk/res/android"
  xmlns:tools="http://schemas.android.com/tools"
  android:id="@+id/activity_main"
  android:layout_width="match_parent"
  android:layout_height="match_parent"
  tools:context="com.bzu.fshiner.parttimejob.MainActivity">
  <RelativeLayout
    android:id="@+id/tab_title"
    android:layout_width="match_parent"
    android:layout_height="48dp">
    <TextView
      android:id="@+id/tv_top"
      android:layout_width="match_parent"
      android:layout_height="match_parent"
      android:gravity="center"
      android:textSize="18sp"
      android:textColor="@color/text_black"
      android:text="@string/tv_top"/>
    <View
      android:layout_width="match_parent"
      android:layout_height="2px"
      android:background="@color/text_black"
      android:layout_alignParentBottom="true"/>
  </RelativeLayout>
  <LinearLayout
    android:id="@+id/tab_menu"
    android:layout_width="match_parent"
    android:layout_height="56dp"
    android:orientation="horizontal"
    android:layout_alignParentBottom="true">
    <TextView
      android:id="@+id/tv_list"
      android:layout_width="0dp"
      android:layout_height="match_parent"
      android:layout_weight="1"
      android:drawablePadding="3dp"
      android:gravity="center"
      android:background="@drawable/tab_menu_bg"
      android:textColor="@drawable/tab_menu_text"
      android:drawableTop="@drawable/tab_menu_list"
      android:text="@string/tv_list"/>
    <TextView
      android:id="@+id/tv_send"
      android:layout_width="0dp"
      android:layout_height="match_parent"
      android:layout_weight="1"
      android:drawablePadding="3dp"
      android:gravity="center"
      android:background="@drawable/tab_menu_bg"
      android:textColor="@drawable/tab_menu_text"
      android:drawableTop="@drawable/tab_menu_send"
      android:text="@string/tv_send"/>
    <TextView android:id="@+id/tv_personal"
      android:layout_width="0dp"
      android:layout_height="match_parent"
      android:layout_weight="1"
      android:drawablePadding="3dp"
      android:gravity="center"
      android:background="@drawable/tab_menu_bg"
      android:textColor="@drawable/tab_menu_text"
      android:drawableTop="@drawable/tab_menu_personal"
      android:text="@string/tv_personal"/>
   </LinearLayout>
   <View
     android:id="@+id/div_tab_bar"
     android:layout_width="match_parent"
     android:layout_height="2px"
     android:layout_above="@id/tab_menu"/>
   <FrameLayout
     android:id="@+id/fragment_container"
     android:layout_width="match_parent"
     android:layout_height="match_parent"
     android:layout_below="@id/tab_title"
     android:layout_above="@id/tab_menu">
   </FrameLayout>
</RelativeLayout>
(7)在layout文件夹中新建first_fragment.xml文件,具体代码如下:
<?xml version="1.0" encoding="utf-8"?>
<LinearLayout xmlns:android="http://schemas.android.com/apk/res/android"
  android:orientation="vertical"
  android:layout_width="match_parent"
  android:layout_height="match_parent">
  <TextView
    android:id="@+id/tv_content"
    android:layout_width="match_parent"
    android:layout_height="match_parent"
    android:gravity="center"
    android:text="哈哈"
    android:textSize="20sp"/>

</LinearLayout>
(8)在MainActivity中具体代码如下:
package com.bzu.fshiner.parttimejob;

import android.os.Bundle;
import android.support.v7.app.AppCompatActivity;
import android.view.View;
import android.widget.FrameLayout;
import android.widget.TextView;

public class MainActivity extends AppCompatActivity implements View.OnClickListener {
  private TextView tv_top;
  private TextView tv_list;
  private TextView tv_send;
  private TextView tv_personal;
  private FrameLayout fragment_container;
  private FirstFragment f1,f2,f3;

  @Override
  protected void onCreate(Bundle savedInstanceState) {
    super.onCreate(savedInstanceState);
    setContentView(R.layout.activity_main);
    //ui组件初始化与事件绑定
    tv_top=(TextView)this.findViewById(R.id.tv_top);
    tv_list=(TextView)this.findViewById(R.id.tv_list);
    tv_send=(TextView)this.findViewById(R.id.tv_send);
    tv_personal=(TextView)this.findViewById(R.id.tv_personal);
    fragment_container=(FrameLayout)findViewById(R.id.fragment_container);
    tv_list.setOnClickListener(this);
    tv_send.setOnClickListener(this);
    tv_personal.setOnClickListener(this);
  }
  //重置所有文本的选中状态
  public void selected(){
    tv_list.setSelected(false);
    tv_send.setSelected(false);
    tv_personal.setSelected(false);
  }

  //隐藏所有的Fragment
  private void hideAllFragment(android.app.FragmentTransaction transaction) {
    if(f1!=null){
      transaction.hide(f1);
    }
    if(f2!=null){
      transaction.hide(f2);
    }
    if(f3!=null){
      transaction.hide(f3);
    }
  }
  @Override
  public void onClick(View view){
    android.app.FragmentTransaction transaction=getFragmentManager().beginTransaction();
    hideAllFragment(transaction);
    switch(view.getId()){
      case R.id.tv_list:
        selected();
        tv_list.setSelected(true);
        if(f1==null){
          f1 = new FirstFragment("第一个Fragment");
          transaction.add(R.id.fragment_container,f1);
        }else{
          transaction.show(f1);
        }
        break;

      case R.id.tv_send:
        selected();
        tv_send.setSelected(true);
        if(f2==null){
          f2 = new FirstFragment("第2个Fragment");
          transaction.add(R.id.fragment_container,f2);
        }else{
          transaction.show(f2);
        }
        break;

      case R.id.tv_personal:
        selected();
        tv_personal.setSelected(true);
        if(f3==null){
          f3 = new FirstFragment("第三个Fragment");
          transaction.add(R.id.fragment_container,f3);
        }else{
          transaction.show(f3);
        }
        break;
    }
    transaction.commit();
  }

}
(9)创建类,类名为FistFragment,其中具体代码如下:
package com.bzu.fshiner.parttimejob;

import android.app.Fragment;
import android.os.Bundle;
import android.view.LayoutInflater;
import android.view.View;
import android.view.ViewGroup;
import android.widget.TextView;

/**
 * Created by Administrator on 2017/5/9.
 */

public class FirstFragment extends Fragment {
  private String context;
  private TextView textView;

  public FirstFragment(String context) {
    this.context = context;
  }
  public View onCreateView(LayoutInflater inflater, ViewGroup container,Bundle savedInstanceState){
    View view=inflater.inflate(R.layout.first_fragment,container,false);
    textView=(TextView)view.findViewById(R.id.tv_content);
    textView.setText(context);
    return view;
  }
}
以上就是本文的全部内容,希望对大家的学习有所帮助,也希望大家多多支持小牛知识库。
-
本文向大家介绍android实现底部导航栏,包括了android实现底部导航栏的使用技巧和注意事项,需要的朋友参考一下 底部导航栏我选择用FragmentTabHost+Fragment来实现,这个方法比较好用,代码量也不多 首先是开始的activity_main.xml 也可以直接在xml文件里面写 这xml文件就一个view加一个tab view用来显示碎片,tab用来放置底部按钮的数量 再
-
本文向大家介绍Flutter实现底部导航栏,包括了Flutter实现底部导航栏的使用技巧和注意事项,需要的朋友参考一下 本文实例为大家分享了Flutter实现底部导航栏的具体代码,供大家参考,具体内容如下 效果 实现 先将自动生成的main.dart里面的代码删除, 创建app.dart作为首页的页面文件 创建today.dart、kb.dart、playground.dart三个页面文件作为ta
-
本文向大家介绍Android使用BottomNavigationBar实现底部导航栏,包括了Android使用BottomNavigationBar实现底部导航栏的使用技巧和注意事项,需要的朋友参考一下 本文实例为大家分享了Android实现底部导航栏的具体代码,供大家参考,具体内容如下 展示 MODE_FIXED+BACKGROUND_STYLE_STATIC效果 DE_FIXED+BACKGR
-
本文向大家介绍Android实现底部导航栏的主界面,包括了Android实现底部导航栏的主界面的使用技巧和注意事项,需要的朋友参考一下 在主流app中,应用的主界面都是底部含有多个标签的导航栏,点击可以切换到相应的界面,如图: 接下来将描述下其实现过程。 1.首先是分析界面,底部导航栏我们可以用一个占满屏幕宽度、包裹着数个标签TextView、方向为横向horizontal的线性布局LinearL
-
本文向大家介绍Flutter实现底部导航栏效果,包括了Flutter实现底部导航栏效果的使用技巧和注意事项,需要的朋友参考一下 大家最近都在讨论新鲜技术-flutter,小编也在学习中,遇到大家都遇到的问题,底部导航。下面给大家贴出底部导航的编写,主要参考了lime这个项目。 上代码 一.在main.dart文件中 定义APP的基本信息 其中主要代码部分 其中,各个页面的主要声明 底部导航栏的内容
-
本文向大家介绍Android实现顶部底部双导航界面功能,包括了Android实现顶部底部双导航界面功能的使用技巧和注意事项,需要的朋友参考一下 最近想弄一个双导航功能,查看了许多资料,总算是实现了功能,这边就算是给自己几个笔记吧! 先来看看效果 那么就开始实现了! 底部导航栏我选择用FragmentTabHost+Fragment来实现,这个方法我觉得挺好用的,代码量也不多 首先是开始的acti