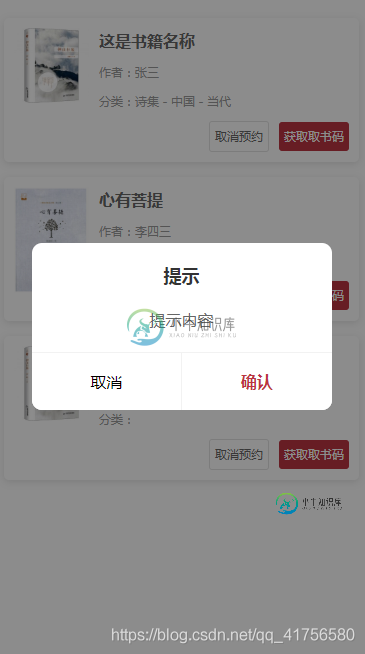
vue插件--仿微信小程序showModel实现模态提示窗功能
效果图:

下面是源码:
index.js
import Vue from 'vue';
import model from './model.vue';


export default {
 install(Vue) {

 const defaults = {
  show: false,
  mask: true,
  title: '提示',
  content: '这是正文',
  confirmButton: true,
  cancelButton: true,
  confirmText: '确认',
  cancelText: '取消',
  cancelCallBack: () => {},
  confirmCallBack: () => {}
 };

 const modelVueConstructor = Vue.extend(model);

 Vue.prototype.$model = (options = {}) => {
  if (Vue.prototype.$isServer) return;
  options = Object.assign({}, defaults, options);
  let parent = document.body ;
  let instance = new modelVueConstructor({
  el: document.createElement('div'),
  data: options
  });
  parent.appendChild(instance.$el);

  return instance;
 };

 },
};
model.vue
<template>
 <div v-if="show" class="model-container">
 <div class="model-main">
  <div class="model-title">{{title}}</div>
  <div class="model-content" v-html="content"></div>
  <div class="model-buttons">
  <button v-if="cancelButton" @click="cancelClick" class="button">{{cancelText}}</button>
  <button v-if="confirmButton" @click="confirmClick" class="button confirm">{{confirmText}}</button>
  </div>
 </div>
 <div v-show="mask" class="model-mask"></div>
 </div>

</template>

<script type="text/babel">
 export default {
 data() {
 return {
 show: false,
 mask: true,
 title: '提示',
 content: '这是正文',
 confirmButton: true,
 cancelButton: true,
 confirmText: '确认',
 cancelText: '取消',
 cancelCallBack: () => {},
 confirmCallBack: () => {}
 };
 },
 methods: {
 cancelClick(){
  this.show = false;
  this.cancelCallBack();
 },
 confirmClick(){
  this.show = false;
  this.confirmCallBack();
 }
 }
 };
</script>
<style lang="less" scoped>
 .model-container{
 width: 100%;
 height: 100vh;
 position: fixed;
 top: 0;
 left: 0;
 z-index: var(--model-index);
 display: flex;
 justify-content: center;
 align-items: center;
 .model-main{
  position: relative;
  z-index: 9;
  width: 80%;
  background-color: #ffffff;
  border-radius: 10px;
  overflow: hidden;
  text-align: center;
  .model-title{
  font-size: 18px;
  color: #333;
  width: 100%;
  padding: 18px;
  font-weight: bold;
  overflow: hidden;
  white-space: nowrap;
  text-overflow: ellipsis;
  }
  .model-content{
  font-size: 16px;
  color: #666;
  padding: 10px;
  padding-top: 0px;
  padding-bottom: 20px;
  }
  .model-buttons{
  width: 100%;
  display: flex;
  align-items: center;
  .button{
   flex: 1;
   padding: 18px 10px;
   overflow: hidden;
   white-space: nowrap;
   text-overflow: ellipsis;
   font-size: 16px;
   outline: none;
   background-color: #ffffff;
   border-top: 1px solid #f2f2f2;
   border-right: 1px solid #f2f2f2;
   &.confirm{
   color: var(--theme);
   font-weight: bold;
   }
   &:last-child{
   border-right: 0;
   }
   &:active{
   background-color: #f2f2f2;
   }
  }
  }
 }
 .model-mask{
  width: 100%;
  height: 100%;
  position: absolute;
  top: 0;
  left: 0;
  z-index: 1;
  background-color: rgba(0,0,0,0.45);
 }
 }
</style>
通过添加实例方法,把插件添加到vue.prototype上来实现。
在使用之前需要将插件挂载到Vue全局实例上:
main.js
import VueModel from './components/model/index.js';
Vue.use(VueModel);
完成上述条件后,就可以在你的vue项目中使用啦:
this.$model({
 show: true,
 title: "提示",
 content: "提示内容",
 cancelButton: true,
 confirmCallBack: () => {
 console.log("确认");
 },
 cancelCallBack: () => {
 console.log("取消");
 }
});
总结
到此这篇关于vue插件--仿微信小程序showModel实现模态提示窗的文章就介绍到这了,更多相关微信小程序showModel实现模态提示窗内容请搜索小牛知识库以前的文章或继续浏览下面的相关文章希望大家以后多多支持小牛知识库!
-
本文向大家介绍微信小程序实现拖拽功能,包括了微信小程序实现拖拽功能的使用技巧和注意事项,需要的朋友参考一下 总结 以上所述是小编给大家介绍的微信小程序实现拖拽功能,希望对大家有所帮助,如果大家有任何疑问请给我留言,小编会及时回复大家的。在此也非常感谢大家对呐喊教程网站的支持! 如果你觉得本文对你有帮助,欢迎转载,烦请注明出处,谢谢!
-
本文向大家介绍微信小程序实现签字功能,包括了微信小程序实现签字功能的使用技巧和注意事项,需要的朋友参考一下 效果展示 准备工作 1.canvas的使用 主要用到了 bindtouchstart , bindtouchmove 两个属性,捕捉手指移动的同时,将移动前的坐标和移动后的坐标用canvas的画图api绘制出来 2.wx.createCanvasContext 这个api用于创建并获取指
-
本文向大家介绍微信小程序实现留言功能,包括了微信小程序实现留言功能的使用技巧和注意事项,需要的朋友参考一下 需求:留言可以点赞,点过赞之后图标变化,没人只能点赞一次,留言可以在留言 index.wxml 主要的wxss代码(用于点赞的展示,实现小手、空心小手) js 从后台传过来的数据 留言里面的留言 js 点击我要留言 留言点赞 点赞返回的为点赞人的id 其中所得View初始化全部为false
-
本文向大家介绍微信小程序中悬浮窗功能的实现代码,包括了微信小程序中悬浮窗功能的实现代码的使用技巧和注意事项,需要的朋友参考一下 问题场景 所谓悬浮窗就是图中微信图标的按钮,采用fixed定位,可拖动和点击。 这算是一个比较常见的实现场景了。 为什么要用cover-view做悬浮窗?原生组件出来背锅了~ 最初我做悬浮窗用的不是cover-view,而是view。 这是简化的代码结构: 为什么要用co
-
本文向大家介绍微信小程序常用的3种提示弹窗实现详解,包括了微信小程序常用的3种提示弹窗实现详解的使用技巧和注意事项,需要的朋友参考一下 1. 表示操作成功,文字上方会显示一个表示操作成功的图标。 2.表示加载中,显示为加载中图标。 3.不显示图标,一般用作提示。 以上3种弹窗均使用wx.showToast接口,调用后会根据设定的duration停留一定时间。 此外,表示加载中的弹窗还可以使用wx.
-
本文向大家介绍微信小程序 仿猫眼实现实例代码,包括了微信小程序 仿猫眼实现实例代码的使用技巧和注意事项,需要的朋友参考一下 微信小程序仿猫眼 实现效果图: movie.js movie.json movie.wxml movie.wxss 感谢阅读,希望能帮助到大家,谢谢大家对本站的支持!

