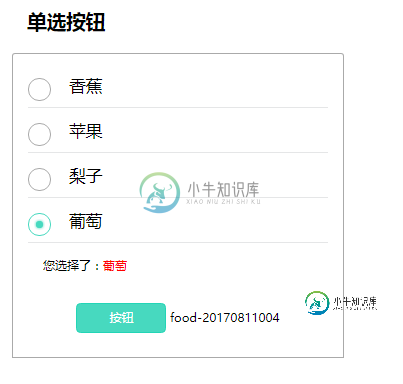
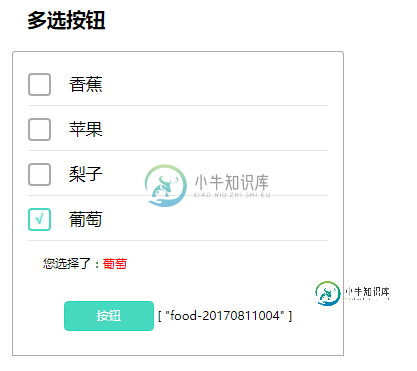
vue实现单选和多选功能
本文实例为大家分享了vue实现单选和多选功能的具体代码,供大家参考,具体内容如下复制代码
<!DOCTYPE html>
<html lang="en">

<head>
 <meta charset="UTF-8">
 <meta>
 <title>Document</title>
 <script src="../vue.js"></script>
 <style>
  ul, li {
   list-style-type: none;
  }

  * {
   margin: 0;
   padding: 0;
  }

  .border-1px {
   position: relative;
  }

  .border-1px:after {
   display: block;
   position: absolute;
   left: 0;
   bottom: 0;
   width: 100%;
   border-top: 1px solid rgba(7, 17, 27, .1);
   content: ' ';
  }

  @media (-webkit-min-device-pixel-ratio: 1.5),(min-device-pixel-ratio: 1.5) {
   .border-1px::after {
    -webkit-transform: scaleY(0.7);
    transform: scaleY(0.7);
   }
  }

  @media (-webkit-min-device-pixel-ratio: 2),(min-device-pixel-ratio: 2) {
   .border-1px ::after {
    -webkit-transform: scaleY(0.5);
    transform: scaleY(0.5);
   }
  }

  #example {
   margin: 20px;
  }

  h3 {
   font-size: 26px;
   margin-left: 20px;
   height: 60px;
  }

  .self-radio {
   display: none;
  }

  .self-radio + label {
   -webkit-appearance: none;
   background-color: #fff;
   border: 1px solid #aaa;
   border-radius: 50px;
   display: inline-block;
   position: relative;
   width: 30px;
   height: 30px;
   box-sizing: border-box;
  }

  .self-radio:checked + label {
   border: 1px #47d9bf solid;
  }

  .self-radio:checked + label:after {
   position: absolute;
   top: 9px;
   left: 9px;
   content: ' ';
   width: 10px;
   height: 10px;
   border-radius: 50px;
   background: #47d9bf;
   box-shadow: 0px 0px 5px 0px #47d9bf;
  }

  .check-area {
   display: inline-block;
   width: 400px;
   padding: 12px 20px;
   border: 1px solid #aaa;
   border-top-left-radius: 4px;
   border-top-right-radius: 4px;
  }

  li {
   height: 60px;
  }

  li .self-radio + label {
   vertical-align: middle;
  }

  li span {
   margin-left: 20px;
   display: inline-block;
   line-height: 60px;
   font-size: 22px;
  }

  p {
   height: 60px;
   line-height: 60px;
   margin-left: 20px;
  }

  p span {
   color: #f00;
  }

  .btn {
   margin: 20px auto;
   width: 100%;
   text-align: center;
  }

  .btn button {
   width: 120px;
   height: 40px;
   line-height: 30px;
   font-size: 16px;
   color: #fff;
   background: #47d9bf;
   border: 1px #23d5b6 solid;
   border-radius: 6px;
   text-align: center;
   outline: none;
  }

  .btn button:hover {
   background: #23d5b6;
  }
 </style>
</head>

<body>
<div id="example">
 <h3>单选按钮</h3>
 <div class="check-area" v-show="items.length!=0">
  <ul>
   <li class="border-1px" v-for="(item,index) in items">
    <input class="self-radio" type="radio"
      :id="'radio-'+item.id"
      :data-id="'food-'+item.id" name="radio"
      :checked="index==0"
      :value="item.value"
      v-model="checkValue">
    <label :for="'radio-'+item.id" @click="setCheckValue(item)"></label>
    <span>{{item.value}}</span>
   </li>
  </ul>
  <p>您选择了:<span>{{checkValue}}</span></p>
  <div class="btn">
   <button @click="showCheck(checkId)">按钮</button>
   <span>{{checkId}}</span>
  </div>
 </div>
</div>
<script>
 var itemData = [{id: '20170811001', value: '香蕉'},
  {id: '20170811002', value: '苹果'},
  {
   id: '20170811003',
   value: '梨子'
  }, {id: '20170811004', value: '葡萄'}]
 //itemData = [];
 var vm = new Vue({
  el: '#example',
  data: {
   items: '',
   checkValue: '',
   checkId: ''
  },
  methods: {
   init: function () {

   },
   initData: function () {
    var self = this;
    self.items = itemData;
    if (itemData.length != 0) {
     self.checkValue = self.items[0].value;
     self.checkId = 'food-' + self.items[0].id
    }
   },
   setCheckValue: function (item) {
    this.checkId = 'food-' + item.id;
   }
   ,
   showCheck: function () {
    console.log(this.checkId)
   }
  },
  mounted: function () {
   this.initData();
  }
 })

</script>
</body>

</html>

vue实现多选功能
<!DOCTYPE html>
<html lang="en">

<head>
 <meta charset="UTF-8">
 <meta>
 <title>Document</title>
 <script src="../vue.js"></script>
 <style>
 ul, li {
  list-style-type: none;
 }

 * {
  margin: 0;
  padding: 0;
 }

 .border-1px {
  position: relative;
 }

 .border-1px:after {
  display: block;
  position: absolute;
  left: 0;
  bottom: 0;
  width: 100%;
  border-top: 1px solid rgba(7, 17, 27, .1);
  content: ' ';
 }

 @media (-webkit-min-device-pixel-ratio: 1.5),(min-device-pixel-ratio: 1.5) {
  .border-1px::after {
  -webkit-transform: scaleY(0.7);
  transform: scaleY(0.7);
  }
 }

 @media (-webkit-min-device-pixel-ratio: 2),(min-device-pixel-ratio: 2) {
  .border-1px ::after {
  -webkit-transform: scaleY(0.5);
  transform: scaleY(0.5);
  }
 }

 #example {
  margin: 20px;
 }

 h3 {
  font-size: 26px;
  margin-left: 20px;
  height: 60px;
 }

 .self-checkbox {
  display: none;
 }

 .self-checkbox + label {
  margin-top: 16px;
  -webkit-appearance: none;
  background-color: #fff;
  border: 2px solid #aaa;
  border-radius: 5px;
  display: inline-block;
  position: relative;
  width: 30px;
  height: 30px;
  box-sizing: border-box;
  vertical-align: top;
 }

 .self-checkbox:checked + label {
  border: 2px #47d9bf solid;
 }

 .self-checkbox:checked + label:after {
  display: inline-block;
  text-align: center;
  content: '√';
  width: 100%;
  height: 30px;
  line-height: 26px;
  color: #47d9bf;
  font-size: 18px;
  text-shadow: 0px 0px 5px #47d9bf;
 }

 .check-area {
  display: inline-block;
  width: 400px;
  padding: 12px 20px;
  border: 1px solid #aaa;
  border-top-left-radius: 4px;
  border-top-right-radius: 4px;
 }

 li {
  height: 60px;
 }

 li .self-radio + label {
  vertical-align: middle;
 }

 li span {
  margin-left: 20px;
  display: inline-block;
  line-height: 60px;
  font-size: 22px;
 }

 p {
  height: 60px;
  line-height: 60px;
  margin-left: 20px;
 }

 p span {
  color: #f00;
 }

 .btn {
  margin: 20px auto;
  width: 100%;
  text-align: center;
 }

 .btn button {
  width: 120px;
  height: 40px;
  line-height: 30px;
  font-size: 16px;
  color: #fff;
  background: #47d9bf;
  border: 1px #23d5b6 solid;
  border-radius: 6px;
  text-align: center;
  outline: none;
 }

 .btn button:hover {
  background: #23d5b6;
 }
 </style>
</head>

<body>
<div id="example">
 <h3>多选按钮</h3>
 <div class="check-area" v-show="items.length!=0">
 <ul>
  <li class="border-1px" v-for="(item,index) in items">
  <input class="self-checkbox" type="checkbox"
   :id="'checkbox-'+item.id"
   :data-id="'food-'+item.id" name="radio"
   :value="item.value"
   v-model="checkValues"
   @click="setCheckValue($event,item)">
  <label :for="'checkbox-'+item.id"></label>
  <span>{{item.value}}</span>
  </li>
 </ul>
 <p>您选择了:<span v-show="checkValues.length">{{filterCheckValues}}</span></p>
 <div class="btn">
  <button @click="showCheck(checkIds)">按钮</button>
  <span v-show="checkIds.length">{{checkIds}}</span>
 </div>
 </div>
</div>
<script>
 var itemData = [{id: '20170811001', value: '香蕉'},
 {id: '20170811002', value: '苹果'},
 {
  id: '20170811003',
  value: '梨子'
 }, {id: '20170811004', value: '葡萄'}]
 //itemData = [];
 var vm = new Vue({
 el: '#example',
 data: {
  items: '',
  checkValues: [],
  checkIds: []
 },
 computed: {
  filterCheckValues: function () {
  var value = this.checkValues;
  var reValue = '';
  for (var i = 0; i < value.length; i++) {
   reValue += value[i] + '、'
  }
  reValue = reValue.substring(0, reValue.length - 1)
  return reValue;
  }
 },
 methods: {
  initData: function () {
  var self = this;
  self.items = itemData;
  if (itemData.length != 0) {
//   self.checkValues[0] = self.items[0].value;
//   self.checkIds[0] = 'food-' + self.items[0].id;
  }
  },
  setCheckValue: function (ev, item) {
  var id = 'food-' + item.id;
  if (ev.target.checked) {
   this.checkIds.push(id);
  } else if (this.checkIds.indexOf(id) > -1) {
   this.checkIds.remove(id);
  }
  }
  ,
  showCheck: function () {
  console.log(this.checkIds)
  }
 },
 filter: {},
 mounted: function () {
  this.initData();
 }
 })
 Array.prototype.remove = function (val) {
 var index = this.indexOf(val);
 if (index > -1) {
  this.splice(index, 1);
 }
 };
</script>
</body>

</html>

以上就是本文的全部内容,希望对大家的学习有所帮助,也希望大家多多支持小牛知识库。
-
本文向大家介绍vue实现自定义多选与单选的答题功能,包括了vue实现自定义多选与单选的答题功能的使用技巧和注意事项,需要的朋友参考一下 本来实现多选单选这个功能,vue组件中在表单方面提供了一个v-model指令,非常的善解“猿”意, 能把我们的多选单选功能很完美的且很强大得双向绑定起来,实现多选单选任意选根本不在话下。 但是,凡事都有一个但是! 但是奈何这个项目设计稿的缘故,使用原生的表单组件是
-
本文向大家介绍vue v-model实现自定义样式多选与单选功能,包括了vue v-model实现自定义样式多选与单选功能的使用技巧和注意事项,需要的朋友参考一下 这两天在玩mpvue,但是下午如果对着文档大眼瞪小眼的话,肯定会睡着的。 想起昨晚的flag,我就想直接用demo上手吧,一举两得 谁想到我好不容易快做完了,v-model在小程序中不起作用! 来不及研究为什么,我先直接在原来项目上
-
本文向大家介绍RecyclerView实现流式标签单选多选功能,包括了RecyclerView实现流式标签单选多选功能的使用技巧和注意事项,需要的朋友参考一下 RecyclerView简介 RecyclerView是Android一个更强大的控件,其不仅可以实现和ListView同样的效果,还有优化了ListView中的各种不足。其可以实现数据纵向滚动,也可以实现横向滚动(ListView做不到横
-
本文向大家介绍jquery实现简单的全选和反选功能,包括了jquery实现简单的全选和反选功能的使用技巧和注意事项,需要的朋友参考一下 首先我们看个简单的实例 下面再给大家分享一段基于jQuery实现checkbox列表全选、反选和不选功能的代码,适用于网页多选后需要进行批量操作的场景(如批量删除等)。文章结合实例,代码简洁,基本覆盖选项选择操作的方方面面,希望可以帮到有需要的前端开发爱好者。 引
-
本文向大家介绍Vue实现选择城市功能,包括了Vue实现选择城市功能的使用技巧和注意事项,需要的朋友参考一下 查看完整的代码请到 我的github地址 https://github.com/qianyinghuanmie/vue2.0-demos 一、结果展示 二、前期准备: 1.引入汉字转拼音的插件,利用NPM安装 代码指令为 npm install pinyin --save ,详细步骤请
-
本文向大家介绍Android实现ListView控件的多选和全选功能实例,包括了Android实现ListView控件的多选和全选功能实例的使用技巧和注意事项,需要的朋友参考一下 本文实例讲述了Android实现ListView控件的多选和全选功能。分享给大家供大家参考,具体如下: 主程序代码 MainActivity.Java 继承自BaseAdapter的MyAdapter 主界面的布局文件

