Android编程实现图片背景渐变切换与图层叠加效果
本文实例讲述了Android编程实现图片背景渐变切换与图层叠加效果。分享给大家供大家参考,具体如下:
本例要实现的目的:
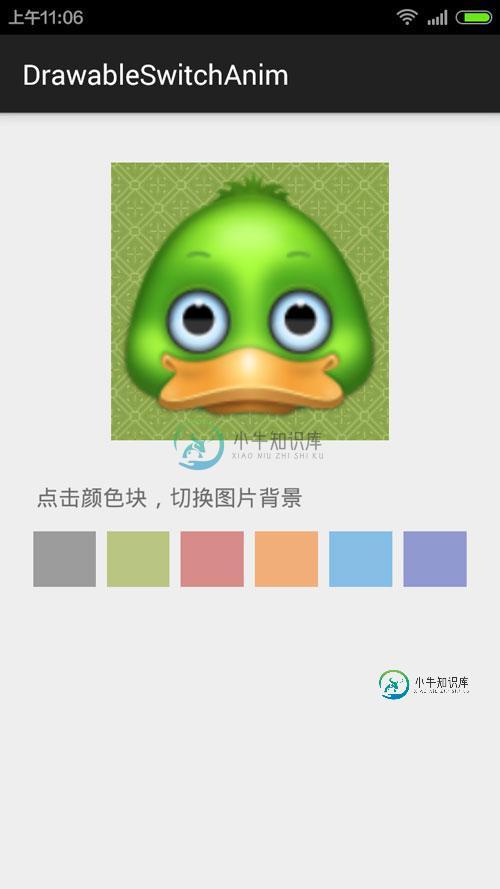
1.图片背景渐变的切换,例如渐变的从红色切换成绿色。
2.代码中进行图层叠加,即把多个Drawable叠加在一起显示在一个组件之上。
效果图:

代码很简单:
(1)布局文件:
<RelativeLayout xmlns:android="http://schemas.android.com/apk/res/android"
  xmlns:tools="http://schemas.android.com/tools"
  android:layout_width="match_parent"
  android:layout_height="match_parent"
  android:paddingLeft="@dimen/activity_horizontal_margin"
  android:paddingRight="@dimen/activity_horizontal_margin"
  android:paddingTop="@dimen/activity_vertical_margin"
  android:paddingBottom="@dimen/activity_vertical_margin"
  tools:ignore="ContentDescription"
  tools:context=".MainActivity">
  <ImageView
    android:id="@+id/color_iv"
    android:layout_width="200dp"
    android:layout_height="200dp"
    android:layout_centerHorizontal="true"
    android:src="@drawable/image_bg_2"
    android:layout_margin="20dp" />
  <TextView
    android:id="@+id/note_text"
    android:layout_below="@+id/color_iv"
    android:layout_width="wrap_content"
    android:layout_height="wrap_content"
    android:textSize="16sp"
    android:layout_margin="10dp"
    android:text="点击颜色块,切换图片背景" />
  <LinearLayout
    android:layout_width="match_parent"
    android:layout_height="48dip"
    android:layout_below="@+id/note_text"
    android:layout_marginBottom="8dip"
    android:layout_marginLeft="4dip"
    android:layout_marginRight="4dip"
    android:orientation="horizontal">
    <ImageView
      android:layout_width="0dip"
      android:layout_height="match_parent"
      android:layout_margin="4dip"
      android:layout_weight="1"
      android:background="#99666666"
      android:onClick="onColorClicked"
      android:tag="#99666666" />
    <ImageView
      android:layout_width="0dip"
      android:layout_height="match_parent"
      android:layout_margin="4dip"
      android:layout_weight="1"
      android:background="#9996AA39"
      android:onClick="onColorClicked"
      android:tag="#9996AA39" />
    <ImageView
      android:layout_width="0dip"
      android:layout_height="match_parent"
      android:layout_margin="4dip"
      android:layout_weight="1"
      android:background="#99C74B46"
      android:onClick="onColorClicked"
      android:tag="#99C74B46" />
    <ImageView
      android:layout_width="0dip"
      android:layout_height="match_parent"
      android:layout_margin="4dip"
      android:layout_weight="1"
      android:background="#99F4842D"
      android:onClick="onColorClicked"
      android:tag="#99F4842D" />
    <ImageView
      android:layout_width="0dip"
      android:layout_height="match_parent"
      android:layout_margin="4dip"
      android:layout_weight="1"
      android:background="#993F9FE0"
      android:onClick="onColorClicked"
      android:tag="#993F9FE0" />
    <ImageView
      android:layout_width="0dip"
      android:layout_height="match_parent"
      android:layout_margin="4dip"
      android:layout_weight="1"
      android:background="#995161BC"
      android:onClick="onColorClicked"
      android:tag="#995161BC" />
  </LinearLayout>
</RelativeLayout>
(2)Activity代码:
package com.sinatj.colorgradientanim;
import android.graphics.Color;
import android.graphics.drawable.ColorDrawable;
import android.graphics.drawable.Drawable;
import android.graphics.drawable.LayerDrawable;
import android.graphics.drawable.TransitionDrawable;
import android.os.Build;
import android.os.Handler;
import android.support.v7.app.ActionBarActivity;
import android.os.Bundle;
import android.view.View;
import android.widget.ImageView;
public class MainActivity extends ActionBarActivity {
  private ImageView imageView;
  private Drawable oldBackground = null;
  private Drawable bgDrawable;
  @Override
  protected void onCreate(Bundle savedInstanceState) {
    super.onCreate(savedInstanceState);
    setContentView(R.layout.activity_main);
    imageView = (ImageView) findViewById(R.id.color_iv);
    bgDrawable = getResources().getDrawable(R.drawable.image_bg_1);
    //初始颜色
    changeColor(Color.parseColor("#6696AA39"));
  }
  private void changeColor(int newColor) {
    Drawable colorDrawable = new ColorDrawable(newColor);
    //图层叠加
    LayerDrawable ld = new LayerDrawable(new Drawable[]{bgDrawable, colorDrawable});
    if (oldBackground == null) {
      imageView.setBackgroundDrawable(ld);
    } else {
      //渐变切换
      TransitionDrawable td = new TransitionDrawable(new Drawable[]{oldBackground, ld});
      imageView.setBackgroundDrawable(td);
      td.startTransition(300);
    }
    oldBackground = ld;
  }
  public void onColorClicked(View v) {
    int color = Color.parseColor(v.getTag().toString());
    changeColor(color);
  }
}
希望本文所述对大家Android程序设计有所帮助。
-
本文向大家介绍android中实现背景图片颜色渐变方法,包括了android中实现背景图片颜色渐变方法的使用技巧和注意事项,需要的朋友参考一下 常用,记录一下。 效果图: 首先新建xml文件 bg_gradient.xml 在布局文件里面引用
-
本文向大家介绍原生js实现图片层叠轮播切换效果,包括了原生js实现图片层叠轮播切换效果的使用技巧和注意事项,需要的朋友参考一下 本文实例介绍了js焦点图片层叠轮播切换滚动效果,分享给大家供大家参考,具体内容如下 效果图: 功能描述: 自定义图片尺寸; 每隔一段时间自动滚动图片; 每次动画执行的时候改变图片的位置,宽高以及其它属性也要跟随着变化; 鼠标移上图片,显示当前图片的详细信息
-
本文向大家介绍pyqt5实现按钮添加背景图片以及背景图片的切换方法,包括了pyqt5实现按钮添加背景图片以及背景图片的切换方法的使用技巧和注意事项,需要的朋友参考一下 简介 对与控件QPushButton中的可以使用setStyleSheet设置它背景图片。具体设置背景图片的方法有两种 然而对于这种方法背景图片无法进行边框的自适应,可以使用下面的方法 可以做到自适应边框。 代码 代码里面有两个图片
-
本文向大家介绍jQuery实现图片渐入渐出切换展示效果,包括了jQuery实现图片渐入渐出切换展示效果的使用技巧和注意事项,需要的朋友参考一下 在这之前我们先看看我们要做的效果是什么样的: 我们要图片在过“一定时间”后自动切换,在右下角处有小方块似数字1,2,3,4,这些数字是根据图片的个数自动出现的,当鼠标经过的时候数字颜色有一定的变化; 下面我们来看看具体怎么实现。 第一步:先写简单的html
-
本文向大家介绍js实现图片从左往右渐变切换效果的方法,包括了js实现图片从左往右渐变切换效果的方法的使用技巧和注意事项,需要的朋友参考一下 本文实例讲述了js实现图片从左往右渐变切换效果的方法。分享给大家供大家参考。具体实现方法如下: 希望本文所述对大家的javascript程序设计有所帮助。
-
问题内容: 我一直在尝试在背景图片的顶部使用线性渐变,以使背景底部的阴影效果从黑色变为透明,但似乎无法使其显示。 我在这里阅读了其他案例和示例,但没有一个对我有用。我只能看到渐变或图像,但不能全部看到。 只需单击第一个徽标,就忽略该效果,此后我要尝试的是整个网站的正文。 这是我的CSS代码: 问题答案: 好的,我通过 在行尾 添加背景图片的网址来解决此问题。 这是我的工作代码:

