
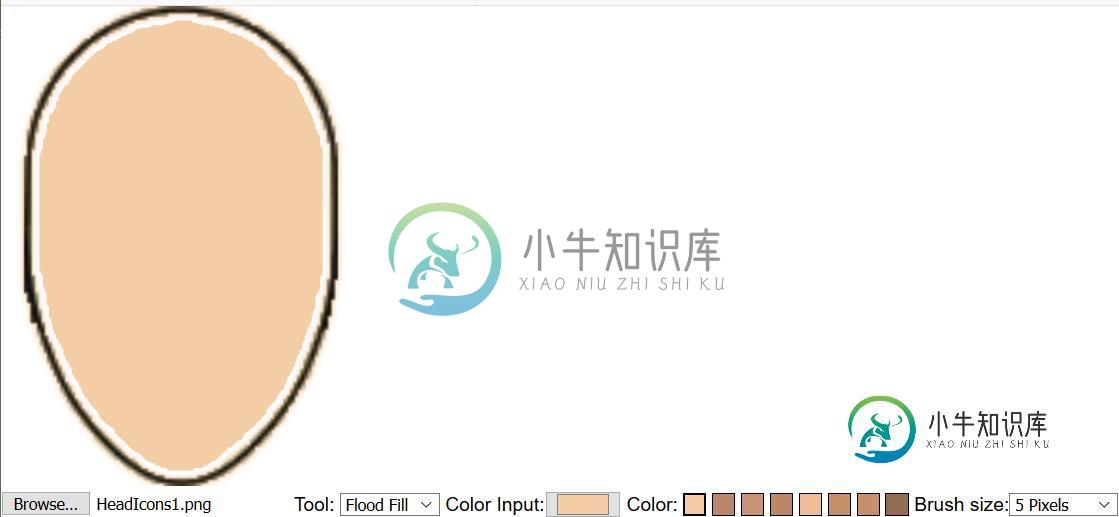
画布-泛光填充在PNG图像的边缘留下白色像素,具有透明

现在,我尝试执行泛洪填充算法来填充透明的PNG图像,使用文章中的泛洪填充算法如何避免在泛洪填充算法期间超过最大调用堆栈大小?使用非递归方法和Uint32Array很好地处理颜色堆栈。
但是,此整体填充算法保留了未填充的白色(实际上是浅灰色边或抗锯齿边)。这是我的代码:
 var BrushColorString  = '#F3CDA6'; // skin color
canvas.addEventListener('mousedown', function(e) {

        const rect = canvas.getBoundingClientRect()
        CanvasMouseX = e.clientX - rect.left;
        CanvasMouseY = e.clientY - rect.top;

        if (mode === 'flood-fill')
        {
            // test flood fill algorithm
            paintAt(context,  CanvasMouseX,CanvasMouseY,hexToRgb(BrushColorString));

        }
    });
function paintAt(ContextOutput,startX, startY,curColor) {
//function paintAt(ctx,startX, startY,curColor) {
    // read the pixels in the canvas

    const width = ContextOutput.canvas.width,
    height = ContextOutput.canvas.height,pixels = width*height;
    const imageData = ContextOutput.getImageData(0, 0, width, height);
    var data1 = imageData.data;
    const p32 = new Uint32Array(data1.buffer);
    const stack = [startX + (startY * width)]; // add starting pos to stack
    const targetColor = p32[stack[0]];
    var SpanLeft = true, SpanRight = true; // logic for spanding left right
    var leftEdge = false, rightEdge = false;

    // proper conversion of color to Uint32Array
    const newColor = new Uint32Array((new Uint8ClampedArray([curColor.r,curColor.g, curColor.b, curColor.a])).buffer)[0];
    // need proper comparison of target color and new Color
    if (targetColor === newColor || targetColor === undefined) { return } // avoid endless loop


    while (stack.length){

        let idx = stack.pop();
        while(idx >= width && p32[idx - width] === targetColor) { idx -= width }; // move to top edge
        SpanLeft = SpanRight = false;   // not going left right yet
        leftEdge = (idx % width) === 0;
        rightEdge = ((idx +1) % width) === 0;
        while (p32[idx] === targetColor) {
            p32[idx] = newColor;
            if(!leftEdge) {
                if (p32[idx - 1] === targetColor) { // check left
                    if (!SpanLeft) {
                        stack.push(idx - 1);  // found new column to left
                        SpanLeft = true;  //
                    } else if (SpanLeft) {
                        SpanLeft = false;
                    }
                }
            }
            if(!rightEdge) {
                if (p32[idx + 1] === targetColor) {
                    if (!SpanRight) {
                        stack.push(idx + 1); // new column to right
                        SpanRight = true;
                    }else if (SpanRight) {
                        SpanRight = false;
                    }
                }
            }
            idx += width;

        }


    }


    clearCanvas(ContextOutput);
    ContextOutput.putImageData(imageData,0, 0);


};
function hexToRgb(hex) {
        var result = /^#?([a-f\d]{2})([a-f\d]{2})([a-f\d]{2})$/i.exec(hex);
        return result ? {
              r: parseInt(result[1], 16),
              g: parseInt(result[2], 16),
              b: parseInt(result[3], 16),
              a: 255
        } : null;
    };
到目前为止,我已经尝试使用以下建议:
- 使用matchOutlineColor函数,使用画布中提到的RGBA值-泛光填充在边缘留下白色像素
如果您对如何处理洪水填充算法的抗锯齿边缘问题有任何想法,请尽快响应。
更新日期:
以下是根据建议修订的油漆功能规范,该规范考虑了公差:
<div id="container"><canvas id="control" >Does Not Support Canvas Element</canvas></div>
 <div><label for="tolerance">Tolerance</label>
<input id="tolerance" type="range" min="0" max="255" value="32" step="1" oninput="this.nextElementSibling.value = this.value"><output>32</output></div>
var canvas = document.getElementById("control");
var context = canvas.getContext('2d');
var CanvasMouseX =  -1; var CanvasMouseY = -1;
var BrushColorString  = '#F3CDA6'; // skin color


 canvas.addEventListener('mousedown', function(e) {

        const rect = canvas.getBoundingClientRect()
        CanvasMouseX = e.clientX - rect.left;
        CanvasMouseY = e.clientY - rect.top;

        // testing


        if (mode === 'flood-fill')
        {
            // test flood fill algorithm
            paintAt(context,CanvasMouseX,CanvasMouseY,
hexToRgb(BrushColorString),tolerance.value);


        }
    });
function hexToRgb(hex) {
    var result = /^#?([a-f\d]{2})([a-f\d]{2})([a-f\d]{2})$/i.exec(hex);
    return result ? {
          r: parseInt(result[1], 16),
          g: parseInt(result[2], 16),
          b: parseInt(result[3], 16),
          a: 255
    } : null;
};
function clearCanvas(ctx) {
    ctx.clearRect(0, 0,ctx.canvas.width,ctx.canvas.height);

};
function colorDistance(index, R00,G00,B00,A00, data0)
{
    var index1 = index << 2; // multiplyed by 4
    const R = R00 - data0[index1 + 0];
    const G = G00 - data0[index1 + 1];
    const B = B00 - data0[index1 + 2];
    const A = A00 - data0[index1 + 3];
    return Math.sqrt((R * R) + (B * B) + (G * G) + (A * A));
}

function paintAt(ContextOutput,startX, startY,curColor,tolerance) {
    // read the pixels in the canvas

    const width = ContextOutput.canvas.width,
          height = ContextOutput.canvas.height, pixels = width*height;

    const rightEdgeNum = width - 1, bottomEdgeNum = height - 1;
    const imageData = ContextOutput.getImageData(0, 0, width, height);
    var data1 = imageData.data;
    const p32 = new Uint32Array(data1.buffer);
    const stack = [startX + (startY * width)]; // add starting pos to stack
    const targetColor = p32[stack[0]];

    var SpanLeft = true, SpanRight = true; // logic for spanning left right
    var leftEdge = false, rightEdge = false, IsBlend = false;
    const DistancesArray = new Uint16Array(pixels);  // array distance value
    var R=-1,G=-1,B=-1,A = -1,idx =0,Distance=0;
    var R0 = data1[(4*(startX + (startY * width)))+0],
        G0 = data1[(4*(startX + (startY * width)))+1],
        B0 = data1[(4*(startX + (startY * width)))+2],
        A0 = data1[(4*(startX + (startY * width)))+3];
    var CalculatedTolerance = Math.sqrt(tolerance * tolerance * 4);

    const BlendR = curColor.r |0, BlendG = curColor.g |0,
          BlendB = curColor.b |0, BlendA = curColor.a|0;
    // color variable for blending
    const newColor = new Uint32Array((new Uint8ClampedArray([BlendR,BlendG,BlendB,BlendA])).buffer)[0];

    if (targetColor === newColor || targetColor === undefined) { return }
    // avoid endless loop

        while (stack.length){
            idx = stack.pop();

            while (idx >= width &&
            colorDistance(idx - width,R0,G0,B0,A0,data1) <= CalculatedTolerance) { idx -= width }; // move to top edge
            SpanLeft = SpanRight = false;   // not going left right yet
            leftEdge = (idx % width) === 0;
            rightEdge = ((idx +1) % width) === 0;

            while ((Distance = colorDistance(idx,R0,G0,B0,A0,data1)) <= CalculatedTolerance) {
                DistancesArray[idx] = (Distance / CalculatedTolerance) * 255 | 0x8000;
                p32[idx] = newColor;
                if(!leftEdge) {

                    if (colorDistance(idx - 1,R0,G0,B0,A0,data1) <= CalculatedTolerance) { // check left
                        if (!SpanLeft) {
                            stack.push(idx - 1);  // found new column to left
                            SpanLeft = true;  //
                        } else if (SpanLeft) {
                            SpanLeft = false;
                        }
                    }
                }
                if(!rightEdge) {
                    if (colorDistance(idx + 1,R0,G0,B0,A0,data1) <= CalculatedTolerance) {
                        if (!SpanRight) {
                        stack.push(idx + 1); // new column to right
                        SpanRight = true;
                        }else if (SpanRight) {
                            SpanRight = false;
                        }
                    }
                }
                idx += width;

            }
        }
        idx = 0;
        while (idx <= pixels-1) {
            Distance = DistancesArray[idx];
            if (Distance !== 0) {
                if (Distance === 0x8000) {
                    p32[idx] = newColor;
                } else {
                     IsBlend = false;
                    const x = idx % width;
                    const y = idx / width | 0;
                    if (x >= 1 && DistancesArray[idx - 1] === 0) { IsBlend = true }
                    else if (x <= rightEdgeNum -1 && DistancesArray[idx + 1] === 0) { IsBlend = true }
                    else if (y >=1 && DistancesArray[idx - width] === 0) { IsBlend = true }
                    else if (y <=bottomEdgeNum-1 && DistancesArray[idx + width] === 0) { IsBlend = true }
                    if (IsBlend) {
                        // blending at the edge
                        Distance &= 0xFF;
                        Distance = Distance / 255;
                        const invDist = 1 - Distance;
                        const idx1 = idx << 2;
                        data1[idx1 + 0] = data1[idx1 + 0] * Distance + BlendR * invDist;
                        data1[idx1 + 1] = data1[idx1 + 1] * Distance + BlendG * invDist;
                        data1[idx1 + 2] = data1[idx1 + 2] * Distance + BlendB * invDist;
                        data1[idx1 + 3] = data1[idx1 + 3] * Distance + BlendA * invDist;

                    } else {
                        p32[idx] = newColor;
                    }
                }
            }
            idx++;
        }
    // this recursive algorithm works but still not working well due to the issue stack overflow!
    clearCanvas(ContextOutput);
    ContextOutput.putImageData(imageData,0, 0);
   // way to deal with memory leak at the array.
    DistancesArray = [];

    newColor = [];
    p32 = [];

};
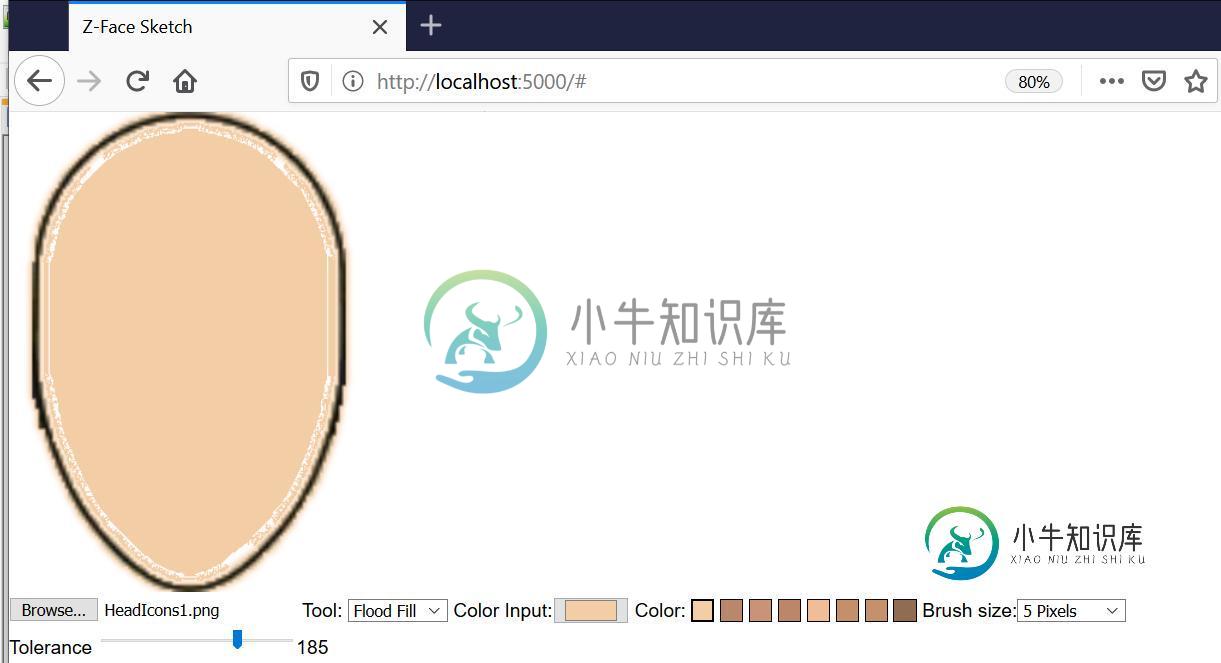
当容忍度变得太大时,我该如何处理这种问题。任何替代算法都将不胜感激。
共有1个答案

我是以下公认答案的作者:如何避免在洪水填充算法期间超过最大调用堆栈大小?画布整体填充未填充到边缘
不幸的是,没有完美的解决方案。
以下方法存在问题。
- 设置公差使其获得所有边缘混淆现象通常会填充不需要的区域。
- 将公差设置得太低会使边缘看起来比标准填充更糟糕。
- 重复填充会导致边缘混淆现象。
- 使用简单的混合函数。正确的混合函数可以在W3C合成和混合级别“混合正常”中找到。抱歉,我没有时间完成这个答案。
- 不容易转换为渐变或模式填充。
有一个更好的解决方案,但它有1000行长,仅代码本身无法满足32K的回答限制。
这个答案是如何改变你的功能来减少边缘混淆现象,使用公差和简单的边缘混合。
笔记
- 答案中的各个片段可能有拼写错误或名称错误。有关正确的工作代码,请参阅底部的示例
检测边缘的最简单方法是使用公差并填充在填充原点处像素颜色公差范围内的像素。
这使填充与混叠边重叠,然后可以检测并混合这些边,以减少因消除混叠而产生的瑕疵。
问题是,要获得良好的别名覆盖,需要很大的容差,这最终会填充您直觉上不希望着色的区域。
颜色可以由3个值表示:红色、绿色、蓝色。如果用x、y、z替换名称,很容易看出每个颜色在3D空间中的独特位置。
更好的是,这个3D空间中任何两种颜色之间的距离都与感知到的颜色差异直接相关。因此,我们可以用简单的数学来计算差异(毕达哥拉斯)。
因为我们还需要考虑alpha通道,所以我们需要提升一维。每种颜色及其alpha部分在4D空间中都有一个唯一的点。这些4D颜色之间的距离与颜色和透明度的感知差异直接相关。
幸运的是,我们不需要想象4D空间,我们所做的只是扩展数学(毕达哥拉斯在所有欧几里德维度上都能工作)。
因此,我们得到了可以添加到洪水填充函数中的函数和准备代码。
var idx = stack[0] << 2; // remove let first line inside while (stack.length){
const r = data1[idx] ;
const g = data1[idx + 1] ;
const b = data1[idx + 2];
const a = data1[idx + 3]
function colorDist(idx) {  // returns the spacial distance from the target color of pixel at idx
    idx <<= 2;
    const R = r - data1[i];
    const G = g - data1[i + 1];
    const B = b - data1[i + 2];
    const A = a - data1[i + 3];
    return (R * R + B * B + G * G + A * A) ** 0.5;
}
在函数声明中,我们添加了一个指定为值0到255的参数容差
函数声明从
function paintAt(contextOutput, startX, startY, curColor) {
到
function paintAt(contextOutput, startX, startY, curColor, tolerance = 0) {
容限作为可选参数。
- 公差为0仅填充目标颜色
- 255的公差应填满所有像素
我们需要将公差从通道值转换为4D距离值,以便255覆盖4D颜色空间中两种颜色之间的最大距离。
在函数顶部添加以下行
tolerance = (tolerance * tolerance * 4) ** 0.5; // normalize to 4D RGBA space
我们现在需要更改像素匹配语句以使用公差。任何有p32[idx]==目标颜色(targetColor)或类似颜色的地方都需要用彩色dist(idx)替换
while (checkPixel(ind)) {
变成了
 // declare variable dist at top of function
 while ((dist = colorDist(idx)) <= tolerance) {
为了对抗混淆现象,我们需要将填充颜色混合成与颜色距离成比例的量。
对所有像素执行此操作意味着,如果颜色距离不为0且小于公差,则远离填充边缘的像素将获得错误的颜色。
我们只想混合位于填充边缘的像素,不包括画布边缘的像素。对于许多像素,当我们遇到它们时,无法知道一个像素是否在填充的边缘。我们只能知道何时找到所有填充的像素。
因此,我们必须保持一个数组,该数组保持所有填充像素的颜色距离
在函数的顶部创建一个缓冲区以保持像素颜色距离。
const distances = new Uint16Array(width*height);
然后在内环中 <罢工> 以及设置像素颜色 设置匹配位置距离。
 while ((dist = colorDist(idx)) <= tolerance) {
     //Must not fill color here do in second pass p32[idx] = newColor;
     distances[idx] = (dist / tolerance) * 255 | 0x8000;
为了跟踪填充的像素,我们设置距离值的顶部位。这意味着距离将为所有要填充的像素保留非零值,为零表示要忽略的像素。这是用0x8000完成的
填充的主要部分未完成。在我们开始下一个过程之前,让填充完成它的工作。
在外环退出后,我们一次一个地跨过每个像素。检查是否需要填充。
如果需要填充,则提取颜色距离。如果为零,则将像素设置为p32数组中的颜色。如果距离不为零,则检查其周围的4个像素。如果4个相邻像素中的任何一个标记为不填充距离[idx]==0,并且该像素不在画布边界之外,我们知道它是一条边,需要混合。
// declare at top of function
var blend, dist, rr, gg, bb, aa;

// need fill color's channels for quickest possible access.
const fr = curColor.r | 0;
const fg = curColor.g | 0;
const fb = curColor.b | 0;
const fa = curColor.a | 0;


// after main fill loop.
idx = 0;
const rightEdge = width - 1, bottomEdge = height - 1;
while (idx < width * height){
    dist = distances[idx];
    if (dist !== 0) {
        if (dist === 0x8000) {
            p32[idx] = newColor;
        } else {
            blend = false;
            const x = idx % width;
            const y = idx / width | 0;
            if (x > 0 && distances[idx - 1] === 0) { blend = true }
            else if (x < rightEdge && distances[idx + 1] === 0) { blend = true }
            else if (y > 0 && distances[idx - width] === 0) { blend = true }
            else if (y < bottomEdge && distances[idx + width] === 0) { blend = true }

            if (blend) { // pixels is at fill edge an needs to blend
                dist &= 0xFF;             // remove fill bit
                dist = dist / 255;        // normalize to range 0-1
                const invDist = 1 - dist; // invert distance

                // get index in byte array
                const idx1 = idx << 2;    // same as idx * 4

                // simple blend function (not the same as used by 2D API)
                data[idx1]     = data[idx1    ] * dist + fr * invDist;
                data[idx1 + 1] = data[idx1 + 1] * dist + fg * invDist;
                data[idx1 + 2] = data[idx1 + 2] * dist + fb * invDist;
                data[idx1 + 3] = data[idx1 + 3] * dist + fa * invDist;

            } else {
                p32[idx] = newColor;
            }
       }
    }
    idx++;
}
现在把新的像素阵列放到画布上。
这个示例是对代码修改版本的简单包装。它是为了确保我没有犯任何算法错误,并强调使用此方法时的质量或质量不足。
- 单击第一个按钮添加随机圆
- 使用滑块设置公差0-255
- 单击“清除”以清除画布
- 单击画布以在鼠标位置填充随机颜色
画布已缩放2,以使工件更可见。
函数FlodFill替换了您的油漆At并且太大,应该分成两部分,一部分用于填充传递,另一部分用于边缘检测和混合。
const ctx = canvas.getContext("2d");
var circle = true;
test();
canvas.addEventListener("click", e => {circle = false; test(e)});
toggleFill.addEventListener("click",e => {circle = true; test(e)});
clear.addEventListener("click",()=>ctx.clearRect(0,0,500,500));
function randomCircle() {
    ctx.beginPath();
    ctx.strokeStyle = "black";
    ctx.lineWidth = 4;
    const x = Math.random() * 100 | 0;
    const y = Math.random() * 100 | 0;
    ctx.arc(x, y, Math.random() * 25 + 25, 0 , Math.PI * 2);
    ctx.stroke();
    return {x,y};
}

function test(e) {
    if (circle) {
        toggleFill.textContent = "Click canvas to fill";
        randomCircle();
    } else {
        toggleFill.textContent = "Click button add random circle";
        const col = {
            r: Math.random() * 255 | 0,
            g: Math.random() * 255 | 0,
            b: Math.random() * 255 | 0,
            a: Math.random() * 255 | 0,
        };
        floodFill(ctx, (event.offsetX - 1) / 2 | 0, (event.offsetY -1) / 2| 0, col, tolerance.value);
    }
}

// Original function from SO question https://stackoverflow.com/q/65359146/3877726
function floodFill(ctx, startX, startY, curColor, tolerance = 0) {
    var idx, blend, dist, rr, gg, bb, aa, spanLeft = true, spanRight = true, leftEdge = false, rightEdge = false;
    const width = ctx.canvas.width,  height = ctx.canvas.height, pixels = width*height;
    const imageData = ctx.getImageData(0, 0, width, height);
    const data = imageData.data;
    const p32 = new Uint32Array(data.buffer);
    const stack = [startX + (startY * width)];
    const targetColor = p32[stack[0]];
    const fr = curColor.r | 0;
    const fg = curColor.g | 0;
    const fb = curColor.b | 0;
    const fa = curColor.a | 0;
    const newColor = (fa << 24) + (fb << 16) + (fg << 8) + fr;
    if (targetColor === newColor || targetColor === undefined) { return }

    idx = stack[0] << 2;
    const rightE = width - 1, bottomE = height - 1;
    const distances = new Uint16Array(width*height);
    tolerance = (tolerance * tolerance * 4) ** 0.5;

    const r = data[idx] ;
    const g = data[idx + 1] ;
    const b = data[idx + 2];
    const a = data[idx + 3]
    function colorDist(idx) {
        if (distances[idx]) { return Infinity }
        idx <<= 2;
        const R = r - data[idx];
        const G = g - data[idx + 1];
        const B = b - data[idx + 2];
        const A = a - data[idx + 3];
        return (R * R + B * B + G * G + A * A) ** 0.5;
    }

    while (stack.length) {
        idx = stack.pop();
        while (idx >= width && colorDist(idx - width) <= tolerance) { idx -= width }; // move to top edge
        spanLeft = spanRight = false;   // not going left right yet
        leftEdge = (idx % width) === 0;
        rightEdge = ((idx + 1) % width) === 0;
        while ((dist = colorDist(idx)) <= tolerance) {
            distances[idx] = (dist / tolerance) * 255 | 0x8000;
            if (!leftEdge) {
                if (colorDist(idx - 1) <= tolerance) {
                    if (!spanLeft) {
                        stack.push(idx - 1);
                        spanLeft = true;
                    } else if (spanLeft) {
                        spanLeft = false;
                    }
                }
            }
            if (!rightEdge) {
                if (colorDist(idx + 1) <= tolerance) {
                    if (!spanRight) {
                        stack.push(idx + 1);
                        spanRight = true;
                    }else if (spanRight) {
                        spanRight = false;
                    }
                }
            }
            idx += width;
        }
    }
    idx = 0;
    while (idx < pixels) {
        dist = distances[idx];
        if (dist !== 0) {
            if (dist === 0x8000) {
                p32[idx] = newColor;
            } else {
                blend = false;
                const x = idx % width;
                const y = idx / width | 0;
                if (x > 0 && distances[idx - 1] === 0) { blend = true }
                else if (x < rightE && distances[idx + 1] === 0) { blend = true }
                else if (y > 0 && distances[idx - width] === 0) { blend = true }
                else if (y < bottomE && distances[idx + width] === 0) { blend = true }
                if (blend) {
                    dist &= 0xFF;
                    dist = dist / 255;
                    const invDist = 1 - dist;
                    const idx1 = idx << 2;
                    data[idx1]     = data[idx1    ] * dist + fr * invDist;
                    data[idx1 + 1] = data[idx1 + 1] * dist + fg * invDist;
                    data[idx1 + 2] = data[idx1 + 2] * dist + fb * invDist;
                    data[idx1 + 3] = data[idx1 + 3] * dist + fa * invDist;
                } else {
                    p32[idx] = newColor;
                }
            }
        }
        idx++;
    }

    ctx.putImageData(imageData,0, 0);
}
canvas {
width: 200px;
height: 200px;
border: 1px solid black;
}<label for="tolerance">Tolerance</label>
<input id="tolerance" type="range" min="0" max="255" value="32" step="1"></input>
<button id ="toggleFill" >Click add random circle</button>
<button id ="clear" >Clear</button><br>
<canvas id="canvas" width="100" height="100"></canvas>-
此页http://wildlife.x-tremeteam.com利用CSS边框图像属性和。带有透明边缘的png图像,可在我的div上创建“撕裂的纸张”外观。除了在我的Android(三星SIII)上,无论我使用的是它的默认浏览器还是Chrome应用程序,它都工作得很好。在这一点上,我可以看到在20px边界的内部和外部都有一个轻微的边缘。有趣的是,我看不到角落的边缘。带边框的div的背景是透明的。
-
使用下面的代码,我可以在加载到画布中的图像上绘制一个区域,并用一些颜色填充绘制的区域。 现在,我需要用图像而不是颜色填充绘制区域。比如: 帆布fillStyle='url(myimage.jpg)'; 而不是 帆布fillStyle='#123456'//填充颜色示例 HTML: jquery。拉票。min.js
-
问题内容: 但是我需要一个Java等效项。我需要一个图像类型(如,,…),该图像类型可以完全透明(alpha = 0)保留此颜色。当然还有一种将其保存为文件的方法。 问题答案: import java.awt.; import java.awt.image. ; 修改代码以使每个像素透明 来源:http://www.rgagnon.com/javadetails/java-0265.html
-
问题内容: 我有一个屏幕外的BufferedImage,它是用type构造的。它可以包含任何内容,我正在寻找一种方法(相当有效)用透明像素完全覆盖图像,从而生成“不可见”图像。 使用这样的东西: 没有效果。一种可能的方法可能只是覆盖BufferedImage中的每个像素,但是我不确定这是最佳解决方案。你会怎么做? [编辑] 图形文档建议不要将clearRect用于屏幕外图像,但是我已经尝试了与上面
-
我试图从眼动跟踪结果创建一个热图(显示用户在屏幕上最频繁查看的位置)。 对于用户经常查看的像素,我想设置不透明的红色,对于不太频繁的橙色,等等...我使用红色到绿色的色阶。但是对于频率最低的像素,我希望它们不仅显示绿色,而且是透明的。 问题是,当我尝试改变颜色时,例如使用它实际上并没有根据新旧颜色将像素作为平均值着色,它只是显示一些新的、看起来奇怪的颜色。 图像与alpha RGBA值设置为50:
-
基本上我的问题分为两部分。 > 我想知道将要操纵像素并将特定颜色转换为透明像素的首选/快速方法。 我想知道我是否能够使用这个“BuffereImage”,而不必将其保存为支持“png”等透明度的文件格式 我找到了一种设置单个像素的方法 这儿呢 正如它所提到的,这是一种“缓慢的方法” 我发现这个线程Java:用透明像素填充BufferedImage 哪一条评论提到了“int[]”和操纵像素。 本质上