按钮未显示在TableLayout中的ListView下方
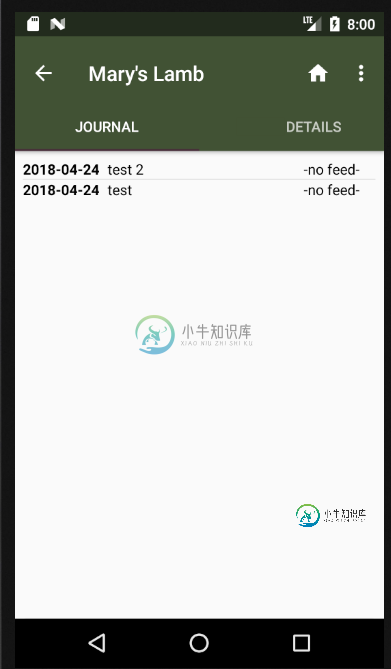
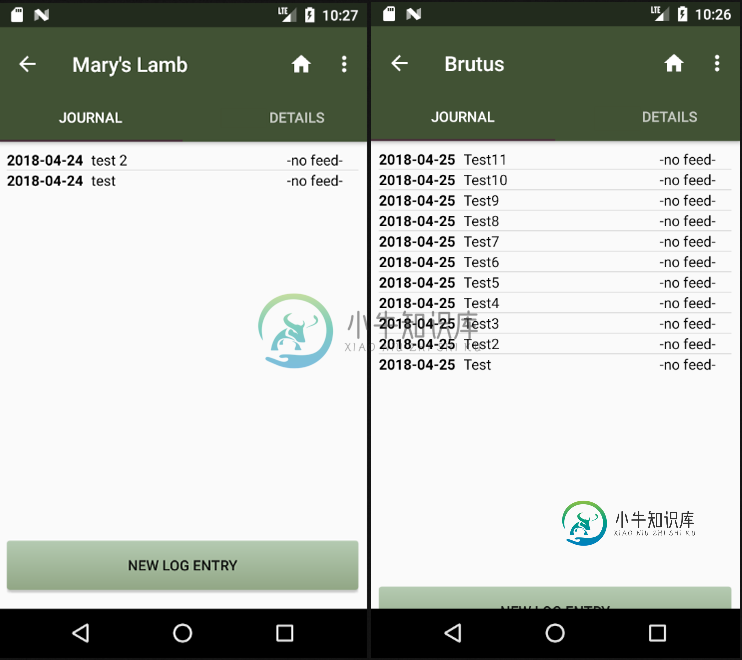
我正在使用Android Studio v3。1.2. 我有一对带有列表视图和按钮的活动。无论ListView中有多少项,按钮都应对齐底部。
在我的主活动中,ListView和按钮在RelativeLayout上完美渲染。我可以添加很多项目到ListView和按钮保持不变。
另一方面,我的JournalAbFragment是一个在表格布局中使用RelativeLayout的片段。该片段由PetDetailTabbedActivity在代码中创建。片段的布局是MainActivity布局的修改版本,但即使ListView不包含任何数据,按钮也不会显示。我尝试过使用带有权重的LinearLayout,但效果有限——按钮出现了,但它在listview内容下方浮动,并随着数据添加到listview而向下移动。然后,当ListView中有几行时,它会被垂直地扭曲。
这是我尝试过的最新布局:
<?xml version="1.0" encoding="utf-8"?>
<RelativeLayout xmlns:android="http://schemas.android.com/apk/res/android"
    xmlns:tools="http://schemas.android.com/tools"
    android:layout_width="match_parent"
    android:layout_height="match_parent" >

    <LinearLayout
        android:id="@+id/topLayout"
        android:layout_width="match_parent"
        android:layout_height="wrap_content"
        android:layout_alignParentTop="true"
        android:orientation="vertical"
        android:padding="8dp"
        >

        <ListView
            android:id="@+id/journallistview"
            android:layout_width="match_parent"
            android:layout_height="wrap_content"
            />

    </LinearLayout>

    <Button
        android:id="@+id/addentrybtn"
        android:layout_width="match_parent"
        android:layout_height="wrap_content"
        android:layout_alignParentBottom="true"
        android:layout_margin="8dp"
        android:text="@string/addentrybtn" />

</RelativeLayout>
因为它与MainActivity上的布局非常相似,看起来应该可以工作,所以我忍不住认为TabLayout与此有关。
我错过了什么?!如何让按钮粘贴到活动布局的底部而不被挤压?谢谢你的帮助。下面是创建片段的父活动的Java。
public class PetDetailTabbedActivity extends AppCompatActivity implements DeleteConfirmDialog.DeleteConfirmDialogListener {

    private SectionsPageAdapter mSectionsPageAdapter;
    private ViewPager mViewPager;
    DatabaseHelper myDB;
    Integer iPetID = 0;
    private int REQUEST_CODE = 1;
    JournalTabFragment journalFrag;

    @Override
    protected void onCreate(Bundle savedInstanceState) {
        super.onCreate(savedInstanceState);
        setContentView(R.layout.pet_detail_tabbed_activity);

        myDB = new DatabaseHelper(this);

        //load the toolbar
        Toolbar toolbar = findViewById(R.id.toolbar);
        setSupportActionBar(toolbar);
        //let's give it a back button in the title bar
        getSupportActionBar().setDisplayHomeAsUpEnabled(true);
        assert getSupportActionBar() != null;

        Bundle bundle = getIntent().getExtras();
        if(bundle != null) {
            //get the pet ID from the extras
            iPetID = bundle.getInt("PetID");
        }
    }

    @Override
    protected void onResume() {
        super.onResume();

        if(iPetID > 0) {
            String sPetName = myDB.getPetNameByID(iPetID);
            getSupportActionBar().setTitle(sPetName);
        }
        mSectionsPageAdapter = new SectionsPageAdapter(getSupportFragmentManager());

        mViewPager = findViewById(R.id.container);
        setupViewPager(mViewPager);

        TabLayout tabLayout = findViewById(R.id.tabs);
        tabLayout.setupWithViewPager(mViewPager);
    }

    private void setupViewPager(ViewPager viewPager) {
        SectionsPageAdapter adapter = new SectionsPageAdapter((getSupportFragmentManager()));

        String sStatus = myDB.getPetStatusByPetID(iPetID);

        journalFrag = new JournalTabFragment();
        Bundle jbundle = new Bundle();
        jbundle.putInt("PetID", iPetID);
        journalFrag.setArguments(jbundle);

        PetDetailTabFragment petFrag = new PetDetailTabFragment();
        Bundle gbundle = new Bundle();
        gbundle.putInt("PetID", iPetID);
        petFrag.setArguments(gbundle);

        //add the tabs
        adapter.addFragment(journalFrag, "Journal");
        adapter.addFragment(petFrag,"Details");

        viewPager.setAdapter(adapter);
    }

    @Override
    public boolean onCreateOptionsMenu(Menu menu) {
        MenuInflater inflater = getMenuInflater();
        inflater.inflate(R.menu.detailsmenu, menu);
        return true;
    }

    @Override
    public boolean onOptionsItemSelected(MenuItem item){
        switch(item.getItemId()){
            case R.id.home:
                goHome();
                return true;
            case R.id.edit:
                openEditActivity();
                return true;
            case R.id.delete:
                deletePet();
                return true;
            default:
                return super.onOptionsItemSelected(item);
        }

    }

    private void goHome() {
        Intent intent = new Intent(PetDetailTabbedActivity.this, MainActivity.class);
        startActivity(intent);
    }

    private void openEditActivity() {
        Intent editIntent;
        editIntent = new Intent(PetDetailTabbedActivity.this, EditPetActivity.class);
        editIntent.putExtra("PetID", iPetID);
        startActivityForResult(editIntent, REQUEST_CODE);
    }


    private void deletePet() {

        //bundle up the iEntryID for the dialog to pass back;
        //    otherwise it's null when the dlg closes
        Bundle args = new Bundle();
        args.putInt("ItemID", iPetID);

        DeleteConfirmDialog dlg = new DeleteConfirmDialog();
        dlg.setArguments(args);
        dlg.show(getSupportFragmentManager(), "Confirm Delete Dialog");
    }

    @Override
    public void applyValue(int itemid) {

        //the deletePet method in the db helper class also deletes journal entries for this pet
        Integer iPetID = (Integer)itemid;
        boolean bSuccess = myDB.deletePet(iPetID);
        if (bSuccess == true) {
            displayToastShort("Successfully deleted");
            Intent gobacktoprevactivity = new Intent();
            setResult(RESULT_OK,gobacktoprevactivity);
            finish();
        }
        else
            displayToastLong("Cannot delete the pet");
    }

    public void displayToastLong(String message) {
        StyleableToast.makeText(this, message, Toast.LENGTH_LONG, R.style.AccentToast).show();
    }
    public void displayToastShort(String message) {
        StyleableToast.makeText(this, message, Toast.LENGTH_SHORT, R.style.AccentToast).show();
    }

    @Override
    protected void onActivityResult(int requestCode, int resultCode, Intent data) {
        super.onActivityResult(requestCode, resultCode, data);
        if(requestCode == REQUEST_CODE) {
            if (resultCode == RESULT_OK) {
                recreate();
                journalFrag.adapter.notifyDataSetChanged();
            }
        }
    }

}

更新:这是部分工作的布局(显示按钮)。如您所见,当ListView中只有几行时,它会从底部向上浮动,当有几行时,它会被向下推。
<?xml version="1.0" encoding="utf-8"?>
<LinearLayout
    xmlns:android="http://schemas.android.com/apk/res/android"
    android:layout_width="match_parent"
    android:layout_height="match_parent"
    android:orientation="vertical"
    android:padding="8dp">

    <ListView
        android:id="@+id/journallistview"
        android:layout_width="match_parent"
        android:layout_height="wrap_content"
        android:layout_weight="0" />

    <View
        android:layout_width="0dp"
        android:layout_height="0dp"
        android:layout_weight="3"/>


    <LinearLayout
        android:id="@+id/buttonlayout"
        android:layout_width="match_parent"
        android:layout_height="0dp"
        android:layout_weight="1"
        android:orientation="horizontal">

        <Button
            android:id="@+id/addentrybtn"
            android:layout_width="match_parent"
            android:layout_height="wrap_content"
            android:text="@string/addentrybtn" />

    </LinearLayout>

</LinearLayout>

共有2个答案
更新
在重新阅读您的问题之后,我设置了一个项目,该项目使用一个包含两个片段的活动,正如您上面所描述的。
以下是日志片段布局(在前面的回答中建议的布局):
<?xml version="1.0" encoding="utf-8"?>
<RelativeLayout xmlns:android="http://schemas.android.com/apk/res/android"
    xmlns:tools="http://schemas.android.com/tools"
    android:layout_width="match_parent"
    android:layout_height="match_parent" >

    <LinearLayout
        android:id="@+id/topLayout"
        android:layout_width="match_parent"
        android:layout_height="match_parent"
        android:layout_alignParentTop="true"
        android:layout_above="@+id/addentrybtn"
        android:orientation="vertical"
        android:padding="8dp"
        >

        <ListView
            android:id="@+id/journallistview"
            android:layout_width="match_parent"
            android:layout_height="wrap_content"
            />

    </LinearLayout>

    <Button
        android:id="@+id/addentrybtn"
        android:layout_width="match_parent"
        android:layout_height="wrap_content"
        android:layout_alignParentBottom="true"
        android:layout_margin="8dp"
        android:text="ADD ENTRY" />

</RelativeLayout>
带有日志片段的代码:
public class JournalFragment extends Fragment {


  public static JournalFragment newInstance(){
    return new JournalFragment();
  }

  @Nullable
  @Override
  public View onCreateView(@NonNull LayoutInflater inflater, @Nullable ViewGroup container, @Nullable Bundle savedInstanceState) {
    return inflater.inflate(R.layout.fragment_journal, container, false);
  }


  @Override
  public void onViewCreated(@NonNull View view, @Nullable Bundle savedInstanceState) {
    super.onViewCreated(view, savedInstanceState);

    ListView listView = view.findViewById(R.id.journallistview);
    final ListAdapter listAdapter = new ArrayAdapter<>(view.getContext(),  android.R.layout.simple_list_item_1, getItems(100));
    listView.setAdapter(listAdapter);
  }


  private String []  getItems(int count){
    String [] items = new String[count];
    for(int i = 0; i < count; i++){
      items[i] = "Item "+ i;
    }
    return items;
  }
}
DetailFragment在这里是无用的(出于显示目的而存根),但为了完整性,我将包括它:
<?xml version="1.0" encoding="utf-8"?>
<RelativeLayout xmlns:android="http://schemas.android.com/apk/res/android"
    android:layout_width="match_parent" android:layout_height="match_parent">

    <android.support.v7.widget.AppCompatTextView
        android:layout_centerInParent="true"
        android:text="Detail Fragment!"
        android:layout_width="wrap_content"
        android:layout_height="wrap_content" />

</RelativeLayout>
DetailFragment的代码(同样是为了完整性):
public class DetailFragment extends Fragment {

  public static DetailFragment newInsance(){
    return new DetailFragment();
  }

  @Nullable
  @Override
  public View onCreateView(@NonNull LayoutInflater inflater, @Nullable ViewGroup container, @Nullable Bundle savedInstanceState) {
    return inflater.inflate(R.layout.fragment_detail, container, false);
  }
}
下面是活动布局(准骨骼相对布局、工具栏、TabLayout和ViewPager):
<?xml version="1.0" encoding="utf-8"?>
<RelativeLayout xmlns:android="http://schemas.android.com/apk/res/android"
    xmlns:app="http://schemas.android.com/apk/res-auto"
    xmlns:tools="http://schemas.android.com/tools"
    android:layout_width="match_parent"
    android:layout_height="match_parent"
    tools:context=".MainActivity">

    <android.support.v7.widget.Toolbar
        android:id="@+id/journalToolbar"
        android:layout_width="match_parent"
        android:layout_height="?android:attr/actionBarSize"
        android:background="@color/colorPrimary"
        android:theme="@style/ThemeOverlay.AppCompat.Dark" />

    <android.support.design.widget.TabLayout
        android:id="@+id/tabs"
        android:layout_width="match_parent"
        android:layout_height="wrap_content"
        android:layout_below="@+id/journalToolbar"
        android:background="@color/colorPrimary"
        android:theme="@style/ThemeOverlay.AppCompat.Dark"
        app:tabTextColor="#fff"/>

    <android.support.v4.view.ViewPager
        android:id="@+id/viewPager"
        android:layout_width="match_parent"
        android:layout_height="match_parent"
        android:layout_below="@+id/tabs" />

</RelativeLayout>
活动代码:
public class MainActivity extends AppCompatActivity {

  @Override
  protected void onCreate(Bundle savedInstanceState) {
    super.onCreate(savedInstanceState);
    setContentView(R.layout.activity_main);

    Toolbar toolbar = findViewById(R.id.journalToolbar);
    setSupportActionBar(toolbar);

    getSupportActionBar().setDisplayHomeAsUpEnabled(true);

    ViewPager viewPager = findViewById(R.id.viewPager);
    TabLayout tabLayout = findViewById(R.id.tabs);
    viewPager.setAdapter(new PagerAdapter(getSupportFragmentManager()));
    tabLayout.setupWithViewPager(viewPager);
  }


  private final class PagerAdapter extends FragmentPagerAdapter {

    PagerAdapter(FragmentManager fm) {
      super(fm);
    }

    @Nullable
    @Override
    public CharSequence getPageTitle(int position) {
      return position == 0 ? getString(R.string.journal) : getString(R.string.details);
    }

    @Override
    public Fragment getItem(int position) {

      if(position == 0){
        return JournalFragment.newInstance();
      }else{
        return DetailFragment.newInsance();
      }
    }

    @Override
    public int getCount() {
      return 2;
    }
  }
}
好运和快乐编码!
-
我无法弄清楚每三个条目的like按钮是如何以及为什么被按下的,从我实际按下的like按钮开始,但(幸运的是)只有一个,而且也调用了正确的API。 请帮忙。
-
我试图在应用程序启动时显示项目的listview。但在应用程序启动时,没有显示listview,只有一个空白屏幕。下面是代码: MainActivity.java 但是现在我在logcat中得到了以下内容: 并且应用程序停止..请帮助!
-
我有一个包含我的数据的listView,但我需要能够按下向上滚动的按钮(如果listView可以向上滚动)和向下滚动的按钮(如果listView可以向下滚动),而不是使用滚动条滚动 listView可以转到的最大Y位置 listView滚动到的当前Y位置 使用这些值,我可以编写其余的代码。
-
我试图在片段中填充一个具有自定义布局的listView。但是,当我启动应用程序时,listview的内容没有加载(这是使用数组适配器获得的)。下面是加载listView的代码: 这里是我的CustomAdapter的代码: } 这是列表项布局的xml: 这里是主要布局: 我没有收到任何错误消息,但是当我启动应用程序时,listView中没有显示任何项目,并且永远不会调用我的适配器的getView方
-
Javascript(jQuery)代码 HTML/EJS代码 我读过的一些不起作用的帖子: 如何在单击按钮时通过动画显示视图? 尝试在单击按钮时显示div
-
我试图做一个简单的菜单游戏pyplay,但我正在努力显示菜单按钮的交互式文本。我有一个非常简单的菜单,有“开始”和“退出”选项,我试图用我制作的按钮类来显示它们。 由于某种原因,按钮背景会闪烁,但文本不会出现。我得到了一堆矩形,当我滚动它们时,它们会正确地改变颜色,但没有文本。 我看了类似的问题,但似乎不明白为什么我的问题不起作用。任何帮助或指导都将不胜感激。 下面是一个代码示例。颜色在单独的py

