06-添加 Reducers
理解 Reducers
首先需要理解什么是 reducer,dva 中 reducer 的概念,主要是来源于下层封装的 redux,在 dva 中 reducers 主要负责修改 model 的数据(state)。
也许你在迷惑,为什么会叫做 reducer 这个名字,你或许知道 reduce 这个方法,在很多程序语言中,数组类型都具备 reduce 方法,而这个方法的功能就是聚合,比如下面这个在 javascript 中的例子:
[{x:1},{y:2},{z:3}].reduce(function(prev, next){
    return Object.assign(prev, next);
})
//return {x:1, y:2, z:3}
可以看到,在上面的这个例子中,我将三个对象合并成了一个对象,这就是 reducer 的思想,model 的数据就是通过我们分离出来的 reducer 创建出来的,这样可以让每个 reducer 专注于相关数据的修改,但是最终会构建出完整的数据。
如果你想了解更多,可以参看 Redux Reducers。
给 Users Model 添加 Reducers
回到我们之前的 /models/users.js,我们在之前已经定义好了它的 state,接下来我们看看如何根据新的数据来修改本身的 state,这就是 reducers 要做的事情。
export default {
  namespace: 'users',

  state: {
    list: [],
    total: null,
    loading: false, // 控制加载状态
    current: null, // 当前分页信息
    currentItem: {}, // 当前操作的用户对象
    modalVisible: false, // 弹出窗的显示状态
    modalType: 'create', // 弹出窗的类型(添加用户,编辑用户)
  },
  effects: {
    *query(){},
    *create(){},
    *'delete'(){},
    *update(){},
  },
  reducers: {
    showLoading(){}, // 控制加载状态的 reducer
    showModal(){}, // 控制 Modal 显示状态的 reducer
    hideModal(){},
    // 使用静态数据返回
    querySuccess(state){
      const mock = {
        total: 3,
        current: 1,
        loading: false,
        list: [
          {
            id: 1,
            name: '张三',
            age: 23,
            address: '成都',
          },
          {
            id: 2,
            name: '李四',
            age: 24,
            address: '杭州',
          },
          {
            id: 3,
            name: '王五',
            age: 25,
            address: '上海',
          },
        ],

      };
      return {...state, ...mock, loading: false};
    },
    createSuccess(){},
    deleteSuccess(){},
    updateSuccess(){},
  }
}
我们把之前 UserList 组件中模拟的静态数据,移动到了 reducers 中,通过调用 'users/query/success' 这个 reducer,我们就可以将 Users Model 的数据变成静态数据,那么我们如何调用这个 reducer,能够让这个数据传入 UserList 组件呢,接下来需要做的是:关联Model。
关联 Model
// ./src/routes/Users.jsx
import React, { Component, PropTypes } from 'react';

// 引入 connect 工具函数
import { connect } from 'dva';

// Users 的 Presentational Component
// 暂时都没实现
import UserList from '../components/Users/UserList';
import UserSearch from '../components/Users/UserSearch';
import UserModal from '../components/Users/UserModal';

// 引入对应的样式
// 可以暂时新建一个空的
import styles from './Users.less';

function Users({ location, dispatch, users }) {

  const {
    loading, list, total, current,
    currentItem, modalVisible, modalType
    } = users;

  const userSearchProps={};
  const userListProps={
        dataSource: list,
        total,
        loading,
        current,
    };
  const userModalProps={};

  return (
    <div className={styles.normal}>
      {/* 用户筛选搜索框 */}
      <UserSearch {...userSearchProps} />
      {/* 用户信息展示列表 */}
      <UserList {...userListProps} />
      {/* 添加用户 & 修改用户弹出的浮层 */}
      <UserModal {...userModalProps} />
    </div>
  );
}

Users.propTypes = {
  users: PropTypes.object,
};

// 指定订阅数据,这里关联了 users
function mapStateToProps({ users }) {
  return {users};
}

// 建立数据关联关系
export default connect(mapStateToProps)(Users);
在之前的 组件设计 中讲到了 Presentational Component 的设计概念,在订阅了数据以后,就可以通过 props 访问到 model 的数据了,而 UserList 展示组件的数据,也是 Container Component 通过 props 传递的过来的。
组件和 model 建立了关联关系以后,如何在组件中获取 reduers 的数据呢,或者如何调用 reducers呢,就是需要发起一个 action。
发起 Actions
actions 的概念跟 reducers 一样,也是来自于 dva 封装的 redux,表达的概念是发起一个修改数据的行为,主要的作用是传递信息:
dispatch({
    type: '', // action 的名称,与 reducers(effects)对应
    ... // 调用时传递的参数,在 reducers(effects)可以获取
});
需要注意的是:action的名称(type)如果是在 model 以外调用需要添加 namespace。
通过 dispatch 函数,可以通过 type 属性指定对应的 actions 类型,而这个类型名在 reducers(effects)会一一对应,从而知道该去调用哪一个 reducers(effects),除了 type 以外,其它对象中的参数随意定义,都可以在对应的 reducers(effects)中获取,从而实现消息传递,将最新的数据传递过去更新 model 的数据(state)。
相关的更多信息,可以参看 Redux Actions。
回到例子中,目前传入 UserList 组件的只是默认空数据,那么如何调用 reducers 获取刚才定义的静态数据呢?发起一个 actions:
dispatch({
    type: 'users/querySuccess', // 调用一个actions
    payload: {}, // 调用时传递的参数
});
知道了如何发起一个 action,那么剩下的就是发起的时机了,通常我们建议在组件内部的生命周期发起,如:
...
componentDidMount() {
    this.props.dispatch({
        type: 'model/action',
    });
}
...
不过在本例中采用另一种发起 action 的场景,在本例中获取用户数据信息的时机就是访问 /users/ 这个页面,所以我们可以监听路由信息,只要路径是 /users/ 那么我们就会发起 action,获取用户数据:
// ./src/models/users.js
import { hashHistory } from 'dva/router';

export default {
  namespace: 'users',

  state: {
    list: [],
    total: null,
    loading: false, // 控制加载状态
    current: null, // 当前分页信息
    currentItem: {}, // 当前操作的用户对象
    modalVisible: false, // 弹出窗的显示状态
    modalType: 'create', // 弹出窗的类型(添加用户,编辑用户)
  },

  // Quick Start 已经介绍过 subscriptions 的概念,这里不在多说
  subscriptions: {
    setup({ dispatch, history }) {
      history.listen(location => {
        if (location.pathname === '/users') {
          dispatch({
            type: 'querySuccess',
            payload: {}
          });
        }
      });
    },
  },

  effects: {
    *query(){},
    *create(){},
    *'delete'(){},
    *update(){},
  },
  reducers: {
    showLoading(){}, // 控制加载状态的 reducer
    showModal(){}, // 控制 Modal 显示状态的 reducer
    hideModal(){},
    // 使用静态数据返回
    querySuccess(state){
      const mock = {
        total: 3,
        current: 1,
        loading: false,
        list: [
          {
            name: '张三',
            age: 23,
            address: '成都',
          },
          {
            name: '李四',
            age: 24,
            address: '杭州',
          },
          {
            name: '王五',
            age: 25,
            address: '上海',
          },
        ],

      };
      return {...state, ...mock, loading: false};
    },
    createSuccess(){},
    deleteSuccess(){},
    updateSuccess(){},
  }
}
以上代码在浏览器访问 /users 路径的时候就会发起一个 action,数据准备完毕,别忘了回到 index.js 中,添加我们的 models:
// ./src/index.js
import './index.html';
import './index.less';
import dva, { connect } from 'dva';

import 'antd/dist/antd.css';

// 1. Initialize
const app = dva();

// 2. Model
app.model(require('./models/users.js'));

// 3. Router
app.router(require('./router'));

// 4. Start
app.start(document.getElementById('root'));
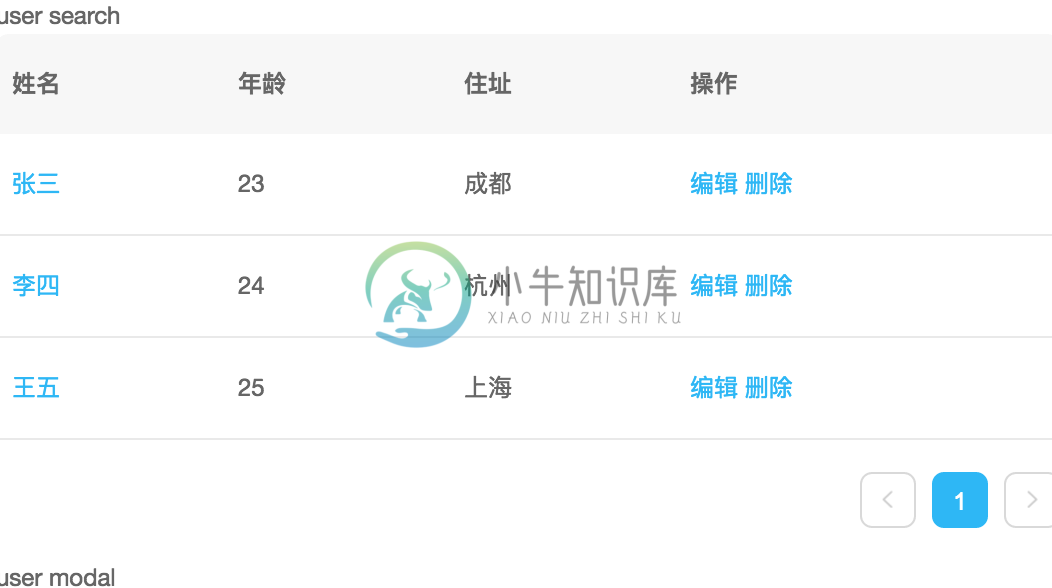
如果一切正常,访问:http://127.0.0.1:8989/ ,可以看到:

小结
在这个例子中,我们在 合适的时机(进入 /users/ )发起(dispatch)了一个 action,修改了 model 的数据,并且通过 Container Components 关联了 model,通过 props 传递到 Presentation Components,组件成功显示。如果你想了解更多关于 reducers & actions 的信息,可以参看 redux。
下一步,进入添加Effects。

