
创建应用
从这里开始,我们假设你已经在你的本地安装好了 Plus 程序的 Master 分支版本程序。
创建拓展包
在 Plus 目录执行下面的命令执行:
php artisan package:create
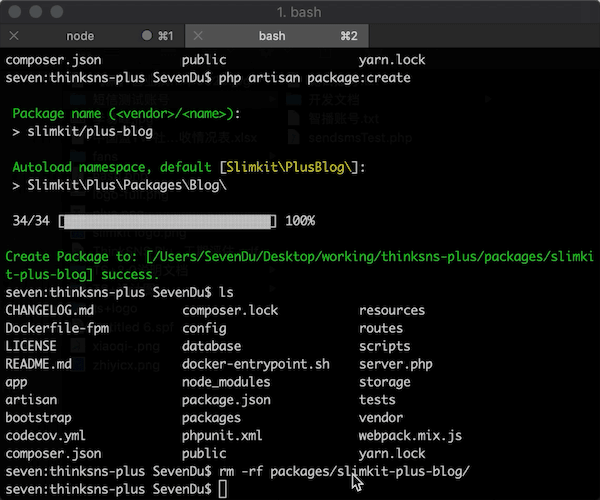
我们将包名称定义为 slimkit/plus-blog 命令空间为 SlimKit\Plus\Packages\Blog\ 创建完成后,页面会提示你所处位置,存储位置位于 Plus 程序的 packages/ 目录下,名字叫做 slimkit-plus-blo。
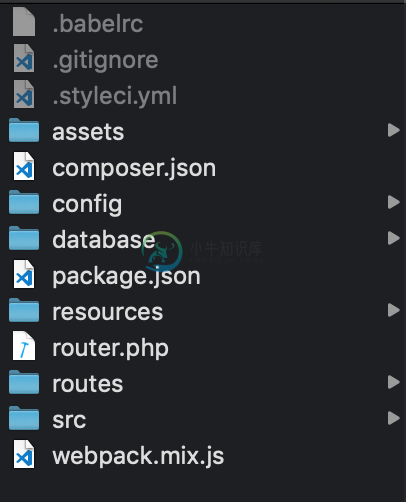
我们进入 packages/slimkit-plus-blog 目录,你会看到已经为你生成好了下面的结构:
安装本地拓展包
我们创建完成拓展包后,我们需要安装,现在我们打开 Plus 程序的 composer.json 文件,然后找到 repositories 字段,我们在这个字段的数组中添加如下信息:
{
  "type": "path",
  "url": "packages/slimkit-plus-blog",
  "options": {
    "symlink": true,
    "plus-soft": true
  }
}
2
3
4
5
6
7
8
然后执行 php artisan app:version 然后不用输入新的版本号,直接回车即可。执行完成后我们在 Plus 目录下执行:
composer require slimkit/plus-blog -vvv
等到命令完成。然后执行 php artisan package:handle 你会看到下面红框部分的信息:
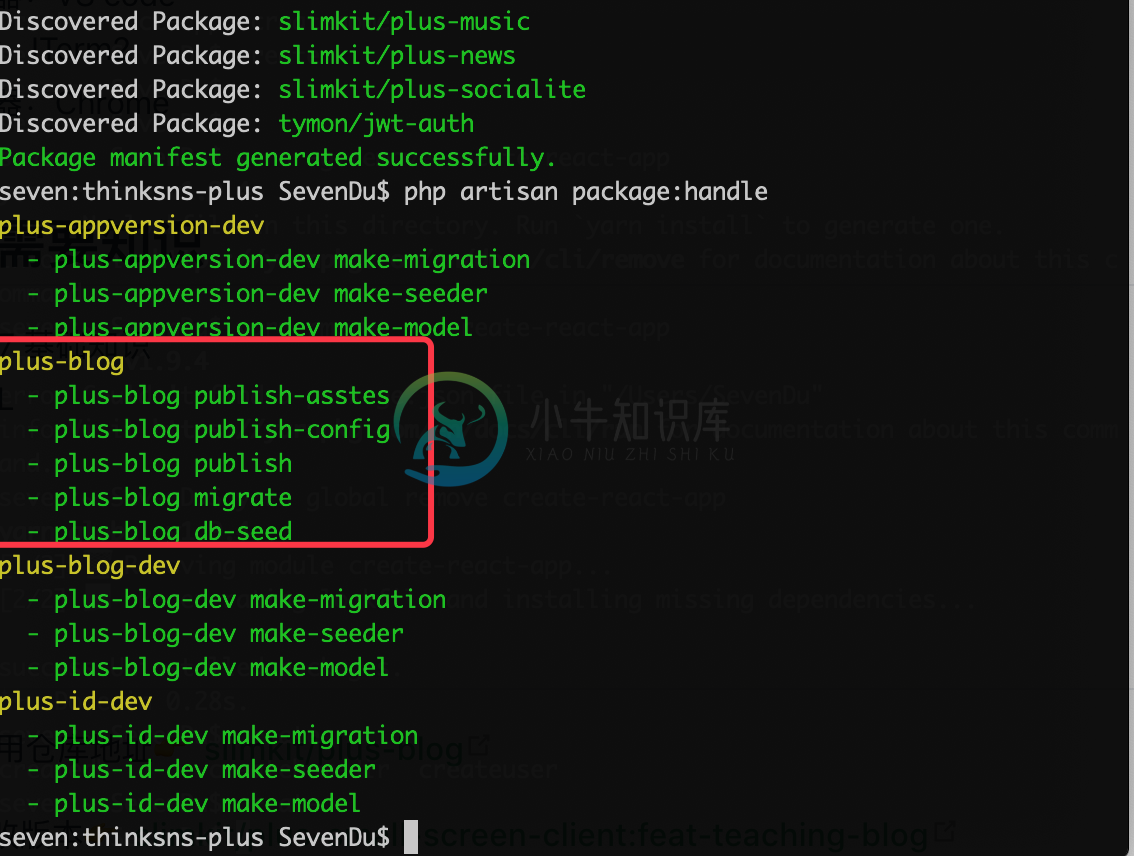
开发过程,真正需要的是红色框下面的那一些命令。
设计数据表
收看,我们考虑到 Plus 是一个多用户的程序,我们可以允许每个用户都创建自己的 Blog,所以我们设计一张如下记录表:
blogs
| 字段 | 类型 | 属性 | 描述 |
|---|---|---|---|
id | int 10 | 自增字段,unsigned | 博客自增字段 |
slug | VARCHAR 50 | 博客自定义地址 | |
name | VARCHAR 100 | Blog 名称 | |
desc | VARCHAR 255 | nullable, 默认 null | Blog 描述 |
logo | VARCHAR 255 | nullable, 默认 null | Blog 头像 |
owner_id | int 10 | unsigned | Blog 创建者 |
posts_count | int 10 | unsigned, nullable, 默认 0 | Blog 统计数 |
latest_post_sent_at | timestamp | nullable, 默认 null | 最新发布 Blog 时间 |
reviewed_at | timestamp | nullable, 默认 null | 后台审核时间,存在时间表示通过 |
blogs 表索引:
| 字段 | 索引 |
|---|---|
id | primary |
slug | unique |
owner_id | unique |
posts_count | index |
latest_post_sent_at | index |
reviewed_at | index |
计入我们有设计 Blog 表,那么我们也还要设计文章表:
blog_articles
| 字段 | 类型 | 属性 | 描述 |
|---|---|---|---|
id | int 10 | 自增字段,unsigned | 博客自增字段 |
title | VARCHAR 150 | 文章标题 | |
contents | TEXT | 文章内容 | |
blog_id | int 10 | unsigned | 所属 Blog |
creator_id | int 10 | unsigned | 创建者用户 ID |
comments_count | int 10 | unsigned | 评论统计数 |
reviewed_at | timestamp | nullable, 默认 null | 审核时间,投稿文章博主审核,存在时间则表示通过 |
| 字段 | 索引 |
|---|---|
id | primary |
blog_id | index |
creator_id | index |
reviewed_at | index |
创建数据表迁移
我们设计完数据表后,我们应当为拓展包生成数据表迁移,这样就可以将数据表写入到数据库了。我们现在执行:
php artisan package:handle plus-blog-dev make-model
然后输入 Blog,接着输入 blogs,第三个确认输入 yes 等到完成,完成后我们继续下一个迁移创建。
我们继续执行一次上看的命令,然后输入 article,然后输入 blog_articles,第三个也是输入 yes 等待完成。
现在,我们打开应用下的 database/migrations/ 目录,你会看到有一个 create_blogs_table 结尾的 PHP 文件,我已经将上面的表设计转化为迁移 PHP 代码,你只需要写入即可:
<?php

use Illuminate\Support\Facades\Schema;
use Illuminate\Database\Schema\Blueprint;
use Illuminate\Database\Migrations\Migration;

class CreateBlogsTable extends Migration
{
  /**
   * Run the migrations.
   *
   * @return void
   */
  public function up()
  {
    Schema::create('blogs', function (Blueprint $table) {
      $table->increments('id');
      $table->string('slug', 50)->comment('博客自定义地址');
      $table->string('name', 100)->comment('博客名称');
      $table->string('desc', 255)->nullable()->default(null)->comment('博客描述');
      $table->string('logo', 255)->nullable()->default(null)->comment('博客 Logo');
      $table->integer('owner_id')->unsigned()->comment('博客所有者');
      $table->integer('posts_count')->unsigned()->nullable()->default(0)->comment('博客帖子统计');
      $table->timestamp('latest_post_sent_at')->nullable()->default(null)->comment('最后发布文章时间');
      $table->timestamp('reviewed_at')->nullable()->default(null)->comment('审核通过时间');
      $table->timestamps();

      // 索引
      $table->unique('slug');
      $table->unique('owner_id');
      $table->index('posts_count');
      $table->index('latest_post_sent_at');
      $table->index('reviewed_at');
    });
  }

  /**
   * Reverse the migrations.
   *
   * @return void
   */
  public function down()
  {
    Schema::dropIfExists('blogs');
  }
}
2
3
4
5
6
7
8
9
10
11
12
13
14
15
16
17
18
19
20
21
22
23
24
25
26
27
28
29
30
31
32
33
34
35
36
37
38
39
40
41
42
43
44
45
46
接下来,我们接着编写 blog_articles 迁移文件,和上面一样,我们找到 create_blog_articles_table 结尾的 PHP 文件,写入下面的内容:
<?php

use Illuminate\Support\Facades\Schema;
use Illuminate\Database\Schema\Blueprint;
use Illuminate\Database\Migrations\Migration;

class CreateBlogArticlesTable extends Migration
{
  /**
   * Run the migrations.
   *
   * @return void
   */
  public function up()
  {
    Schema::create('blog_articles', function (Blueprint $table) {
      $table->increments('id');
      $table->string('title', 150)->comment('文章标题');
      $table->text('contents')->comment('文章内容');
      $table->integer('blog_id')->unsigned()->comment('文章所属博客');
      $table->integer('creator_id')->unsigned()->comment('文章创建者');
      $table->integer('comments_count')->unsigned()->nullable()->default(0)->comment('文章评论数量统计');
      $table->timestamp('reviewed_at')->nullable()->default(null)->comment('审核通过时间');
      $table->timestamps();

      // 索引
      $table->index('blog_id');
      $table->index('creator_id');
      $table->index('reviewed_at');
    });
  }

  /**
   * Reverse the migrations.
   *
   * @return void
   */
  public function down()
  {
    Schema::dropIfExists('blog_articles');
  }
}
2
3
4
5
6
7
8
9
10
11
12
13
14
15
16
17
18
19
20
21
22
23
24
25
26
27
28
29
30
31
32
33
34
35
36
37
38
39
40
41
42
TIP
需要用到的 Laravel 知识 数据填充
其实这里用不到,这是为了你在开发的时候你向填充一些数据做一个演示!你需要填充数据请执行:
php artisan package:handle plus-blog db-seed
千万不要重复执行,因为如果是插入操作,重复执行数据库已存在的记录则会报错!
迁移数据表
我们创建完迁移文件,使用下面的命令进行数据表的创建操作:
php artisan migrate -vvv
等到执行完成后,我们可以去数据库查看,已经创建好这两张表了!