Redis 安装和配置
优质
小牛编辑
135浏览
2023-12-01
Redis 安装和配置
如果你用 Spring Data MongoDB 依赖请注意
- 请先看官网最新支持到哪个版本的依赖:https://docs.spring.io/spring-data/data-redis/docs/current/reference/html/
- 查看锚点为:
New in Spring Data Redis的内容
- 查看锚点为:
- 目前 201712 支持 Redis 3.2
如果你用 RedisDesktopManager 客户端请注意
- 请查看介绍中支持哪个版本:https://github.com/uglide/RedisDesktopManager
- 目前 201712 支持 2.8 以上
Docker 下安装 Redis
- 创建一个宿主机目录用来存放 redis 配置文件:
mkdir -p /opt/conf/redis - 创建一个宿主机以后用来存放数据的目录:
mkdir -p /data/redis/db - 安装镜像:
docker pull redis:3.2 - 查看下载下来的镜像:
docker images 自己编写一个配置文件
vim /opt/conf/redis/redis.conf,内容如下:Redis 默认的配置文件内容:
bind 0.0.0.0requirepass casredis123456protected-mode yesport 6379tcp-backlog 511timeout 0tcp-keepalive 300daemonize nosupervised nopidfile /data/redis_6379.pidloglevel noticelogfile ""databases 16save 900 1save 300 10save 60 10000stop-writes-on-bgsave-error yesrdbcompression yesrdbchecksum yesdbfilename dump.rdbdir /dataslave-serve-stale-data yesslave-read-only yesrepl-diskless-sync norepl-diskless-sync-delay 5repl-disable-tcp-nodelay noslave-priority 100appendonly noappendfilename "appendonly.aof"appendfsync everysecno-appendfsync-on-rewrite noauto-aof-rewrite-percentage 100auto-aof-rewrite-min-size 64mbaof-load-truncated yeslua-time-limit 5000slowlog-log-slower-than 10000slowlog-max-len 128latency-monitor-threshold 0notify-keyspace-events ""hash-max-ziplist-entries 512hash-max-ziplist-value 64list-max-ziplist-size -2list-compress-depth 0set-max-intset-entries 512zset-max-ziplist-entries 128zset-max-ziplist-value 64hll-sparse-max-bytes 3000activerehashing yesclient-output-buffer-limit normal 0 0 0client-output-buffer-limit slave 256mb 64mb 60client-output-buffer-limit pubsub 32mb 8mb 60hz 10aof-rewrite-incremental-fsync yes
- 启动镜像:
docker run -d -ti -p 6379:6379 -v /opt/conf/redis/redis.conf:/etc/redis/redis.conf -v /data/redis/db:/data --restart always --name cas-redis redis:3.2 redis-server /etc/redis/redis.conf - 查看镜像运行情况:
docker ps - 进入镜像中 redis shell 交互界面:
docker exec -it 0cdc76fef7b4 redis-cli -h 127.0.0.1 -p 6379 -a casredis123456 - 重新启动服务:
docker restart cas-redis
Redis 安装
- Redis 安装
- 官网:http://redis.io/
- 官网下载:http://redis.io/download
- 官网 Github 地址:https://github.com/redis
- 此时(20160212) Redis 最新稳定版本为:3.0.7
- 官网帮助中心:http://redis.io/documentation
- 我个人习惯
/opt目录下创建一个目录setups用来存放各种软件安装包;在/usr目录下创建一个program用来存放各种解压后的软件包,下面的讲解也都是基于此习惯 - 我个人已经使用了第三方源:
EPEL、RepoForge,如果你出现yum install XXXXX安装不成功的话,很有可能就是你没有相关源,请查看我对源设置的文章 - Redis 下载:
wget http://download.redis.io/releases/redis-3.0.7.tar.gz(大小:1.4 M)- 安装依赖包:
yum install -y gcc-c++ tcl - 解压:
tar zxvf redis-3.0.7.tar.gz - 移动到我个人安装目录:
mv redis-3.0.7/ /usr/program/ - 进入解压后目录:
cd /usr/program/redis-3.0.7/ - 编译:
make - 编译安装:
make install- 安装完之后会在:
/usr/local/bin目录下生成好几个 redis 相关的文件
- 安装完之后会在:
- 复制配置文件:
cp /usr/program/redis-3.0.7/redis.conf /etc/ - 修改配置:
vim /etc/redis.conf- 把旧值:
daemonize no - 改为新值:
daemonize yes
- 把旧值:
- 启动:
/usr/local/bin/redis-server /etc/redis.conf - 关闭:
redis-cli -h 127.0.0.1 -p 6379 shutdown - 查看是否启动:
ps -ef | grep redis - 进入客户端:
redis-cli - 关闭客户端:
redis-cli shutdown - 开机启动配置:
echo "/usr/local/bin/redis-server /etc/redis.conf" >> /etc/rc.local - 开放防火墙端口:
- 添加规则:
iptables -I INPUT -p tcp -m tcp --dport 6379 -j ACCEPT - 保存规则:
service iptables save - 重启 iptables:
service iptables restart
- 添加规则:
- 安装依赖包:
Redis-3.0.7 配置
- 编辑配置文件:
vim /etc/redis.conf - Redis 默认的配置文件内容:
# 是否以后台daemon方式运行,默认是 no,一般我们会改为 yesdaemonize nopidfile /var/run/redis.pidport 6379tcp-backlog 511timeout 0tcp-keepalive 0loglevel noticelogfile ""# 开启数据库的数量,Redis 是有数据库概念的,默认是 16 个,数字从 0 ~ 15databases 16save 900 1save 300 10save 60 10000stop-writes-on-bgsave-error yesrdbcompression yesrdbchecksum yesdbfilename dump.rdbdir ./slave-serve-stale-data yesslave-read-only yesrepl-diskless-sync norepl-diskless-sync-delay 5repl-disable-tcp-nodelay noslave-priority 100appendonly noappendfilename "appendonly.aof"appendfsync everysecno-appendfsync-on-rewrite noauto-aof-rewrite-percentage 100auto-aof-rewrite-min-size 64mbaof-load-truncated yeslua-time-limit 5000slowlog-log-slower-than 10000slowlog-max-len 128latency-monitor-threshold 0notify-keyspace-events ""hash-max-ziplist-entries 512hash-max-ziplist-value 64list-max-ziplist-entries 512list-max-ziplist-value 64set-max-intset-entries 512zset-max-ziplist-entries 128zset-max-ziplist-value 64hll-sparse-max-bytes 3000activerehashing yesclient-output-buffer-limit normal 0 0 0client-output-buffer-limit slave 256mb 64mb 60client-output-buffer-limit pubsub 32mb 8mb 60hz 10aof-rewrite-incremental-fsync yes
Redis-3.2.8 配置
- 编辑配置文件:
vim /etc/redis.conf - Redis 默认的配置文件内容:
# 默认绑定是:127.0.0.1,这样就只能本机才能连上,为了让所有机子连上,这里需要改为:0.0.0.0bind 0.0.0.0protected-mode yesport 6379tcp-backlog 511timeout 0tcp-keepalive 300daemonize yessupervised nopidfile /var/run/redis_6379.pidloglevel noticelogfile ""databases 16save 900 1save 300 10save 60 10000stop-writes-on-bgsave-error yesrdbcompression yesrdbchecksum yesdbfilename dump.rdbdir ./slave-serve-stale-data yesslave-read-only yesrepl-diskless-sync norepl-diskless-sync-delay 5repl-disable-tcp-nodelay noslave-priority 100appendonly noappendfilename "appendonly.aof"appendfsync everysecno-appendfsync-on-rewrite noauto-aof-rewrite-percentage 100auto-aof-rewrite-min-size 64mbaof-load-truncated yeslua-time-limit 5000slowlog-log-slower-than 10000slowlog-max-len 128latency-monitor-threshold 0notify-keyspace-events ""hash-max-ziplist-entries 512hash-max-ziplist-value 64list-max-ziplist-size -2list-compress-depth 0set-max-intset-entries 512zset-max-ziplist-entries 128zset-max-ziplist-value 64hll-sparse-max-bytes 3000activerehashing yesclient-output-buffer-limit normal 0 0 0client-output-buffer-limit slave 256mb 64mb 60client-output-buffer-limit pubsub 32mb 8mb 60hz 10aof-rewrite-incremental-fsync yes
设置 Redis 请求密码
- 打开
vim /etc/redis.conf配置文件,找到默认是被注释的这一行:# requirepass foobared - 去掉注释,把
foobared改为你想要设置的密码,比如我打算设置为:123456,所以我改为:requirepass 123456 - 修改之后重启下服务
- 有了密码之后,进入客户端,就得这样访问:
redis-cli -h 127.0.0.1 -p 6379 -a 123456 - 如果用 IP 进入客户端,但是报:
Could not connect to Redis at 192.168.1.121:6379: Connection refused- 原因:Redis 默认只允许本机访问,可是有时候我们也需要 Redis 被远程访问。
- 解决办法:
- 修改 Redis 配置文件:
vim /etc/redis.conf - 找到 bind 那行配置,默认是(需要注意的是配置文件中除了注释还有一个默认开启的地方,所以不要漏掉):
# bind 127.0.0.1 - 去掉 # 注释并改为:
bind 0.0.0.0
- 修改 Redis 配置文件:
Redis 常用命令
- 命令是不区分大小写的,但是这里为了方便和后面的 key value 进行区分所以我全部写大写,你也可以用小写。
- 但是需要注意的是:key 是完全区分大小写的,比如 key=codeBlog 和 key=codeblog 是两个键值
- 官网命令列表:http://redis.io/commands
SET key value,设值。eg:SET myblog www.youmeek.comGET key,取值SELECT 0,切换数据库INCR key,递增数字DECR key,递减数字KEYS *,查看当前数据库下所有的 keyAPPEND key value,给尾部追加内容,如果要追加的 key 不存在,则相当于 SET key valueSTRLEN key,返回键值的长度,如果键不存在则返回 0MSET key1 value1 key2 value2,同时设置多值MGET key1 value1 key2 value2,同时取多值EXPIRE key 27,设置指定键的生存时间,27 的单位是秒TTL key,查看键的剩余生存时间- 返回 -2,表示不存在,过了生存时间后被删除
- 返回 -1,表示没有生存时间,永久存储
- 返回正整数,表示还剩下对应的生存时间
PERSIST key,清除生成时间,重新变成永久存储(重新设置 key 的值也可以起到清除生存时间的效果)FLUSHDB,清空当前数据库所有键值FLUSHALL,清空所有数据库的所有键值
把 redis 添加到系统服务中
- 新建文件:
vim /etc/init.d/redis - 添加如下内容:
#!/bin/sh## redis - this script starts and stops the redis-server daemon## chkconfig: - 85 15# description: Redis is a persistent key-value database# processname: redis-server# config: /usr/local/redis-2.4.X/bin/redis-server# config: /usr/local/ /redis-2.4.X/etc/redis.conf# Source function library.. /etc/rc.d/init.d/functions# Source networking configuration.. /etc/sysconfig/network# Check that networking is up.[ "$NETWORKING" = "no" ] && exit 0redis="/usr/local/bin/redis-server"prog=$(basename $redis)REDIS_CONF_FILE="/etc/redis.conf"[ -f /etc/sysconfig/redis ] && . /etc/sysconfig/redislockfile=/var/lock/subsys/redisstart() {[ -x $redis ] || exit 5[ -f $REDIS_CONF_FILE ] || exit 6echo -n $"Starting $prog: "daemon $redis $REDIS_CONF_FILEretval=$?echo[ $retval -eq 0 ] && touch $lockfilereturn $retval}stop() {echo -n $"Stopping $prog: "killproc $prog -QUITretval=$?echo[ $retval -eq 0 ] && rm -f $lockfilereturn $retval}restart() {stopstart}reload() {echo -n $"Reloading $prog: "killproc $redis -HUPRETVAL=$?echo}force_reload() {restart}rh_status() {status $prog}rh_status_q() {rh_status >/dev/null 2>&1}case "$1" instart)rh_status_q && exit 0$1;;stop)rh_status_q || exit 0$1;;restart|configtest)$1;;reload)rh_status_q || exit 7$1;;force-reload)force_reload;;status)rh_status;;condrestart|try-restart)rh_status_q || exit 0;;*)echo $"Usage: $0 {start|stop|status|restart|condrestart|try-restart| reload|orce-reload}"exit 2esac
- 修改权限:
chmod 755 /etc/init.d/redis - 启动服务:
service redis start - 停止服务:
service redis stop - 重启服务:
service ngredisnx restart
Redis 客户端
Redis GUI 管理工具
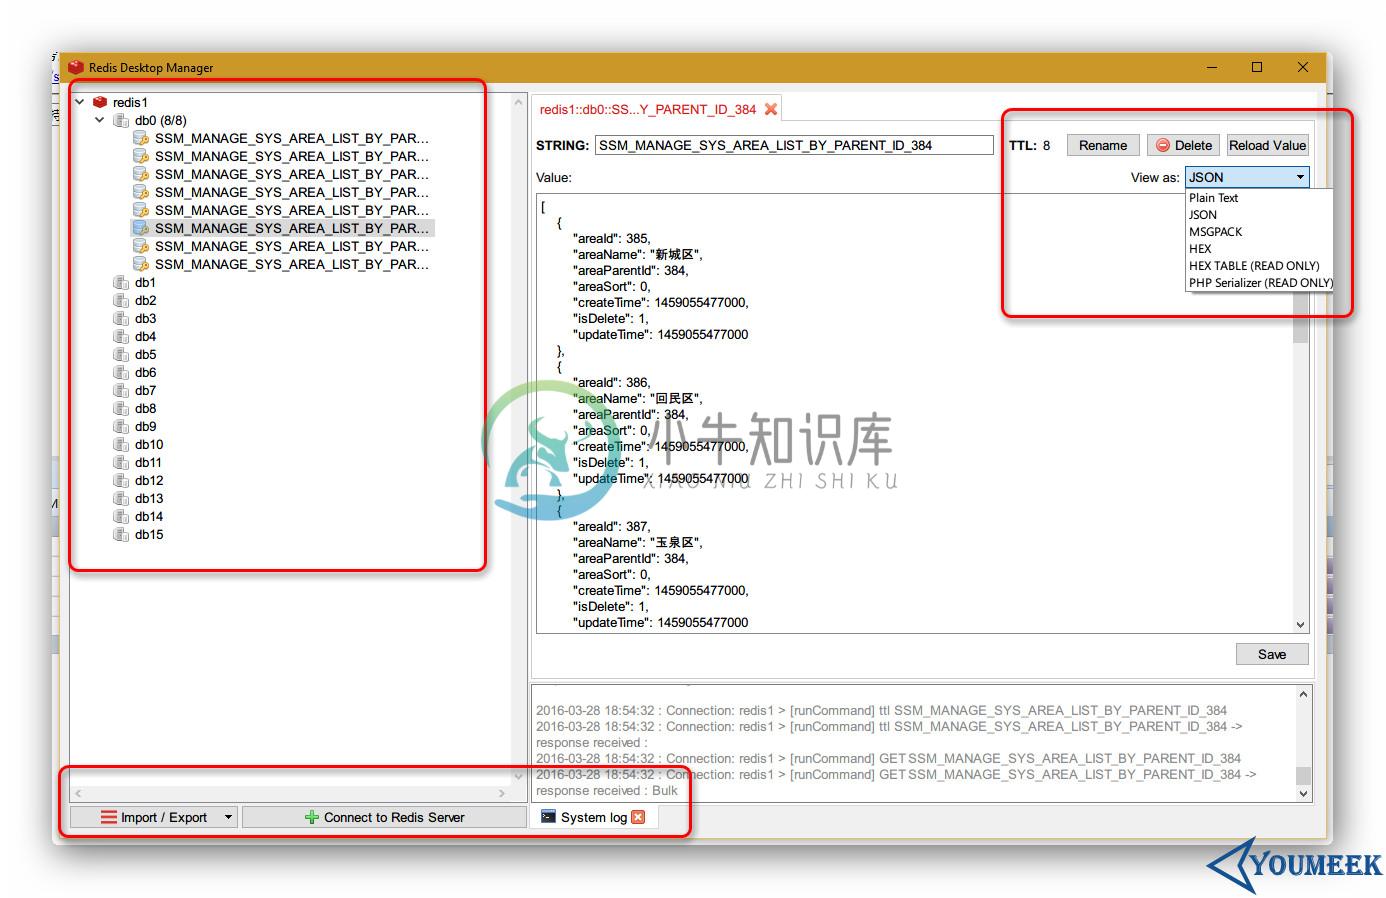
- Redis Desktop Manager
- 官网:http://redisdesktop.com/
- 官网下载:http://redisdesktop.com/download
- 效果如下图:

Redis 主从(主从从)配置
Redis 主从架构
- 假设有两台服务器,一台做主,一台做从
- Redis 主信息:
- IP:12.168.1.114=
- 端口:6379
- Redis 从信息:
- IP:12.168.1.115
- 端口:6379
- Redis 主信息:
- 编辑从机的 Redis 配置文件,找到 210 行(大概),默认这一行应该是注释的:
# slaveof <masterip> <masterport> - 我们需要去掉该注释,并且填写我们自己的主机的 IP 和 端口,比如:
slaveof 192.168.1.114 6379 - 配置完成后重启从机 Redis 服务
- 重启完之后,进入主机的 redis-cli 状态下,输入:
INFO replication- 可以查询到当前主机的 redis 处于什么角色,有哪些从机已经连上主机。
- 此时已经完成了主从配置,我们可以测试下:
- 我们进入主机的 redis-cli 状态,然后 set 某个值,比如:
set myblog YouMeek.com
- 我们进入主机的 redis-cli 状态,然后 set 某个值,比如:
- 我们切换进入从机的 redis-cli 的状态下,获取刚刚设置的值看是否存在:
get myblog,此时,我们可以发现是可以获取到值的。 - 但是有一个需要注意的:从库不具备写入数据能力,不然会报错。 从库只有只读能力。
Redis主从从架构
- Redis 主从从的意思:看桌面上的截图。
- 优点,除了减少主库连接的压力,还有可以关掉主库的持久化功能,把持久化的功能交给从库进行处理。
- 第一个从库配置的信息是连上主库,后面的第二个从库配置的连接信息是连上第一个从库, 假如还有第三个从库的话,我们可以把第三个从库的配置信息连上第二个从库上,以此类推。
Redis 3 主 2 从 3 哨兵—配置集群+HA(高可用、故障转移)
- 3 主 2 从 3 哨兵(平均每台机子是:1 主 2 从 3 哨兵)
- 一个健康的集群部署,至少需要 3 个 Sentinel 实例,官网(Example 2: basic setup with three boxes):https://redis.io/topics/sentinel
- 这里使用了 3 台阿里云服务器,系统:CentOS 6.8
- 3 主:
192.168.1.1
先做 Redis 集群,然后写个 Spring Data Redis 测试是否可以正常使用该集群
- 每台服务器各有一个 Redis 程序,然后有 3 个不同配置文件,启动 Redis 的时候指定各自的配置文件,依次表示 3 个 Redis 程序。
- 先关闭防火墙,避免各种端口未开放问题
- Redis 目前支持主从复制,但是主挂掉后,从也只能只读,所以需要在主挂掉后,从一个其中一个从节点中升级到主,这里用到的是:redis sentinel
- 漂移 IP 这里用到 keepalived
Windows 版本的 Redis
- Windows 是别人改造的版本,需要到这里下载:https://github.com/MSOpenTech/redis/releases
- 使用
.msi后缀的文件进行安装,此安装包自带安装 Windows 服务 - 配置文件也跟原版本不一样,叫做:
redis.windows.conf

