jekyll-toc
Table of Contents
Installation
Add jekyll-toc plugin in your site's Gemfile, and run bundle install.
gem 'jekyll-toc'
Add jekyll-toc to the gems: section in your site's _config.yml.
plugins:
  - jekyll-toc
Set toc: true in posts for which you want the TOC to appear.
---
layout: post
title: "Welcome to Jekyll!"
toc: true
---
Usage
There are three Liquid filters, which can be applied to HTML content,e.g. the Liquid variable content available in Jekyll's templates.
Basic Usage
toc filter
Add the toc filter to your site's {{ content }} (e.g. _layouts/post.html).
{{ content | toc }}
This filter places the TOC directly above the content.
Advanced Usage
If you'd like separated TOC and content, you can use {% toc %} tag (or toc_only filter) and inject_anchors filter.
{% toc %} tag / toc_only filter
Generates the TOC itself as described below.Mostly useful in cases where the TOC should not be placed immediatelyabove the content but at some other place of the page, i.e. an aside.
<div>
  <div id="table-of-contents">
    {% toc %}
  </div>
  <div id="markdown-content">
    {{ content }}
  </div>
</div>
{% toc %} Tag Limitation
{% toc %} works only for Jekyll Posts and Jekyll Collections.If you'd like to use {% toc %} except posts or collections, please use toc_only filter as described below.
<div>
  <div id="table-of-contents">
    {{ content | toc_only }}
  </div>
  <div id="markdown-content">
    {{ content | inject_anchors }}
  </div>
</div>
inject_anchors filter
Injects HTML anchors into the content without actually outputting the TOC itself.They are of the form:
<a class="anchor" href="#heading1-1" aria-hidden="true">
  <span class="octicon octicon-link"></span>
</a>
This is only useful when the TOC itself should be placed at some otherlocation with the toc_only filter.
Generated HTML
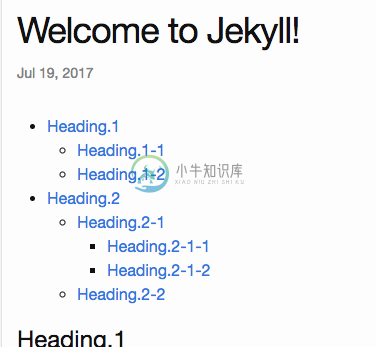
jekyll-toc generates an unordered list by default. The HTML output is as follows.
<ul id="toc" class="section-nav">
  <li class="toc-entry toc-h1"><a href="#heading1">Heading.1</a>
    <ul>
      <li class="toc-entry toc-h2"><a href="#heading1-1">Heading.1-1</a></li>
      <li class="toc-entry toc-h2"><a href="#heading1-2">Heading.1-2</a></li>
    </ul>
  </li>
  <li class="toc-entry toc-h1"><a href="#heading2">Heading.2</a>
    <ul>
      <li class="toc-entry toc-h2"><a href="#heading2-1">Heading.2-1</a>
        <ul>
          <li class="toc-entry toc-h3"><a href="#heading2-1-1">Heading.2-1-1</a></li>
          <li class="toc-entry toc-h3"><a href="#heading2-1-2">Heading.2-1-2</a></li>
        </ul>
      </li>
      <li class="toc-entry toc-h2"><a href="#heading2-2">Heading.2-2</a></li>
    </ul>
  </li>
</ul>
Customization
jekyll-toc is customizable on _config.yml.
Default Configuration
# _config.yml
toc:
  min_level: 1
  max_level: 6
  ordered_list: false
  no_toc_section_class: no_toc_section
  list_id: toc
  list_class: section-nav
  sublist_class: ''
  item_class: toc-entry
  item_prefix: toc-
TOC levels
# _config.yml
toc:
  min_level: 2 # default: 1
  max_level: 5 # default: 6
The default heading range is from <h1> to <h6>.
Enable TOC by default
You can enable TOC by default with Front Matter Defaults:
# _config.yml
defaults:
  - scope:
      path: ""
    values:
      toc: true
Skip TOC
The heading is ignored in the toc by adding no_toc class.
<h1>h1</h1>
<h1 class="no_toc">This heading is ignored in the TOC</h1>
<h2>h2</h2>
Skip TOC Sectionally
The headings are ignored inside the element which has no_toc_section class.
<h1>h1</h1>
<div class="no_toc_section">
  <h2>This heading is ignored in the TOC</h2>
  <h3>This heading is ignored in the TOC</h3>
</div>
<h4>h4</h4>
Which would result in only the <h1> & <h4> within the example being included in the TOC.
The class can be configured on _config.yml:
# _config.yml
toc:
  no_toc_section_class: exclude # default: no_toc_section
Configuring multiple classes are allowed:
# _config.yml
toc:
  no_toc_section_class:
    - no_toc_section
    - exclude
    - your_custom_skip_class_name
CSS Styling
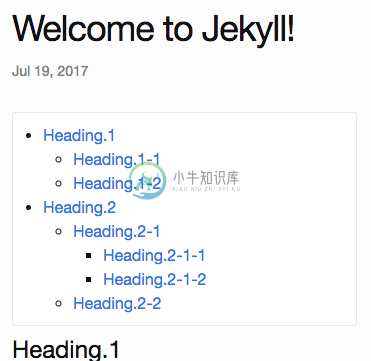
The toc can be modified with CSS. The sample CSS is the following.
.section-nav {
  background-color: #fff;
  margin: 5px 0;
  padding: 10px 30px;
  border: 1px solid #e8e8e8;
  border-radius: 3px;
}
Each TOC li entry has two CSS classes for further styling. The general toc-entry is applied to all li elements in the ul.section-nav.
Depending on the heading level each specific entry refers to, it has a second CSS class toc-XX, where XX is the HTML heading tag name.For example, the TOC entry linking to a heading <h1>...</h1> (a single # in Markdown) will get the CSS class toc-h1.
Custom CSS Class and ID
You can apply custom CSS classes to the generated <ul> and <li> tags.
# _config.yml
toc:
  list_id: my-toc-id # Default: "toc"
  list_class: my-list-class # Default: "section-nav"
  sublist_class: my-sublist-class # Default: no class for sublists
  item_class: my-item-class # Default: "toc-entry"
  item_prefix: item- # Default: "toc-":
Using Unordered/Ordered lists
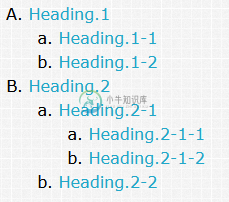
By default the table of contents will be generated as an unordered list via <ul></ul> tags. This can be configured to use ordered lists instead <ol></ol>.This can be configured in _config.yml:
# _config.yml
toc:
  ordered_list: true # default is false
In order to change the list type, use the list-style-type css property.Add a class to the sublist_class configuration to append it to the ol tags so that you can add the list-style-type property.
Example
# _config.yml
toc:
  ordered_list: true
  list_class: my-list-class
  sublist_class: my-sublist-class
.my-list-class {
  list-style-type: upper-alpha;
}

.my-sublist-class: {
  list-style-type: lower-alpha;
}
This will produce:
Alternative Tools
- Adding anchor to headings
- Generating TOC for kramdown content
-
使用Jekyll构建博客并使用 1.到jekyll模板网站下载自己喜欢的模板 http://jekyllthemes.org 2.在github上创建repository 3.利用git命令在下载好的文件夹完成博客初始化 #git初始化 $ git init #创建一个没有父节点的分支gh-pages。因为github规定,只有该分支中的页面,才会
-
对于喜欢用Vim书写或者浏览markdown格式的文档的人来说,可能或多或少的都希望Vim能有TOC(Table of Contents)功能,目前有两种解决方案,一种是使用mzlogin开发的vim-markdown-toc插件,另外是用tagbar,下面分别介绍 vim-markdown-toc是一款同时支持GFM和Redcarpet两种TOC链接风格的Table of Contents自动生
-
Jekyll 是采用Ruby语言实现的将纯文本转换为静态博客网站的利器,也是本站点的关键技术。本文将对Jekyll中的进阶内容进行说明。 基本过程 Jekyll 是一个简单的博客形态的静态站点生产机器。它有一个模版目录,其中包含原始文本格式的文档,通过一个转换器(如 Markdown)和我们的 Liquid 渲染器转化成一个完整的可发布的静态网站,你可以发布在任何你喜爱的服务器上。Jekyll 也
-
说明 在各个静态博客网站生成工具之间迁移文章时,可能会遇到链接不一致的问题。 比如你在 jekyll 配置好了,文章链接是 https://hqweay.cn/2019/09/23/new-post 。迁移到 hexo ,文章链接就变成了 https://hqweay.cn/2019/09/23/2019-09-23-new-post 。 通常,为了 SEO、使用第三方评论、或其它原因,我们总希望
-
The various Markdown renderers supported by Jekyll sometimes have extra options available. Kramdown Kramdown is the default Markdown renderer for Jekyll. Below is a list of the currently supported opt
-
目录 Jekyll 和 Github Pages是什么? Jekyll 基础 1. Jekyll 目录结构 2. 关于布局 3.更进一步 本篇文章主要内容 1. 使用collection 1.1 为什么要使用collection 1.2如何使用collection 1.2.1 告诉Jekyll读取你的collection 1.2.2 添加内容 2. 配置左侧边栏 3.优化前后页按钮 4. 添加代码
-
最终效果:https://haoqchen.site 如果喜欢可以直接使用我修改后的主题。 但是请一定要将我的信息替换成你自己的,另外请不要保留我的博客。 主体来源于:Hux Blog 跟着这个博客教程走:如何快速搭建自己的github.io博客 同时受到了这个博客的很大帮助:利用 GitHub Pages 快速搭建个人博客 以下部分借鉴GJXS1980 动态鼠标曲线 添加模块canvas-nes
-
Jekyll 是一个简单的免费的Blog生成工具,类似WordPress。但是和WordPress又有很大的不同,原因是jekyll只是一个生成静态网页的工具,不需要数据库支持。但是可以配合第三方服务,例如discuz。最关键的是jekyll可以免费部署在Github上,而且可以绑定自己的域名。 快速安装指令: gem install jekylljekyll new my-awesome-sit
-
中文网站 jekyllcn 快速开始 ~ $ gem install jekyll bundler ~ $ jekyll new my-awesome-site ~ $ cd my-awesome-site ~/my-awesome-site $ bundle install ~/my-awesome-site $ bundle exec jekyll serve # => 打开浏览器 http
-
jekyll-admin 是一个 jekyll 插件,为用户提供了传统 CMS(内容管理系统)风格的图形化界面来创作内容和管理 jekyll 网站。 该项目分为两部分。基于 Ruby 的 HTTP API 处理 jekyll 和文件系统的操作部分,以及在这个 API 基础上的基于 JavaScript 的前端部分。 安装: 就像安装其他插件一样,请参阅 jekyll 文档的插件安装部分安装 jek
-
Jekyll的增强版,使用Markdown来写日志。 Jekyll采用静态文件方式管理,不需要数据库即可支持一个独立博客站点,在github-pages平台上被普遍采用。Jekyll-Bootstrap在Jekyll基础上,集成了twitter-bootstrap界面风格和一些实用的插件,并且易于扩展。
-
Jekyll Docker Jekyll Docker is a software image that has Jekyll and many of its dependencies ready to use for you in an encapsulated format. It includes a default set of gems, different image types wi
-
jekyll-katex This is a Jekyll plugin for performing compile-time math rendering via the KaTeX library.KaTeX is a library for rending math on the web using LaTeX, similar to MathJax. KaTeX differs from
-
�� Jekyll Spaceship �� Jekyll plugin for Astronauts. Install | Config | Usage | Credits | License Built with ❤︎ by jeffreytse and contributors Spaceship is a minimalistic, powerful and extremely custo
-
reveal-jekyll Transforms Markdown files into presentation slides using reveal.js and Jekyll. The theme is based on Solarized Colors (by Ethan Schoonover) containing a light and a dark theme. reveal-je


