如何简单入门使用Travis-CI持续集成
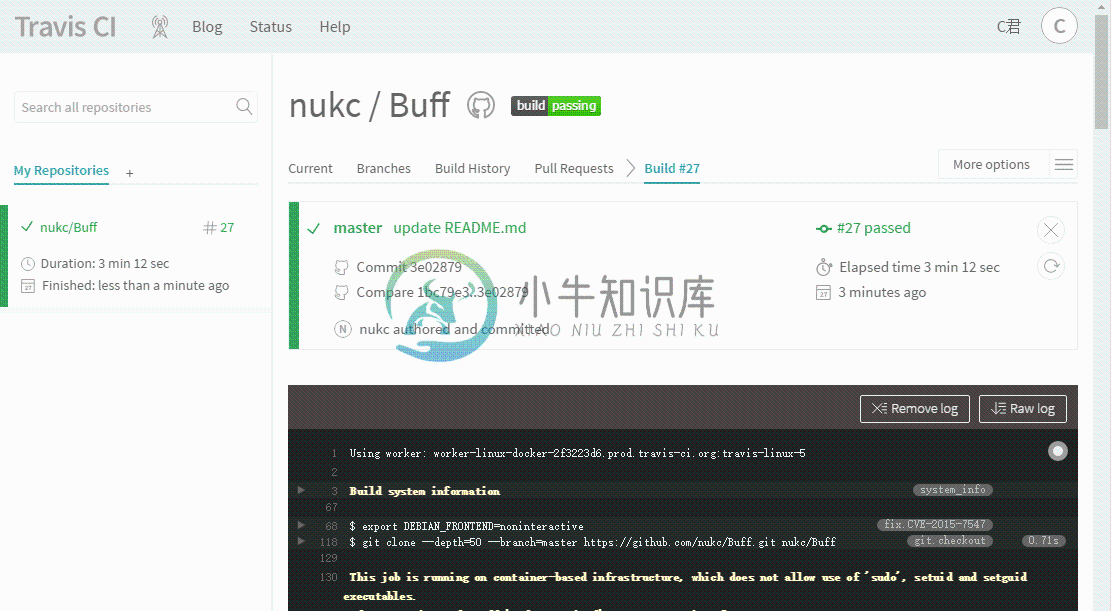
不知道你们有没有看过 这样一个标识,只看文字就可以看出这个项目是否已经构建成功(让大家知道项目没有问题),如果不成功则会显示 Build failing。 如果你的项目还没有使用,那么赶快跟我一起来装13吧。233333
Travis-CI 是什么?
Travis-CI是一个开源的持续构建项目,能够测试和部署;Travis-CI会同步你在GitHub上托管的项目,每当你Commit Push之后,就会在几分钟内开始按照你的要求测试部署你的项目。
目前Travis-CI分http://travis-ci.org/(GitHub公开项目进这个)和http://travis-ci.com/(私有付费项目)
官方文档:https://docs.travis-ci.com/
开始使用 Travis-CI
1:用你的GitHub账号登录Travis-CI,确认接受访问GitHub的权限。
2:登录之后,Travis-CI就会同步你GitHub账号的仓库。然后打开个人页面并给你想要构建的项目启用Travis-CI。
3:添加 .travis.yml 文件到你项目根目录下,Travis-CI会按照.travis.yml里的内容进行构建。
如下是一个Android项目配置例子:
language: android
android:
  components:
    # Uncomment the lines below if you want to
    # use the latest revision of Android SDK Tools
    # - platform-tools
    # - tools

    # The BuildTools version used by your project
    - build-tools-19.1.0

    # The SDK version used to compile your project
    - android-19

    # Additional components
    - extra-google-google_play_services
    - extra-google-m2repository
    - extra-android-m2repository
    - addon-google_apis-google-19

    # Specify at least one system image,
    # if you need to run emulator(s) during your tests
    - sys-img-armeabi-v7a-android-19
    - sys-img-x86-android-17
4:把 .travis.yml push到你的GitHub上以触发Travis-CI进行构建。
5:最后你就可以到构建状态页面来查看你的项目是否构建成功。
配置构建脚本
由于我也是刚入门不久,所以我只能讲解一些基础用法,如果有其他需求,大家可以自己慢慢探索。
先来看看下面这个我使用过的配置:
language: android   # 声明构建语言环境

notifications:      # 每次构建的时候是否通知,如果不想收到通知邮箱(个人感觉邮件贼烦),那就设置false吧
  email: false

sudo: false         # 开启基于容器的Travis CI任务,让编译效率更高。

android:            # 配置信息
  components:
    - tools
    - build-tools-23.0.2
    - android-23
    - extra-android-m2repository     # Android Support Repository
    - extra-android-support          # Support Library

before_install:
 - chmod +x gradlew  # 改变gradlew的访问权限

script:              # 执行:下面的命令
  - ./gradlew assembleRelease

before_deploy:       # 部署之前
  # 使用 mv 命令进行修改apk文件的名字
  - mv app/build/outputs/apk/app-release.apk app/build/outputs/apk/buff.apk

deploy:              # 部署
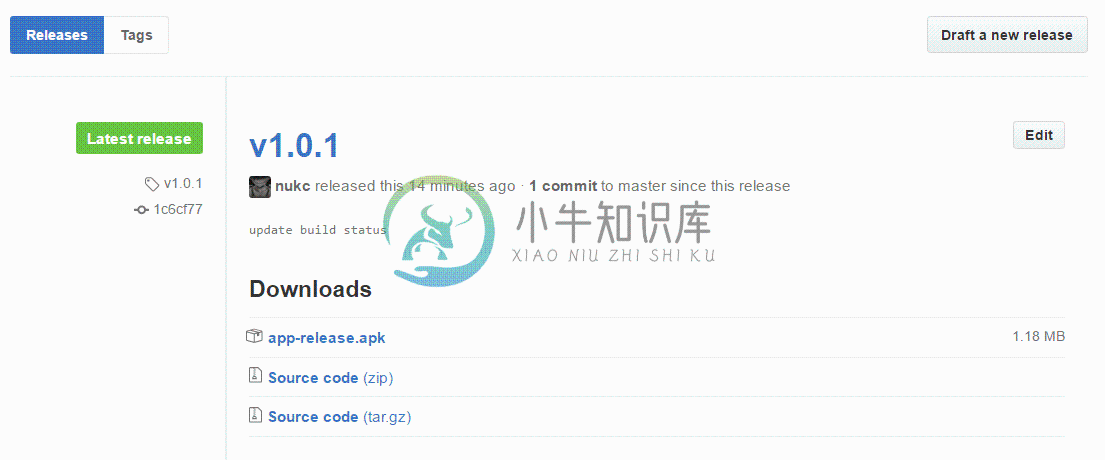
  provider: releases # 部署到GitHub Release,除此之外,Travis CI还支持发布到fir.im、AWS、Google App Engine等
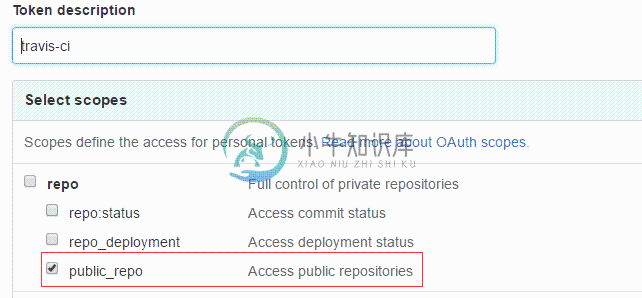
  api_key:           # 填写GitHub的token (Settings -> Personal access tokens -> Generate new token)
    secure: 7f4dc45a19f742dce39cbe4d1e5852xxxxxxxxx
  file: app/build/outputs/apk/buff.apk   # 部署文件路径
  skip_cleanup: true     # 设置为true以跳过清理,不然apk文件就会被清理
  on:     # 发布时机
    tags: true       # tags设置为true表示只有在有tag的情况下才部署
除了上面这些命令外,还有很多,比如:branches: (指定持续集成的分支), install:(安装软件包)等待,如果想进一步了解请到Customizing Your Build
自动发布到GitHub Release:
密码和证书安全
对于密码等敏感信息,Travis CI提供了2种解决方案:
对密码等敏感信息进行加密,然后再构建环境时解密。
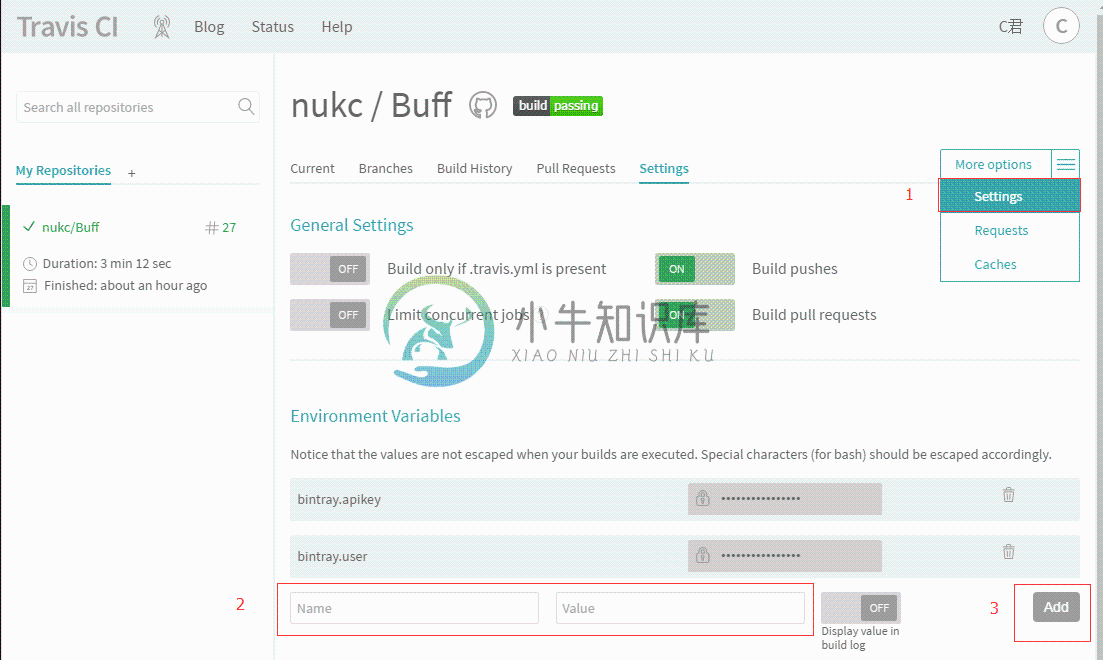
在Travis CI控制台设置环境变量,然后使用
System.getenv()获取值。
考虑到安全问题,我们的签名设置可能是这样的:
release {
    try {
        storeFile file("nukc.jks")
        storePassword KEYSTORE_PASSWORD
        keyAlias "C"
        keyPassword KEY_PASSWORD
    } catch (ex) {
        throw new Exception("You should define KEYSTORE_PASSWORD and KEY_PASSWORD in gradle.properties.")
    }
}
KEYSTORE_PASSWORD和KEY_PASSWORD环境变量放在了gradle.properties文件,可以直接在build.gradle中使用如果不知道是否能获取到gradle.properties里的环境变量,那就加个判断吧。(设置了会获取不到?比如.gitignore设置了忽略没有上传,判断一下也好)然后最终就变成这样:
release {
    try {
        storeFile file("nukc.jks")
        storePassword project.hasProperty("KEYSTORE_PASSWORD") ? KEYSTORE_PASSWORD : System.getenv("KEYSTORE_PASSWORD")
        keyAlias "C"
        keyPassword project.hasProperty("KEY_PASSWORD") ? KEY_PASSWORD : System.getenv("KEY_PASSWORD")
    } catch (ex) {
        throw new Exception("You should define KEYSTORE_PASSWORD and KEY_PASSWORD in gradle.properties.")
    }
}
对于文件加密,Travis CI提供了一个基于ruby的CLI命令行工具,可以直接使用gem安装:
gem install travis
安装后进入安卓项目根目录,尝试对证书文件加密:
travis encrypt-file nukc.jks --add
如果首次运行,travis会提示需要登录,运行travis login --org并输入Github用户名密码即可。(付费版则为travis login --pro)
travis encrypt-file指令会做几件事情:
在Travis CI控制台自动生成一对密钥: encrypted_e6c55137b621_key和encrypted_e6c55137b621_iv
基于密钥通过openssl对文件进行加密,上例中会项目根目录生成xx.jks.enc文件
在.travis.yml中自动生成Travis CI环境下解密文件的配置,上例运行后可以看到.travis.yml中多了几行:
before_install:
    - gem install fir-cli
    - openssl aes-256-cbc -K $encrypted_e6c55137b621_key -iv $encrypted_e6c55137b621_iv
      -in nukc.jks.enc -out nukc.jks -d
最后在.gitignore中忽略xx.jks以及gradle.properties
项目使用了Bintray配置文件
目前我的开源项目用不到证书签名,我还是比较关心Bintray apikey的安全,上传到JCenter还是比较实用的。本来我把bintray.apikey和bintray.user设置在了local.properties中,但由于local.properties不会被上传,Travis CI无法获取到,那肯定是会build failing的。
之前:(报错,没有local.properties这样的文件)
Properties properties = new Properties()
properties.load(project.rootProject.file('local.properties').newDataInputStream())
bintray {
    user = properties.getProperty("bintray.user")
    key = properties.getProperty("bintray.apikey")
    configurations = ['archives']
    pkg {
        repo = "maven"
        name = "Buff"
        websiteUrl = siteUrl
        vcsUrl = gitUrl
        licenses = ["MIT"]
        publish = true
    }
}
然后我把这2个变量添加到了Travis CI控制台,最后改一下。
Properties properties = new Properties()
boolean isHasFile = false
if (project.rootProject.findProject('local.properties') != null){
    isHasFile = true
    properties.load(project.rootProject.file('local.properties').newDataInputStream())
}
bintray {
    user = isHasFile ? properties.getProperty("bintray.user") : System.getenv("bintray.user")
    key = isHasFile ? properties.getProperty("bintray.apikey") : System.getenv("bintray.apikey")
    configurations = ['archives']
    pkg {
        repo = "maven"
        name = "Buff"
        websiteUrl = siteUrl
        vcsUrl = gitUrl
        licenses = ["MIT"]
        publish = true
    }
}
如何在自己的项目中显示Status Image
爬过的坑
如果你遇到了其他的问题,可以尝试到travis-ci/issues里找找,或者Google / StackOverflow
/home/travis/build.sh: line 45: ./gradlew: Permission denied
gradlew的权限问题,修改gradlew的权限,在.travis.yml里加上:
before_install:
 - chmod +x gradlew
failed to find Build Tools revision 23.0.2
我是加上 - tools 解决的:
android:
  components:
    - tools
failed to deploy
设置一下这个token的权限就好了
最后,希望大家都能顺顺利利的build passing。
-
本文翻译自:How to run travis-ci locally I've just joined a project, and I'm new to travis-ci. 我刚加入了一个项目,我是travis-ci的新手。 I'd rather not have to push every little change to .travis.yml and every little chang
-
travis-ci自动部署 by Amir Off 由Amir Off 如何使用Travis CI设置高级自动部署 (How to set up advanced automatic deployment with Travis CI) This post is a sequel to my previous Advanced Web Development and Deployment Work
-
travis-ci自动部署 by Robin Bobbitt 罗宾·波比(Robin Bobbitt) 如何使用Travis CI部署(几乎)零恐惧的Cloud Foundry应用 (How to deploy your Cloud Foundry app with (almost) zero fear using Travis CI) Application deployments to the
-
node Assert api学习 assert.strictEqual() / assert.notStrictEqual() 判断期望值与实际值是否相等或不相等 assert.deepStrictEqual() / assert.notDeepStrictEqual() 判断对象是否完全相等或不相等(深度遍历对象的可枚举属性,且递归对比子对象的可枚举属性) assert.throws() /
-
travis ci by Vijayabharathi Balasubramanian 通过Vijayabharathi Balasubramanian 如何使用Travis CI和GitHub进行Web开发工作流程 (How to use Travis CI and GitHub for your web development workflow’s heavy lifting) It’s co
-
travis ci A single misplaced comma in a single JSON file can wreck your app. But only if you let it. 单个JSON文件中的单个错位逗号可能会破坏您的应用程序。 但前提是您愿意。 The best way to stop this from happening is to catch that err
-
原文链接 —— 以webpack文档部署为例子 Overview Some friends and I have been running webpack-china for a few months. After a few months effort, most doc translation job have also been done. We keep tracking the mast
-
from http://oyanglul.us getting started Github page 上建博客本来就是很geek的事情, 用octopress来建博客可用说是 for ruby geeks, 因为可以用欢乐的rake <task> 来完成建立文章和发布等一系 列task. 当然他依赖于 Jekyll 如果wordpress的发布过程是这样的: 打开wordpress 点下new
-
Contents Introduction Define Resource "try" and "catch" mode Bool mode Annotation mode Check block exception Resource for asynchronous entries Configure Rules Definitions of rules HTTP APIs for rules
-
Normal Usage If remoteFilter is set as a function, At.js will invoke it if local filter can not find any data so, At.js will always invoke remoteFilter with matched string and then you can use it to f
-
CSS Grid(网格) 模块是创建网站布局一个非常棒的工具。它能使你快速地进行布局尝试,比你尝试过的任何其他布局系统都快。 要创建的网格 我们将模仿一个经典网站布局,从非常基本的 Grid(网格) 开始: 首先,我将解释我们需要的 HTML 和 CSS ,我已经将其分解为四个部分。 一旦你了解了这些,我们将继续进行布局试验。 1、HTML 结构 我们需要的第一件事是一点 HTML 。 一个网格容
-
As of Dojo 1.8, Dojo has converted their modules to AMD modules. However, Dojo uses some loader plugins, and the loader plugin APIs are still in draft mode for AMD. So while some modules from Dojo can
-
Introduction While RequireJS loads jQuery just like any other dependency, jQuery's wide use and extensive plugin ecosystem mean you'll likely have other scripts in your project that also depend on jQu
-
问题 如何在 Google App Engine 上使用模板 解答 web.py templetor 把模板编译成 python 字节码,这需要访问标准库中的 parser 模块。不幸的是,由于安全原因 GAE 禁用了这个模块。 为了克服这个状况,web.py 支持把模板编译成 python 代码,从而避免在 GAE 上使用原来的模板。web.py 确保在应用这种方法的时候模板中的代码不需要任何改


