SpringBoot + SpringSecurity 环境搭建的步骤
一、使用SpringBoot+Maven搭建一个多模块项目(可以参考这篇文章 --> 这里)

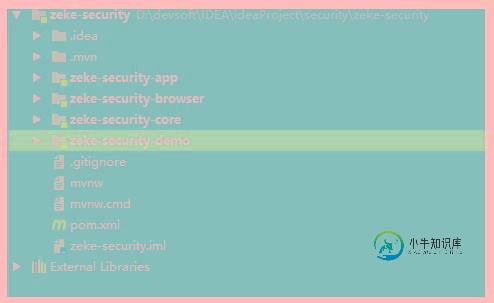
二、删除父工程的src文件,删除app、browser、core下的.java文件
依赖关系:
- demo 依赖 browser
- browser、app依赖core
三、父工程pom.xml文件
<?xml version="1.0" encoding="UTF-8"?>
<project xmlns="http://maven.apache.org/POM/4.0.0" xmlns:xsi="http://www.w3.org/2001/XMLSchema-instance"
  xsi:schemaLocation="http://maven.apache.org/POM/4.0.0 http://maven.apache.org/xsd/maven-4.0.0.xsd">
  <modelVersion>4.0.0</modelVersion>

  <groupId>com.zeke</groupId>
  <artifactId>zeke-security</artifactId>
  <version>0.0.1-SNAPSHOT</version>
  <packaging>pom</packaging>
  <name>zeke-security</name>

  <properties>
    <zeke-security-version>1.0-SNAPSHOT</zeke-security-version>
  </properties>

  <modules>
    <module>zeke-security-app</module>
    <module>zeke-security-browser</module>
    <module>zeke-security-core</module>
    <module>zeke-security-demo</module>
  </modules>

  <dependencies>
    <dependency>
      <groupId>junit</groupId>
      <artifactId>junit</artifactId>
      <scope>test</scope>
    </dependency>
    <dependency>
      <groupId>org.springframework.boot</groupId>
      <artifactId>spring-boot-test</artifactId>
      <version>1.5.8.RELEASE</version>
      <scope>test</scope>
    </dependency>
  </dependencies>

  <dependencyManagement>
    <dependencies>
      <dependency>
        <groupId>io.spring.platform</groupId>
        <artifactId>platform-bom</artifactId>
        <version>Brussels-SR6</version>
        <type>pom</type>
        <scope>import</scope>
      </dependency>
      <dependency>
        <groupId>org.springframework.cloud</groupId>
        <artifactId>spring-cloud-dependencies</artifactId>
        <version>Dalston.SR5</version>
        <type>pom</type>
        <scope>import</scope>
      </dependency>
      <dependency>
        <groupId>org.springframework.boot</groupId>
        <artifactId>spring-boot-configuration-processor</artifactId>
        <optional>true</optional>
      </dependency>
    </dependencies>
  </dependencyManagement>

  <build>
    <plugins>
      <plugin>
        <groupId>org.apache.maven.plugins</groupId>
        <artifactId>maven-compiler-plugin</artifactId>
        <version>2.3.2</version>
        <configuration>
          <source>1.8</source>
          <target>1.8</target>
          <encoding>UTF-8</encoding>
        </configuration>
      </plugin>
    </plugins>
  </build>

</project>
四、zeke-security-demo项目下的pom.xml文件
<?xml version="1.0" encoding="UTF-8"?>
<project xmlns="http://maven.apache.org/POM/4.0.0" xmlns:xsi="http://www.w3.org/2001/XMLSchema-instance"
  xsi:schemaLocation="http://maven.apache.org/POM/4.0.0 http://maven.apache.org/xsd/maven-4.0.0.xsd">
  <modelVersion>4.0.0</modelVersion>

  <parent>
    <groupId>com.zeke</groupId>
    <artifactId>zeke-security</artifactId>
    <version>0.0.1-SNAPSHOT</version>
  </parent>

  <artifactId>zeke-security-demo</artifactId>>

  <dependencies>
    <dependency>
      <groupId>com.zeke</groupId>
      <artifactId>zeke-security-browser</artifactId>
      <version>${zeke-security-version}</version>
    </dependency>
    <dependency>
      <groupId>junit</groupId>
      <artifactId>junit</artifactId>
      <version>4.12-beta-3</version>
      <scope>test</scope>
    </dependency>
    <dependency>
      <groupId>org.springframework.boot</groupId>
      <artifactId>spring-boot-starter-aop</artifactId>
    </dependency>
    <dependency>
      <groupId>commons-io</groupId>
      <artifactId>commons-io</artifactId>
    </dependency>

    <!-- swagger -->
    <dependency>
      <groupId>io.springfox</groupId>
      <artifactId>springfox-swagger2</artifactId>
      <version>2.7.0</version>
    </dependency>
    <dependency>
      <groupId>io.springfox</groupId>
      <artifactId>springfox-swagger-ui</artifactId>
      <version>2.7.0</version>
    </dependency>

    <!-- WireMock -->
    <dependency>
      <groupId>com.github.tomakehurst</groupId>
      <artifactId>wiremock</artifactId>
      <version>2.14.0</version>
    </dependency>
    <dependency>
      <groupId>org.springframework</groupId>
      <artifactId>spring-test</artifactId>
      <version>4.3.12.RELEASE</version>
      <scope>test</scope>
    </dependency>
    <dependency>
      <groupId>org.springframework</groupId>
      <artifactId>spring-test</artifactId>
      <version>4.3.12.RELEASE</version>
      <scope>test</scope>
    </dependency>
    <dependency>
      <groupId>org.springframework</groupId>
      <artifactId>spring-test</artifactId>
      <version>4.3.12.RELEASE</version>
      <scope>test</scope>
    </dependency>
  </dependencies>

  <build>
    <plugins>
      <plugin>
        <groupId>org.springframework.boot</groupId>
        <artifactId>spring-boot-maven-plugin</artifactId>
        <version>1.5.6.RELEASE</version>
        <executions>
          <execution>
            <goals>
              <goal>repackage</goal>
            </goals>
          </execution>
        </executions>
      </plugin>
    </plugins>
    <finalName>demo</finalName>
  </build>
</project>
五、zeke-security-core项目下的pom.xml文件
<?xml version="1.0" encoding="UTF-8"?>
<project xmlns="http://maven.apache.org/POM/4.0.0" xmlns:xsi="http://www.w3.org/2001/XMLSchema-instance"
  xsi:schemaLocation="http://maven.apache.org/POM/4.0.0 http://maven.apache.org/xsd/maven-4.0.0.xsd">
  <modelVersion>4.0.0</modelVersion>

  <parent>
    <artifactId>zeke-security</artifactId>
    <groupId>com.zeke</groupId>
    <version>0.0.1-SNAPSHOT</version>
  </parent>

  <artifactId>zeke-security-core</artifactId>

  <dependencies>
    <dependency>
      <groupId>org.springframework.cloud</groupId>
      <artifactId>spring-cloud-starter-oauth2</artifactId>
    </dependency>
    <!--<dependency>-->
    <!--<groupId>org.springframework.boot</groupId>-->
    <!--<artifactId>spring-boot-starter-data-redis</artifactId>-->
    <!--</dependency>-->
    <dependency>
      <groupId>org.springframework.boot</groupId>
      <artifactId>spring-boot-starter-jdbc</artifactId>
    </dependency>
    <dependency>
      <groupId>mysql</groupId>
      <artifactId>mysql-connector-java</artifactId>
    </dependency>
    <dependency>
      <groupId>org.springframework.social</groupId>
      <artifactId>spring-social-config</artifactId>
    </dependency>
    <dependency>
      <groupId>org.springframework.social</groupId>
      <artifactId>spring-social-core</artifactId>
    </dependency>
    <dependency>
      <groupId>org.springframework.social</groupId>
      <artifactId>spring-social-security</artifactId>
    </dependency>
    <dependency>
      <groupId>org.springframework.social</groupId>
      <artifactId>spring-social-web</artifactId>
    </dependency>
    <dependency>
      <groupId>commons-lang</groupId>
      <artifactId>commons-lang</artifactId>
    </dependency>
    <dependency>
      <groupId>commons-collections</groupId>
      <artifactId>commons-collections</artifactId>
    </dependency>
    <dependency>
      <groupId>commons-beanutils</groupId>
      <artifactId>commons-beanutils</artifactId>
    </dependency>
  </dependencies>
</project>
六、zeke-security-browser项目下的pom.xml文件
<?xml version="1.0" encoding="UTF-8"?>
<project xmlns="http://maven.apache.org/POM/4.0.0" xmlns:xsi="http://www.w3.org/2001/XMLSchema-instance"
  xsi:schemaLocation="http://maven.apache.org/POM/4.0.0 http://maven.apache.org/xsd/maven-4.0.0.xsd">
  <modelVersion>4.0.0</modelVersion>

  <parent>
    <groupId>com.zeke</groupId>
    <artifactId>zeke-security</artifactId>
    <version>0.0.1-SNAPSHOT</version>
  </parent>

  <artifactId>zeke-security-browser</artifactId>

  <dependencies>
    <dependency>
      <groupId>com.zeke</groupId>
      <artifactId>zeke-security-core</artifactId>
      <version>${zeke-security-version}</version>
    </dependency>
    <dependency>
      <groupId>org.springframework.session</groupId>
      <artifactId>spring-session</artifactId>
    </dependency>
  </dependencies>
</project>
七、zeke-security-app项目下的pom.xml文件
<?xml version="1.0" encoding="UTF-8"?>
<project xmlns="http://maven.apache.org/POM/4.0.0" xmlns:xsi="http://www.w3.org/2001/XMLSchema-instance"
  xsi:schemaLocation="http://maven.apache.org/POM/4.0.0 http://maven.apache.org/xsd/maven-4.0.0.xsd">
  <modelVersion>4.0.0</modelVersion>

  <parent>
    <artifactId>zeke-security</artifactId>
    <groupId>com.zeke</groupId>
    <version>0.0.1-SNAPSHOT</version>
  </parent>

  <artifactId>zeke-security-app</artifactId>

  <dependencies>
    <dependency>
      <groupId>com.zeke</groupId>
      <artifactId>zeke-security-core</artifactId>
      <version>${zeke-security-version}</version>
    </dependency>
  </dependencies>
</project>
八、zeke-security-demo项目下的application.properties
 spring.datasource.driver-class-name=com.mysql.jdbc.Driver
spring.datasource.url=jdbc:mysql://127.0.0.1:3306/imooc-demo
spring.datasource.username=root
spring.datasource.password=

spring.session.store-type=none
security.basic.enabled=false
九、在zeke-security-demo启动类上添加测试接口
@RestController
@SpringBootApplication
public class ZekeSecurityDemoApplication {

  public static void main(String[] args) {
    SpringApplication.run(ZekeSecurityDemoApplication.class, args);
  }

  @GetMapping("/hello")
  public String hello(){
    return "success";
  }
}
十、输入地址localhost/hello
以上就是本文的全部内容,希望对大家的学习有所帮助,也希望大家多多支持小牛知识库。
-
解压下列压缩包至/tmp/redis目录,以符合上述目录结构: 部署相关组件: cd /tmp/redis/deploy ./deploy.sh 修改Master配置文件redis.conf,注释掉包含slaveof的语句。 修改Slave配置文件redis.conf,添加slaveof masterIP port,指定主从 修改三台机器的sentinel配置文件,指定主服务器的IP和端口: se
-
本文向大家介绍PHP环境搭建的详细步骤,包括了PHP环境搭建的详细步骤的使用技巧和注意事项,需要的朋友参考一下 接着上篇继续学习,谈谈IIS支持php怎么配置: 1、去php官网下载php:http://windows.php.net/download/ 。IIS7我们需要选择php 5.3 以上的VC9包,下载zip文件。如图: 2、将 zip 包解压缩到自己选择的目录,例如 C:\PHP\。解
-
实践的前提是搭建环境,本节的几个小节将介绍在几种常见操作平台上 OpenResty 的安装。 为了降低用户安装门槛,对于不同系统安装,部分章节存在比较大的重复内容。读者只需要选择自己需要的平台并尝试安装即可。
-
在进行OpenFOAM编程之前,用户需要搭建编程环境。 首先用户需要确保手边有一个编译好OpenFOAM的Linux系统,也可以在这里下载编译好的虚拟机。虚拟机的意思是在用户的windows中单独存放一个linux系统。这样用户就不需要再单独安装linux系统。用户首先打开虚拟机,然后按住Ctrl+Alt+T三个按键打开终端,通过mkdir命令创建新的文件夹,名称为OpenFOAM_tut: $
-
本文向大家介绍python搭建虚拟环境的步骤详解,包括了python搭建虚拟环境的步骤详解的使用技巧和注意事项,需要的朋友参考一下 前言 相信对于python开发人员来说,机器上有不同的python版本是很正常的,因为开发的项目有的用2.6或2.7,有的就要用3.0+版本,如何把这些不同的版本管理好,保持每个环境的干净和独立,方便不同版本之间的切换,这时候就要用到我们的虚拟环境了,所以今天我们就来
-
本文向大家介绍Java+Eclipse+Selenium环境搭建的方法步骤,包括了Java+Eclipse+Selenium环境搭建的方法步骤的使用技巧和注意事项,需要的朋友参考一下 先选好自己要学的Selenium的版本然后再进行安装,少走弯路,,,, ===================================所需环境========================== 1、安装JA

