
Vue实现仿iPhone悬浮球的示例代码
悬浮球插件简单的效果图:
很遗憾,没找到太好的视频转gif的软件,压缩出来的大小超过了限制,就不放图了
可以参考其他人的图,效果一致:
简单实用案例:
<!-- 给定一个初始位置position,插槽中填写想滑动的部分 -->
<xuanfuqiu :position="position">
	<d-add-button @click="addPigFarm" add-item="猪场"></d-add-button>
</xuanfuqiu>
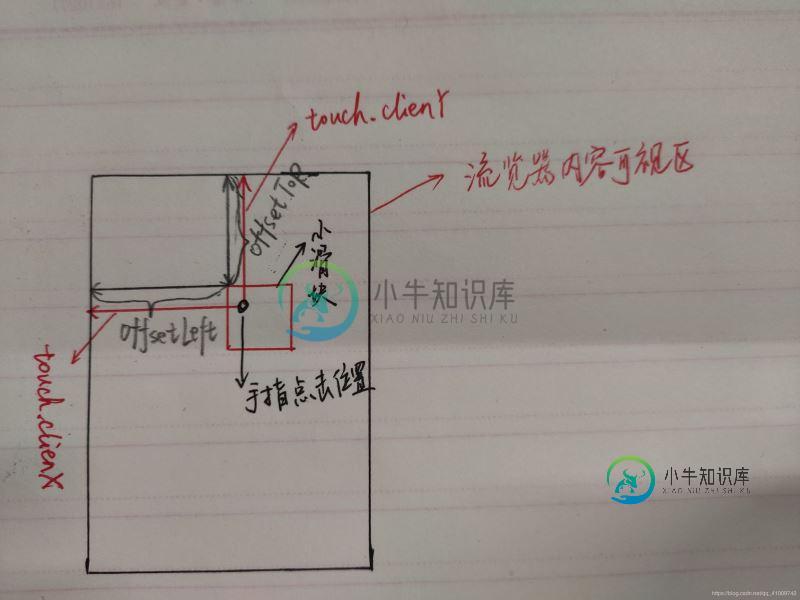
原理示意图
请结合代码注释来理解
悬浮球插件代码如下:
<template>
  <div>
    <div class="xuanfu" id="moveDiv" :style="position"
      @mousedown="down" @touchstart="down"
      @mousemove="move" @touchmove="move"
      @mouseup="end" @touchend="end">
      <slot></slot>
    </div>
  </div>
</template>

<script>
export default {
  name: "",
  components: {},
  props: {
    // 通过position来设置初始定位
    position: {
      type: Object,
      default: function() {
        return {
          top: "32.25rem",
          left: "18.34375rem"
        }
      }
    },
    // 通过fixed来禁用自由移动
    fixed: {
      type: Boolean,
      default: false
    }
  },
  data() {
    return {
      flags: false,
      positionTemp: { x: 0, y: 0 },  // 记录手指点击的位置
      nx: '', ny: '', dx: '', dy: '', xPum: '', yPum: '',
    }
  },
  watch: {},
  computed: {},
  methods: {
    // 实现移动端拖拽
    down(){
      if (this.fixed) {
        return
      }

      this.flags = true;
      var touch;
      // 该if判断是用touch还是mouse来移动
      if (event.touches) {
        touch = event.touches[0];
      } else {
        touch = event;
      }
      this.positionTemp.x = touch.clientX;  // 手指点击后的位置
      this.positionTemp.y = touch.clientY;

      this.dx = moveDiv.offsetLeft;  // 移动的div元素的位置
      this.dy = moveDiv.offsetTop;

      // console.log("moveDiv.offsetLeft", moveDiv.offsetLeft)
      // console.log("touch.clientX", touch.clientX)
    },
    move(){
      if(this.flags) {
        var touch ;
        if(event.touches){
          touch = event.touches[0];
        }else {
          touch = event;
        }
        this.nx = touch.clientX - this.positionTemp.x;  // 手指移动的变化量
        this.ny = touch.clientY - this.positionTemp.y;

        this.xPum = this.dx + this.nx;  // 移动后,div元素的位置
        this.yPum = this.dy + this.ny;

        let windowWidth = document.documentElement.clientWidth
        let windowHeight = document.documentElement.clientHeight
        // console.log("window.clientWidth", windowWidth)
        // console.log(this.xPum)
        // console.log(" moveDiv.clientWidth", moveDiv.clientWidth)

        if (this.xPum > 0 && (this.xPum + moveDiv.clientWidth < windowWidth)) {
        	// movediv的左右边,未出界
          moveDiv.style.left = this.xPum + "px";
        } else if (this.xPum <= 0) {
          // 左边出界,则左边缘贴边
          moveDiv.style.left = 0 + "px";
        } else if (this.xPum + moveDiv.clientWidth >= windowWidth) {
          // 右边缘出界
          moveDiv.style.left = (windowWidth - moveDiv.clientWidth) + "px";
          // console.log("dx", windowWidth - moveDiv.clientWidth)
        }
        // 上下未出界
        if (this.yPum > 0 && (this.yPum + moveDiv.clientHeight < windowHeight)) {
          moveDiv.style.top = this.yPum +"px";
        } else if (this.yPum <= 0) {
          // 上边缘出界
          moveDiv.style.top = 0 + "px"
        } else if (this.yPum + moveDiv.clientHeight >= windowHeight) {
          // 下边缘
          // console.log("windowHeight:", windowHeight)
          // console.log("moveDiv.clientHeight:", moveDiv.clientHeight)
          // console.log(this.yPum + moveDiv.clientHeight)
          moveDiv.style.top = windowHeight - moveDiv.clientHeight + "px"
        }

        // 阻止页面的滑动默认事件,为了只让悬浮球滑动,其他部分不滑动;如果碰到滑动问题,1.2 请注意是否获取到 touchmove, 系统默认passive: true,无法使用preventDefault
        // document.addEventListener("touchmove", function(){
        //  event.preventDefault();
        // }, { passive: false });
        // document.addEventListener("mousemove", function(){
        //   event.preventDefault();
        // }, { passive: false });
        document.addEventListener("touchmove", this.preventDefault, { passive: false })
        document.addEventListener("mousemove", this.preventDefault, { passive: false })
      }
    },
    //鼠标释放时候的函数,鼠标释放,移除之前添加的侦听事件,将passive设置为true,不然背景会滑动不了
    end(){
      this.flags = false
      // 注意事项,在添加和删除监听事件时,其function必须是同名的函数,不能为匿名函数。
      document.removeEventListener('touchmove',this.preventDefault, false)
      document.removeEventListener('mousemove',this.preventDefault, false)
      // 下面两句是保证在移除监听事件后,除了悬浮球的部分还能够滑动,如果不添加,则无法滑动
      document.addEventListener("touchmove", function(e) {
        window.event.returnValue = true
      })
      document.addEventListener("mousemove", function(e) {
        window.event.returnValue = true
      })
    },
    preventDefault(e) {
      e.preventDefault()
    }
  },
  created() {},
  mounted() {}
}
</script>

<style lang="scss" scoped>
.xuanfu {
  /* 如果碰到滑动问题,1.3 请检查 z-index。z-index需比web大一级*/
  z-index: 999;
  position: fixed; // 这里的定位方式有待考量,fixed的话存在未知设置不合理,跑出屏幕不显示的问题
}
</style>
到此这篇关于Vue实现仿iPhone悬浮球的示例代码的文章就介绍到这了,更多相关Vue 悬浮球内容请搜索小牛知识库以前的文章或继续浏览下面的相关文章希望大家以后多多支持小牛知识库!
-
本文向大家介绍Android仿360悬浮小球自定义view实现示例,包括了Android仿360悬浮小球自定义view实现示例的使用技巧和注意事项,需要的朋友参考一下 Android仿360悬浮小球自定义view实现示例 效果图如下: 实现当前这种类似的效果 和360小球 悬浮桌面差不错类似。这种效果是如何实现的呢。废话不多说 ,直接上代码。 1.新建工程,添加悬浮窗权限。 2.自定义一个Floa
-
本文向大家介绍Vue实现PC端靠边悬浮球的代码,包括了Vue实现PC端靠边悬浮球的代码的使用技巧和注意事项,需要的朋友参考一下 我想把退出登录的按钮做成一个悬浮球的样子,带动画的那种。 实现是这个样子: 手边没有球形图。随便找一个,功能这里演示的为单机悬浮球注销登录 嗯,具体代码: data js方法 css 总结 到此这篇关于Vue实现PC端靠边悬浮球的代码的文章就介绍到这了,更多相关Vue靠边
-
本文向大家介绍vue悬浮可拖拽悬浮按钮的实例代码,包括了vue悬浮可拖拽悬浮按钮的实例代码的使用技巧和注意事项,需要的朋友参考一下 前言 vue开发手机端悬浮按钮实现,可以拖拽,滚动的时候收到里边,不影响视线 github地址 使用,基于vue-cli3.0+webpack 4+vant ui + sass+ rem适配方案+axios封装,构建手机端模板脚手架 vue-h5-template 后
-
本文向大家介绍Android仿微信文章悬浮窗效果的实现代码,包括了Android仿微信文章悬浮窗效果的实现代码的使用技巧和注意事项,需要的朋友参考一下 序言 前些日子跟朋友聊天,朋友Z果粉,前些天更新了微信,说微信出了个好方便的功能啊,我问是啥功能啊,看看我大Android有没有,他说现在阅读公众号文章如果有人给你发微信你可以把这篇文章当作悬浮窗悬浮起来,方便你聊完天不用找继续阅读,听完是不是觉得
-
本文向大家介绍Android view滑动悬浮固定效果实现代码示例,包括了Android view滑动悬浮固定效果实现代码示例的使用技巧和注意事项,需要的朋友参考一下 1.背景 在项目开发过程中,有时候会碰到这样的需求:在滑动的过程中,在某时要将子view固定在顶部(常见的是将界面中的tab在滑动到顶部的时候进行固定)。 之前写过一篇滑动组件悬浮固定在顶部的文章,但感觉还是有些复杂,因此就有了这次
-
本文向大家介绍Android实现悬浮对话框代码,包括了Android实现悬浮对话框代码的使用技巧和注意事项,需要的朋友参考一下 先给大家展示下效果图,大家觉效果满意,请参考实现代码。 直接上代码: 首先inflate一个xml文件,产生一个view;再创建一个Dialog,设置Dialog的View为inflate的view;然后通过WindowManager.LayoutParams设置Dial