
vue-cli单页应用改成多页应用配置详解

前言
从接触vue开始用的是vue-cli直接搭建单页应用,参考配合着vue-router开发起来简直爽到吊炸天,但是由于项目越来越复杂了,单页用起来可能有点力不从心,能不能弄成多页面呢,查了相关资料得到的结论是完全可以的,能多页面多入口,并且可以使用组件,还引入jQuery,这简直完美了,这个demo是从我已经改造完成的项目中摘出来的,现在演示下怎么把基于vue2的vue-cli单页模板改造成多页面,并且多入口的项目。
技术栈
- vue: 2.0.1
- vue-resource:1.0.3
- vue-router:2.0.0
- webpack:1.13.2
- gulp:3.9.1
- ES6
运行
git clone https://github.com/dawnyu/vue-cli-multipage.git
npm install
npm run build
npm run dev
改造后的目录
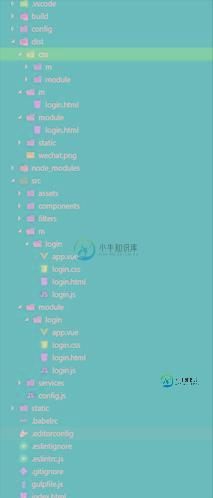
可以多目录生成目标文件
公共的js和样式图标放到assets文件夹即可
修改点
build/utils.js
var path = require('path')
var config = require('../config')
var glob = require('glob')
 // 将样式提取到单独的css文件中,而不是打包到js文件或使用style标签插入在head标签中
var ExtractTextPlugin = require('extract-text-webpack-plugin')

exports.assetsPath = function(_path) {
 var assetsSubDirectory = process.env.NODE_ENV === 'production' ?
 config.build.assetsSubDirectory :
 config.dev.assetsSubDirectory
 return path.posix.join(assetsSubDirectory, _path)
}

exports.cssLoaders = function(options) {
 options = options || {}
 // generate loader string to be used with extract text plugin
 function generateLoaders(loaders) {
 var sourceLoader = loaders.map(function(loader) {
  var extraParamChar
  if (/\?/.test(loader)) {
  loader = loader.replace(/\?/, '-loader?')
  extraParamChar = '&'
  } else {
  loader = loader + '-loader'
  extraParamChar = '?'
  }
  return loader + (options.sourceMap ? extraParamChar + 'sourceMap' : '')
 }).join('!')

 if (options.extract) {
  return ExtractTextPlugin.extract('vue-style-loader', sourceLoader)
 } else {
  return ['vue-style-loader', sourceLoader].join('!')
 }
 }

 // http://vuejs.github.io/vue-loader/configurations/extract-css.html
 return {
 css: generateLoaders(['css']),
 postcss: generateLoaders(['css']),
 less: generateLoaders(['css', 'less']),
 sass: generateLoaders(['css', 'sass?indentedSyntax']),
 scss: generateLoaders(['css', 'sass']),
 stylus: generateLoaders(['css', 'stylus']),
 styl: generateLoaders(['css', 'stylus'])
 }
}

// Generate loaders for standalone style files (outside of .vue)
exports.styleLoaders = function(options) {
 var output = []
 var loaders = exports.cssLoaders(options)
 for (var extension in loaders) {
 var loader = loaders[extension]
 output.push({
  test: new RegExp('\\.' + extension + '$'),
  loader: loader
 })
 }
 return output
}
//增加获取多入口的方法 注意 这个参数是个数组
exports.getEntry = function(globPaths) {
 var entries = {},
 basename, tmp, pathname;
 for (globPath of globPaths) {
 glob.sync(globPath).forEach(function(entry) {
  basename = path.basename(entry, path.extname(entry));
  tmp = entry.split('/').splice(-3);
  pathname = tmp.splice(0, 1) + '/' + basename; // 正确输出js和html的路径
  entries[pathname] = entry;
 });
 }
 console.log(entries);
 return entries;
}
webpack.base.conf.js
var path = require('path')
var config = require('../config')
var webpack = require('webpack')
var merge = require('webpack-merge')
var utils = require('./utils')
var projectRoot = path.resolve(__dirname, '../') ///——driname当前目录
var chunks = Object.keys(utils.getEntry(['./src/module/**/*.js', './src/m/**/*.js']));
// 将样式提取到单独的css文件中,而不是打包到js文件或使用style标签插入在head标签中
var ExtractTextPlugin = require('extract-text-webpack-plugin');
module.exports = {
 entry: utils.getEntry(['./src/module/**/*.js', './src/m/**/*.js']),//传入需要打包的入口,我这里是pc端和手机端入口打到一个包里
 output: {
 path: config.build.assetsRoot,
 publicPath: process.env.NODE_ENV === 'production' ? config.build.assetsPublicPath : config.dev.assetsPublicPath, //根名称可配置
 filename: '[name].js'
 },
 resolve: {
 extensions: ['', '.js', '.vue'],
 fallback: [path.join(__dirname, '../node_modules')],
 alias: {
  'src': path.resolve(__dirname, '../src'),
  'assets': path.resolve(__dirname, '../src/assets'),
  'components': path.resolve(__dirname, '../src/components'),
  'jquery': 'jquery'
 }
 },
 resolveLoader: {
 fallback: [path.join(__dirname, '../node_modules')]
 },
 module: {
 loaders: [{
  test: /\.vue$/,
  loader: 'vue-loader'
  },
  {
  test: /\.js$/,
  loader: 'babel',
  include: projectRoot,
  exclude: /node_modules/
  },
  {
  test: /\.json$/,
  loader: 'json'
  },
  {
  test: /\.(png|jpe?g|gif|svg)(\?.*)?$/,
  loader: 'url',
  query: {
   limit: 30000,
   name: utils.assetsPath('img/[name].[hash:7].[ext]')
  }
  },
  {
  test: /\.(woff2?|eot|ttf|otf)(\?.*)?$/,
  loader: 'url',
  query: {
   limit: 10000,
   name: utils.assetsPath('fonts/[name].[hash:7].[ext]')
  }
  }
 ]
 },
 eslint: {
 formatter: require('eslint-friendly-formatter')
 },
 vue: {
 loaders: utils.cssLoaders(),
 postcss: [
  require('autoprefixer')({
  browsers: ['last 2 versions']
  })
 ]
 },
 plugins: [
 // new webpack.optimize.CommonsChunkPlugin('static/build.js'),
 // 提取公共模块
 new webpack.optimize.CommonsChunkPlugin({
  name: 'vendors', // 公共模块的名称
  chunks: chunks, // chunks是需要提取的模块
  minChunks: chunks.length
 }),
 // 配置提取出的样式文件
 new ExtractTextPlugin('css/[name].css'),
 //引入jqury
 new webpack.ProvidePlugin({
  $: "jquery",
  jQuery: "jquery"
 })
 ],
}
webpack.dev.conf.js
var config = require('../config')
var webpack = require('webpack')
var merge = require('webpack-merge')
var utils = require('./utils')
var baseWebpackConfig = require('./webpack.base.conf')
var HtmlWebpackPlugin = require('html-webpack-plugin')
 // add hot-reload related code to entry chunks
Object.keys(baseWebpackConfig.entry).forEach(function(name) {
 baseWebpackConfig.entry[name] = ['./build/dev-client'].concat(baseWebpackConfig.entry[name])
})

module.exports = merge(baseWebpackConfig, {
 module: {
 loaders: utils.styleLoaders({ sourceMap: config.dev.cssSourceMap })
 },
 // eval-source-map is faster for development
 devtool: '#eval-source-map',
 plugins: [
 new webpack.DefinePlugin({
  'process.env': config.dev.env
 }),
 // https://github.com/glenjamin/webpack-hot-middleware#installation--usage
 new webpack.optimize.OccurenceOrderPlugin(),
 new webpack.HotModuleReplacementPlugin(),
 new webpack.NoErrorsPlugin(),
 // https://github.com/ampedandwired/html-webpack-plugin
 // new HtmlWebpackPlugin({
 // filename: 'index.html',
 // template: 'index.html',
 // inject: true
 // })
 ]
})

var pages = utils.getEntry(['./src/module/**/*.html', './src/m/**/*.html']);


for (var pathname in pages) {


 // 配置生成的html文件,定义路径等
 var conf = {
 filename: pathname + '.html',
 template: pages[pathname], // 模板路径
 favicon: './src/assets/images/wechat.png',
 inject: true // js插入位置

 };


 if (pathname in module.exports.entry) {
 conf.chunks = ['vendors', pathname];
 conf.hash = true;
 }

 module.exports.plugins.push(new HtmlWebpackPlugin(conf));
}
webpack.prod.conf.js
var path = require('path')
var config = require('../config')
var utils = require('./utils')
var webpack = require('webpack')
var merge = require('webpack-merge')
var baseWebpackConfig = require('./webpack.base.conf')
var ExtractTextPlugin = require('extract-text-webpack-plugin')
var HtmlWebpackPlugin = require('html-webpack-plugin')
var env = process.env.NODE_ENV === 'testing' ?
 require('../config/test.env') :
 config.build.env

module.exports = merge(baseWebpackConfig, {
 module: {
 loaders: utils.styleLoaders({ sourceMap: config.build.productionSourceMap, extract: true })
 },
 devtool: config.build.productionSourceMap ? '#source-map' : false,
 output: {
 path: config.build.assetsRoot,
 filename: utils.assetsPath('js/[name].[chunkhash].js'),
 chunkFilename: utils.assetsPath('js/[id].[chunkhash].js')
 },
 vue: {
 loaders: utils.cssLoaders({
  sourceMap: config.build.productionSourceMap,
  extract: true
 })
 },
 plugins: [
 // http://vuejs.github.io/vue-loader/workflow/production.html
 new webpack.DefinePlugin({
  'process.env': env
 }),
 new webpack.optimize.UglifyJsPlugin({
  compress: {
  warnings: false,
  drop_debugger: true,
  drop_console: true
  }
 }),
 new webpack.optimize.OccurenceOrderPlugin(),
 // extract css into its own file
 new ExtractTextPlugin(utils.assetsPath('css/[name].[contenthash].css')),
 // generate dist index.html with correct asset hash for caching.
 // you can customize output by editing /index.html
 // see https://github.com/ampedandwired/html-webpack-plugin
 // new HtmlWebpackPlugin({
 // filename: process.env.NODE_ENV === 'testing' ?
 //  'index.html' : config.build.index,
 // template: 'index.html',
 // favicon: './src/assets/images/tjd.ico',
 // inject: true,
 // minify: {
 //  removeComments: true,
 //  collapseWhitespace: true,
 //  removeAttributeQuotes: true
 //  // more options:
 //  // https://github.com/kangax/html-minifier#options-quick-reference
 // },
 // // necessary to consistently work with multiple chunks via CommonsChunkPlugin
 // chunksSortMode: 'dependency'
 // }),
 // split vendor js into its own file
 new webpack.optimize.CommonsChunkPlugin({
  name: 'vendor',
  minChunks: function(module, count) {
  // any required modules inside node_modules are extracted to vendor
  return (
   module.resource &&
   /\.js$/.test(module.resource) &&
   module.resource.indexOf(
   path.join(__dirname, '../node_modules')
   ) === 0
  )
  }
 }),
 // extract webpack runtime and module manifest to its own file in order to
 // prevent vendor hash from being updated whenever app bundle is updated
 new webpack.optimize.CommonsChunkPlugin({
  name: 'manifest',
  chunks: ['vendor']
 })
 ]
})

if (config.build.productionGzip) {
 var CompressionWebpackPlugin = require('compression-webpack-plugin')

 webpackConfig.plugins.push(
 new CompressionWebpackPlugin({
  asset: '[path].gz[query]',
  algorithm: 'gzip',
  test: new RegExp(
  '\\.(' +
  config.build.productionGzipExtensions.join('|') +
  ')$'
  ),
  threshold: 10240,
  minRatio: 0.8
 })
 )
}

var pages = utils.getEntry(['./src/module/**/*.html', './src/m/**/*.html']);

for (var pathname in pages) {


 // 配置生成的html文件,定义路径等
 var conf = {
 filename: pathname + '.html',
 template: pages[pathname], // 模板路径
 favicon: './src/assets/images/wechat.png',
 inject: true // js插入位置

 };
 if (pathname in pages) {
 conf.chunks = ['vendors', pathname];
 conf.hash = true;
 }

 module.exports.plugins.push(new HtmlWebpackPlugin(conf));
}
git地址:https://github.com/dawnyu/vue-cli-multipage.git
以上就是本文的全部内容,希望对大家的学习有所帮助,也希望大家多多支持小牛知识库。
-
本文向大家介绍Vue单页及多页应用全局配置404页面实践记录,包括了Vue单页及多页应用全局配置404页面实践记录的使用技巧和注意事项,需要的朋友参考一下 前后端分离后,控制路由跳转的责任转移到了前端,后端只负责给前端返回一个html文档以及提供各种接口。下面我们用作例子的两个项目,均采用vue作为基础框架,一个是SPA应用,另一个是多页应用,均由前端进行路由控制及渲染的。 总体思路 无论单页还是
-
本文向大家介绍vue中SPA单页面应用程序详解,包括了vue中SPA单页面应用程序详解的使用技巧和注意事项,需要的朋友参考一下 一、SPA的概述 SPA(single page application)单页面应用程序,在一个完成的应用或者站点中,只有一个完整的html页面,这个页面有一个容器,可以把需要加载的代码片段插入到该容器中。 SPA的工作原理: eg: http://127.0.0.
-
不要用Angular angular: 老牌框架. 源于google. 难学, 难用. 文档垃圾. 13年7月做项目. angular 1. 它的文档: directive. 被无数人(老外)骂: 看不懂. 'The worst document that I've ever read' 3 个月没变. (很多留言都是一年以前的) 所以说最大的教训: google 也有很多很烂的东西. 关注度特别
-
本文向大家介绍详解一个基于react+webpack的多页面应用配置,包括了详解一个基于react+webpack的多页面应用配置的使用技巧和注意事项,需要的朋友参考一下 简单介绍 首先本文不会对webpack代码进行解释,其所有配置都可以在文档上找到。 平时工作中会写一些多页面应用,因为习惯了react的开发模式,故此写了一个简单的配置,跟大家一起分享。如果你也喜欢,对你的开发有所帮助,希望给点
-
本文向大家介绍react MPA 多页配置详解,包括了react MPA 多页配置详解的使用技巧和注意事项,需要的朋友参考一下 create-react-app 默认创建的是 SPA 应用,随着代码量的增加,build 后的 js 文件会越来越大。网上有很多拆分大的 js 文件的方案,但其实把 SPA 拆分成 MPA 也未尝不是一种解决方案。下面是 react 多页面配置过程,以备忘。 一、创建工
-
本文向大家介绍详解vue 单页应用(spa)前端路由实现原理,包括了详解vue 单页应用(spa)前端路由实现原理的使用技巧和注意事项,需要的朋友参考一下 写在前面:通常 SPA 中前端路由有2种实现方式: window.history location.hash 下面就来介绍下这两种方式具体怎么实现的 一.history 1.history基本介绍 window.history 对象包含浏览器的