iOS自定义UICollectionViewLayout实现瀑布流布局
移动端访问不佳,请访问我的个人博客
最近项目中需要用到瀑布流的效果,但是用UICollectionViewFlowLayout又达不到效果,自己动手写了一个瀑布流的layout,下面是我的心路路程
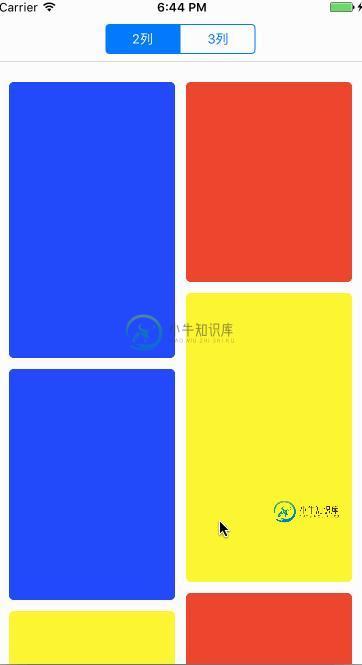
先上效果图与demo地址:

因为是用UICollectionView来实现瀑布流的,决定继承UICollectionViewLayout来自定义一个layout来实现一个简单瀑布流的布局,下面是需要重写的方法:
重写这个属性得出UICollectionView的ContentSize:collectionViewContentSize
重写这个方法来得到每个item的布局:layoutAttributesForItem(at indexPath: IndexPath) -> UICollectionViewLayoutAttributes?
重写这个方法给UICollectionView所有item的布局:layoutAttributesForElements(in rect: CGRect) -> [UICollectionViewLayoutAttributes]?
重写这个方法来实现UICollectionView前的操作:prepare()
实现思路
通过代理模式获得到需要的列数和每一item的高度,用过列数与列之间的间隔和UICollectionView的宽度来得出每一列的宽度,item从左边到右布局,下一列的item放到高度最小的列下面,防止每列的高度不均匀,下面贴上代码和注释:
import UIKit

@objc protocol WCLWaterFallLayoutDelegate {
 //waterFall的列数
 func columnOfWaterFall(_ collectionView: UICollectionView) -> Int
 //每个item的高度
 func waterFall(_ collectionView: UICollectionView, layout waterFallLayout: WCLWaterFallLayout, heightForItemAt indexPath: IndexPath) -> CGFloat
}

class WCLWaterFallLayout: UICollectionViewLayout {

 //代理
 weak var delegate: WCLWaterFallLayoutDelegate?
 //行间距
 @IBInspectable var lineSpacing: CGFloat = 0
 //列间距
 @IBInspectable var columnSpacing: CGFloat = 0
 //section的top
 @IBInspectable var sectionTop: CGFloat = 0 {
 willSet {
  sectionInsets.top = newValue
 }
 }
 //section的Bottom
 @IBInspectable var sectionBottom: CGFloat = 0 {
 willSet {
  sectionInsets.bottom = newValue
 }
 }
 //section的left
 @IBInspectable var sectionLeft: CGFloat = 0 {
 willSet {
  sectionInsets.left = newValue
 }
 }
 //section的right
 @IBInspectable var sectionRight: CGFloat = 0 {
 willSet {
  sectionInsets.right = newValue
 }
 }
 //section的Insets
 @IBInspectable var sectionInsets: UIEdgeInsets = UIEdgeInsets.zero
 //每行对应的高度
 private var columnHeights: [Int: CGFloat]   = [Int: CGFloat]()
 private var attributes: [UICollectionViewLayoutAttributes] = [UICollectionViewLayoutAttributes]()

 //MARK: Initial Methods
 init(lineSpacing: CGFloat, columnSpacing: CGFloat, sectionInsets: UIEdgeInsets) {
 super.init()
 self.lineSpacing = lineSpacing
 self.columnSpacing = columnSpacing
 self.sectionInsets = sectionInsets
 }

 required init?(coder aDecoder: NSCoder) {
 super.init(coder: aDecoder)
 }

 //MARK: Public Methods


 //MARK: Override
 override var collectionViewContentSize: CGSize {
 var maxHeight: CGFloat = 0
 for height in columnHeights.values {
  if height > maxHeight {
  maxHeight = height
  }
 }
 return CGSize.init(width: collectionView?.frame.width ?? 0, height: maxHeight + sectionInsets.bottom)
 }

 override func prepare() {
 super.prepare()
 guard collectionView != nil else {
  return
 }
 if let columnCount = delegate?.columnOfWaterFall(collectionView!) {
  for i in 0..<columnCount {
  columnHeights[i] = sectionInsets.top
  }
 }
 let itemCount = collectionView!.numberOfItems(inSection: 0)
 attributes.removeAll()
 for i in 0..<itemCount {
  if let att = layoutAttributesForItem(at: IndexPath.init(row: i, section: 0)) {
  attributes.append(att)
  }
 }
 }

 override func layoutAttributesForItem(at indexPath: IndexPath) -> UICollectionViewLayoutAttributes? {
 if let collectionView = collectionView {
  //根据indexPath获取item的attributes
  let att = UICollectionViewLayoutAttributes.init(forCellWith: indexPath)
  //获取collectionView的宽度
  let width = collectionView.frame.width
  if let columnCount = delegate?.columnOfWaterFall(collectionView) {
  guard columnCount > 0 else {
   return nil
  }
  //item的宽度 = (collectionView的宽度 - 内边距与列间距) / 列数
  let totalWidth = (width - sectionInsets.left - sectionInsets.right - (CGFloat(columnCount) - 1) * columnSpacing)
  let itemWidth = totalWidth / CGFloat(columnCount)
  //获取item的高度,由外界计算得到
  let itemHeight = delegate?.waterFall(collectionView, layout: self, heightForItemAt: indexPath) ?? 0
  //找出最短的那一列
  var minIndex = 0
  for column in columnHeights {
   if column.value < columnHeights[minIndex] ?? 0 {
   minIndex = column.key
   }
  }
  //根据最短列的列数计算item的x值
  let itemX = sectionInsets.left + (columnSpacing + itemWidth) * CGFloat(minIndex)
  //item的y值 = 最短列的最大y值 + 行间距
  let itemY = (columnHeights[minIndex] ?? 0) + lineSpacing
  //设置attributes的frame
  att.frame = CGRect.init(x: itemX, y: itemY, width: itemWidth, height: itemHeight)
  //更新字典中的最大y值
  columnHeights[minIndex] = att.frame.maxY
  }
  return att
 }
 return nil
 }

 override func layoutAttributesForElements(in rect: CGRect) -> [UICollectionViewLayoutAttributes]? {
 return attributes
 }
}
最后附带demo地址,大家喜欢的话可以star一下
上面是简单的瀑布流的实现过程,希望大家能学到东西,有很多地方考虑的不足,欢迎大家交流学习,谢谢大家的阅读。
-
本文向大家介绍IOS实现自定义布局瀑布流,包括了IOS实现自定义布局瀑布流的使用技巧和注意事项,需要的朋友参考一下 瀑布流是电商应用展示商品通常采用的一种方式,如图示例 瀑布流的实现方式,通常有以下几种 通过UITableView实现(不常用) 通过UIScrollView实现(工作量较大) 通过UICollectionView实现(通常采用的方式) 一、UICollectionView基础 1、
-
本文向大家介绍IOS简单实现瀑布流UICollectionView,包括了IOS简单实现瀑布流UICollectionView的使用技巧和注意事项,需要的朋友参考一下 UICollectionView 比tableView 灵活,功能也强大很多。系统实现了流式布局,但用处还有很多限制。 要想实现更灵活的布局,就咬重写UICollectionViewLayout。 先看下实现效果: 废话不多说,直接
-
本文向大家介绍js瀑布流布局的实现,包括了js瀑布流布局的实现的使用技巧和注意事项,需要的朋友参考一下 本文实例为大家分享了js实现瀑布流布局的具体代码,供大家参考,具体内容如下 原理: 1、瀑布流布局,要求进行布局的元素等宽,然后计算元素的宽与浏览器的宽度之比,得到需要布置的列数。 2、创建一个数组,长度为列数,数组元素为每一列已布置元素的总高度。(一开始为0)。 3、将未布置的元素,依次布置到
-
本文向大家介绍iOS实现水平方向瀑布流,包括了iOS实现水平方向瀑布流的使用技巧和注意事项,需要的朋友参考一下 效果 源码:https://github.com/YouXianMing/Animations 细节 继承UICollectionViewLayout 重载UICollectionViewLayout的四个方法 部分实现细节 以上就是本文的全部内容,希望对大家的学习有所帮助,也希望大家
-
本文向大家介绍iOS瀑布流的简单实现(Swift),包括了iOS瀑布流的简单实现(Swift)的使用技巧和注意事项,需要的朋友参考一下 这段时间突然想到一个很久之前用到的知识-瀑布流,本来想用一个简单的方法,发现自己走入了歧途,最终只能狠下心来重写UICollectionViewFlowLayout.下面我将用两种方法实现瀑布流,以及会介绍第一种实现的bug. <1>第一种 效果图如下所示: 这种
-
本文向大家介绍基于jquery实现瀑布流布局,包括了基于jquery实现瀑布流布局的使用技巧和注意事项,需要的朋友参考一下 本文实例为大家介绍了基于jquery实现瀑布流布局的关键代码,分享给大家供大家参考,具体内容如下 效果图: 具体代码: 使用jquery-1.8.3.min.js,waterfall.js代码如下: 希望本文所述对大家学习有所帮助,谢谢大家的阅读。
-
本文向大家介绍Ionic3实现图片瀑布流布局,包括了Ionic3实现图片瀑布流布局的使用技巧和注意事项,需要的朋友参考一下 瀑布流布局是比较流行的一种网站页面布局,视觉表现为参差不齐的多栏布局,随着页面滚动条向下滚动,这种布局还会不断加载数据块并附加至当前尾部。 瀑布流布局一般使用在网页中,在移动端用的比较少但是也不可缺。下面就介绍一下如何在ionic3中使用瀑布流布局。 首先创建一个项目,这里不
-
本文向大家介绍ios基于UICollectionView实现横向瀑布流,包括了ios基于UICollectionView实现横向瀑布流的使用技巧和注意事项,需要的朋友参考一下 在网上找了许久,一直没有发现有提供横向瀑布流效果的。在项目中用到了我就在垂直瀑布流的基础上,进行了修改,做出了横向瀑布流的效果。同时也对一些UICollectionView的属性进行简单的注释,方便以后查阅。 1、首先要写一

