用.NET如何生成二维码
下面介绍一下如何用.NET生成二维码(QR Code码制),下面给出详细步骤:
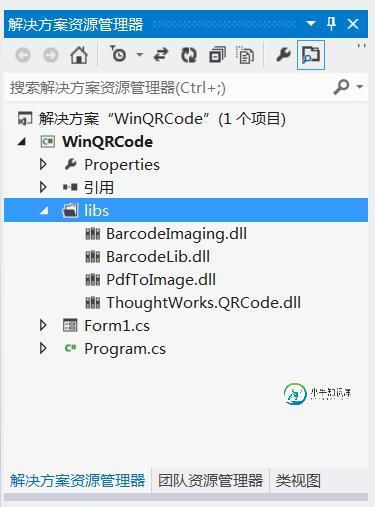
1、新建一个window应用程序,然后引入.NET二维码类库(开源的类库,可从网上下载):

2、构建UI界面,代码如下:
namespace WinQRCode
{
  partial class Form1
  {
    /// <summary>
    /// 必需的设计器变量。
    /// </summary>
    private System.ComponentModel.IContainer components = null;

    /// <summary>
    /// 清理所有正在使用的资源。
    /// </summary>
    /// <param name="disposing">如果应释放托管资源,为 true;否则为 false。</param>
    protected override void Dispose(bool disposing)
    {
      if (disposing && (components != null))
      {
        components.Dispose();
      }
      base.Dispose(disposing);
    }

    #region Windows 窗体设计器生成的代码

    /// <summary>
    /// 设计器支持所需的方法 - 不要
    /// 使用代码编辑器修改此方法的内容。
    /// </summary>
    private void InitializeComponent()
    {
      this.button1 = new System.Windows.Forms.Button();
      this.button2 = new System.Windows.Forms.Button();
      this.pictureBox1 = new System.Windows.Forms.PictureBox();
      this.label1 = new System.Windows.Forms.Label();
      this.textBox1 = new System.Windows.Forms.TextBox();
      this.label2 = new System.Windows.Forms.Label();
      this.lbl解码信息 = new System.Windows.Forms.Label();
      ((System.ComponentModel.ISupportInitialize)(this.pictureBox1)).BeginInit();
      this.SuspendLayout();
      //
      // button1
      //
      this.button1.Location = new System.Drawing.Point(446, 31);
      this.button1.Margin = new System.Windows.Forms.Padding(4, 5, 4, 5);
      this.button1.Name = "button1";
      this.button1.Size = new System.Drawing.Size(103, 37);
      this.button1.TabIndex = 0;
      this.button1.Text = "编码";
      this.button1.UseVisualStyleBackColor = true;
      this.button1.Click += new System.EventHandler(this.button1_Click);
      //
      // button2
      //
      this.button2.Location = new System.Drawing.Point(446, 81);
      this.button2.Margin = new System.Windows.Forms.Padding(4, 5, 4, 5);
      this.button2.Name = "button2";
      this.button2.Size = new System.Drawing.Size(103, 37);
      this.button2.TabIndex = 1;
      this.button2.Text = "解码";
      this.button2.UseVisualStyleBackColor = true;
      this.button2.Click += new System.EventHandler(this.button2_Click);
      //
      // pictureBox1
      //
      this.pictureBox1.Location = new System.Drawing.Point(23, 117);
      this.pictureBox1.Margin = new System.Windows.Forms.Padding(4, 5, 4, 5);
      this.pictureBox1.Name = "pictureBox1";
      this.pictureBox1.Size = new System.Drawing.Size(279, 253);
      this.pictureBox1.SizeMode = System.Windows.Forms.PictureBoxSizeMode.StretchImage;
      this.pictureBox1.TabIndex = 2;
      this.pictureBox1.TabStop = false;
      //
      // label1
      //
      this.label1.AutoSize = true;
      this.label1.Location = new System.Drawing.Point(18, 39);
      this.label1.Margin = new System.Windows.Forms.Padding(4, 0, 4, 0);
      this.label1.Name = "label1";
      this.label1.Size = new System.Drawing.Size(69, 25);
      this.label1.TabIndex = 3;
      this.label1.Text = "信息:";
      //
      // textBox1
      //
      this.textBox1.Location = new System.Drawing.Point(95, 37);
      this.textBox1.Margin = new System.Windows.Forms.Padding(4, 5, 4, 5);
      this.textBox1.Name = "textBox1";
      this.textBox1.Size = new System.Drawing.Size(333, 31);
      this.textBox1.TabIndex = 4;
      //
      // label2
      //
      this.label2.AutoSize = true;
      this.label2.Location = new System.Drawing.Point(18, 81);
      this.label2.Margin = new System.Windows.Forms.Padding(4, 0, 4, 0);
      this.label2.Name = "label2";
      this.label2.Size = new System.Drawing.Size(88, 25);
      this.label2.TabIndex = 5;
      this.label2.Text = "二维码:";
      //
      // lbl解码信息
      //
      this.lbl解码信息.AutoSize = true;
      this.lbl解码信息.Location = new System.Drawing.Point(101, 81);
      this.lbl解码信息.Margin = new System.Windows.Forms.Padding(4, 0, 4, 0);
      this.lbl解码信息.Name = "lbl解码信息";
      this.lbl解码信息.Size = new System.Drawing.Size(0, 25);
      this.lbl解码信息.TabIndex = 6;
      //
      // Form1
      //
      this.AutoScaleDimensions = new System.Drawing.SizeF(11F, 24F);
      this.AutoScaleMode = System.Windows.Forms.AutoScaleMode.Font;
      this.ClientSize = new System.Drawing.Size(572, 384);
      this.Controls.Add(this.lbl解码信息);
      this.Controls.Add(this.label2);
      this.Controls.Add(this.textBox1);
      this.Controls.Add(this.label1);
      this.Controls.Add(this.pictureBox1);
      this.Controls.Add(this.button2);
      this.Controls.Add(this.button1);
      this.Font = new System.Drawing.Font("微软雅黑", 10.8F, System.Drawing.FontStyle.Regular, System.Drawing.GraphicsUnit.Point, ((byte)(134)));
      this.Margin = new System.Windows.Forms.Padding(4, 5, 4, 5);
      this.Name = "Form1";
      this.Text = "二维码";
      ((System.ComponentModel.ISupportInitialize)(this.pictureBox1)).EndInit();
      this.ResumeLayout(false);
      this.PerformLayout();

    }

    #endregion

    private System.Windows.Forms.Button button1;
    private System.Windows.Forms.Button button2;
    private System.Windows.Forms.PictureBox pictureBox1;
    private System.Windows.Forms.Label label1;
    private System.Windows.Forms.TextBox textBox1;
    private System.Windows.Forms.Label label2;
    private System.Windows.Forms.Label lbl解码信息;
  }
}
图形如下所示:

3、编写 编码和解码按钮事件,进行编码和解码处理:
using System;
using System.Collections.Generic;
using System.ComponentModel;
using System.Data;
using System.Drawing;
using System.Linq;
using System.Text;
using System.Windows.Forms;

namespace WinQRCode
{
  using ThoughtWorks.QRCode.Codec;
  using ThoughtWorks.QRCode.Codec.Data;
  using ThoughtWorks.QRCode.Codec.Util;
  using System.IO;
  using PdfToImage;
  public partial class Form1 : Form
  {
    public Form1()
    {
      InitializeComponent();
    }
    /// <summary>
    /// 编码
    /// </summary>
    /// <param name="sender"></param>
    /// <param name="e"></param>
    private void button1_Click(object sender, EventArgs e)
    {
      if (this.textBox1.Text != "")
      {
        Cursor.Current = Cursors.WaitCursor;
        if (textBox1.Text.Trim() == String.Empty)
        {
          MessageBox.Show("不能为空.");
          return;
        }
        QRCodeEncoder qrCodeEncoder = new QRCodeEncoder();
        qrCodeEncoder.QRCodeEncodeMode = QRCodeEncoder.ENCODE_MODE.BYTE;
        qrCodeEncoder.QRCodeScale = 4;
        qrCodeEncoder.QRCodeVersion = 7;
        qrCodeEncoder.QRCodeErrorCorrect = QRCodeEncoder.ERROR_CORRECTION.M;
        System.Drawing.Image image;
        String data = textBox1.Text;
        //编码
        image = qrCodeEncoder.Encode(data);
        //图片显示
        this.pictureBox1.Image = image;
        Cursor.Current = Cursors.Default;

      }
    }
    /// <summary>
    /// 解码
    /// </summary>
    /// <param name="sender"></param>
    /// <param name="e"></param>
    private void button2_Click(object sender, EventArgs e)
    {
      Cursor.Current = Cursors.WaitCursor;
      Bitmap b = this.pictureBox1.Image as Bitmap;
      try
      {
        QRCodeDecoder decoder = new QRCodeDecoder();
        //解码
        String decodedString = decoder.decode(new QRCodeBitmapImage(b));
        //显示解码信息
        this.lbl解码信息.Text += decodedString ;
      }
      catch (Exception ex)
      {
        MessageBox.Show(ex.Message);
      }
      Cursor.Current = Cursors.Default;
    }

    private void Form1_Load(object sender, EventArgs e)
    {

    }
  }
}
4、编译运行,如下图:

以上就是关于使用.NET生成二维码的大概思路,还有许多不足之处,希望大家多提建议,或者自己进行创新修改。
-
本文向大家介绍iOS使用CIFilter生成二维码,包括了iOS使用CIFilter生成二维码的使用技巧和注意事项,需要的朋友参考一下 二维码(Quick Response Code,简称QR Code)是由水平和垂直两个方向上的线条设计而成的一种二维条形码(barcode)。可以编码网址、电话号码、文本等内容,能够存储大量的数据信息。自iOS 7以来,二维码的生成和读取只需要使用Core Ima
-
及策微信小程序二维码生成器,是一个根据小程序相关数据生成二维码的工具。在进行参数设置后,通过用户在不同场景中扫描该场景二维码激活小程序,从而准确帮您获取小程序的渠道推广数据,用户来源。 生成二维码 名称:为二维码定义一个独立的,方便识别的名称; 类型:选择生成小程序的类型; 页面路径:通过扫描将生成的二维码所访问的页面路径。也就是说你可以将任意页面生成为二维码,供用户扫描后直接进入; 参数设置:
-
1、renderQrCode 用法 renderQrCode 生成二维码极其简单方便,常见用法如下: // 二维码携带的数据 String data = "weixin://wxpay/bizpayurl?appid=xx&mch_id=xx......"; // 渲染二维码图片,长度与宽度为 200 像素 renderQrCode(data, 200, 200); 上例代码中的 data 为该
-
昨天看到了一篇关于二维码使用的文章,其设计初衷是使用二维码卡片来帮助小朋友控制智能音箱。即在 Raspberry Pi 上使用摄像头来识别二维码,二维码卡片上是一些简单的操作,如播放音乐、暂停等等,卡片的另外一面则是相应的解释。这是一个有趣的二维码在物联网应用的场 景。 于是乎,我便想尝试一下直接在云端生成二维码图片,并保存。当然了,对于二维码来说,直接在浏览器上生成显然是更加简单友好的。 总览
-
本文向大家介绍java 生成二维码实例,包括了java 生成二维码实例的使用技巧和注意事项,需要的朋友参考一下 最近有点时间想学点东西,想做个简单的系统,现在登录的时候使用扫描二维码获取验证码登录,于是就有了下面的一些代码 首先要导入pom依赖 这个是goole提供的一些包 第一个类是goole提供帮主类 画出图片 生成图片工具类 controller 二维码示例 以上就是java 生成二维码实例
-
说明 用于门店结账时生成桌台微信二维码(2015-07-01新增) 使用时将返回的code_url内容直接生成二维码。 请求地址 http://api.dc78.cn/Api/cash_qr_wxpay 请求方式 GET 请求参数 参数 参数名称 必填 描述 范例 table 桌台 bzid 结算业务单号 amt 结账金额 type 支付通道 wx=微信支付,ali=支付宝支付 返回 { "sta

