
如何用Python 实现全连接神经网络(Multi-layer Perceptron)

代码
import numpy as np

# 各种激活函数及导数
def sigmoid(x):
  return 1 / (1 + np.exp(-x))


def dsigmoid(y):
  return y * (1 - y)


def tanh(x):
  return np.tanh(x)


def dtanh(y):
  return 1.0 - y ** 2


def relu(y):
  tmp = y.copy()
  tmp[tmp < 0] = 0
  return tmp


def drelu(x):
  tmp = x.copy()
  tmp[tmp >= 0] = 1
  tmp[tmp < 0] = 0
  return tmp


class MLPClassifier(object):
  """多层感知机,BP 算法训练"""

  def __init__(self,
         layers,
         activation='tanh',
         epochs=20, batch_size=1, learning_rate=0.01):
    """
    :param layers: 网络层结构
    :param activation: 激活函数
    :param epochs: 迭代轮次
    :param learning_rate: 学习率
    """
    self.epochs = epochs
    self.learning_rate = learning_rate
    self.layers = []
    self.weights = []
    self.batch_size = batch_size

    for i in range(0, len(layers) - 1):
      weight = np.random.random((layers[i], layers[i + 1]))
      layer = np.ones(layers[i])
      self.layers.append(layer)
      self.weights.append(weight)
    self.layers.append(np.ones(layers[-1]))

    self.thresholds = []
    for i in range(1, len(layers)):
      threshold = np.random.random(layers[i])
      self.thresholds.append(threshold)

    if activation == 'tanh':
      self.activation = tanh
      self.dactivation = dtanh
    elif activation == 'sigomid':
      self.activation = sigmoid
      self.dactivation = dsigmoid
    elif activation == 'relu':
      self.activation = relu
      self.dactivation = drelu

  def fit(self, X, y):
    """
    :param X_: shape = [n_samples, n_features]
    :param y: shape = [n_samples]
    :return: self
    """
    for _ in range(self.epochs * (X.shape[0] // self.batch_size)):
      i = np.random.choice(X.shape[0], self.batch_size)
      # i = np.random.randint(X.shape[0])
      self.update(X[i])
      self.back_propagate(y[i])

  def predict(self, X):
    """
    :param X: shape = [n_samples, n_features]
    :return: shape = [n_samples]
    """
    self.update(X)
    return self.layers[-1].copy()

  def update(self, inputs):
    self.layers[0] = inputs
    for i in range(len(self.weights)):
      next_layer_in = self.layers[i] @ self.weights[i] - self.thresholds[i]
      self.layers[i + 1] = self.activation(next_layer_in)

  def back_propagate(self, y):
    errors = y - self.layers[-1]

    gradients = [(self.dactivation(self.layers[-1]) * errors).sum(axis=0)]

    self.thresholds[-1] -= self.learning_rate * gradients[-1]
    for i in range(len(self.weights) - 1, 0, -1):
      tmp = np.sum(gradients[-1] @ self.weights[i].T * self.dactivation(self.layers[i]), axis=0)
      gradients.append(tmp)
      self.thresholds[i - 1] -= self.learning_rate * gradients[-1] / self.batch_size
    gradients.reverse()
    for i in range(len(self.weights)):
      tmp = np.mean(self.layers[i], axis=0)
      self.weights[i] += self.learning_rate * tmp.reshape((-1, 1)) * gradients[i]
测试代码
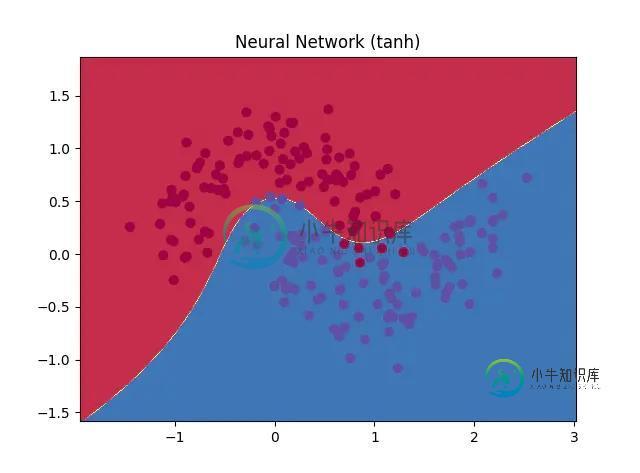
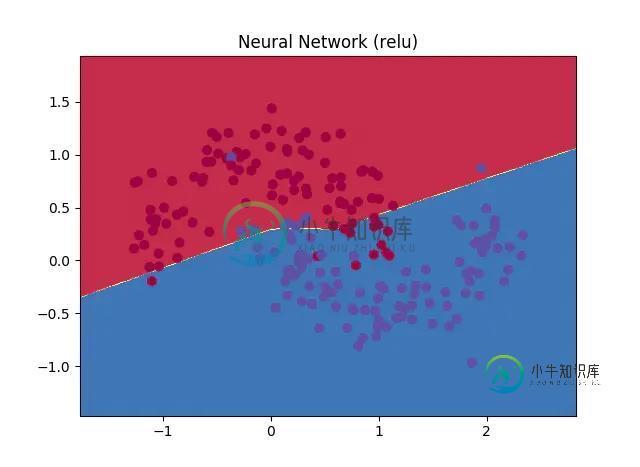
import sklearn.datasets
import numpy as np

def plot_decision_boundary(pred_func, X, y, title=None):
  """分类器画图函数,可画出样本点和决策边界
  :param pred_func: predict函数
  :param X: 训练集X
  :param y: 训练集Y
  :return: None
  """

  # Set min and max values and give it some padding
  x_min, x_max = X[:, 0].min() - .5, X[:, 0].max() + .5
  y_min, y_max = X[:, 1].min() - .5, X[:, 1].max() + .5
  h = 0.01
  # Generate a grid of points with distance h between them
  xx, yy = np.meshgrid(np.arange(x_min, x_max, h), np.arange(y_min, y_max, h))
  # Predict the function value for the whole gid
  Z = pred_func(np.c_[xx.ravel(), yy.ravel()])
  Z = Z.reshape(xx.shape)
  # Plot the contour and training examples
  plt.contourf(xx, yy, Z, cmap=plt.cm.Spectral)
  plt.scatter(X[:, 0], X[:, 1], s=40, c=y, cmap=plt.cm.Spectral)

  if title:
    plt.title(title)
  plt.show()


def test_mlp():
  X, y = sklearn.datasets.make_moons(200, noise=0.20)
  y = y.reshape((-1, 1))
  n = MLPClassifier((2, 3, 1), activation='tanh', epochs=300, learning_rate=0.01)
  n.fit(X, y)
  def tmp(X):
    sign = np.vectorize(lambda x: 1 if x >= 0.5 else 0)
    ans = sign(n.predict(X))
    return ans

  plot_decision_boundary(tmp, X, y, 'Neural Network')
效果
更多机器学习代码,请访问 https://github.com/WiseDoge/plume
以上就是如何用Python 实现全连接神经网络(Multi-layer Perceptron)的详细内容,更多关于Python 实现全连接神经网络的资料请关注小牛知识库其它相关文章!
-
辅助阅读:TensorFlow中文社区教程 - 英文官方教程 代码见:full_connect.py Linear Model 加载lesson 1中的数据集 将Data降维成一维,将label映射为one-hot encoding def reformat(dataset, labels): dataset = dataset.reshape((-1, image_size * imag
-
PyTorch包含创建和实现神经网络的特殊功能。在本章中,我们将创建一个简单的神经网络,实现一个隐藏层开发单个输出单元。 我们将使用以下步骤使用PyTorch实现第一个神经网络 - 第1步 首先,需要使用以下命令导入PyTorch库 - 第2步 定义所有图层和批量大小以开始执行神经网络,如下所示 - 第3步 由于神经网络包含输入数据的组合以获得相应的输出数据,使用以下给出的相同程序 - 第4步 借
-
我知道密集层意味着一个典型的完全连接层,这意味着每个输入都将到每个神经元进行乘法。但最近我脑海中出现了一些问题,当在youtube、博客、StackOverflow和文章上搜索时,没有人给我满意的答案。 1-为什么我们需要神经网络中的全连接(密集)层,它的用法?我们不能使用稀疏层吗(意味着一些输入只会到达一些神经元,所以所有神经元不会得到所有输入) 2-如果我们使用稀疏层会发生什么?我知道计算量会
-
例如,有一个3乘3的图像, 有两个2x2滤波器的卷积神经网络卷积图像 最后,输出的维是2x2x2 我可以将上述程序视为以下内容吗? 由于2x2过滤器,在整个图像上滑动后,我得到了4个小图像 并使用这4幅小图像作为全连接神经网络的输入 最后我也能得到8个输出 我真的不知道CNN中的反向传播,所以我试图从经典的全连接神经网络中理解它。 通过输入一幅小图像,我们可以一次性更新全连接神经网络中的权重,这与
-
本文向大家介绍神经网络(BP)算法Python实现及应用,包括了神经网络(BP)算法Python实现及应用的使用技巧和注意事项,需要的朋友参考一下 本文实例为大家分享了Python实现神经网络算法及应用的具体代码,供大家参考,具体内容如下 首先用Python实现简单地神经网络算法: 使用自己定义的神经网络算法实现一些简单的功能: 小案例: X: Y 0 0
-
我已经实现了下面的神经网络来解决Python中的异或问题。我的神经网络由3个神经元的输入层、1个2个神经元的隐层和1个神经元的输出层组成。我使用Sigmoid函数作为隐藏层和输出层的激活函数: backpropogation似乎是正确的,但我一直得到这个错误,所有的值都变成了“nan”,输出: 你能帮我解决这个问题吗?谢谢你。