详解Bootstrap创建表单的三种格式(一)
在本章中,我们将学习如何使用 Bootstrap 创建表单。Bootstrap 通过一些简单的 HTML 标签和扩展的类即可创建出不同样式的表单。
Bootstrap表单类型分为三种格式:垂直或基本表单、内联表单、水平表单。
垂直或基本表单(display:block;)
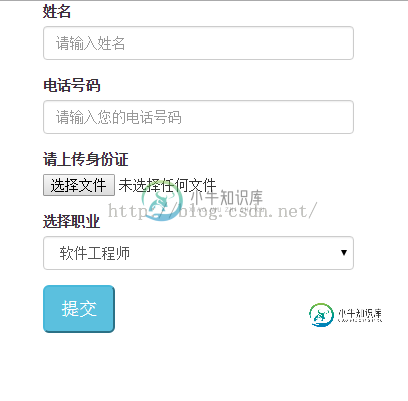
基本的表单结构是 Bootstrap 自带的,个别的表单控件自动接收一些全局样式。下面列出了创建基本表单的步骤:
向父 <form> 元素添加 role="form"。
把标签和控件放在一个带有 class .form-group 的 <div> 中。这是获取最佳间距所必需的。
向所有的文本元素 <input>、<textarea> 和 <select> 添加 class .form-control。
<!doctype html>
<html lang="en">
 <head>
  <!--网站编码格式,UTF-8 国际编码,GBK或 gb2312 中文编码-->
  <meta http-equiv="content-type" content="text/html;charset=utf-8" />
  <meta http-equiv="X-UA-Compatible" content="IE=edge">
  <meta name="Keywords" content="关键词一,关键词二">
  <meta name="Description" content="网站描述内容">
  <meta name="Author" content="Yvette Lau">
  <meta name = "viewport" content = " width = device-width, initial-scale = 1 ">
  <title>BootstrapDemo</title>
  <!--css js 文件的引入-->
  <link rel="stylesheet" type="text/css" href="../bootstrap-3.3.5-dist/css/bootstrap.min.css">
 </head>
 <body style="padding: 20px;">
  <div class = "col-xs-12 col-sm-6 col-md-4 col-lg-3">
   <form role = "form">
    <div class = "form-group">
     <label for = "name">姓名</label>
     <input type = "text" class = "form-control" id = "name"
       placeholder = "请输入姓名"></input>
    </div>
    <div class = "form-group">
     <label for = "tel">电话号码</label>
     <input type="text" class="form-control" id = "tel"
       placeholder = "请输入您的电话号码"></input>
    </div>
    <div class = "form-group">
     <label for = "idCard">请上传身份证</label>
     <input type = "file" id = "idCard"></input>
    </div>
    <div class = "form-group">
     <label for = "profession">选择职业</label>
     <select id = "profession" class = "form-control">
      <option>软件工程师</option>
      <option>测试工程师</option>
      <option>硬件工程师</option>
      <option>质量分析师</option>
     </select>
    </div>
    <div class="form-group">
     <button type = "submit" class="btn-info btn-lg">提交</button>
    </div>
   </form>
  </div>
 </body>
</html>
效果如下:

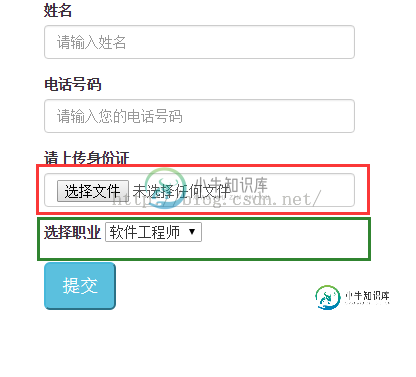
如果我们将select的form-control去掉,并给input type = "file"加上form-control,看看效果如何。

是不是能看出和上面效果的区别了呢?这样您大概明白form-control的作用了,它是设置外围的边框效果,包括宽、高、获取
焦点时form的样式。
内联表单(全部在同一行,display为inline-block)
如果需要创建一个表单,它的所有元素是内联的,向左对齐的,标签是并排的,请向 <form> 标签添加 class .form-inline。
因为head部分的内容都是一样的,所以我们只列出body部分的内容。
<body style="padding: 20px;">
 <form role = "form" class="form-inline">
  <div class = "form-group">
   <label for = "name">姓名</label>
   <input type = "text" class = "form-control" id = "name" placeholder = "请输入姓名"></input>
  </div>
  <div class = "form-group">
   <label for = "tel">电话号码</label>
   <input type="text" class="form-control" id = "tel" placeholder = "请输入您的电话号码"></input>
  </div>
  <div class = "form-group">
   <label for = "idCard">请上传身份证</label>
   <input type = "file" id = "idCard"></input>
  </div>
  <div class = "form-group">
   <label for = "profession">选择职业</label>
   <select id = "profession" class = "form-control">
    <option>软件工程师</option>
    <option>测试工程师</option>
    <option>硬件工程师</option>
    <option>质量分析师</option>
   </select>
  </div>
  <div class="form-group">
   <button type = "submit" class="btn-info btn-lg">提交</button>
  </div>
 </form>
</body>
显示效果:

默认情况下,Bootstrap 中的 input、select 和 textarea 有 100% 宽度。在使用水平表单时,您需要在表单控件上设置一个宽度。
使用 class .sr-only,可以隐藏内联表单的标签。
注:sr-only是展示给屏幕阅读器,而非是普通的读者看的。
其它元素在form的class为form-inline时,display为inLine-block;但是input tyoe = "file"却仍是display:block,可以看出其布局是有问题的,此时可以单独设置其display为inline-block;
水平表单(label和input等表单元素在同一行)
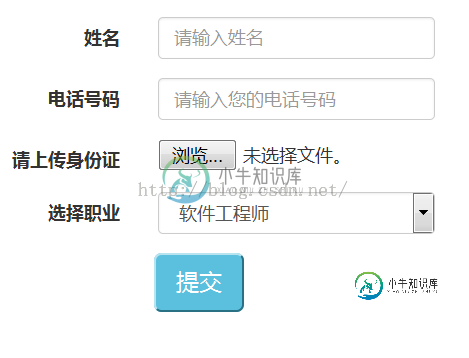
水平表单与其他表单不仅标记的数量上不同,而且表单的呈现形式也不同。如需创建一个水平布局的表单,请按下面的几个步骤进行:
1、向父 <form> 元素添加 class .form-horizontal。
2、把标签和控件放在一个带有 class .form-group 的 <div> 中。
3、向标签添加 class .control-label。
4、设置label和其兄弟div的宽度(因为input等默认宽度是100%)。
<body style="padding: 20px;">
 <form role = "form" class="form-horizontal">
  <div class = "form-group">
   <label class="col-sm-2 control-label" for = "name">姓名</label>
   <div class="col-sm-2">
    <input type = "text" class = "form-control" id = "name"
     placeholder = "请输入姓名"></input>
   </div>
  </div>
  <div class = "form-group">
   <label class="col-sm-2 control-label" for = "tel">电话号码</label>
   <div class="col-sm-2">
    <input type="text" class="form-control" id = "tel"
      placeholder = "请输入您的电话号码"></input>
   </div>
  </div>
  <div class = "form-group">
   <label class="col-sm-2 control-label" for = "idCard">请上传身份证</label>
   <div class="col-sm-2">
    <input type = "file" id = "idCard" style="display:inline-block;"></input>
   </div>
  </div>
  <div class = "form-group">
   <label class="col-sm-2 control-label" for = "profession">选择职业</label>
   <div class="col-sm-2">
    <select id = "profession" class = "form-control">
     <option>软件工程师</option>
     <option>测试工程师</option>
     <option>硬件工程师</option>
     <option>质量分析师</option>
    </select>
   </div>
  </div>
  <div class="form-group">
   <div class="col-sm-2 col-sm-offset-2">
    <button type = "submit" class="btn-info btn-lg">提交</button>
   </div>
  </div>
 </form>
</body>
效果:

以上内容给大家介绍了Bootstrap创建表单的相关内容,希望大家喜欢。
-
本文向大家介绍第七篇Bootstrap表单布局实例代码详解(三种表单布局),包括了第七篇Bootstrap表单布局实例代码详解(三种表单布局)的使用技巧和注意事项,需要的朋友参考一下 Bootstrap提供了三种表单布局:垂直表单,内联表单和水平表单。下面逐一给大家介绍,有兴趣的朋友一起学习吧。 创建垂直或基本表单: •·向父 <form> 元素添加 role="form"。 •·把标签和控件放在
-
本文向大家介绍详解SpringBoot工程的三种搭建方式,包括了详解SpringBoot工程的三种搭建方式的使用技巧和注意事项,需要的朋友参考一下 SpringBoot的主要目的是简化配置文件,通过少量配置即可运行Java程序,其强大的自动配置功能帮助开发者轻松实现配置装配,通过引入SpringBoot的 starter 就能实现想要的功能,不需要额外的配置。 目前SpringBoot工程有三种搭
-
主要内容:Servlet、GenericServlet 、HttpServlet 的关系,Servlet 接口,GenericServlet 抽象类,HttpServlet 抽象类,总结在 Servlet 中,一个动态网页对应一个 Servlet 类,我们可以通过 web.xml 配置文件将 URL 路径和 Servlet 类对应起来。访问一个动态网页的过程,实际上是将对应的 Servlet 类加载、实例化并调用相关方法的过程;网页上显示的内容,就是通过 Servlet 类中的某些方法向浏览器输
-
本文向大家介绍Bootstrap如何创建表单,包括了Bootstrap如何创建表单的使用技巧和注意事项,需要的朋友参考一下 Bootstrap表单类型分为三种格式:垂直或基本表单、内联表单、水平表单。 垂直或基本表单(display:block;) 基本的表单结构是 Bootstrap 自带的,个别的表单控件自动接收一些全局样式。下面列出了创建基本表单的步骤: 向父 <form> 元素添加 rol
-
本文向大家介绍python线程的几种创建方式详解,包括了python线程的几种创建方式详解的使用技巧和注意事项,需要的朋友参考一下 Python3 线程中常用的两个模块为: _thread threading(推荐使用) 使用Thread类创建 说明:主线程会等待所有的子线程结束后才结束 使用Thread子类创建 为了让每个线程的封装性更完美,所以使用threading模块时,往往会定义一个新的子
-
本文向大家介绍Bootstrap三种表单布局的使用方法,包括了Bootstrap三种表单布局的使用方法的使用技巧和注意事项,需要的朋友参考一下 Bootstrap提供了三种表单布局:垂直表单,内联表单和水平表单 创建垂直或基本表单: •·向父 <form> 元素添加 role="form"。 •·把标签和控件放在一个带有 class .form-group 的 <div> 中。这是获取最佳间

