Android提高之ListView实现自适应表格的方法
前面有文章介绍了使用GridView实现表格的方法,本文就来说说如何用ListView实现自适应的表格。GridView比ListView更容易实现自适应的表格,但是GridView每个格单元的大小固定,而ListView实现的表格可以自定义每个格单元的大小,但因此实现自适应表格也会复杂些(主要由于格单元大小不一)。此外,GridView实现的表格可以定位在具体某个格单元,而ListView实现的表格则只能定位在表格行。因此还是那句老话:根据具体的使用环境而选择GridView 或者 ListView实现表格。
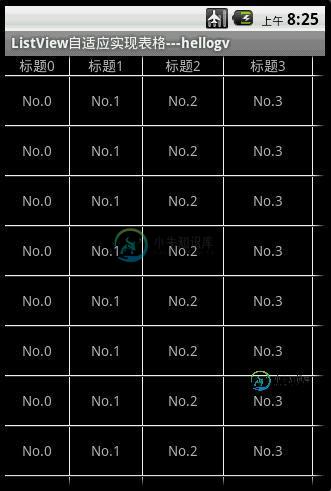
先来看看本文程序运行的效果图,如下图所示:

本文实现的ListView表格,可以每个格单元大小不一,文本(TextView)或图片(ImageView)做格单元的数据,不需要预先定义XML实现样式(自适应的根本目标)。由于ListView置于HorizontalScrollView中,因此对于列比较多/列数据比较长的数据表也能很好地适应其宽度。
main.xml源码如下:
<?xml version="1.0" encoding="utf-8"?>
<LinearLayout xmlns:android="http://schemas.android.com/apk/res/android"
 android:orientation="vertical" android:layout_width="fill_parent"
 android:layout_height="fill_parent">
 <HorizontalScrollView android:id="@+id/HorizontalScrollView01"
 android:layout_height="fill_parent" android:layout_width="fill_parent">
 <ListView android:id="@+id/ListView01" android:layout_height="wrap_content"
  android:layout_width="wrap_content"></ListView>
 </HorizontalScrollView>
</LinearLayout>
主类testMyListView.java的源码如下:
package com.testMyListView;
import java.util.ArrayList;
import com.testMyListView.TableAdapter.TableCell;
import com.testMyListView.TableAdapter.TableRow;
import android.app.Activity;
import android.os.Bundle;
import android.view.View;
import android.widget.AdapterView;
import android.widget.ListView;
import android.widget.LinearLayout.LayoutParams;
import android.widget.Toast;
/**
 * @author hellogv
 */
public class testMyListView extends Activity {
 /** Called when the activity is first created. */
 ListView lv;
 @Override
 public void onCreate(Bundle savedInstanceState) {
 super.onCreate(savedInstanceState);
 setContentView(R.layout.main);
 this.setTitle("ListView自适应实现表格---hellogv");
 lv = (ListView) this.findViewById(R.id.ListView01);
 ArrayList<TableRow> table = new ArrayList<TableRow>();
 TableCell[] titles = new TableCell[5];// 每行5个单元
 int width = this.getWindowManager().getDefaultDisplay().getWidth()/titles.length;
 // 定义标题
 for (int i = 0; i < titles.length; i++) {
  titles[i] = new TableCell("标题" + String.valueOf(i),
   width + 8 * i,
   LayoutParams.FILL_PARENT,
   TableCell.STRING);
 }
 table.add(new TableRow(titles));
 // 每行的数据
 TableCell[] cells = new TableCell[5];// 每行5个单元
 for (int i = 0; i < cells.length - 1; i++) {
  cells[i] = new TableCell("No." + String.valueOf(i),
   titles[i].width,
   LayoutParams.FILL_PARENT,
   TableCell.STRING);
 }
 cells[cells.length - 1] = new TableCell(R.drawable.icon,
   titles[cells.length - 1].width,
   LayoutParams.WRAP_CONTENT,
   TableCell.IMAGE);
 // 把表格的行添加到表格
 for (int i = 0; i < 12; i++)
  table.add(new TableRow(cells));
 TableAdapter tableAdapter = new TableAdapter(this, table);
 lv.setAdapter(tableAdapter);
 lv.setOnItemClickListener(new ItemClickEvent());
 }
 class ItemClickEvent implements AdapterView.OnItemClickListener {
 @Override
 public void onItemClick(AdapterView<?> arg0, View arg1, int arg2,
  long arg3) {
  Toast.makeText(testMyListView.this, "选中第"+String.valueOf(arg2)+"行", 500).show();
 }
 }
}
ListView自适应实现Table的类TableAdapter.java代码如下:
此处需要注意:TableCell是格单元的类,TableRow是表格行的类,TableRowView是实现表格行的组件。实现步骤:TableCell --> TableRow(TableRowView)-->ListView
package com.testMyListView;
import java.util.List;
import android.content.Context;
import android.graphics.Color;
import android.view.Gravity;
import android.view.View;
import android.view.ViewGroup;
import android.widget.BaseAdapter;
import android.widget.ImageView;
import android.widget.LinearLayout;
import android.widget.TextView;
public class TableAdapter extends BaseAdapter {
 private Context context;
 private List<TableRow> table;
 public TableAdapter(Context context, List<TableRow> table) {
 this.context = context;
 this.table = table;
 }
 @Override
 public int getCount() {
 return table.size();
 }
 @Override
 public long getItemId(int position) {
 return position;
 }
 public TableRow getItem(int position) {
 return table.get(position);
 }
 public View getView(int position, View convertView, ViewGroup parent) {
 TableRow tableRow = table.get(position);
 return new TableRowView(this.context, tableRow);
 }
 /**
 * TableRowView 实现表格行的样式
 * @author hellogv
 */
 class TableRowView extends LinearLayout {
 public TableRowView(Context context, TableRow tableRow) {
  super(context);

  this.setOrientation(LinearLayout.HORIZONTAL);
  for (int i = 0; i < tableRow.getSize(); i++) {//逐个格单元添加到行
  TableCell tableCell = tableRow.getCellValue(i);
  LinearLayout.LayoutParams layoutParams = new LinearLayout.LayoutParams(
   tableCell.width, tableCell.height);//按照格单元指定的大小设置空间
  layoutParams.setMargins(0, 0, 1, 1);//预留空隙制造边框
  if (tableCell.type == TableCell.STRING) {//如果格单元是文本内容
   TextView textCell = new TextView(context);
   textCell.setLines(1);
   textCell.setGravity(Gravity.CENTER);
   textCell.setBackgroundColor(Color.BLACK);//背景黑色
   textCell.setText(String.valueOf(tableCell.value));
   addView(textCell, layoutParams);
  } else if (tableCell.type == TableCell.IMAGE) {//如果格单元是图像内容
   ImageView imgCell = new ImageView(context);
   imgCell.setBackgroundColor(Color.BLACK);//背景黑色
   imgCell.setImageResource((Integer) tableCell.value);
   addView(imgCell, layoutParams);
  }
  }
  this.setBackgroundColor(Color.WHITE);//背景白色,利用空隙来实现边框
 }
 }
 /**
 * TableRow 实现表格的行
 * @author hellogv
 */
 static public class TableRow {
 private TableCell[] cell;
 public TableRow(TableCell[] cell) {
  this.cell = cell;
 }
 public int getSize() {
  return cell.length;
 }
 public TableCell getCellValue(int index) {
  if (index >= cell.length)
  return null;
  return cell[index];
 }
 }
 /**
 * TableCell 实现表格的格单元
 * @author hellogv
 */
 static public class TableCell {
 static public final int STRING = 0;
 static public final int IMAGE = 1;
 public Object value;
 public int width;
 public int height;
 private int type;
 public TableCell(Object value, int width, int height, int type) {
  this.value = value;
  this.width = width;
  this.height = height;
  this.type = type;
 }
 }
}
希望本文所述实例能够对大家进行Android项目开发有所帮助。
-
本文向大家介绍Android提高之自定义Menu(TabMenu)实现方法,包括了Android提高之自定义Menu(TabMenu)实现方法的使用技巧和注意事项,需要的朋友参考一下 一般使用过UCWEB-Android版的人都应该对其特殊的menu有一定的印象,把menu做成Tab-Menu(支持分页的Menu),可以容纳比Android传统的menu更丰富的内容(Android的menu超过6
-
本文向大家介绍js实现iframe自动自适应高度的方法,包括了js实现iframe自动自适应高度的方法的使用技巧和注意事项,需要的朋友参考一下 本文实例讲述了js实现iframe自动自适应高度的方法。分享给大家供大家参考。具体如下: 在编写网页的时候,很多时候要用到自动伸缩iframe高度 ,假如ifram中嵌入的是一个列表,那么增加数据后,刷新列表,iframe高度会自动伸长。删除数据后,ifr
-
本文向大家介绍JS实现iframe自适应高度的方法示例,包括了JS实现iframe自适应高度的方法示例的使用技巧和注意事项,需要的朋友参考一下 本文实例讲述了JS实现iframe自适应高度的方法。分享给大家供大家参考,具体如下: PS:高度自适应应用广泛,本站的很多在线工具也使用了这一技巧,列举如下几个工具供大家参考: JavaScript在线格式化工具(基于beautify.js插件): htt
-
本文向大家介绍jquery实现textarea 高度自适应,包括了jquery实现textarea 高度自适应的使用技巧和注意事项,需要的朋友参考一下 之前给大家分享过用Javascript控制文本框textarea高度随内容自适应增长收缩,今天花了点时间换了种实现方法,总结一下 以上就是本文所述的全部内容了,希望对大家学习jQuery能够有所帮助。
-
本文向大家介绍Android应用中通过Layout_weight属性用ListView实现表格,包括了Android应用中通过Layout_weight属性用ListView实现表格的使用技巧和注意事项,需要的朋友参考一下 今天主要说的是对Layout_weight属性的完全解析,以及利用Layout_weight这个属性使用ListView来实现表格的效果,我们都知道Android里面专门有一个
-
本文向大家介绍JS实现iframe自适应高度的方法(兼容IE与FireFox),包括了JS实现iframe自适应高度的方法(兼容IE与FireFox)的使用技巧和注意事项,需要的朋友参考一下 本文实例讲述了JS实现iframe自适应高度的方法。分享给大家供大家参考,具体如下: 之前一直被iframe自适应高度的问题困扰,很多JS代码在FF里面似乎就变成哑巴了。后来下面这段代码终于被我从万千号称兼容

