
基于popupWindow实现悬浮半透明效果

本文实例为大家分享了popupWindow实现悬浮半透明效果的具体代码,供大家参考,具体内容如下
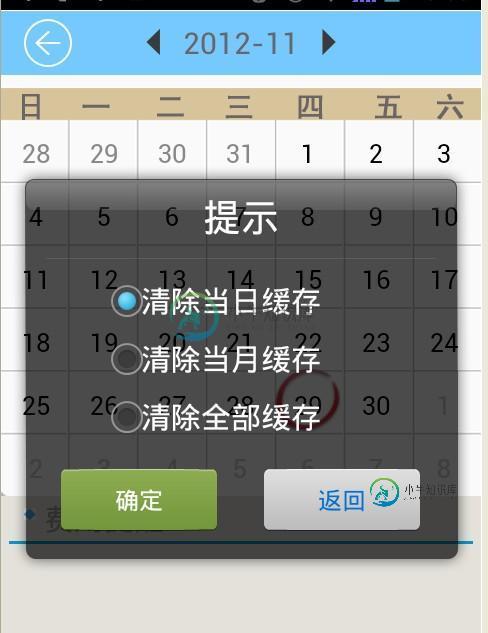
如上图显示弹出一个半透明框
java代码:
//清空数据
  private void ShowPopup() {
    LayoutInflater mLayoutInflater = (LayoutInflater) getSystemService(LAYOUT_INFLATER_SERVICE);
    ViewGroup mView = (ViewGroup) mLayoutInflater.inflate(
        R.layout.soft_calendar_popup, null, true);
    final PopupWindow popupWindow = new PopupWindow(mView,
        LayoutParams.WRAP_CONTENT, LayoutParams.WRAP_CONTENT, true);
    final RadioButton radio1 = (RadioButton) mView
        .findViewById(R.id.radio0);
    final RadioButton radio2 = (RadioButton) mView
        .findViewById(R.id.radio1);
    final RadioButton radio3 = (RadioButton) mView
        .findViewById(R.id.radio2);

    Button btn1 = (Button) mView.findViewById(R.id.button1);
    btn1.setOnClickListener(new OnClickListener() {

      @Override
      public void onClick(View v) {
        //确定按钮实现的操作
        popupWindow.dismiss();
      }
    });
    Button btn2 = (Button) mView.findViewById(R.id.button2);
    btn2.setOnClickListener(new OnClickListener() {

      @Override
      public void onClick(View v) {
        // 取消按钮实现的操作
        popupWindow.dismiss();
      }
    });

    popupWindow.setBackgroundDrawable(new BitmapDrawable());
    popupWindow.showAtLocation(findViewById(R.id.RelativeLayout1),
        Gravity.CENTER | Gravity.CENTER, 0, 0);//在屏幕的中间位置显示
    popupWindow.update();
  }
soft_calendar_popup.xml的内容:
<?xml version="1.0" encoding="utf-8"?>
<LinearLayout xmlns:android="http://schemas.android.com/apk/res/android"
  android:layout_width="460px"
  android:layout_height="423px"
  android:background="@drawable/soft_calendar_popup_bg"
  android:orientation="vertical" >

  <TextView
    android:id="@+id/textView1"
    android:layout_width="match_parent"
    android:layout_height="wrap_content"
    android:layout_marginTop="30px"
    android:gravity="center"
    android:text="提示"
    android:textColor="@android:color/white"
    android:textSize="25dip" />

  <RadioGroup
    android:id="@+id/radioGroup1"
    android:layout_width="match_parent"
    android:layout_height="wrap_content"
    android:layout_marginLeft="100px"
    android:layout_marginRight="100px"
    android:layout_marginTop="30px" >

    <RadioButton
      android:id="@+id/radio0"
      android:layout_width="match_parent"
      android:layout_height="wrap_content"
      android:checked="true"
      android:text="清除当日缓存"
      android:textSize="20dip"
      android:textColor="@android:color/white" />

    <RadioButton
      android:id="@+id/radio1"
      android:textSize="20dip"
      android:layout_width="match_parent"
      android:layout_height="wrap_content"
      android:text="清除当月缓存"
      android:textColor="@android:color/white" />

    <RadioButton
      android:id="@+id/radio2"
      android:textSize="20dip"
      android:layout_width="match_parent"
      android:layout_height="wrap_content"
      android:text="清除全部缓存"
      android:textColor="@android:color/white" />
  </RadioGroup>

  <LinearLayout
    android:layout_width="match_parent"
    android:layout_height="wrap_content"
    android:layout_marginTop="15dip"
    android:gravity="center_horizontal" >

    <Button
      android:id="@+id/button1"
      android:layout_width="158px"
      android:layout_height="wrap_content"
      android:layout_marginRight="30dip"
      android:background="@drawable/btn2"
      android:gravity="center"
      android:text="确定"
      android:textColor="@android:color/white" />

    <Button
      android:id="@+id/button2"
      android:layout_width="158px"
      android:layout_height="wrap_content"
      android:background="@drawable/btn1"
      android:gravity="center"
      android:text="返回"
      android:textColor="#0072D7" />
  </LinearLayout>

</LinearLayout>
以上就是本文的全部内容,希望对大家的学习有所帮助,也希望大家多多支持小牛知识库。
-
主要内容:本节引言:,1.相关方法解读,2.使用代码示例,3.示例代码下载,本节小结:本节引言: 本节给大家带来的是最后一个用于显示信息的UI控件——PopupWindow(悬浮框),如果你想知道 他长什么样子,你可以打开你手机的QQ,长按列表中的某项,这个时候后弹出一个黑色的小 对话框,这种就是PopupWindow了,和AlertDialog对话框不同的是,他的位置可以是随意的; 另外AlertDialog是非堵塞线程的,而PopupWindow则是堵塞线程的!而官方有这样一句
-
本文向大家介绍js+html5实现半透明遮罩层弹框效果,包括了js+html5实现半透明遮罩层弹框效果的使用技巧和注意事项,需要的朋友参考一下 点击按钮,出现半透明遮罩层弹框,说说自己之前发过的愁吧 1、遮罩层半透明了 弹框也跟着半透明了 就像这样 绝望吧 是哪里错了呢?你的css是这样写的吧: 应该这样: 需要注意的是这几个参数的意思:RGB Red Green Bule 3色!及212, 0
-
本文向大家介绍Android实现顶部悬浮效果,包括了Android实现顶部悬浮效果的使用技巧和注意事项,需要的朋友参考一下 本文实例为大家分享了Android实现顶部悬浮效果的具体代码,供大家参考,具体内容如下 效果图 布局 java 注意事项 1.清单文件需要配置 2.gradle配置需要24以上 3.recyclerView的下滑和swipRefreshLayout的下拉刷新会冲突,所以需要
-
本文向大家介绍Android Menu半透明效果的开发实例,包括了Android Menu半透明效果的开发实例的使用技巧和注意事项,需要的朋友参考一下 不知道大家是否用过天天动听,对于它界面上的半透明Menu效果,笔者感觉非常漂亮。下面是天天动听半透明Menu的截图,欣赏下吧: 感觉还不错吧?那么如何实现这种半透明Menu效果呢?本文就重点讨论并给出这种Menu的具体代码实现过程。
-
本文向大家介绍php实现给图片加灰色半透明效果的方法,包括了php实现给图片加灰色半透明效果的方法的使用技巧和注意事项,需要的朋友参考一下 本文实例讲述了php实现给图片加灰色半透明效果的方法。分享给大家供大家参考。具体实现方法如下: 原理: 1.首先计算出原图片的尺寸 2.创建相同尺寸的半透明图片 3.使用 imagecopy()方法,把新创建的半透明图片与原图合并 具体实现代码如下: 希望本文
-
如题,这个有趣效果是如何实现的? 截图如下。 1.隐藏前: 2.隐藏后: