原生javascript实现Tab选项卡切换功能
分析个人用原生JS获取类名元素的代码:
getByClassName:function(className,parent){

            var elem = [],

                node = parent != undefined&&parent.nodeType==1?parent.getElementsByTagName('*'):document.getElementsByTagName('*'),

                p = new RegExp("(^|\\s)"+className+"(\\s|$)");

            for(var n=0,i=node.length;n<i;n++){

                if(p.test(node[n].className)){

                    elem.push(node[n]);

                }

            }

            return elem;

        }
parent参数是可选的,但需要先判断它是否存在,且是节点dom元素 parent != undefined&&parent.nodeType==1 ,nodeType == 1可以判断节点是否为dom元素,在火狐浏览器里面,空白也算是节点(.childnodes),用这个属性就判断是否为dom元素,排除空白符.
移除元素的类名:
var cur = new RegExp(this.sCur,'g');  //this.sCur就是类名,这里是用变量保存 如:this.sCur = "cur";

           this.oTab_btn[n].className = this.oTab_btn[n].className.replace(cur,'');
调用例子:
<!doctype html>

<html lang="en">

<head>

    <meta charset="UTF-8">

    <title>Document</title>

    <style type="text/css">

    body,p,ul,li {padding: 0;margin: 0;}

    ul {list-style: none;}

    h3 {padding: 5px;background-color: #999;margin-bottom: 10px;}

    pre {border: 1px dotted #000;}

    .explan {padding: 10px;color: #333;line-height: 1.6;}

    .box {width: 300px;height:100px;border: 1px solid #ccc;}

    .box ul{height: 30px;line-height: 30px;}

    .box ul li {float: left;display: inline;width: 150px;text-align: center;background-color: #eee;cursor: pointer;}

    .box .tab-cur {background-color: #000;color: #fff;}

    .box p {display: none;padding: 30px;}

    /*tabB*/

    #tabB {width: 450px;}

    .box .tab-cur02 {background-color: #025023;}

    </style>

</head>

<body>

    <div class="explan">

        <strong>使用阅读 :</strong> <br>

            {'tabBtn':'#tabA .tab-i','tabCon':'#tabA .tab-c','cur':'tab-cur'} 【必选】 <br>

          (1)'tabBtn':'#tabA .tab-i','tabCon':'#tabA .tab-c'  选择器:只支持 #id .className,(ID + 空格 + 类名) 【必选】<br>

          (2)'cur':'tab-cur'(默认) :为切换按钮当前状态(类名)【必选】<br>

          (3)'type':'mouseover'|| 'clicl' 默认是点击 【可选】

    </div>

    <h3>tabA</h3>

     <pre>new LGY_tab({'tabBtn':'#tabA .tab-i',

    'tabCon':'#tabA .tab-c',

    'cur':'tab-cur'

    });

         </pre>

    <div class="box" id="tabA">

        <ul>

            <li class="tab-i">btn-A</li>

            <li class="tab-i">btn-B</li>

        </ul>

        <p class="tab-c">con-A</p>

        <p class="tab-c">con-B</p>

    </div>
    <h3>tabB</h3>

     <pre>new LGY_tab({'tabBtn':'#tabB .tab-i',

    'tabCon':'#tabB .tab-k',

    'cur':'tab-cur02',

    'type':'mouseover'

    });

         </pre>

    <div class="box" id="tabB">

        <ul>

            <li class="tab-i">btn-A</li>

            <li class="tab-i">btn-B</li>

            <li class="tab-i">btn-C</li>

        </ul>

        <p class="tab-k">con-A</p>

        <p class="tab-k">con-B</p>

        <p class="tab-k">con-C</p>

    </div>

    <script type="text/javascript" src="下方的代码段.js"></script>

    <script type="text/javascript">

    //

    new LGY_tab({'tabBtn':'#tabA .tab-i',

                 'tabCon':'#tabA .tab-c',

                 'cur':'tab-cur'

    });

    //

    new LGY_tab({'tabBtn':'#tabB .tab-i',

                 'tabCon':'#tabB .tab-k',

                 'cur':'tab-cur02',

                 'type':'mouseover'

    });

    //test

    //

    new LGY_tab({'tabBtn':'#tabB .tab-j',

                 'tabCon':'#tabB .tab-k',

                 'cur':'tab-cur02',

                 'type':'mouseover'

    });

    </script>

</body>

</html>
JS详细代码:
function LGY_tab(option){

    this.oTab_btn = this.getDom(option.tabBtn);//切换点击的元素

    this.oTab_clist = this.getDom(option.tabCon); //切换的内容

    if(!this.oTab_btn || !this.oTab_clist) return;

    this.sCur = option.cur; //激活的状态

    this.type = option.type || 'click';

    this.nLen = this.oTab_btn.length;

    this.int();

}

LGY_tab.prototype = {

    getId:function(id){

        return document.getElementById(id);

    },

    getByClassName:function(className,parent){

        var elem = [],

            node = parent != undefined&&parent.nodeType==1?parent.getElementsByTagName('*'):document.getElementsByTagName('*'),

            p = new RegExp("(^|\\s)"+className+"(\\s|$)");

        for(var n=0,i=node.length;n<i;n++){

            if(p.test(node[n].className)){

                elem.push(node[n]);

            }

        }

        return elem;

    },

    getDom:function(s){

        var nodeName = s.split(' '),

            p = this.getId(nodeName[0].slice(1)),

            c = this.getByClassName(nodeName[1].slice(1),p);

        if(!p || c.length==0) return null;

        return c;

    },

    change:function(){

        var cur = new RegExp(this.sCur,'g');

        for(var n=0;n<this.nLen;n++){

            this.oTab_clist[n].style.display = 'none';

            this.oTab_btn[n].className = this.oTab_btn[n].className.replace(cur,'');

        }

    },

    int:function(){

        var that = this;

        this.oTab_btn[0].className += ' '+this.sCur;

        this.oTab_clist[0].style.display = 'block';

        for(var n=0;n<this.nLen;n++){

            this.oTab_btn[n].index = n;

            this.oTab_btn[n]['on'+this.type] = function(){

                that.change();

                that.oTab_btn[this.index].className +=' ' + that.sCur;

                that.oTab_clist[this.index].style.display = 'block';

            }

        }

    }

}
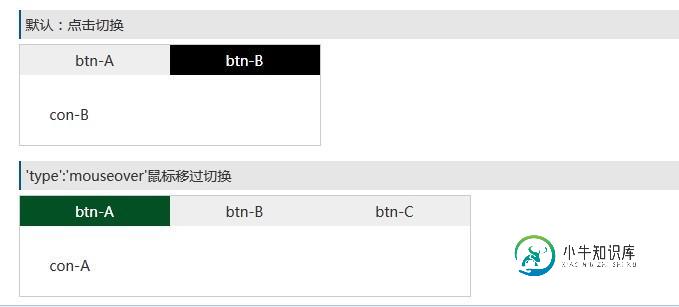
最终效果图展示:

效果是不是很棒呢,而且兼容性也不错,代码也很简洁,完全可以替代庞大的jQuery选项卡切换插件了。
-
本文向大家介绍js实现tab选项卡切换功能,包括了js实现tab选项卡切换功能的使用技巧和注意事项,需要的朋友参考一下 话不多说,请看代码: 以上就是本文的全部内容,希望本文的内容对大家的学习或者工作能带来一定的帮助,同时也希望多多支持呐喊教程!
-
本文向大家介绍jQuery简单实现tab选项卡切换效果,包括了jQuery简单实现tab选项卡切换效果的使用技巧和注意事项,需要的朋友参考一下 抽空把公司项目上用的tab效果封装了一下,实在是需要用的地方太多了~~~ 效果图: 代码: 以上就是本文的全部内容,希望能给大家一个参考,也希望大家多多支持呐喊教程。
-
本文向大家介绍基于javascript实现tab选项卡切换特效调试笔记,包括了基于javascript实现tab选项卡切换特效调试笔记的使用技巧和注意事项,需要的朋友参考一下 本文实例为大家分析了javascript实现tab选项卡切换的调试笔记,供大家参考,具体内容如下 制作导航栏,点击导航栏元素时下面的内容会产生相应的变化,并且该元素显示特殊样式。 js源代码: HTML代码: 效果图:
-
本文向大家介绍jQuery实现Tab选项卡切换效果简单演示,包括了jQuery实现Tab选项卡切换效果简单演示的使用技巧和注意事项,需要的朋友参考一下 本文实例针对jQuery实现Tab选项卡切换效果进行了简单演示,完全是自己的思考实现过程,分享给大家供大家参考。具体如下: 起初我Html代码架子是这样的: 后来换成了下面这个: 之所以换成这个,是因为我觉得 dl dt dd 在页面布局中用的比
-
本文向大家介绍jQuery实现TAB选项卡切换特效简单演示,包括了jQuery实现TAB选项卡切换特效简单演示的使用技巧和注意事项,需要的朋友参考一下 本文实例为大家分享jQuery实现TAB选项卡切换特效,供大家参考,具体内容如下 1、tab切换 on 2、tab切换 mouseenter 效果图: 以上就是本文的全部内容,希望对大家的学习有所帮助。
-
本文向大家介绍Android ViewPager实现选项卡切换,包括了Android ViewPager实现选项卡切换的使用技巧和注意事项,需要的朋友参考一下 本文实例介绍了ViewPager实现选项卡切换,效果图如下: 步骤一:这里使用兼容低版本的v4包进行布局,这里eclipse没有输入提示,所以要手动输入,文件名称“activity_main.xml” 步骤二:选项卡中的内容都是从布局文件中

