
Android编程实现在底端显示选项卡的方法

本文实例讲述了Android编程实现在底端显示选项卡的方法。分享给大家供大家参考,具体如下:
1.layout 文件
<?xml version="1.0" encoding="utf-8" ?>
<LinearLayout xmlns:android="http://schemas.android.com/apk/res/android"
android:orientation="vertical" android:layout_width="fill_parent"
android:layout_height="fill_parent">
  <TabHost android:id="@+id/edit_item_tab_host"
  android:layout_width="fill_parent" android:layout_height="fill_parent">
    <LinearLayout android:orientation="vertical"
    android:layout_width="fill_parent"
    android:layout_height="fill_parent"
    android:padding="5dp">
      <FrameLayout android:id="@android:id/tabcontent"
      android:layout_width="fill_parent"
      android:layout_height="wrap_content"
      android:padding="5dp" android:layout_weight="1">
        <LinearLayout android:id="@+id/widget_layout_Blue"
        android:layout_width="fill_parent"
        android:layout_height="fill_parent"
        android:orientation="vertical">
          <RelativeLayout android:layout_width="fill_parent"
          android:layout_height="wrap_content"
          android:paddingLeft="3px"
          android:paddingRight="3px">
            <LinearLayout android:id="@+id/titleLayout_person_check_road_add"
            android:layout_width="wrap_content"
            android:layout_height="wrap_content"
            android:orientation="vertical">
            </LinearLayout>
            <LinearLayout
            android:id="@+id/layout_person_check_road_add"
            android:layout_width="wrap_content"
            android:layout_height="wrap_content"
            android:layout_toRightOf="@id/titleLayout_person_check_road_add"
            android:layout_alignTop="@id/titleLayout_person_check_road_add"
            android:orientation="vertical">
            </LinearLayout>
        </RelativeLayout>
    </LinearLayout>
    <LinearLayout android:id="@+id/widget_layout_red"
    android:layout_width="fill_parent"
    android:layout_height="fill_parent"
    android:orientation="vertical">
      <RelativeLayout android:layout_width="fill_parent"
      android:layout_height="wrap_content"
      android:paddingLeft="3px" android:paddingRight="3px">
        <LinearLayout android:id="@+id/titleLayout_person_check_road_add1"
        android:layout_width="wrap_content"
        android:layout_height="wrap_content"
        android:orientation="vertical">
        </LinearLayout>
        <LinearLayout
        android:id="@+id/layout_person_check_road_add1"
        android:layout_width="wrap_content"
        android:layout_height="wrap_content"
        android:layout_toRightOf="@id/titleLayout_person_check_road_add1"
        android:layout_alignTop="@id/titleLayout_person_check_road_add1"
        android:orientation="vertical">
        </LinearLayout>
    </RelativeLayout>
</LinearLayout>
<LinearLayout android:id="@+id/widget_layout_green"
android:layout_width="fill_parent" android:layout_height="fill_parent"
android:orientation="vertical">
  <RelativeLayout android:layout_width="fill_parent"
  android:layout_height="wrap_content"
  android:paddingLeft="3px" android:paddingRight="3px">
    <LinearLayout android:id="@+id/titleLayout_person_check_road_add2"
    android:layout_width="wrap_content"
    android:layout_height="wrap_content"
    android:orientation="vertical"> </LinearLayout>
    <LinearLayout android:id="@+id/layout_person_check_road_add2"
    android:layout_width="wrap_content"
    android:layout_height="wrap_content"
    android:layout_toRightOf="@id/titleLayout_person_check_road_add2"
    android:layout_alignTop="@id/titleLayout_person_check_road_add2"
    android:orientation="vertical"> </LinearLayout>
  </RelativeLayout>
</LinearLayout>
<LinearLayout android:id="@+id/widget_layout_yellow"
android:layout_width="fill_parent" android:layout_height="fill_parent"
android:orientation="vertical">
  <RelativeLayout android:layout_width="fill_parent"
  android:layout_height="wrap_content"
  android:paddingLeft="3px" android:paddingRight="3px">
    <LinearLayout android:id="@+id/titleLayout_person_check_road_add3"
    android:layout_width="wrap_content"
    android:layout_height="wrap_content"
    android:orientation="vertical"> </LinearLayout>
    <LinearLayout android:id="@+id/layout_person_check_road_add3"
    android:layout_width="wrap_content"
    android:layout_height="wrap_content"
    android:layout_toRightOf="@id/titleLayout_person_check_road_add3"
    android:layout_alignTop="@id/titleLayout_person_check_road_add3"
    android:orientation="vertical"> </LinearLayout>
  </RelativeLayout>
</LinearLayout>
</FrameLayout>
<TabWidget android:id="@android:id/tabs"
android:layout_width="fill_parent" android:layout_height="wrap_content"
android:layout_weight="0" /> </LinearLayout>
</TabHost>
</LinearLayout>
2.Java 文件
import android.app.ActivityGroup;
import android.graphics.Color;
import android.os.Bundle;
import android.widget.EditText;
import android.widget.LinearLayout;
import android.widget.LinearLayout.LayoutParams;
import android.widget.TabHost;
import android.widget.TextView;
public class TabBottom extends ActivityGroup {
  public static TabHost myTabhost;
  private LayoutParams title_params = new LayoutParams(120, 50);
  private LayoutParams content_params = new LayoutParams(158, 50);
  private LinearLayout titleLayout, showViewLayout, titleLayout1,
  showViewLayout1, titleLayout2, showViewLayout2, titleLayout3,
  showViewLayout3;
  @Override
  protected void onCreate(Bundle savedInstanceState) {
    super.onCreate(savedInstanceState);
    setContentView(R.layout.bottomtab);
    myTabhost = (TabHost) findViewById(R.id.edit_item_tab_host);
    myTabhost.setup(this.getLocalActivityManager());
    titleLayout = (LinearLayout) findViewById(R.id.titleLayout_person_check_road_add);
    showViewLayout = (LinearLayout) findViewById(R.id.layout_person_check_road_add);
    titleLayout1 = (LinearLayout) findViewById(R.id.titleLayout_person_check_road_add1);
    showViewLayout1 = (LinearLayout) findViewById(R.id.layout_person_check_road_add1);
    titleLayout2 = (LinearLayout) findViewById(R.id.titleLayout_person_check_road_add2);
    showViewLayout2 = (LinearLayout) findViewById(R.id.layout_person_check_road_add2);
    titleLayout3 = (LinearLayout) findViewById(R.id.titleLayout_person_check_road_add3);
    showViewLayout3 = (LinearLayout) findViewById(R.id.layout_person_check_road_add3);
    myTabhost.addTab(myTabhost
    .newTabSpec("One")
    .setIndicator("收件箱",
    getResources().getDrawable(R.drawable.icon))
    .setContent(R.id.widget_layout_Blue));
    myTabhost.addTab(myTabhost
    .newTabSpec("Two")
    .setIndicator("发件箱",
    getResources().getDrawable(R.drawable.icon))
    .setContent(R.id.widget_layout_green));
    myTabhost.addTab(myTabhost
    .newTabSpec("Three")
    .setIndicator("垃圾箱",
    getResources().getDrawable(R.drawable.icon))
    .setContent(R.id.widget_layout_red));
    myTabhost.addTab(myTabhost
    .newTabSpec("Four")
    .setIndicator("发送",
    getResources().getDrawable(R.drawable.icon))
    .setContent(R.id.widget_layout_yellow));
    showInLayout();
    showInLayout1();
    showInLayout2();
    showInLayout3();
  }
  /*
  * 填充第一个选项卡页面
  */
  private void showInLayout() {
    for (int i = 0; i < 10; i++) {
      String condName = "名称显示1";
      TextView tv = new TextView(this);
      tv.setTextColor(Color.WHITE);
      tv.setTextSize(16);
      tv.setLayoutParams(title_params);
      tv.setText(condName + ":");
      titleLayout.addView(tv);
      EditText tv1 = new EditText(this);
      tv1.setTextSize(16);
      tv1.setLayoutParams(content_params);
      tv1.setText(condName);
      showViewLayout.addView(tv1);
    }
  }
  private void showInLayout1() {
    for (int i = 0; i < 10; i++) {
      String condName = "名称显示2";
      TextView tv = new TextView(this);
      tv.setTextColor(Color.WHITE);
      tv.setTextSize(16);
      tv.setLayoutParams(title_params);
      tv.setText(condName + ":");
      titleLayout1.addView(tv);
      TextView tv1 = new TextView(this);
      tv1.setTextColor(Color.WHITE);
      tv1.setTextSize(16);
      tv1.setLayoutParams(content_params);
      tv1.setText(condName + ":");
      showViewLayout1.addView(tv1);
    }
  }
  private void showInLayout2() {
    for (int i = 0; i < 10; i++) {
      String condName = "名称显示3";
      TextView tv = new TextView(this);
      tv.setTextColor(Color.WHITE);
      tv.setTextSize(16);
      tv.setLayoutParams(title_params);
      tv.setText(condName + ":");
      titleLayout2.addView(tv);
      TextView tv1 = new TextView(this);
      tv1.setTextColor(Color.WHITE);
      tv1.setTextSize(16);
      tv1.setLayoutParams(content_params);
      tv1.setText(condName + ":");
      showViewLayout2.addView(tv1);
    }
  }
  private void showInLayout3() {
    for (int i = 0; i < 10; i++) {
      String condName = "名称显示4";
      TextView tv = new TextView(this);
      tv.setTextColor(Color.WHITE);
      tv.setTextSize(16);
      tv.setLayoutParams(title_params);
      tv.setText(condName + ":");
      titleLayout3.addView(tv);
      TextView tv1 = new TextView(this);
      tv1.setTextColor(Color.WHITE);
      tv1.setTextSize(16);
      tv1.setLayoutParams(content_params);
      tv1.setText(condName + ":");
      showViewLayout3.addView(tv1);
    }
  }
}
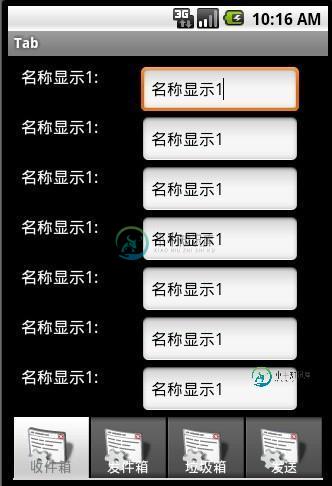
效果如下:

更多关于Android相关内容感兴趣的读者可查看本站专题:《Android开发入门与进阶教程》、《Android编程之activity操作技巧总结》、《Android资源操作技巧汇总》、《Android操作json格式数据技巧总结》、《Android数据库操作技巧总结》、《Android编程开发之SD卡操作方法汇总》、《Android视图View技巧总结》及《Android控件用法总结》
希望本文所述对大家Android程序设计有所帮助。
-
本文向大家介绍Android编程实现将tab选项卡放在屏幕底部的方法,包括了Android编程实现将tab选项卡放在屏幕底部的方法的使用技巧和注意事项,需要的朋友参考一下 本文实例讲述了Android编程实现将tab选项卡放在屏幕底部的方法。分享给大家供大家参考,具体如下: 今天写Tab的时候由于TAB的跳转问题去查资料,倒反而发现更有趣的问题,就是如何将TAB放置在屏幕的底端。有点类似IPhon
-
视图与所有其他选项卡栏项目(事件、挂起、浏览、我的个人资料)配合良好,但对于“更多”部分,当推送到相关视图控制器时,选项卡栏视图控制器将显示选项卡栏上方的新底部栏,如图所示。 现在我试图设置底部栏为无,试图隐藏底部栏在属性检查员,没有工作。我想帮助删除这个空白视图视为底部栏,显示在标签栏上方。
-
本文向大家介绍js选项卡的实现方法,包括了js选项卡的实现方法的使用技巧和注意事项,需要的朋友参考一下 本文实例讲述了js选项卡的实现方法。分享给大家供大家参考。具体分析如下: 一、思路 1. 获取元素; 2. for循环按钮元素添加onclick(点击) 或者 onmousemove(移入)事件; 3. 点击当前按钮时会以高亮状态显示,通过for循环历遍把所有的按钮样式设置为空在把所有div的d
-
本文向大家介绍Android ViewPager实现选项卡切换,包括了Android ViewPager实现选项卡切换的使用技巧和注意事项,需要的朋友参考一下 本文实例介绍了ViewPager实现选项卡切换,效果图如下: 步骤一:这里使用兼容低版本的v4包进行布局,这里eclipse没有输入提示,所以要手动输入,文件名称“activity_main.xml” 步骤二:选项卡中的内容都是从布局文件中
-
本文向大家介绍Android编程之TabWidget选项卡用法实例分析,包括了Android编程之TabWidget选项卡用法实例分析的使用技巧和注意事项,需要的朋友参考一下 本文实例讲述了Android编程之TabWidget选项卡用法。分享给大家供大家参考,具体如下: 1 概览 TabWidget与TabHost。tab组件一般包括TabHost和TabWidget、FrameLayout,且
-
本文向大家介绍iOS实现选项卡效果的方法,包括了iOS实现选项卡效果的方法的使用技巧和注意事项,需要的朋友参考一下 先来看看实现效果: 控件是如何使用的 添加LMJTabDelegate代理 代理函数 LMJTab介绍: 总结 以上就是这篇文章的全部内容了,希望能对各位iOS开发者们有所帮助,如果有疑问大家可以留言交流。