
基于Pytorch SSD模型分析

本文参考github上SSD实现,对模型进行分析,主要分析模型组成及输入输出大小.SSD网络结构如下图:
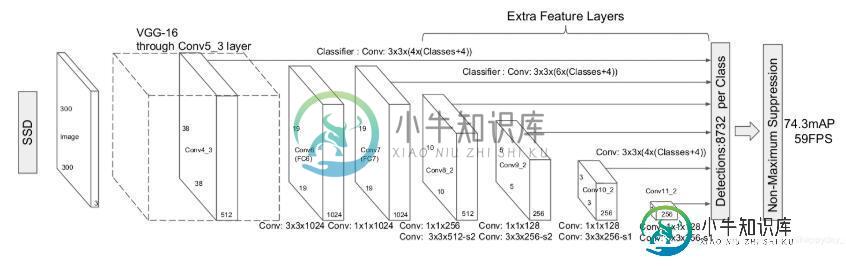
每输入的图像有8732个框输出;
import torch
import torch.nn as nn
import torch.nn.functional as F
from torch.autograd import Variable
#from layers import *
from data import voc, coco
import os
base = {
 '300': [64, 64, 'M', 128, 128, 'M', 256, 256, 256, 'C', 512, 512, 512, 'M',
   512, 512, 512],
 '512': [],
}
extras = {
 '300': [256, 'S', 512, 128, 'S', 256, 128, 256, 128, 256],
 '512': [],
}
mbox = {
 '300': [4, 6, 6, 6, 4, 4], # number of boxes per feature map location
 '512': [],
}
VGG基础网络结构:
def vgg(cfg, i, batch_norm=False):
 layers = []
 in_channels = i
 for v in cfg:
  if v == 'M':
   layers += [nn.MaxPool2d(kernel_size=2, stride=2)]
  elif v == 'C':
   layers += [nn.MaxPool2d(kernel_size=2, stride=2, ceil_mode=True)]
  else:
   conv2d = nn.Conv2d(in_channels, v, kernel_size=3, padding=1)
   if batch_norm:
    layers += [conv2d, nn.BatchNorm2d(v), nn.ReLU(inplace=True)]
   else:
    layers += [conv2d, nn.ReLU(inplace=True)]
   in_channels = v
 pool5 = nn.MaxPool2d(kernel_size=3, stride=1, padding=1)
 conv6 = nn.Conv2d(512, 1024, kernel_size=3, padding=6, dilation=6)
 conv7 = nn.Conv2d(1024, 1024, kernel_size=1)
 layers += [pool5, conv6,
    nn.ReLU(inplace=True), conv7, nn.ReLU(inplace=True)]
 return layers
size=300
vgg=vgg(base[str(size)], 3)
print(vgg)
输出为:
Conv2d(3, 64, kernel_size=(3, 3), stride=(1, 1), padding=(1, 1))
ReLU(inplace)
Conv2d(64, 64, kernel_size=(3, 3), stride=(1, 1), padding=(1, 1))
ReLU(inplace)
MaxPool2d(kernel_size=2, stride=2, padding=0, dilation=1, ceil_mode=False)
Conv2d(64, 128, kernel_size=(3, 3), stride=(1, 1), padding=(1, 1))
ReLU(inplace)
Conv2d(128, 128, kernel_size=(3, 3), stride=(1, 1), padding=(1, 1))
ReLU(inplace)
MaxPool2d(kernel_size=2, stride=2, padding=0, dilation=1, ceil_mode=False)
Conv2d(128, 256, kernel_size=(3, 3), stride=(1, 1), padding=(1, 1))
ReLU(inplace)
Conv2d(256, 256, kernel_size=(3, 3), stride=(1, 1), padding=(1, 1))
ReLU(inplace)
Conv2d(256, 256, kernel_size=(3, 3), stride=(1, 1), padding=(1, 1))
ReLU(inplace)
MaxPool2d(kernel_size=2, stride=2, padding=0, dilation=1, ceil_mode=True)
Conv2d(256, 512, kernel_size=(3, 3), stride=(1, 1), padding=(1, 1))
ReLU(inplace)
Conv2d(512, 512, kernel_size=(3, 3), stride=(1, 1), padding=(1, 1))
ReLU(inplace)
Conv2d(512, 512, kernel_size=(3, 3), stride=(1, 1), padding=(1, 1))
ReLU(inplace)
MaxPool2d(kernel_size=2, stride=2, padding=0, dilation=1, ceil_mode=False)
Conv2d(512, 512, kernel_size=(3, 3), stride=(1, 1), padding=(1, 1))
ReLU(inplace)
Conv2d(512, 512, kernel_size=(3, 3), stride=(1, 1), padding=(1, 1))
ReLU(inplace)
Conv2d(512, 512, kernel_size=(3, 3), stride=(1, 1), padding=(1, 1))
ReLU(inplace)
MaxPool2d(kernel_size=3, stride=1, padding=1, dilation=1, ceil_mode=False)
Conv2d(512, 1024, kernel_size=(3, 3), stride=(1, 1), padding=(6, 6), dilation=(6, 6))
ReLU(inplace)
Conv2d(1024, 1024, kernel_size=(1, 1), stride=(1, 1))
ReLU(inplace)
SSD中添加的网络
add_extras函数构建基本的卷积层
def add_extras(cfg, i, batch_norm=False):
 # Extra layers added to VGG for feature scaling
 layers = []
 in_channels = i
 flag = False
 for k, v in enumerate(cfg):
  if in_channels != 'S':
   if v == 'S':
    layers += [nn.Conv2d(in_channels, cfg[k + 1],
       kernel_size=(1, 3)[flag], stride=2, padding=1)]
   else:
    layers += [nn.Conv2d(in_channels, v, kernel_size=(1, 3)[flag])]
   flag = not flag
  in_channels = v
 return layers
extra_layers=add_extras(extras[str(size)], 1024)
for layer in extra_layers:
 print(layer)
输出为:
Conv2d(1024, 256, kernel_size=(1, 1), stride=(1, 1))
Conv2d(256, 512, kernel_size=(3, 3), stride=(2, 2), padding=(1, 1))
Conv2d(512, 128, kernel_size=(1, 1), stride=(1, 1))
Conv2d(128, 256, kernel_size=(3, 3), stride=(2, 2), padding=(1, 1))
Conv2d(256, 128, kernel_size=(1, 1), stride=(1, 1))
Conv2d(128, 256, kernel_size=(3, 3), stride=(1, 1))
Conv2d(256, 128, kernel_size=(1, 1), stride=(1, 1))
Conv2d(128, 256, kernel_size=(3, 3), stride=(1, 1))
multibox函数得到每个特征图的默认box的位置计算网络和分类得分网络
def multibox(vgg, extra_layers, cfg, num_classes):
 loc_layers = []
 conf_layers = []
 vgg_source = [21, -2]
 for k, v in enumerate(vgg_source):
  loc_layers += [nn.Conv2d(vgg[v].out_channels,
         cfg[k] * 4, kernel_size=3, padding=1)]
  conf_layers += [nn.Conv2d(vgg[v].out_channels,
      cfg[k] * num_classes, kernel_size=3, padding=1)]
 for k, v in enumerate(extra_layers[1::2], 2):
  loc_layers += [nn.Conv2d(v.out_channels, cfg[k]
         * 4, kernel_size=3, padding=1)]
  conf_layers += [nn.Conv2d(v.out_channels, cfg[k]
         * num_classes, kernel_size=3, padding=1)]
 return vgg, extra_layers, (loc_layers, conf_layers)
base_, extras_, head_ = multibox(vgg(base[str(size)], 3), ## 产生vgg19基本模型
          add_extras(extras[str(size)], 1024),
          mbox[str(size)], num_classes)
#mbox[str(size)]为:[4, 6, 6, 6, 4, 4]
得到的输出为:
base_为上述描述的vgg网络,extras_为extra_layers网络,head_为:
([Conv2d(512, 16, kernel_size=(3, 3), stride=(1, 1), padding=(1, 1)),
 Conv2d(1024, 24, kernel_size=(3, 3), stride=(1, 1), padding=(1, 1)),
 Conv2d(512, 24, kernel_size=(3, 3), stride=(1, 1), padding=(1, 1)),
 Conv2d(256, 24, kernel_size=(3, 3), stride=(1, 1), padding=(1, 1)),
 Conv2d(256, 16, kernel_size=(3, 3), stride=(1, 1), padding=(1, 1)),
 Conv2d(256, 16, kernel_size=(3, 3), stride=(1, 1), padding=(1, 1))],
 [Conv2d(512, 84, kernel_size=(3, 3), stride=(1, 1), padding=(1, 1)),
 Conv2d(1024, 126, kernel_size=(3, 3), stride=(1, 1), padding=(1, 1)),
 Conv2d(512, 126, kernel_size=(3, 3), stride=(1, 1), padding=(1, 1)),
 Conv2d(256, 126, kernel_size=(3, 3), stride=(1, 1), padding=(1, 1)),
 Conv2d(256, 84, kernel_size=(3, 3), stride=(1, 1), padding=(1, 1)),
 Conv2d(256, 84, kernel_size=(3, 3), stride=(1, 1), padding=(1, 1))])
SSD网络及forward函数为:
class SSD(nn.Module):
 """Single Shot Multibox Architecture
 The network is composed of a base VGG network followed by the
 added multibox conv layers. Each multibox layer branches into
  1) conv2d for class conf scores
  2) conv2d for localization predictions
  3) associated priorbox layer to produce default bounding
   boxes specific to the layer's feature map size.
 See: https://arxiv.org/pdf/1512.02325.pdf for more details.

 Args:
  phase: (string) Can be "test" or "train"
  size: input image size
  base: VGG16 layers for input, size of either 300 or 500
  extras: extra layers that feed to multibox loc and conf layers
  head: "multibox head" consists of loc and conf conv layers
 """

 def __init__(self, phase, size, base, extras, head, num_classes):
  super(SSD, self).__init__()
  self.phase = phase
  self.num_classes = num_classes
  self.cfg = (coco, voc)[num_classes == 21]
  self.priorbox = PriorBox(self.cfg)
  self.priors = Variable(self.priorbox.forward(), volatile=True)
  self.size = size

  # SSD network
  self.vgg = nn.ModuleList(base)
  # Layer learns to scale the l2 normalized features from conv4_3
  self.L2Norm = L2Norm(512, 20)
  self.extras = nn.ModuleList(extras)

  self.loc = nn.ModuleList(head[0])
  self.conf = nn.ModuleList(head[1])

  if phase == 'test':
   self.softmax = nn.Softmax(dim=-1)
   self.detect = Detect(num_classes, 0, 200, 0.01, 0.45)

 def forward(self, x):
  """Applies network layers and ops on input image(s) x.

  Args:
   x: input image or batch of images. Shape: [batch,3,300,300].

  Return:
   Depending on phase:
   test:
    Variable(tensor) of output class label predictions,
    confidence score, and corresponding location predictions for
    each object detected. Shape: [batch,topk,7]

   train:
    list of concat outputs from:
     1: confidence layers, Shape: [batch*num_priors,num_classes]
     2: localization layers, Shape: [batch,num_priors*4]
     3: priorbox layers, Shape: [2,num_priors*4]
  """
  sources = list()
  loc = list()
  conf = list()

  # apply vgg up to conv4_3 relu
  for k in range(23):
   x = self.vgg[k](x) ##得到的x尺度为[1,512,38,38]

  s = self.L2Norm(x)
  sources.append(s)

  # apply vgg up to fc7
  for k in range(23, len(self.vgg)):
   x = self.vgg[k](x) ##得到的x尺寸为[1,1024,19,19]
  sources.append(x)

  # apply extra layers and cache source layer outputs
  for k, v in enumerate(self.extras):
   x = F.relu(v(x), inplace=True)
   if k % 2 == 1:
    sources.append(x)
  '''
  上述得到的x输出分别为:
  torch.Size([1, 512, 10, 10])
  torch.Size([1, 256, 5, 5])
  torch.Size([1, 256, 3, 3])
  torch.Size([1, 256, 1, 1])
  '''

  # apply multibox head to source layers
  for (x, l, c) in zip(sources, self.loc, self.conf):
   loc.append(l(x).permute(0, 2, 3, 1).contiguous())
   conf.append(c(x).permute(0, 2, 3, 1).contiguous())

  loc = torch.cat([o.view(o.size(0), -1) for o in loc], 1)
  conf = torch.cat([o.view(o.size(0), -1) for o in conf], 1)
  if self.phase == "test":
   output = self.detect(
    loc.view(loc.size(0), -1, 4),     # loc preds
    self.softmax(conf.view(conf.size(0), -1,
        self.num_classes)),    # conf preds
    self.priors.type(type(x.data))     # default boxes
   )
  else:
   output = (
    loc.view(loc.size(0), -1, 4), #[1,8732,4]
    conf.view(conf.size(0), -1, self.num_classes),#[1,8732,21]
    self.priors
   )
  return output
上述代码中sources中保存的数据输出如下,即用于边框提取的特征图:
torch.Size([1, 512, 38, 38])
torch.Size([1, 1024, 19, 19])
torch.Size([1, 512, 10, 10])
torch.Size([1, 256, 5, 5])
torch.Size([1, 256, 3, 3])
torch.Size([1, 256, 1, 1])
模型输入为
x=Variable(torch.randn(1,3,300,300))
以上这篇基于Pytorch SSD模型分析就是小编分享给大家的全部内容了,希望能给大家一个参考,也希望大家多多支持小牛知识库。
-
1. Hierarchical Softmax的缺点与改进 在讲基于Negative Sampling的word2vec模型前,我们先看看Hierarchical Softmax的的缺点。的确,使用霍夫曼树来代替传统的神经网络,可以提高模型训练的效率。但是如果我们的训练样本里的中心词w是一个很生僻的词,那么就得在霍夫曼树中辛苦的向下走很久了。能不能不用搞这么复杂的一颗霍夫曼树,将模型变的更加简单呢
-
1. 基于Hierarchical Softmax的模型概述 我们先回顾下传统的神经网络词向量语言模型,里面一般有三层,输入层(词向量),隐藏层和输出层(softmax层)。里面最大的问题在于从隐藏层到输出的softmax层的计算量很大,因为要计算所有词的softmax概率,再去找概率最大的值。这个模型如下图所示。其中V是词汇表的大小, word2vec对这个模型做了改进,首先,对于从输入层到隐藏
-
概述 本章节介绍如何从一个系统的数据库设计模型出发,一步步设计一个系统。 在软件项目(尤其是外包软件项目)中,通常有两种情况: 客户提供软件需求书; 客户提供原型设计; 对于以上两种情况的项目,在开发的流程上是有很大的差别的,最大的差别就在于页面交互上。 客户提供软件需求书:页面数量及形态不确定,带来的复杂性也不确定;(所以,为了固化需求,通常会跟客户做出原型或者UI进行需求确认,跟客户的合同也会
-
我正在尝试使用Keras ResNet50实现来训练二值图像分类模型。 我想在不使用转移学习的情况下测试模型,但当我尝试使用简单的密集层(带有sigmoid激活)来更改二元分类的输出层时,我在形状大小方面出现了错误。 我的代码是这样的: 执行此操作时,我出现以下错误: 如果我在得到的致密层之前添加一个扁平层: 我错过了什么?如何更改致密层的输入形状?
-
我们迄今为止看到的模型可能具有“基于规则”的特征,因为它们涉及受简单规则支配的系统。 在本章和以后的章节中,我们将探索基于智能体(agent)的模型。 基于智能体的模型包含智能体,它旨在模拟人和其他实体,它们收集世界的信息,制定决策并采取行动。 智能体通常位于空间或网络中,并在本地彼此交互。 他们通常有不完整的,不全面的世界信息。 智能体之间经常存在差异,而不像以前的所有模型,它们的所有成分都相同
-
一、Memcached简介 memcached是一款非常普及的服务器端缓存软件,memcached主要是基于Libevent库进行开发的。 如果你还不了解libevent相关知识,请先看我的 libevent 这篇文章《Linux c 开发 - libevent 》 memcached也是使用autotools的进行代码编译管理的,如果你还不了解autotools,你可以先看下文章:《Linux