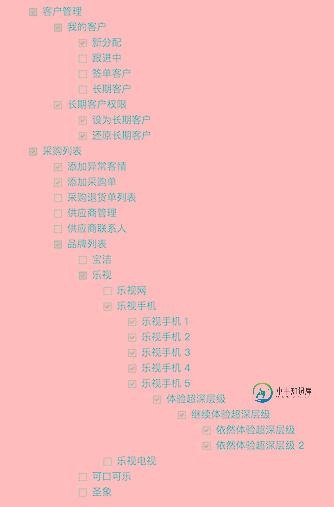
基于 Vue 的树形选择组件的示例代码
本文介绍了基于 Vue 的树形选择组件。分享给大家,具体如下:
系统要求:Vue 2
基本特性
- 完美的多级联动效果
- 支持无限多的分级
- 有 全选、半选、不选 三种状态
截图展示

代码如下:
 <!DOCTYPE html>
<html lang="en">
<head>
 <meta charset="UTF-8">
 <link rel="icon" href="https://v1-cn.vuejs.org/images/logo.png" rel="external nofollow" type="image/x-icon">
 <title>Vue Tree Select Example</title>
 <script src="https://cdn.bootcss.com/vue/2.4.2/vue.js"></script>
</head>
<body>

 <!-- 递归引用的模板 -->
 <template id="one-select" style="display: none;">
  <ul>
   <li v-for="(node, key, index) in tree">
    <div v-if="key != 'selected'">
     <div v-on:click="nodeClick(node, index)" v-bind:class="[node.selected == null ? 'tree-select-null' : (node.selected == 'half' ? 'tree-select-half' : 'tree-select-full'), 'tree-select', 'inline-block']"></div>

     <div class="inline-block">{{ key }}</div>
     <div v-if="key != ''">
      <one-select v-bind:tree="node" v-bind:isroot="false"></one-select>
     </div>
    </div>
   </li>
  </ul>
 </template>

 <!-- 整体树容器 -->
 <div id="tree">
  <one-select v-bind:isroot="true" v-bind:tree="tree"></one-select>
 </div>

<textarea id="treeDataJSON" style="display: none;">
{
 "客户管理": {
  "我的客户": {
   "新分配": {},
   "跟进中": {},
   "签单客户": {},
   "长期客户": {}
  },
  "长期客户权限": {
   "设为长期客户": {},
   "还原长期客户": {}
  }
 },
 "采购列表": {
  "添加异常客情": {},
  "添加采购单": {},
  "采购退货单列表": {},
  "供应商管理": {},
  "供应商联系人": {},
  "品牌列表": {
   "宝洁": {},
   "乐视": {
    "乐视网": {},
    "乐视手机": {
     "乐视手机 1": {},
     "乐视手机 2": {},
     "乐视手机 3": {},
     "乐视手机 4": {},
     "乐视手机 5": {
      "体验超深层级": {
       "继续体验超深层级": {
        "依然体验超深层级": {},
        "依然体验超深层级 2": {}
       }
      }
     }
    },
    "乐视电视": {}
   },
   "可口可乐": {},
   "圣象": {}
  }
 }
}
</textarea>

<script>
// 初始数据
var treeDataJSON = document.getElementById("treeDataJSON").value;
var treeData = JSON.parse(treeDataJSON);
Vue.component('one-select', {
 name: 'one-select',
 template: '#one-select',
 props: ['tree', 'isroot'],
 created: function() {
  var realTree = Object.assign({}, this.tree);
  delete realTree.selected;
  if (Object.keys(realTree).length === 0) { // 判断最低级,再刷新父级
   this.refreshAllParentNodes(this.$parent);
  }
 },
 methods: {
  nodeClick: function(node, index) {
   if (node.selected === 'full' || node.selected === 'half') {
    Vue.set(node, 'selected', null);
   } else {
    Vue.set(node, 'selected', 'full');
   }
   this.refreshAllParentNodes(self.$parent);
   this.refreshAllParentNodes(this);
   this.refreshAllSonNodes(this.$children[index], node.selected);
  },
  refreshAllSonNodes: function(node, status) {
   if (node instanceof Vue && node.$children.length) {
    for (index in node.$children) {
     Vue.set(node.$children[index].tree, 'selected', status);
     // 递归计算子级
     this.refreshAllSonNodes(node.$children[index], status);
    }
   }
  },
  refreshAllParentNodes: function(node) {
   if (node instanceof Vue) {
    var status = null;
    var nullCount = 0;
    var halfCount = 0;
    var fullCount = 0;
    for (index in node.$children) {
     if (typeof node.$children[index].tree.selected === 'undefined') {
      nullCount++;
     } else if (node.$children[index].tree.selected === null) {
      nullCount++;
     } else if (node.$children[index].tree.selected === 'half') {
      halfCount++;
     } else if (node.$children[index].tree.selected === 'full') {
      fullCount++;
     }
    }
    if (fullCount === node.$children.length) {
     status = 'full';
    } else if (nullCount === node.$children.length) {
     status = null;
    } else {
     status = 'half';
    }
    Vue.set(node.tree, 'selected', status);

    // 递归计算父级
    this.refreshAllParentNodes(node.$parent);
   }
  },
  log: function(o) {
   console.log(o);
  }
 }
});
vm = new Vue({
 el: '#tree',
 data: {
  tree: treeData
 },
 methods: {
  // 返回最终数据
  getResult: function() {
   return Object.assign({}, this.tree);
  }
 }
});
</script>

<style>
#tree {
 width: 500px;
 margin: 0 auto;
 margin-top: 50px;
}
li {
 list-style: none;
 line-height: 25px;
}
.inline-block {
 display: inline-block;
}
.tree-select {
 width: 13px;
 height: 13px;
 line-height: 16px;
 margin: 3px;
 display: inline-block;
 vertical-align: middle;
 border: 0 none;
 cursor: pointer;
 outline: none;
 background-color: transparent;
 background-repeat: no-repeat;
 background-attachment: scroll;
 background-image: url('selects.png');
}
.tree-select-null {
 background-position: 0 0;
}
.tree-select-full {
 background-position: -14px 0;
}
.tree-select-half {
 background-position: -14px -28px;
}
</style>

</body>
</html>
以上就是本文的全部内容,希望对大家的学习有所帮助,也希望大家多多支持小牛知识库。
-
本文向大家介绍开发Vue树形组件的示例代码,包括了开发Vue树形组件的示例代码的使用技巧和注意事项,需要的朋友参考一下 本文介绍了Vue树形组件的示例代码,分享给大家,具体如下: 使用SemanticUI和vue做一个menubar组件,实现方法大概是这样的: 使用时,假如父组件app使用到了menubar组件,那么data中需要定义一下items数据,例 : 里面的click事件是定义了,当在工
-
本文向大家介绍基于vue的验证码组件的示例代码,包括了基于vue的验证码组件的示例代码的使用技巧和注意事项,需要的朋友参考一下 最近在自己写页面,模仿思否论坛,然后写登录注册UI的时候需要一个验证码组件. 去搜一下没找到什么合适的,而且大多都是基于后端的,于是自己手写一个。 演示 分析验证码组件 分析验证码功能 随机出现的数字大小写字母 (基础功能) 不同的数字或者字母有不同的颜色 (功能优化)
-
本文向大家介绍vue基于element的区间选择组件,包括了vue基于element的区间选择组件的使用技巧和注意事项,需要的朋友参考一下 公司的系统中,产品经理在设计时经常要求对某个字段进行区间阈值设置或者作为筛选条件。但是苦于element中没有非常契合的组件(slider组件并不支持两端均能设定),于是自己动手造了一个。 成果 最终的展示效果如下: 需求 这里以项目的需求为例,基本的需求如下
-
本文向大家介绍vue+element UI实现树形表格带复选框的示例代码,包括了vue+element UI实现树形表格带复选框的示例代码的使用技巧和注意事项,需要的朋友参考一下 一:在component文件夹下新建如下treeTable文件夹,里面有2个文件: eval.js:将数据转换成树形数据 index.vue:树形表格组件 二:在需要的地方引入该组件: 例如:在component文件夹下
-
本文向大家介绍vue实现的树形结构加多选框示例,包括了vue实现的树形结构加多选框示例的使用技巧和注意事项,需要的朋友参考一下 本文实例讲述了vue实现的树形结构加多选框。分享给大家供大家参考,具体如下: 前面说了如何用递归组件来写vue树形结构,写了树形结构还要在前面加多选框,然后往数组里push选项,并在左边显示出来,然后左边进行拖拽排序,拖拽排序上一篇文章我已经介绍过了,在这我就不介绍了,如
-
本文向大家介绍Vue组件之Tooltip的示例代码,包括了Vue组件之Tooltip的示例代码的使用技巧和注意事项,需要的朋友参考一下 前言 本文主要Alert 组件的大致框架, 提供少量可配置选项。 旨在大致提供思路 tooltip 常用于展示鼠标 hover 时的提示信息。 模板结构 大致结构DOM结构 一个div 包含 箭头 及 气泡内容。 v-bind中可选tooltip位置,是否禁用,及

