javascript - webpack分别在linux和windows平台打包,同一张CSS背景图不同平台路径不一致?
我的vue项目通过webpack做了一个简单的皮肤切换功能。这个功能只有部分页面包含,做完以后我发现了一个问题。需要皮肤切换的页面,如果是在windows下打包部署的话,会出现CSS背景图的路径错误的问题,但是在linux平台下完全正常。
我这个皮肤功能大致原理就是通过另外增加两个入口文件(blue入口和red入口)来达到blue版的CSS放在blue.css中,red版的CSS放在red.css中,然后通过dom来动态切换这两个文件实现皮肤切换。
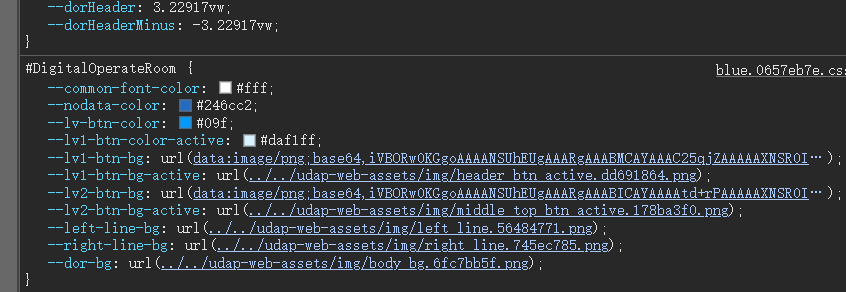
打包后正确的CSS背景图片引用路径应该图中所示:
可以看到返回了两个层级的目录。
但是到了windows平台下就变成了这样子:
可以看到没有返回到上两个层级的目录。
而且只有在这个皮肤样式文件中(blue.xxxxx.css和red.xxxxx.css)的背景图才有问题。
我的webpack配置如下:
'use strict'
const path = require('path')
const defaultSettings = require('./src/settings.js')
const webpack = require('webpack')
var HardSourceWebpackPlugin = require('hard-source-webpack-plugin')
// const MiniCssExtractPlugin = require('mini-css-extract-plugin')
// 不要使用自己安装的mini-css-extract-plugin,会报错,使用vue内置的,可能是因为版本不一致的原因
const MiniCssExtractPlugin = require('./node_modules/@vue/cli-service/node_modules/mini-css-extract-plugin')
const htmlWebpackInjectAttributesPlugin = require('html-webpack-inject-attributes-plugin')
const HtmlWebpackExcludeAssetsPlugin = require('html-webpack-exclude-assets-plugin')

// npx vue-cli-service inspect --mode=production >> webpack.config.js  打印生产配置
// npx vue-cli-service inspect --mode=development >> webpack.config.dev.js  打印开发配置

function resolve(dir) {
  return path.join(__dirname, dir)
}

function setPublicPath() {
  return (process.env.ENV === 'production' ? './' : '/udap-web/')
}

function setOutPutDir() {
  let packageName = ''
  if (process.env.ENV === 'staging' || process.env.ENV === 'development') {
    packageName = 'udap-web'
  } else {
    packageName = 'udap'
  }
  return path.resolve(__dirname, packageName)
}

const themeReg = /^(.*)((red|blue)\..+\.css)$/
const themeRegJS = /^(.*)((red|blue).*\.js)$/
const themeLinkJudge = (tagName, attributes) => {
  return (
    tagName === 'link' && attributes.href && themeReg.test(attributes.href)
  )
}

const name = defaultSettings.title || '' // page title

// If your port is set to 80,
// use administrator privileges to execute the command line.
// For example, Mac: sudo npm run
// You can change the port by the following method:
// port = 9527 npm run dev OR npm run dev --port = 9527
const port = process.env.port || process.env.npm_config_port || 9527 // dev port

// All configuration item explanations can be find in https://cli.vuejs.org/config/
module.exports = {
  /**
   * You will need to set publicPath if you plan to deploy your site under a sub path,
   * for example GitHub Pages. If you plan to deploy your site to https://foo.github.io/bar/,
   * then publicPath should be set to "/bar/".
   * In most cases please use '/' !!!
   * Detail: https://cli.vuejs.org/config/#publicpath
   */
  publicPath: setPublicPath(),
  outputDir: setOutPutDir(),
  assetsDir: 'udap-web-assets',
  lintOnSave: process.env.NODE_ENV === 'development',
  productionSourceMap: false,
  devServer: {
    port: port,
    disableHostCheck: true,
    proxy: {
      '/mock-api': {
        target: '/',
        changeOrigin: true
      },
      '/api/udap_web/websocket': {
        target: 'ws://xxx.xxx.xx.xxxx:3000',
        changeOrigin: true,
        pathRewrite: {
          '^/api': ''
        }
      },
      '/api': {
        target: 'http://xxx.xxx.xx.xxxx:3000', // 公司服务器
        changeOrigin: true
      },
      '/cogones-api': {
        target: 'http://xxx.xxx.xx.xxxx:9300',
        changeOrigin: true,
        pathRewrite: {
          '^/cogones-api': ''
        }
      }
    }
  },
  configureWebpack: {
    devtool: 'source-map',
    // provide the app's title in webpack's name field, so that
    // it can be accessed in index.html to inject the correct title.
    name: name,
    resolve: {
      alias: {
        '@': path.resolve(__dirname, 'src')
      }
    },
    plugins: [
      new HardSourceWebpackPlugin(),
      new webpack.ProvidePlugin({ _: 'lodash' })
    ],
    performance: {
      hints: false
    },
    entry: {
      app: path.resolve(__dirname, 'src/main.js'),
      blue: path.resolve(__dirname, 'src/theme/blue/index.js'),
      red: path.resolve(__dirname, 'src/theme/red/index.js')
    }
  },
  chainWebpack(config) {
    // it can improve the speed of the first screen, it is recommended to turn on preload
    // it can improve the speed of the first screen, it is recommended to turn on preload
    config.plugin('preload').tap(() => [
      {
        rel: 'preload',
        // to ignore runtime.js
        // https://github.com/vuejs/vue-cli/blob/dev/packages/@vue/cli-service/lib/config/app.js#L171
        fileBlacklist: [/\.map$/, /hot-update\.js$/, /runtime\..*\.js$/],
        include: 'initial'
      }
    ])

    // when there are many pages, it will cause too many meaningless requests
    config.plugins.delete('prefetch')

    // set svg-sprite-loader
    config.module
      .rule('svg')
      .exclude.add(resolve('src/icons'))
      .end()
    config.module
      .rule('icons')
      .test(/\.svg$/)
      .include.add(resolve('src/icons'))
      .end()
      .use('svg-sprite-loader')
      .loader('svg-sprite-loader')
      .options({
        symbolId: 'icon-[name]'
      })
      .end()

    config
      .when(process.env.NODE_ENV !== 'development',
        config => {
          config
            .plugin('ScriptExtHtmlWebpackPlugin')
            .after('html')
            .use('script-ext-html-webpack-plugin', [{
              // `runtime` must same as runtimeChunk name. default is `runtime`
              inline: /runtime\..*\.js$/
            }])
            .end()

          config
            .optimization.splitChunks({
              chunks: 'all',
              cacheGroups: {
                libs: {
                  name: 'chunk-libs',
                  test: /[\\/]node_modules[\\/]/,
                  priority: 10,
                  chunks: 'initial' // only package third parties that are initially dependent
                },
                elementUI: {
                  name: 'chunk-elementUI', // split elementUI into a single package
                  priority: 20, // the weight needs to be larger than libs and app or it will be packaged into libs or app
                  test: /[\\/]node_modules[\\/]_?element-ui(.*)/ // in order to adapt to cnpm
                },
                commons: {
                  name: 'chunk-commons',
                  test: resolve('src/components'), // can customize your rules
                  minChunks: 3, //  minimum common number
                  priority: 5,
                  reuseExistingChunk: true
                }
              }
            })
          // https:// webpack.js.org/configuration/optimization/#optimizationruntimechunk
          config.optimization.runtimeChunk('single')
        }
      )

    /** 皮肤配置  start */
    // MiniCssExtractPlugin可以给不同入口的独立打包css文件
    // dev环境下vue使用的不是MiniCssExtractPlugin来提取css生成css文件,而是使用vue-style-loader来生成style标签,
    // 因为我们需要生成文件,所以这里即使dev环境下也使用MiniCssExtractPlugin

    config.when(process.env.NODE_ENV === 'development', config => {
      config
        .plugin('extract-css')
        .use(MiniCssExtractPlugin, [
          {
            filename: '[name].[contenthash:8].css',
            chunkFilename: '[name].[contenthash:8].css'
          }
        ])
        .end()
    })

    // 让normal这个module不去匹配我们的主题文件  /^((?!light\.scss|default\.scss).)*$/
    config.module
      .rule('scss')
      .oneOf('normal')
      .test((p1) => {
        const pat = /^(?!.*\\theme\\).*\.scss$/
        const result = pat.test(p1)
        return result
      })
      .end()

    // 定义自己的module来使用我们自己的loader .*(light|default)\.scss$
    const theme = config.module
      .rule('scss')
      .oneOf('ownTheme')
      .test(/^(?=.*\\theme\\).*\.scss$/)
    // 清除vue-cli写好的loader,改用自己写的
    theme.uses.clear()

    theme
      .use(MiniCssExtractPlugin.loader)
      .loader(MiniCssExtractPlugin.loader)
      .end()
      .use('css-loader')
      .loader('css-loader')
      .end()
      .use('postcss-loader')
      .loader('postcss-loader')
      .end()
      .use('sass-loader')
      .loader('sass-loader')
      .end()

    // 增加自定义标签属性
    config
      .plugin('html')
      .tap((args) => {
        args[0].attributes = {
          'data-theme': function(tag) {
            const { attributes, tagName } = tag
            if (themeLinkJudge(tagName, attributes)) {
              return 'true'
            }
            return false
          },
          rel: function(tag) {
            const { attributes, tagName } = tag
            if (themeLinkJudge(tagName, attributes)) {
              if (attributes.href.indexOf('blue') > -1) {
                return 'stylesheet'
              }
              return 'alternate stylesheet'
            } else if (tagName === 'link') {
              return 'stylesheet'
            }
            return false
          },
          title: function(tag) {
            const { attributes, tagName } = tag
            if (themeLinkJudge(tagName, attributes)) {
              if (attributes.href.indexOf('red') > -1) {
                return 'red'
              } else if (attributes.href.indexOf('blue') > -1) {
                return 'blue'
              }
              return false
            }
            return false
          }
        }

        args[0].excludeAssets = [themeRegJS]
        return args
      })
      .end()

    // HtmlWebpackPlugin生成HTML文件时,这个插件能给生成的标签注入自己需要的属性
    config
      .plugin('htmlInjectAttribute')
      .after('html')
      .use(htmlWebpackInjectAttributesPlugin)
      .end()

    // 移除多入口生成的无用script标签和JS文件
    config
      .plugin('ExcludeAssets')
      .after('htmlInjectAttribute')
      .use(HtmlWebpackExcludeAssetsPlugin)
      .end()

    /** 皮肤配置 end */
  }
}
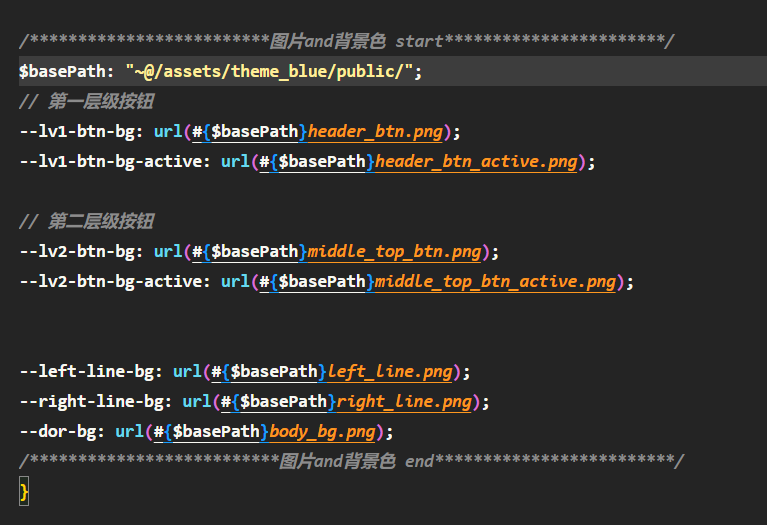
我的scss代码如图所示:
共有1个答案
经过本人的排查,我发现为皮肤定义的webpack config.module中的MiniCssExtractPlugin.loader和vue-cli定义MiniCssExtractPlugin.loader存在差异,
vue-cli中的配置如下:
rule
.use('extract-css-loader')
.loader(require('mini-css-extract-plugin').loader)
.options({
  hmr: !isProd,
  publicPath: cssPublicPath
})
vue-cli源码中的MiniCssExtractPlugin.loader多了publicPath,所以根据实际情况我也定义了一个适合自己项目的publicPath,至此就顺利解决了这个问题。
-
问题内容: 一些旧代码依赖于平台的默认字符集进行翻译。对于“西方世界”中的Windows和Linux安装,我知道这意味着什么。但是考虑到俄罗斯或亚洲平台,我完全不确定其平台的默认字符集是什么(只是UTF-16?)。 因此,我想知道执行以下代码行会得到什么: PS: 我不想在这里讨论字符集的问题及其与Unicode的区别。我只想收集什么操作系统会导致什么特定字符集。请仅发布具体值! 问题答案: 这是
-
问题内容: 我想说的是,我在这里阅读并尝试了多种说明: 我想让我的页面根据所使用的设备使用不同的CSS文件。我已经看到了许多解决方案,都使用了上述某种形式。 但是,在HTC Desire上进行测试时,我始终可以得到iPad专用的输出或完全未过滤的输出。目前,我的测试代码基于: 这是我的HTML文件: 这是iPad的Landscape CSS文件(我在这里只提供它们,因为它们基本上是相同的: 我想知
-
问题内容: 我想在Unix和Windows上使用特定于平台的目录。请看一下代码: 这个输出 我想第二次打电话给(windows)类似 是否可以告诉我在Windows上运行的程序使用Windows分隔符?还是应该始终将反斜杠转换 为正斜杠()?这里首选的策略是什么? 问题答案: 我看到“问题”在哪里。在golang-nuts上的讨论为我提供了提示,该提示始终使用并且是用于依赖平台的操作的函数。 在W
-
1、下载 Windows 版的 OpenResty 压缩包,这里我下载的是 openresty_for_windows_1.7.10.2001_64bit ,你也可以选择 32bit 的版本。如果你对源码感兴趣,下面是源码地址 https://github.com/LomoX-Offical/nginx-openresty-windows。 2、解压到要安装的目录,这里我选择D盘根目录,你可以根据
-
问题内容: 我在Swing应用程序中使用JWebBrowser。此类属于DJ项目。它需要swt jar执行。现在,我已将Windows的swt jar包含在应用程序的jar包装中。我想知道如何在同一包装中包含用于Linux / Mac的swt jars?我正在使用ant来构建应用程序jar。我应该建立将不同的swt罐放入不同平台的罐吗? 问题答案: 如果您想要一个可以在不同平台(Win / Mac
-
GNU/Linux和Mac OS使用换行()或新行作为行结束字符,而Windows使用换行和回车()组合来表示行结束字符。 为了避免这些行结尾的差异的不必要提交,我们必须配置Git客户端写入与Git仓库使用相同的行结束符。 对于Windows系统,可以将Git客户端配置为将行结束符转换为格式,同时退出,并在提交操作时将其转换回格式。以下可根据您的需要来设置。 对于GNU/Linux或Mac OS,

