harmonyos - 如何在List组件中分组展示不同种类的数据?
问题现象
数据包含多个种类(例如标题、标题对应的子类等)的子数据,如何根据数据种类为ListItem设置不同的样式。
共有2个答案
解决措施
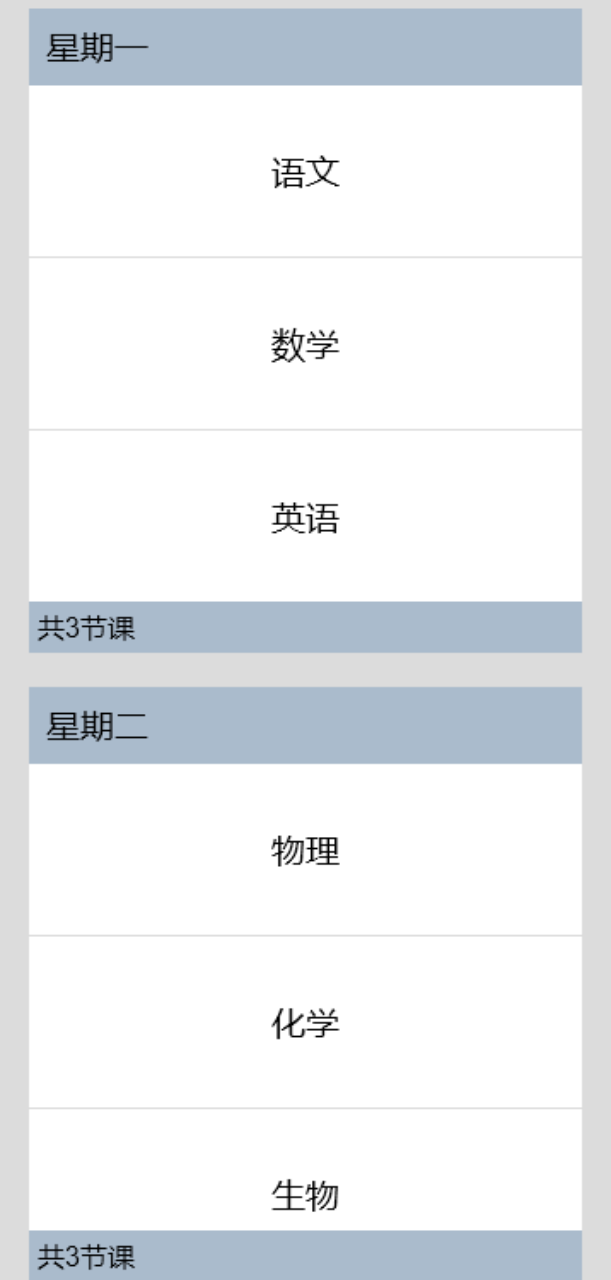
可以通过在List组件中使用ListItemGroup组件来展示Listitem分组,可以单独设置ListItemGroup中的header参数自定义每组的头部组件样式。
代码示例
// xxx.ets @Entry @Component struct ListItemGroupExample { private timetable: TimeTable[] = [ { title: '星期一', projects: ['语文', '数学', '英语'] }, { title: '星期二', projects: ['物理', '化学', '生物'] }, { title: '星期三', projects: ['历史', '地理', '政治'] }, { title: '星期四', projects: ['美术', '音乐', '体育'] } ] @Builder itemHead(text: string) { Text(text) .fontSize(20) .backgroundColor(0xAABBCC) .width('100%') .padding(10) } @Builder itemFoot(num: number) { Text('共' + num + '节课') .fontSize(16) .backgroundColor(0xAABBCC) .width('100%') .padding(5) } build() { Column() { List({ space: 20 }) { ForEach(this.timetable, (item: TimeTable) => { ListItemGroup({ header: this.itemHead(item.title), footer: this.itemFoot(item.projects.length) }) { ForEach(item.projects, (project: string) => { ListItem() { Text(project) .width('100%') .height(100) .fontSize(20) .textAlign(TextAlign.Center) .backgroundColor(0xFFFFFF) } }, (item: string) => item) } .divider({ strokeWidth: 1, color: Color.Blue }) // 每行之间的分界线 }) } .width('90%') .height('100%') .sticky(StickyStyle.Header | StickyStyle.Footer) .scrollBar(BarState.Off) }.width('100%').height('100%').backgroundColor(0xDCDCDC).padding({ top: 5 }) } } interface TimeTable { title: string; projects: string[]; }效果如图所示:

参考链接
ListItemGroup
在React中,你可以使用map函数来遍历列表,并为每个元素创建相应的组件。为了根据数据种类为ListItem设置不同的样式,你可以使用条件语句(例如if或switch)来检查每个元素的种类,并为每种情况应用不同的样式。
以下是一个示例代码,展示了如何根据数据种类为ListItem设置不同的样式:
import React from 'react';const data = [ { type: '标题1', children: ['子数据1', '子数据2'] }, { type: '标题2', children: ['子数据3', '子数据4'] }, // 其他数据...];const ListComponent = () => { return ( <div> {data.map((item) => ( <div key={item.type}> <h1>{item.type}</h1> {item.children.map((child) => ( <div key={child}> <ListItem style={item.type === '标题1' ? styles.title1 : styles.title2}> {child} </ListItem> </div> ))} </div> ))} </div> );};const ListItem = ({ children, style }) => ( <div style={style}>{children}</div>);const styles = { title1: { color: 'blue', fontSize: '20px', }, title2: { color: 'red', fontSize: '18px', },};在上面的代码中,我们首先定义了一个包含不同种类数据的数组data。然后,我们使用map函数来遍历这个数组,并为每个元素创建一个<div>元素。对于每个<div>元素,我们根据元素的类型设置其子元素的样式。这里使用了条件语句if来检查每个元素的类型,并应用相应的样式。如果元素的类型是'标题1',则使用styles.title1样式;否则,使用styles.title2样式。最后,我们使用ListItem组件来展示每个子元素,并将样式作为属性传递给它。
-
List组件如何设置多列9+
-
Text组件如何在textoverflow截断后展示指定内容
-
问题内容: 我们正在考虑将应用程序从obj-c迁移到Swift。一个问题是,我们的obj- c代码中有一个UITableView,其中包含类型为或类型的对象。基本上,它解析cellForRowAtIndexPath上具有的类型。Swift数组(据我所知)只能处理一种类型。鉴于此,我们如何处理UITableView中要使用的两种不同类型?是否会有像DataObj这样的包装对象,我们每个工作都有可精巧
-
问题内容: 只要我有键值对,解组就非常简单了,但是我将如何以不同的顺序解组不同类型的数组呢?单个元素定义明确且已知,但顺序不明确。 我无法提出一个漂亮的解决方案。 我会尝试对所有元素进行错误处理吗?是否有某种工会类型可以为我做到这一点? 游乐场版 问题答案: Go官方博客上有一篇不错的文章:JSON和GO。可以将“任意数据解码”到接口{}中,并使用类型断言来动态确定类型。 您的代码可能可以修改为:
-
问题内容: 我正在用Java处理数组,但有一个问题。我知道Java中的数组是类似数据类型的集合,如下所示: 上面的声明可以作为一个数组读取,该数组是整数类型的集合。 考虑一下: 在这里,我可以说上面的是一个数组,它是不同数据类型的集合,还是它是相似数据类型(即对象)的数组? 我对此感到困惑和怀疑。在Java中,是否可以创建可以容纳不同数据类型的数组或任何种类的集合? 问题答案: Java中的所有对

