swiper.js - swiper ,怎么修改除中间外,其他的slide 的透明度?
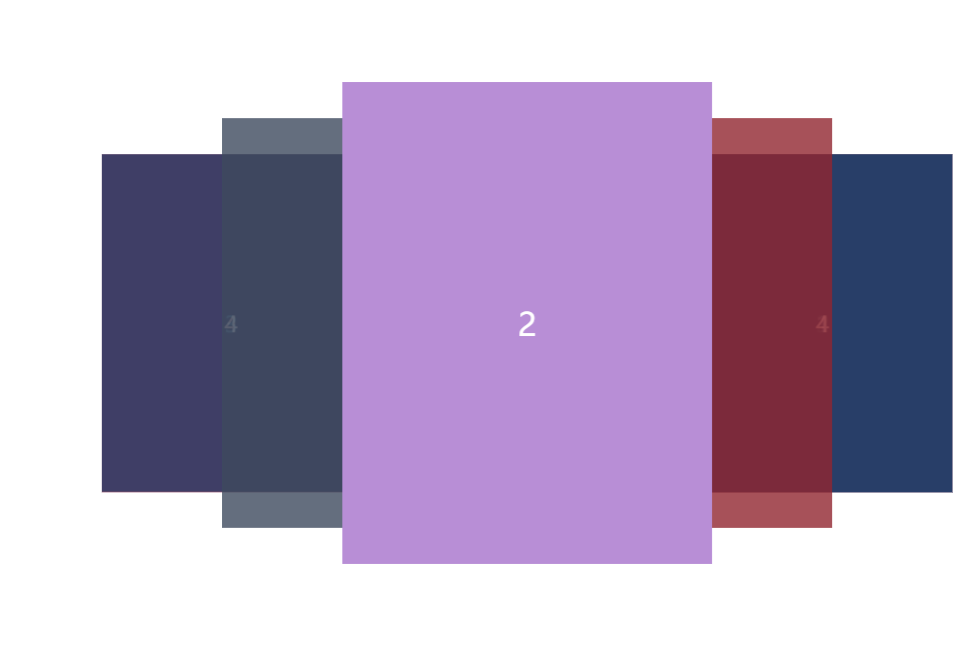
效果如下图所示,creativeEffect里面设置了opacity为0.8,但是现在最底层的透明度还是没有变,想要的效果是除了中间的色块,其他色块元素透明度都是0.8,这种要怎么改?
<html lang="en"><head> <meta charset="UTF-8"> <meta http-equiv="X-UA-Compatible" content="IE=edge"> <meta name="viewport" content="width=device-width, initial-scale=1.0"> <title>swiper叠加轮播图</title></head><body> <link rel="stylesheet" href="https://unpkg.com/swiper@7/swiper-bundle.min.css" /> <style> body { display: flex; align-items: center; justify-content: center; } /* 外层容器 */ .swiper { width: 1310px; height: 482px; } .swiper-wrapper { width: 1216px; height: 482px; } /* 轮播项 */ .swiper .swiper-slide { width: 387px; height: 482px; font-size: 32px; font-weight: 500; color: #ffffff; /* 文字垂直居中 */ display: flex; justify-content: center; align-items: center; /* opacity: 0.5 !important; */ } .swiper .swiper-slide-active { /* opacity: 1 !important; */ } /* 色彩来源:https://color.uisdc.com/ */ .swiper .swiper-slide-1 { background-color: #425066; } .swiper .swiper-slide-2 { background-color: #b88ed6; } .swiper .swiper-slide-3 { background-color: #9d2933; } .swiper .swiper-slide-4 { background-color: #003371; } .swiper .swiper-slide-5 { background-color: #4c8dae; } .swiper .swiper-slide-6 { background-color: #72db09; } .swiper .swiper-slide-7 { background-color: #f72905; } .swiper .swiper-slide-8 { background-color: #03a8fb; } .swiper .swiper-slide-9 { background-color: #9803fb; } /* .swiper-button-prev { width: 34px; height: 34px; background: url("./img/prev.png") no-repeat; background-size: 100% 100%; } .swiper-button-next { width: 34px; height: 34px; background: url("./img/next.png") no-repeat; background-size: 100% 100%; } 去除默认的操作按钮样式 .swiper-button-next:after, .swiper-button-prev:after { display: none; } */ </style> <div class="swiper"> <div class="swiper-wrapper"> <div class="swiper-slide swiper-slide-1">1</div> <div class="swiper-slide swiper-slide-2">2</div> <div class="swiper-slide swiper-slide-3">3</div> <div class="swiper-slide swiper-slide-4">4</div> <!-- <div class="swiper-slide swiper-slide-5">5</div> <div class="swiper-slide swiper-slide-6">6</div> <div class="swiper-slide swiper-slide-7">7</div> <div class="swiper-slide swiper-slide-8">8</div> <div class="swiper-slide swiper-slide-9">9</div> --> </div> <div class="swiper-button-prev"></div> <div class="swiper-button-next"></div> </div> <script src="https://unpkg.com/swiper@7/swiper-bundle.min.js"></script> <script> const swiper = new Swiper('.swiper', { //默认第几个在中心位置显示,总数量中间的一个,计算 initialSlide: 2, autoplay: false, slidesPerView: "3", centeredSlides: true, effect: "creative", loop: true, grabCursor: true, creativeEffect: { prev: { translate: ['-40%', 0, 0], // 偏移量 origin: "center center", scale: 0.85, // 缩放量 opacity: 0.8, shadow: true, // 是否加阴影 }, next: { translate: ['40%', 0, 0], origin: "center center", scale: 0.85, opacity: 0.8, shadow: true, }, limitProgress: 2, // 显示五个堆叠的最重要的这个属性,后面依次以前面属性等比配置 shadowPerProgress: true, //是否等比配置透明度 }, navigation: { nextEl: '.swiper-button-next', prevEl: '.swiper-button-prev', }, }); // 监听改变事件 swiper.on('slideChange', (e) => { console.log(e.realIndex); }); </script></body></html>共有2个答案
.swiper-slide:not(.swiper-slide-active) {opacity: .8 !important;}
要修改除中间外的其他 slide 的透明度,您可以在 creativeEffect 配置中添加一个额外的效果对象,用于指定非中间 slide 的透明度。下面是一个修改后的示例代码,其中添加了一个名为 nonCenterOpacity 的效果对象,用于设置非中间 slide 的透明度为 0.8:
<html lang="en"><head> <meta charset="UTF-8"> <meta http-equiv="X-UA-Compatible" content="IE=edge"> <meta name="viewport" content="width=device-width, initial-scale=1.0"> <title>swiper叠加轮播图</title></head><body> <link rel="stylesheet" href="https://unpkg.com/swiper@7/swiper-bundle.min.css" /> <style> /* 样式部分保持不变 */ </style> <div class="swiper"> <!-- Swiper 结构保持不变 --> </div> <script src="https://unpkg.com/swiper@7/swiper-bundle.min.js"></script> <script> const swiper = new Swiper('.swiper', { // 初始设置保持不变 effect: "creative", creativeEffect: { prev: { // 上一页效果保持不变 }, next: { // 下一页效果保持不变 }, nonCenterOpacity: 0.8, // 添加非中心 slide 的透明度效果对象 }, // 其他设置保持不变 }); // 监听改变事件保持不变 </script></body></html>通过添加 nonCenterOpacity: 0.8,您将为除中间 slide 外的其他 slide 设置透明度为 0.8。请注意,此示例中的代码假设您已经引入了正确版本的 Swiper 库,并且您的页面中包含正确的 HTML 和 CSS 结构。
-
问题内容: 我一直在尝试将画布的默认背景颜色从黑色更改为透明/其他任何颜色-但没有运气。 我的HTML: 我的CSS: 正如您在下面的在线示例中看到的那样,我在画布上附加了一些动画,因此不能仅执行不透明度:0; 在id上。 实时预览:http: //devsgs.com/preview/test/particle/ 任何想法如何覆盖默认黑色? 问题答案: 当我也开始使用three.js时,我遇到了
-
问题内容: 我正在使用以下代码读取PNG图片: 在显示时,有一个黑色背景,我知道是由PNG透明性引起的。 我找到了建议使用的解决方案,但是我不确定如何将其应用于上面的代码。 问题答案: 创建第二个类型… 将原件涂到副本上… 您现在有了图像的非透明版本… 要保存图像,请看写/保存图像
-
①点击条件详情即可编辑条件,如上图红框处 ②可编辑内容如上图,可编辑相关内容,也可删除该预警条件,删除按钮在右上角。 注意:如指标超限改为到期提醒的话,那图层下面需要有日期字段才可成功更改。
-
vscode里查看node运行内存才2G出头, 但是CMD里有6G怎么回事, 电脑环境变量也设置了, 也重启了但是还改变不了vscode里的node内存 设置过setx NODE_OPTIONS --max-old-space-size=xxx但是依然没效果
-
1.手机版 设置方法:我-设置-修改密码 2.电脑版 设置方法:设置-帐号-修改密码
-
本文向大家介绍vuex怎么知道state是通过mutation修改还是外部直接修改的?相关面试题,主要包含被问及vuex怎么知道state是通过mutation修改还是外部直接修改的?时的应答技巧和注意事项,需要的朋友参考一下 [vue] vuex怎么知道state是通过mutation修改还是外部直接修改的?

