
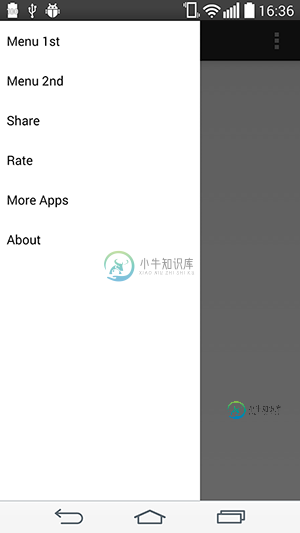
操作栏顶部的Android导航抽屉

我正试图把导航抽屉放在动作栏上,当它像这个应用程序一样向右滑动时:[已删除]
这是我的主要活动布局:
<?xml version="1.0" encoding="utf-8"?>
<android.support.v4.widget.DrawerLayout ...>
    <RelativeLayout android:orientation="vertical"
        android:layout_width="fill_parent"
        android:layout_height="fill_parent">
        ...
    </RelativeLayout>
    <fragment android:name="com...."
        android:layout_gravity="start"
        android:id="@id/navigation"
        android:layout_width="@dimen/navigation_menu_width"
        android:layout_height="fill_parent" />
</android.support.v4.widget.DrawerLayout>
关于stackoverflow的其他一些问题与此类似,但建议所有答案都使用滑动菜单库。但这个应用程序他们仍然使用Android。支持v4.widget。抽屉式布局,他们成功了。不要问我怎么知道他们使用标准的导航抽屉,但我肯定。
非常感谢你的帮助。
这是最终的解决方案:多亏了@Peter Cai,这一切都完美无瑕。https://github.com/lemycanh/DrawerOnTopActionBar
共有3个答案

如果您不想使用lib或此hack:
>
将工具栏添加到此线性布局。
<android.support.v7.widget.Toolbar
    android:id="@+id/toolbar"
    android:minHeight="?attr/actionBarSize"
    android:layout_width="match_parent"
    android:layout_height="wrap_content"
    app:titleTextColor="@android:color/white"
    android:background="?attr/colorPrimary">
</android.support.v7.widget.Toolbar>
在活动中,在setContentView后添加以下行
setSupportActionBar((Toolbar) findViewById(R.id.toolbar));

更新:如何用导航抽屉覆盖actionbar。(使用新工具栏)在构建的依赖项中使用这些。格拉德尔
compile 'com.android.support:appcompat-v7:21.0.0'
compile 'com.android.support:support-v4:21.0.0'
这是你的抽屉布局
<!-- A DrawerLayout is intended to be used as the top-level content view using match_parent for both width and height to consume the full space available. -->
<android.support.v4.widget.DrawerLayout
    xmlns:android="http://schemas.android.com/apk/res/android"
    xmlns:tools="http://schemas.android.com/tools"
    android:id="@+id/drawer_layout"
    android:layout_width="match_parent"
    android:layout_height="match_parent">
    <LinearLayout
        android:id="@+id/layout_main"
        android:layout_width="match_parent"
        android:layout_height="match_parent"
        android:orientation="vertical">
    <include layout="@layout/toolbar"/>
    <!-- As the main content view, the view below consumes the entire
         space available using match_parent in both dimensions. -->
    <FrameLayout
        android:id="@+id/content_frame"
        android:layout_width="match_parent"
        android:layout_height="match_parent"
        android:background="@color/white"/>

    </LinearLayout>
    <fragment android:id="@+id/navigation_drawer"
        android:layout_width="@dimen/navigation_drawer_width"
        android:layout_height="match_parent"
        android:layout_gravity="start"
        android:background="@color/list_background"
         />

</android.support.v4.widget.DrawerLayout>
创建新工具栏。布局文件夹中的xml文件。
<?xml version="1.0" encoding="utf-8"?>
<android.support.v7.widget.Toolbar
    xmlns:android="http://schemas.android.com/apk/res/android"
    xmlns:app="http://schemas.android.com/apk/res-auto"
    android:id="@+id/toolbar"
    android:layout_height="wrap_content"
    android:layout_width="match_parent"
    app:theme="@style/ThemeOverlay.AppCompat.Dark.ActionBar"
    app:popupTheme="@style/ThemeOverlay.AppCompat.Light"
    android:minHeight="?attr/actionBarSize"
    android:background="?attr/colorPrimary" />
转到扩展导航抽屉的活动。并将其添加到SetContentView()之后
Toolbar toolbar = (Toolbar) findViewById(R.id.toolbar);
setSupportActionBar(toolbar);
别忘了在values文件夹中扩展theme NoActionBar。
<style name="Theme.Whtsnxt" parent="@style/Theme.AppCompat.Light.NoActionBar">
    <item name="windowActionBar">false</item>
    <!-- colorPrimary is used for the default action bar background -->
    <item name="windowActionModeOverlay">true</item>
    <item name="android:textColorPrimary">@color/white</item>
    <item name="colorPrimary">@color/splashscreen</item>
    <item name="colorPrimaryDark">@color/holo_blue_light</item>

    <item name="android:windowBackground">@color/white</item>
    <item name="android:colorBackground">@color/white</item>

</style>

我从中学到了一个小“诀窍”https://github.com/jfeinstein10/SlidingMenu以实现您所需的效果。
您只需删除窗口装饰视图的第一个子项,然后将第一个子项添加到抽屉的内容视图中。之后,您只需将抽屉添加到窗口的装饰视图中。
下面是一些详细的步骤。
首先,创建一个名为“decor.xml”或任何您喜欢的xml。只把抽屉放出来,抽屉放进去。下面的“FrameLayout”只是一个容器。我们将使用它包装您的活动内容。
<?xml version="1.0" encoding="utf-8"?>
<android.support.v4.widget.DrawerLayout ...>
    <FrameLayout android:id="@+id/container"
        android:orientation="vertical"
        android:layout_width="fill_parent"
        android:layout_height="fill_parent"/>
    <fragment android:name="com...."
        android:layout_gravity="start"
        android:id="@id/navigation"
        android:layout_width="@dimen/navigation_menu_width"
        android:layout_height="fill_parent" />
</android.support.v4.widget.DrawerLayout>
然后移除主布局中的抽屉布局。现在,您的主要活动的布局应该如下所示
<RelativeLayout android:orientation="vertical"
    android:layout_width="fill_parent"
    android:layout_height="fill_parent">
    ...
</RelativeLayout>
我们假设主活动的布局名为“main.xml”。
在您的主活动中,写成以下内容:
@Override
protected void onCreate(Bundle savedInstanceState) {
    super.onCreate(savedInstanceState);
    setContentView(R.layout.main);

    // Inflate the "decor.xml"
    LayoutInflater inflater = (LayoutInflater) getSystemService(Context.LAYOUT_INFLATER_SERVICE);
    DrawerLayout drawer = (DrawerLayout) inflater.inflate(R.layout.decor, null); // "null" is important.

    // HACK: "steal" the first child of decor view
    ViewGroup decor = (ViewGroup) getWindow().getDecorView();
    View child = decor.getChildAt(0);
    decor.removeView(child);
    FrameLayout container = (FrameLayout) drawer.findViewById(R.id.container); // This is the container we defined just now.
    container.addView(child);

    // Make the drawer replace the first child
    decor.addView(drawer);

    // Do what you want to do.......

}
现在你有了一个可以在操作栏上滑动的抽屉布局。但是你可能会发现它被状态栏覆盖了。你可能需要在抽屉上添加一个paddingTop来解决这个问题。
-
顶部导航栏放在页面头部: 实例<nav data-topbar> <ul> <li> <!-- 如果你不需要标题或图标可以删掉它 --> <h1><a href="#">WebSiteName</a></h1> </li> <!-- 小屏幕上折叠按钮: 去掉 .menu-icon 类,可以去除图标。 如果需要只显示图片,可以删除
-
我正在建立一个android应用程序,我需要知道是否使用动作条夏洛克和jfeinstein10滑菜单。至于ABS,我知道它是为支持旧版本操作系统的应用程序构建的,但现在我可以看到最新的支持库包括动作条。我现在有什么理由要用腹肌吗? 至于滑动菜单,我在谷歌发布新的导航抽屉之前就已经试过了,它工作得很棒,我决定使用它。但现在我不确定是否应该改用导航抽屉。滑动菜单比导航抽屉有什么优势吗?
-
我正在开发一个android项目,我正在尝试使用来自http://developer.android.com/training/implementing-navigation/nav-drawer.html.的示例集成新的导航抽屉 它主要工作除了一件事,动作栏向上按钮不显示菜单,但如果我用手指从边缘滑动主活动屏幕,菜单就会出现,所以我知道实际菜单没有问题,它只是动作栏按钮。 下面是代码 感谢您提供
-
我已经设置了一个左右两侧的导航抽屉。除了一件事,一切都很好。 我希望我的另一个动作栏项目切换右边的抽屉菜单。正常的左边动作栏切换效果很好。谷歌Android应用程序通知面板是我希望动作模仿的。 下面是我用来设置右侧切换的代码(现在它在单击时强制关闭): 如果有人知道怎么做,如果你能让我知道就太好了! 谢谢
-
我的活动课
-
请帮帮我,我已经绕了几个小时了!我设置了一个抽屉菜单和一个工具栏(见下面的代码),我无法让返回/回家功能工作,因为单击它会导致打开抽屉。 这是我的主要活动,在OnCreate期间调用。 以下是我片段的OnCreateView方法中的内容。。。 抽屉菜单工作正常。更改工具栏的标题工作正常。汉堡包图标在片段中更改为向后箭头就好了...然而,每次我按下向后箭头,它都会打开抽屉...有点像抽屉的听众在向后