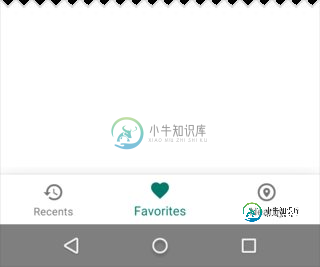
Android新底部导航栏或BottomNavigationView

找不到任何正式样品。
新底栏怎么用?不想做任何定制。
共有1个答案
我想你可能会找这个。
下面是一个快速的代码片段:
public class MainActivity extends AppCompatActivity {
    private BottomBar mBottomBar;

    @Override
    protected void onCreate(Bundle savedInstanceState) {
        super.onCreate(savedInstanceState);

        // Notice how you don't use the setContentView method here! Just
        // pass your layout to bottom bar, it will be taken care of.
        // Everything will be just like you're used to.
        mBottomBar = BottomBar.bind(this, R.layout.activity_main,
                savedInstanceState);

        mBottomBar.setItems(
                new BottomBarTab(R.drawable.ic_recents, "Recents"),
                new BottomBarTab(R.drawable.ic_favorites, "Favorites"),
                new BottomBarTab(R.drawable.ic_nearby, "Nearby"),
                new BottomBarTab(R.drawable.ic_friends, "Friends")
        );

        mBottomBar.setOnItemSelectedListener(new OnTabSelectedListener() {
            @Override
            public void onItemSelected(final int position) {
                // the user selected a new tab
            }
        });
    }

    @Override
    protected void onSaveInstanceState(Bundle outState) {
        super.onSaveInstanceState(outState);
        mBottomBar.onSaveInstanceState(outState);
    }
}
这里是参考链接。
首先,我们需要更新我们的依赖关系!
compile ‘com.android.support:design:25.0.0’
<?xml version="1.0" encoding="utf-8"?>
<RelativeLayout xmlns:android="http://schemas.android.com/apk/res/android"
    xmlns:app="http://schemas.android.com/apk/res-auto"
    android:layout_width="match_parent"
    android:layout_height="match_parent">

    <!-- Content Container -->

    <android.support.design.widget.BottomNavigationView
        android:id="@+id/bottom_navigation"
        android:layout_width="match_parent"
        android:layout_height="wrap_content"
        android:layout_alignParentBottom="true"
        app:itemBackground="@color/colorPrimary"
        app:itemIconTint="@color/white"
        app:itemTextColor="@color/white"
        app:menu="@menu/bottom_navigation_main" />

</RelativeLayout>
<?xml version="1.0" encoding="utf-8"?>
<menu xmlns:android="http://schemas.android.com/apk/res/android"
    xmlns:app="http://schemas.android.com/apk/res-auto">
    <item
        android:id="@+id/action_favorites"
        android:enabled="true"
        android:icon="@drawable/ic_favorite_white_24dp"
        android:title="@string/text_favorites"
        app:showAsAction="ifRoom" />
    <item
        android:id="@+id/action_schedules"
        android:enabled="true"
        android:icon="@drawable/ic_access_time_white_24dp"
        android:title="@string/text_schedules"
        app:showAsAction="ifRoom" />
    <item
        android:id="@+id/action_music"
        android:enabled="true"
        android:icon="@drawable/ic_audiotrack_white_24dp"
        android:title="@string/text_music"
        app:showAsAction="ifRoom" />
</menu>
<?xml version="1.0" encoding="utf-8"?>
<selector xmlns:android="http://schemas.android.com/apk/res/android">
  <item
      android:state_checked="true"
      android:color="@color/colorPrimary" />
  <item
      android:state_checked="false"
      android:color="@color/grey" />
 </selector>
BottomNavigationView bottomNavigationView = (BottomNavigationView)
                findViewById(R.id.bottom_navigation);

bottomNavigationView.setOnNavigationItemSelectedListener(
        new BottomNavigationView.OnNavigationItemSelectedListener() {
            @Override
            public boolean onNavigationItemSelected(@NonNull MenuItem item) {
                switch (item.getItemId()) {
                    case R.id.action_favorites:

                        break;
                    case R.id.action_schedules:

                        break;
                    case R.id.action_music:

                        break;
                }
                return false;
            }
});
编辑:使用Androidx,您只需要添加以下依赖项。
implementation 'com.google.android.material:material:1.2.0-alpha01'
布局
<?xml version="1.0" encoding="utf-8"?>
<FrameLayout xmlns:android="http://schemas.android.com/apk/res/android"
             xmlns:app="http://schemas.android.com/apk/res-auto"
             xmlns:tools="http://schemas.android.com/tools"
             android:layout_width="match_parent"
             android:layout_height="match_parent">
    <com.google.android.material.bottomnavigation.BottomNavigationView
            android:layout_gravity="bottom"
            app:menu="@menu/bottom_navigation_menu"
            android:layout_width="match_parent"
            android:layout_height="wrap_content"/>
</FrameLayout>
如果你想了解更多关于它的方法和它的工作原理,请阅读这篇文章。
-
本文向大家介绍android实现底部导航栏,包括了android实现底部导航栏的使用技巧和注意事项,需要的朋友参考一下 底部导航栏我选择用FragmentTabHost+Fragment来实现,这个方法比较好用,代码量也不多 首先是开始的activity_main.xml 也可以直接在xml文件里面写 这xml文件就一个view加一个tab view用来显示碎片,tab用来放置底部按钮的数量 再
-
Tabbar 底部导航栏 1.4.8 优点: 此组件一般用于应用的底部导航,具有如下特点: 可以设置凸起的按钮,且是全端通用的 图标可以使用字体图标(内置图标和扩展图标)或者图片 可以动态切换菜单的数量以及配置 切换菜单之前,可以进行回调鉴权 可以设置角标 有效防止组件区域高度塌陷,无需给父元素额外的内边距或者外边距来避开导航的区域 缺点: 虽然优点很多,但是如果用此组件模拟tabbar页面的话依
-
本文向大家介绍Android实现底部导航栏功能,包括了Android实现底部导航栏功能的使用技巧和注意事项,需要的朋友参考一下 本文实例为大家分享了Android实现底部导航栏功能的具体代码,供大家参考,具体内容如下 实验效果: (1)在drawable文件夹下新建tab_menu_bg.xml文件,具体代码如下: (2)在drawable文件夹下新建tab_menu_text.xml文件,具
-
我正在使用谷歌的支持设计库V25.1.0在Android应用程序中实现底部导航栏。有没有什么方法可以添加阴影效果,就像现在的Android原生谷歌照片应用一样?
-
本文向大家介绍Android使用BottomNavigationBar实现底部导航栏,包括了Android使用BottomNavigationBar实现底部导航栏的使用技巧和注意事项,需要的朋友参考一下 本文实例为大家分享了Android实现底部导航栏的具体代码,供大家参考,具体内容如下 展示 MODE_FIXED+BACKGROUND_STYLE_STATIC效果 DE_FIXED+BACKGR
-
本文向大家介绍Flutter实现底部导航栏,包括了Flutter实现底部导航栏的使用技巧和注意事项,需要的朋友参考一下 本文实例为大家分享了Flutter实现底部导航栏的具体代码,供大家参考,具体内容如下 效果 实现 先将自动生成的main.dart里面的代码删除, 创建app.dart作为首页的页面文件 创建today.dart、kb.dart、playground.dart三个页面文件作为ta

