
如何支持RecyclerView的全屏导航UI?

我想支持全屏导航UI,如下所示:
https://medium.com/androiddevelopers/windowinsets-listeners-to-layouts-8f9ccc8fa4d1 https://developer.android.com/guide/navigation/gesturenav
虽然我的应用程序的所有活动都运行良好,但我突然碰到了一个有问题的问题,它有一个带有拇指的回收器视图(RecyclerView)。
- 滚动到底部时,不能完全显示最后一项。

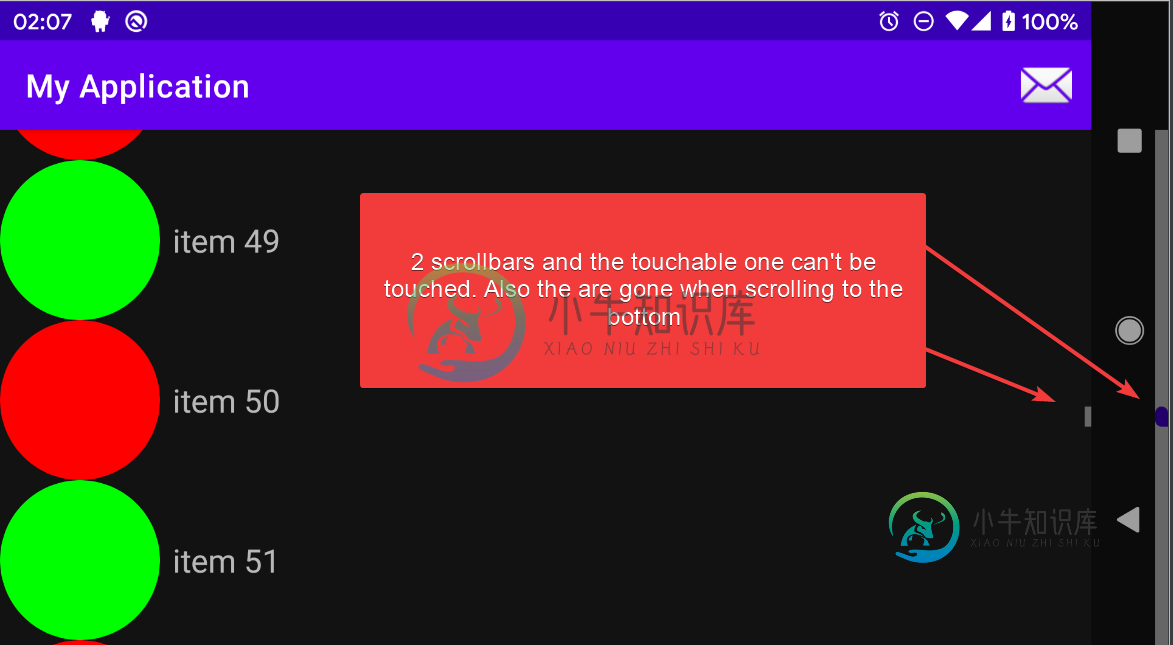
我试着将插图应用到各种视图中,包括填充和边距,但没有任何帮助。
此外,在一些网站中,我看到我应该使用view.system_ui_flag_layout_stable或view.system_ui_flag_layout_hide_navigation,在一些网站中,我还需要添加view.system_ui_flag_layout_fullscreen。帮不上忙。
这是我当前的代码(项目在这里可用,因为我认为这是一个bug):
mainactivity.kt
class MainActivity : AppCompatActivity(R.layout.activity_main) {
    inline fun View.updateMargins(@Px left: Int = marginLeft, @Px top: Int = marginTop, @Px right: Int = marginRight, @Px bottom: Int = marginBottom) {
        updateLayoutParams<ViewGroup.MarginLayoutParams> {
            this.bottomMargin = bottom
            this.topMargin = top
            this.leftMargin = left
            this.rightMargin = right
        }
    }

    override fun onCreate(savedInstanceState: Bundle?) {
        super.onCreate(savedInstanceState)
        setSupportActionBar(toolbar)
        findViewById<View>(android.R.id.content).systemUiVisibility =
            View.SYSTEM_UI_FLAG_LAYOUT_STABLE or View.SYSTEM_UI_FLAG_LAYOUT_HIDE_NAVIGATION
        ViewCompat.setOnApplyWindowInsetsListener(appBarLayout) { _, insets ->
            val systemWindowInsets = insets.systemWindowInsets
            appBarLayout.updateMargins(
                left = systemWindowInsets.left,
                top = systemWindowInsets.top,
                right = systemWindowInsets.right
            )
            insets
        }

        ViewCompat.setOnApplyWindowInsetsListener(recyclerView) { _, insets ->
            val systemWindowInsets = insets.systemWindowInsets
            recyclerView.updatePadding(
                left = systemWindowInsets.left,
                bottom = systemWindowInsets.bottom,
                right = systemWindowInsets.right
            )
            insets
        }

        recyclerView.adapter = object : RecyclerView.Adapter<RecyclerView.ViewHolder>() {
            init {
                setHasStableIds(true)
            }

            override fun onCreateViewHolder(
                parent: ViewGroup,
                viewType: Int
            ): RecyclerView.ViewHolder {
                return object : RecyclerView.ViewHolder(
                    LayoutInflater.from(this@MainActivity).inflate(R.layout.list_item, parent, false)
                ) {}
            }

            override fun getItemId(position: Int): Long = position.toLong()

            override fun getItemCount(): Int = 100

            override fun onBindViewHolder(holder: RecyclerView.ViewHolder, position: Int) {
                holder.itemView.imageView.setColorFilter(if (position % 2 == 0) 0xffff0000.toInt() else 0xff00ff00.toInt())
                holder.itemView.textView.text = "item $position"
            }

        }
    }

    override fun onCreateOptionsMenu(menu: Menu): Boolean {
        menu.add("test").setIcon(android.R.drawable.ic_dialog_email).setOnMenuItemClickListener {
            true
        }.setShowAsAction(MenuItem.SHOW_AS_ACTION_ALWAYS)
        return super.onCreateOptionsMenu(menu)
    }
}
xml(我使用清单中的AppTheme作为主题)
<resources xmlns:tools="http://schemas.android.com/tools">

    <style name="AppTheme" parent="Theme.MaterialComponents.NoActionBar">
        <item name="colorPrimary">@color/colorPrimary</item>
        <item name="colorPrimaryDark">@color/colorPrimaryDark</item>
        <item name="colorAccent">@color/colorAccent</item>
        <item name="android:navigationBarColor" tools:targetApi="lollipop">
            @android:color/transparent
        </item>
        <item name="android:statusBarColor" tools:targetApi="lollipop">@color/colorPrimaryDark
        </item>
    </style>

    <style name="AppTheme.AppBarOverlay" parent="ThemeOverlay.MaterialComponents.Dark.ActionBar" />
</resources>
<androidx.coordinatorlayout.widget.CoordinatorLayout xmlns:android="http://schemas.android.com/apk/res/android"
    xmlns:app="http://schemas.android.com/apk/res-auto" xmlns:tools="http://schemas.android.com/tools"
    android:layout_width="match_parent" android:layout_height="match_parent" tools:context=".MainActivity">


    <com.google.android.material.appbar.AppBarLayout
        android:id="@+id/appBarLayout" android:layout_width="match_parent" android:layout_height="wrap_content"
        android:theme="@style/AppTheme.AppBarOverlay">
        <!--app:popupTheme="@style/AppTheme.PopupOverlay"-->
        <androidx.appcompat.widget.Toolbar
            android:id="@+id/toolbar" android:layout_width="match_parent" android:layout_height="?attr/actionBarSize"
            android:background="?attr/colorPrimary" />
    </com.google.android.material.appbar.AppBarLayout>

    <androidx.recyclerview.widget.RecyclerView
        android:id="@+id/recyclerView" android:layout_width="match_parent" android:layout_height="match_parent"
        android:orientation="vertical" android:scrollbars="vertical" app:fastScrollEnabled="true"
        app:fastScrollHorizontalThumbDrawable="@drawable/thumb_drawable"
        app:fastScrollHorizontalTrackDrawable="@drawable/line_drawable"
        app:fastScrollVerticalThumbDrawable="@drawable/thumb_drawable"
        app:fastScrollVerticalTrackDrawable="@drawable/line_drawable"
        app:layoutManager="androidx.recyclerview.widget.LinearLayoutManager"
        app:layout_behavior="@string/appbar_scrolling_view_behavior" tools:itemCount="100"
        tools:listitem="@layout/list_item" />
</androidx.coordinatorlayout.widget.CoordinatorLayout>
<shape xmlns:android="http://schemas.android.com/apk/res/android" android:shape="rectangle">

    <solid android:color="@android:color/darker_gray" />

    <padding
        android:bottom="10dp" android:left="10dp" android:right="10dp" android:top="10dp" />
</shape>
<selector xmlns:android="http://schemas.android.com/apk/res/android">
    <item android:drawable="@drawable/line" android:state_pressed="true" />

    <item android:drawable="@drawable/line" />
</selector>
<shape xmlns:android="http://schemas.android.com/apk/res/android" android:shape="rectangle">
    <corners
        android:bottomLeftRadius="44dp" android:topLeftRadius="44dp" android:topRightRadius="44dp" />
    <padding
        android:paddingLeft="22dp" android:paddingRight="22dp" />
    <solid android:color="@color/colorPrimaryDark" />
</shape>
Thumb_Drawable.xml
<selector xmlns:android="http://schemas.android.com/apk/res/android">
    <item android:drawable="@drawable/thumb" android:state_pressed="true" />

    <item android:drawable="@drawable/thumb" />
</selector>
- 为什么会发生?它适用于其他各种地方...
- 如何使RecolyerView避免这两种情况,同时允许底部的导航栏显示RecolyerView的内容,因为它是透明的?
- 在哪些情况下,应该添加标志
view.system_ui_flag_layout_fullscreen?在这些情况下,它有什么帮助?
编辑:一个可能的解决办法是避免使用CoordinatorLayout。它很管用,但我想用“官方的方式”做事。这是一个变通方法:
<LinearLayout xmlns:android="http://schemas.android.com/apk/res/android" android:orientation="vertical"
    xmlns:app="http://schemas.android.com/apk/res-auto" xmlns:tools="http://schemas.android.com/tools"
    android:layout_width="match_parent" android:layout_height="match_parent" tools:context=".MainActivity">
    ViewCompat.setOnApplyWindowInsetsListener(recyclerView) { _, insets ->
        val systemWindowInsets = insets.systemWindowInsets
        recyclerView.updatePadding(
            bottom = systemWindowInsets.bottom
        )
        recyclerView.updateMargins(
            left = systemWindowInsets.left,
            right = systemWindowInsets.right
        )
        insets
    }
共有1个答案

由于对我之前的回答有一个评论讨论,我将不编辑那个(它也可能对某人有益)。
最简单的做法是让AppBarLayout处理顶部和底部插入。我们可以通过在AppBarLayout上使用android:fitsSystemWindows=“true”来实现这一点。对于要通过导航栏看到的项目,请在RecyclerView上使用android:cliptopadding=“false”。在RecyclerView上使用android:scrollbars=“none”禁用普通滚动条。则布局XML为:
<?xml version="1.0" encoding="utf-8"?>
<androidx.coordinatorlayout.widget.CoordinatorLayout xmlns:android="http://schemas.android.com/apk/res/android"
    xmlns:app="http://schemas.android.com/apk/res-auto"
    android:layout_width="match_parent"
    android:layout_height="match_parent">

    <com.google.android.material.appbar.AppBarLayout
        android:id="@+id/appBarLayout"
        android:layout_width="match_parent"
        android:layout_height="wrap_content"
        android:fitsSystemWindows="true"
        android:theme="@style/AppTheme.AppBarOverlay">

        <androidx.appcompat.widget.Toolbar
            android:id="@+id/toolbar"
            android:layout_width="match_parent"
            android:layout_height="?attr/actionBarSize"
            android:background="?attr/colorPrimary" />

    </com.google.android.material.appbar.AppBarLayout>

    <androidx.recyclerview.widget.RecyclerView
        android:id="@+id/recyclerView"
        android:layout_width="match_parent"
        android:layout_height="match_parent"
        android:clipToPadding="false"
        android:orientation="vertical"
        android:scrollbars="none"
        app:fastScrollEnabled="true"
        app:fastScrollHorizontalThumbDrawable="@drawable/thumb_drawable"
        app:fastScrollHorizontalTrackDrawable="@drawable/line_drawable"
        app:fastScrollVerticalThumbDrawable="@drawable/thumb_drawable"
        app:fastScrollVerticalTrackDrawable="@drawable/line_drawable"
        app:layoutManager="androidx.recyclerview.widget.LinearLayoutManager"
        app:layout_behavior="@string/appbar_scrolling_view_behavior" />

</androidx.coordinatorlayout.widget.CoordinatorLayout>
在活动/片段中,我们仍然必须处理RecolyerView的底部系统插入,以及RecolyerView和AppBarLayout的左右系统插入。我们使用recyclerView`的边距来使快速滚动进入内容区域。
ViewCompat.setOnApplyWindowInsetsListener(recyclerView) { _, insets ->
            val systemWindowInsets = insets.systemWindowInsets
            appBarLayout.updatePadding(left = systemWindowInsets.left, right = systemWindowInsets.right)
            recyclerView.updatePadding(bottom = systemWindowInsets.bottom)
            recyclerView.updateMargins(left = systemWindowInsets.left, right = systemWindowInsets.right)
            insets
        }
视频结果在这里,评论#27。
-
问题内容: 我正在尝试为我的Java EE / JSF2应用程序实现正确的注销。 它需要两件事: 我需要从JAAS中注销并使会话无效 然后,我必须导航到外部URL以触发Siteminder注销 Siteminder注销URL(在策略服务器上配置->我无法更改)在应用程序上下文之外。例如。如果我的Web应用程序URL为https:// localhost:8080 / sm / MyWebApp,
-
问题内容: 如何从一个活动屏幕导航到另一个活动屏幕?在第一个屏幕中,我有一个按钮,如果我单击该按钮,则必须移至另一个“活动”屏幕。 问题答案:
-
我想将导航栏更改为完全透明,如下图所示。 我试过
-
本文向大家介绍HTML5如何监听video的全屏和退出全屏?相关面试题,主要包含被问及HTML5如何监听video的全屏和退出全屏?时的应答技巧和注意事项,需要的朋友参考一下 监听fullscreenchange事件
-
问题内容: 我已经仔细阅读了http://developer.android.com/guide/practices/screens_support.html和其他相关网站中的文档,但我仍然对此表示怀疑。让我解释: 我已经为值,values-large和values- xlarge实现了dimens.xml,因此,例如,在平板电脑上运行时,我的Android应用程序很好。但是,我指定了填充,边距,
-
问题内容: 我正在设计一个将支持平板电脑的Android应用程序,但是我面临一个关于多屏支持的小问题。 谁能告诉我,下面的布局设计 我们在清单文件中指定以下代码。 现在将 ****如果布局如下,代码将保持不变; 定义是强制性的吗 ****在清单文件中? 如果我不定义怎么办。请帮我。 问题答案: Android开发教程 Android为具有数百种不同屏幕尺寸的数百种设备提供支持,从小型手机到大型电视