
用图像显示标记详细信息onclick标记OpenStreetMap

我正在使用OpenStreetMap创建一个简单的地图应用程序。我已经在MapView中打开了地图,并在地图上添加了标记。这一切都很顺利。当用户点击一个标记时,会弹出一个描述框,其中包含该地点的名称、描述和imageview。
主要活动:
public class MainActivity extends Activity {

     MyItemizedOverlay myItemizedOverlay = null;

    @Override
    protected void onCreate(Bundle savedInstanceState) {
        super.onCreate(savedInstanceState);
        setContentView(R.layout.activity_main);

         MapView mapView = (MapView) findViewById(R.id.mapview);
            mapView.setBuiltInZoomControls(true);

            Drawable marker=getResources().getDrawable(R.drawable.pin_for_map);
            int markerWidth = marker.getIntrinsicWidth();
            int markerHeight = marker.getIntrinsicHeight();
            marker.setBounds(0, markerHeight, markerWidth, 0);

            ResourceProxy resourceProxy = new DefaultResourceProxyImpl(getApplicationContext());

            myItemizedOverlay = new MyItemizedOverlay(marker, resourceProxy);
            mapView.getOverlays().add(myItemizedOverlay);

            GeoPoint myPoint1 = new GeoPoint(0*1000000, 0*1000000);
            myItemizedOverlay.addItem(myPoint1, "myPoint1", "myPoint1");
            GeoPoint myPoint2 = new GeoPoint(50*1000000, 50*1000000);
            myItemizedOverlay.addItem(myPoint2, "myPoint2", "myPoint2");
    }

    @Override
    public boolean onCreateOptionsMenu(Menu menu) {
        // Inflate the menu; this adds items to the action bar if it is present.
        getMenuInflater().inflate(R.menu.main, menu);
        return true;
    }

}
MyItemizedOverlay类:
public class MyItemizedOverlay extends ItemizedOverlay<OverlayItem> {

 private ArrayList<OverlayItem> overlayItemList = new ArrayList<OverlayItem>();

 public MyItemizedOverlay(Drawable pDefaultMarker,
   ResourceProxy pResourceProxy) {
  super(pDefaultMarker, pResourceProxy);
  // TODO Auto-generated constructor stub
 }

 public void addItem(GeoPoint p, String title, String snippet){
  OverlayItem newItem = new OverlayItem(title, snippet, p);
  overlayItemList.add(newItem);
  populate();
 }

 @Override
 public boolean onSnapToItem(int arg0, int arg1, Point arg2, IMapView arg3) {
  // TODO Auto-generated method stub
  return false;
 }

 @Override
 protected OverlayItem createItem(int arg0) {
  // TODO Auto-generated method stub
  return overlayItemList.get(arg0);
 }

 @Override
 public int size() {
  // TODO Auto-generated method stub
  return overlayItemList.size();
 }

}
<RelativeLayout xmlns:android="http://schemas.android.com/apk/res/android"
    xmlns:tools="http://schemas.android.com/tools"
    android:layout_width="match_parent"
    android:layout_height="match_parent" >

    <TextView
        android:layout_width="wrap_content"
        android:layout_height="wrap_content"
        android:layout_centerHorizontal="true"
        android:layout_centerVertical="true"
        android:padding="5dp"
        android:text="@string/hello_world"
        tools:context=".MainActivity" />

    <org.osmdroid.views.MapView
        android:id="@+id/mapview"
        android:layout_width="fill_parent"
        android:layout_height="fill_parent"
        android:clickable="true"/>

</RelativeLayout>
清单:
<manifest xmlns:android="http://schemas.android.com/apk/res/android"
    package="com.example.openstreetmaptutorial"
    android:versionCode="1"
    android:versionName="1.0" >

    <uses-sdk
        android:minSdkVersion="8"
        android:targetSdkVersion="18" />

    <uses-permission android:name="android.permission.ACCESS_COARSE_LOCATION" />
    <uses-permission android:name="android.permission.ACCESS_FINE_LOCATION" />
    <uses-permission android:name="android.permission.ACCESS_WIFI_STATE" />
    <uses-permission android:name="android.permission.ACCESS_NETWORK_STATE" />
    <uses-permission android:name="android.permission.INTERNET" />
    <uses-permission android:name="android.permission.WRITE_EXTERNAL_STORAGE" />

    <application
        android:allowBackup="true"
        android:icon="@drawable/ic_launcher"
        android:label="@string/app_name"
        android:theme="@style/AppTheme" >
        <activity
            android:name="com.example.openstreetmaptutorial.MainActivity"
            android:label="@string/app_name" >
            <intent-filter>
                <action android:name="android.intent.action.MAIN" />

                <category android:name="android.intent.category.LAUNCHER" />
            </intent-filter>
        </activity>
    </application>

</manifest>
请导入osmdroid-android-4.1.jar和slf4j-android-1.5.8.jar库并运行该项目。
我曾经提到过这个联系。
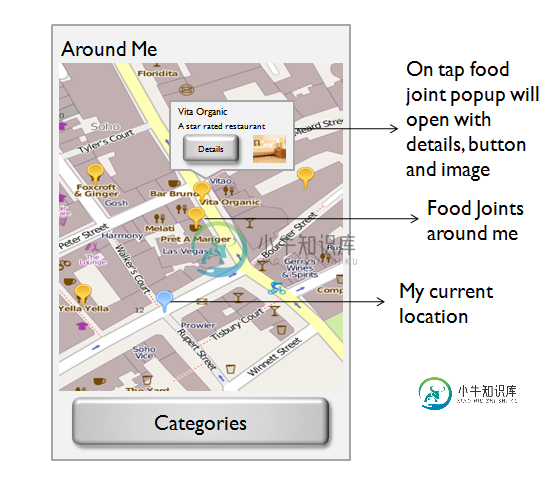
请建议我如何使弹出如上面所描述的
共有1个答案

我已经解决了问题。首先,我创建了一个名为custom_dialog.xml的布局。代码:
<RelativeLayout xmlns:android="http://schemas.android.com/apk/res/android"
    android:layout_width="wrap_content"
    android:layout_height="wrap_content"
    android:background="@drawable/bonuspack_bubble">

   <TextView
        android:id="@+id/map_popup_header"
        android:layout_width="wrap_content"
        android:layout_height="wrap_content"
        android:layout_alignParentLeft="true"
        android:layout_alignParentTop="true"
        android:layout_marginLeft="3dp"
        android:layout_marginTop="3dp"
        android:text="TextView"
        android:textSize="15dp"
        android:textStyle="bold"/>

    <TextView
        android:id="@+id/map_popup_body"
        android:layout_width="wrap_content"
        android:layout_height="wrap_content"
        android:layout_alignLeft="@+id/map_popup_header"
        android:layout_below="@+id/map_popup_header"
        android:layout_marginTop="5dp"
        android:text="TextView"
        android:textSize="12dp"/>

    <ImageView
        android:id="@+id/map_more_info_imageView"
        android:layout_width="wrap_content"
        android:layout_height="wrap_content"
        android:layout_alignParentRight="true"
        android:layout_below="@+id/map_popup_body"
        android:layout_marginRight="5dp"
        android:src="@drawable/moreinfo_arrow" />

</RelativeLayout>
我这样编辑了MapItemizedOverlay类:
public class MapItemizedOverlay extends ItemizedOverlay<OverlayItem> {
    private ArrayList<OverlayItem> mOverlays = new ArrayList<OverlayItem>();
    private Context mContext;

    public MapItemizedOverlay(Drawable defaultMarker, Context context) {
        // super(boundCenterBottom(defaultMarker));
        super(defaultMarker, new DefaultResourceProxyImpl(context));
        mContext = context;
    }

    public void addOverlay(OverlayItem overlay) {
        mOverlays.add(overlay);
        populate();
    }

    @Override
    protected OverlayItem createItem(int i) {
        return mOverlays.get(i);
    }

    @Override
    public int size() {
        return mOverlays.size();
    }

    protected boolean onTap(int index) {
        OverlayItem item = mOverlays.get(index);

        Log.d("Title", item.getTitle());
        Log.d("Snippet", item.getSnippet());
        Log.d("Id", item.getUid());


         //set up dialog
        Dialog dialog = new Dialog(mContext);
        dialog.getWindow().requestFeature(Window.FEATURE_NO_TITLE);
        dialog.getWindow().setBackgroundDrawable(new ColorDrawable(android.graphics.Color.TRANSPARENT));
        dialog.setContentView(R.layout.custom_dialog);
        //dialog.setTitle("This is my custom dialog box");

        dialog.setCancelable(true);
        //there are a lot of settings, for dialog, check them all out!

        //set up text
        TextView map_popup_header = (TextView) dialog.findViewById(R.id.map_popup_header);
        map_popup_header.setText(item.getTitle());

        TextView map_popup_body = (TextView) dialog.findViewById(R.id.map_popup_body);
        map_popup_body.setText(item.getSnippet());

        //set up button
        ImageView imgMoreInfo = (ImageView) dialog.findViewById(R.id.map_more_info_imageView);
        imgMoreInfo.setOnClickListener(new View.OnClickListener() {
            @Override
            public void onClick(View v) {
              Log.d("Clicked", "more info");
            }
        });
        //now that the dialog is set up, it's time to show it
        dialog.show();

        return true;
    }

    // boolean onTap(GeoPoint p, MapView mapView)
    // {
    // return false;
    // }

    // @Override
    // public boolean onSnapToItem(int arg0, int arg1, Point arg2, MapView arg3)
    // {
    // // TODO Auto-generated method stub
    // return false;
    // }

    @Override
    public boolean onSnapToItem(int arg0, int arg1, Point arg2, IMapView arg3) {
        // TODO Auto-generated method stub
        return false;
    }

}
在地图上添加气泡的方法:
// =====For showing restaurant location======================//
    public void showFoodJoint(String foodJointId,double foodJointLat, double foodJointLon, String foodJointName, String foodJointDescription)
    {
        Drawable restaurantLocationDrawable = this.getResources().getDrawable(
                R.drawable.pin_for_restaurant_location);
        MapItemizedOverlay itemizedoverlayForRestaurant = new MapItemizedOverlay(
                restaurantLocationDrawable, this);

        GeoPoint myPoint1 = new GeoPoint(foodJointLat, foodJointLon);
        OverlayItem overlayitem2 = new OverlayItem(foodJointId,foodJointName,foodJointDescription, myPoint1);

        itemizedoverlayForRestaurant.addOverlay(overlayitem2);

        mapOverlays.add(itemizedoverlayForRestaurant);
    }

    // =====For showing restaurant location======================//
-
当我点击google maps标记时,它会注册点击,但我无法在状态改变后显示InfoWindow。 尝试在单击时设置/读取更新的状态 ''' 我期望google map标记会出现某种类型的InfowWindow,但相反,infowWindowOpened返回的是未定义的
-
我在学Android。现在我正在开发一个使用地图API的应用程序。到目前为止,我做了以下操作:-我长时间点击了地图,并打开了一个新的ActivityCyclickedMap,其中显示了我点击的位置的lat和lon-我点击了save按钮,并将lat和lon添加到服务器和我的本地数据库中 我想做的事情是这样的:-当我打开地图时,我想让它显示一个标记,使用数据库中的lat和lon
-
我使用Google Maps Android SDK在地图上添加标记,这些标记的位置存储在我的应用程序的所有用户都可以使用的Firebase数据库中。每个标记的数据存储在唯一的Firebase记录中,每个记录包含纬度 添加了一个新标记。 更改现有标记(移动到新位置和/或“验证”) 删除现有标记 我实现了一个哈希图,如如何使用Firebase Google Maps API Android中的数据更
-
我试图显示存储在mongodb数据库中的lat和lng的标记列表。我正在使用google-maps-react,这是我的子地图组件 我从这里的endpoint得到坐标 仍未显示
-
问题内容: 我通过以下方式向GoogleMap添加默认标记: 如何使标记始终显示标题和摘要而无需触摸?我也想禁用隐藏它们。 问题答案: 这很简单:
-
我尝试了一切,但图像不会显示,我试图缩小图像,但没有用,我试图改变路径,我试图更改图像的位置,但没有帮助,我试图在互联网上搜索,但什么都没有。 我看到的只是空白的图形用户界面,没有文本和图像。如果你能帮我,你会帮我一个大忙。 代码如下: