如何改进表面缺陷的检测?

以下是我采取的步骤:
- 高斯模糊
这是我的密码:
import numpy as np
import cv2
from matplotlib import pyplot as plt
import imutils
path = ''
path_output = ''

img_bgr = cv2.imread(path)
plt.imshow(img_bgr)

# bgr to rgb
img_rgb = cv2.cvtColor(img_bgr, cv2.COLOR_BGR2RGB)
plt.imshow(img_rgb)

# Converting to grayscale
img_just_gray = cv2.cvtColor(img_rgb, cv2.COLOR_BGR2GRAY)

# Displaying the grayscale image
plt.imshow(img_just_gray, cmap='gray')

# Gaussian Blur
ksize_w = 13
ksize_h = 13

img_first_gb = cv2.GaussianBlur(img_rgb, (ksize_w,ksize_h), 0, 0, cv2.BORDER_REPLICATE);
plt.imshow(img_first_gb)

# Dilate the image

dilated_img = cv2.dilate(img_first_gb, np.ones((11,11), np.uint8))
plt.imshow(dilated_img)

# Converting to grayscale
img_gray_operated = cv2.cvtColor(dilated_img, cv2.COLOR_BGR2GRAY)

# Displaying the grayscale image
plt.imshow(img_gray_operated, cmap='gray')

# closing:
kernel_closing = np.ones((7,7),np.uint8)
img_closing = cv2.morphologyEx(img_gray_operated, cv2.MORPH_CLOSE, kernel_closing)
plt.imshow(img_closing, cmap='gray')

# dilation:
# add pixels to the boundaries of objects in an image
kernel_dilation = np.ones((3,3),np.uint8)
img_dilation2 = cv2.dilate(img_closing, kernel_dilation, iterations = 1)
plt.imshow(img_dilation2, cmap='gray')

diff_img = 255 - cv2.absdiff(img_just_gray, img_dilation2)
plt.imshow(diff_img, cmap='gray')

# canny
edgesToFindImage = img_dilation2

v = np.median(img_just_gray)
#print(v)
sigma = 0.33
lower_thresh = int(max(0,(1.0-sigma)*v))
higher_thresh = int(min(255,(1.0+sigma)*v))

img_edges =  cv2.Canny(edgesToFindImage, lower_thresh, higher_thresh)
plt.imshow(img_edges, cmap='gray')

kernel_dilation2 = np.ones((2,2),np.uint8)
img_dilation2 = cv2.dilate(img_edges, kernel_dilation, iterations = 2)
plt.imshow(img_dilation2, cmap='gray')

# find contours
contoursToFindImage = img_dilation2

(_, cnts, _) = cv2.findContours(contoursToFindImage.copy(), cv2.RETR_EXTERNAL,
        cv2.CHAIN_APPROX_SIMPLE)
print(type(cnts))
print(len(cnts))

# -1 for all
cntsWhichOne = -1

# -1 for infill
# >0 for edge thickness
cntsInfillOrEdgeThickness = 3

img_drawing_contours_on_rgb_image = cv2.drawContours(img_rgb.copy(), cnts, cntsWhichOne, (0, 255, 0), cntsInfillOrEdgeThickness)
plt.imshow(img_drawing_contours_on_rgb_image)
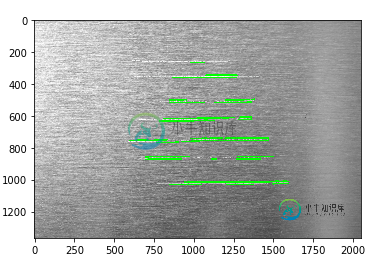
这就是结果。

如何改进此检测?有没有更有效的方法来检测线条?
共有1个答案
在Python OpenCV中有一种方法。如果距离很近,应该使用自适应阈值、形态学来清理小区域并跳过canny边缘。
输入:
import cv2
import numpy as np

# load image
img = cv2.imread('scratches.jpg')

# convert to grayscale
gray = cv2.cvtColor(img, cv2.COLOR_BGR2GRAY)

# adaptive threshold
thresh = cv2.adaptiveThreshold(gray, 255, cv2.ADAPTIVE_THRESH_MEAN_C, cv2.THRESH_BINARY, 11, -35)

# apply morphology
kernel = np.ones((3,30),np.uint8)
morph = cv2.morphologyEx(thresh, cv2.MORPH_CLOSE, kernel)
kernel = np.ones((3,35),np.uint8)
morph = cv2.morphologyEx(morph, cv2.MORPH_OPEN, kernel)

# get hough line segments
threshold = 25
minLineLength = 10
maxLineGap = 20
lines = cv2.HoughLinesP(morph, 1, 30*np.pi/360, threshold, minLineLength, maxLineGap)

# draw lines
linear1 = np.zeros_like(thresh)
linear2 = img.copy()
for [line] in lines:
    x1 = line[0]
    y1 = line[1]
    x2 = line[2]
    y2 = line[3]
    cv2.line(linear1, (x1,y1), (x2,y2), 255, 1)
    cv2.line(linear2, (x1,y1), (x2,y2), (0,0,255), 1)

print('number of lines:',len(lines))

# save resulting masked image
cv2.imwrite('scratches_thresh.jpg', thresh)
cv2.imwrite('scratches_morph.jpg', morph)
cv2.imwrite('scratches_lines1.jpg', linear1)
cv2.imwrite('scratches_lines2.jpg', linear2)

# display result
cv2.imshow("thresh", thresh)
cv2.imshow("morph", morph)
cv2.imshow("lines1", linear1)
cv2.imshow("lines2", linear2)
cv2.waitKey(0)
cv2.destroyAllWindows()
阈值图像:
形态学清理图像:
原始图像上的线条:
黑色背景上的线条:
-
尽管支持抢先式多任务处理,但进程生成却很昂贵——虽然比不上 VMS,但是(平均生成一个进程需要0.1秒左右)要比现在的 Unix 高出一个数量级。脚本功能薄弱,操作系统广泛使用二进制文件格式。除了此前我们总结过的,还有这些后果: 大多数程序都不能用脚本调用。程序间依赖复杂脆弱的远程过程调用(RPC)来通信,这是滋生 bug 的温床。 ……………… Unix 的系统配置和用户配置数据分散存放在众多的
-
本文向大家介绍ES6所改良的javascript“缺陷”问题,包括了ES6所改良的javascript“缺陷”问题的使用技巧和注意事项,需要的朋友参考一下 块级作用域 ES5没有块级作用域,只有全局作用域和函数作用域,由于这一点,变量的作用域甚广,所以一进入函数就要马上将它创建出来。这就造成了所谓的变量提升。 ES5的“变量提升”这一特性往往一不小心就会造成一下错误: 1.内层变量覆盖外层变量 2
-
本文向大家介绍Apache Kafka的缺陷相关面试题,主要包含被问及Apache Kafka的缺陷时的应答技巧和注意事项,需要的朋友参考一下 答:Kafka的局限性是: 没有完整的监控工具集 消息调整的问题 不支持通配符主题选择 速度问题
-
这是一个有问题的或有更好替代物的 gem 列表。不要在项目中使用它们。 rmagick - 这个 gem 因大量消耗内存而臭名昭著。应使用 minimagick 来替代它。 autotest - 测试自动化的过时方案,远不及 guard 和 watchr。 rcov - 代码覆盖率工具,不兼容 Ruby 1.9。应使用 SimpleCov 来替代它。 therubyracer - 内存杀手,强烈不
-
像这个问题的作者一样,我试图理解Scala 2.10的期货和promise中用户可见promise的原因。 特别是,再回到SIP的例子,它是不是完全有缺陷: 我正在想象对的调用会导致运行时异常的情况。因为Promise和Producer-Future是完全分离的,这意味着系统挂起,消费者永远不会成功或失败。 因此,使用promise的唯一安全方式需要类似这样的东西 这显然容易出错和冗长。 对于可见
-
缺陷跟踪(Bug Tracking)是软件研发流程中重要的一环,集项目需求管理和缺陷管理于一身,通过对研发工作流的控制帮助团队建立规范的研发体系。GitHub提供轻量级的缺陷跟踪模块,称为Issues。小巧、易用的Issues模块能与Pull Request紧密整合,是Pull Request工作流的有益补充。 一个小型、管理文档和网页的项目,使用Pull Request往往就足够了。试想如果贡献

