《测试用例:mocha,should,istanbul》
目标
建立一个 lesson6 项目,在其中编写代码。
main.js: 其中有个 fibonacci 函数。fibonacci 的介绍见:http://en.wikipedia.org/wiki/Fibonacci_number 。
此函数的定义为 int fibonacci(int n)
- 当 n === 0 时,返回 0;n === 1时,返回 1;
- n > 1 时,返回
fibonacci(n) === fibonacci(n-1) + fibonacci(n-2),如fibonacci(10) === 55; - n 不可大于10,否则抛错,因为 Node.js 的计算性能没那么强。
- n 也不可小于 0,否则抛错,因为没意义。
- n 不为数字时,抛错。
test/main.test.js: 对 main 函数进行测试,并使行覆盖率和分支覆盖率都达到 100%。
知识点
- 学习使用测试框架 mocha : http://mochajs.org/
- 学习使用断言库 should : https://github.com/tj/should.js
- 学习使用测试率覆盖工具 istanbul : https://github.com/gotwarlost/istanbul
- 简单 Makefile 的编写 : http://blog.csdn.net/haoel/article/details/2886
课程内容
首先,作为一个 Node.js 项目,先执行 npm init 创建 package.json。
其次,建立我们的 main.js 文件,编写 fibonacci 函数。
var fibonacci = function (n) {if (n === 0) {return 0;}if (n === 1) {return 1;}return fibonacci(n-1) + fibonacci(n-2);};if (require.main === module) {// 如果是直接执行 main.js,则进入此处// 如果 main.js 被其他文件 require,则此处不会执行。var n = Number(process.argv[2]);console.log('fibonacci(' + n + ') is', fibonacci(n));}
OK,这只是个简单的实现。
我们可以执行试试
$ node main.js 10

嗯,结果是 55,符合预期。
接下来我们开始测试驱动开发,现在简单的实现已经完成,那我们就对它进行一下简单测试吧。
我们先得把 main.js 里面的 fibonacci 暴露出来,这个简单。加一句
exports.fibonacci = fibonacci;(要是看不懂这句就去补补 Node.js 的基础知识吧)
就好了。
然后我们在 test/main.test.js 中引用我们的 main.js,并开始一个简单的测试。
// file: test/main.test.jsvar main = require('../main');var should = require('should');describe('test/main.test.js', function () {it('should equal 55 when n === 10', function () {main.fibonacci(10).should.equal(55);});});
把测试先跑通,我们再讲这段测试代码的含义。
装个全局的 mocha: $ npm install mocha -g。
-g 与 非-g 的区别,就是安装位置的区别,g 是 global 的意思。如果不加的话,则安装 mocha 在你的项目目录下面;如果加了,则这个 mocha 是安装在全局的,如果 mocha 有可执行命令的话,那么这个命令也会自动加入到你系统 $PATH 中的某个地方(在我的系统中,是这里 /Users/alsotang/.nvm/v0.10.29/bin)
在 lesson6 目录下,直接执行
$ mocha
输出应如下

那么,代码中的 describe 和 it 是什么意思呢?其实就是 BDD 中的那些意思,把它们当做语法来记就好了。
大家来看看 nodeclub 中,关于 topicController 的测试文件:
https://github.com/cnodejs/nodeclub/blob/master/test/controllers/topic.test.js
这文件的内容没有超出之前课程的范围吧。
describe 中的字符串,用来描述你要测的主体是什么;it 当中,描述具体的 case 内容。
而引入的那个 should 模块,是个断言库。玩过 ruby 的同学应该知道 rspec,rspec 它把测试框架和断言库的事情一起做了,而在 Node.js 中,这两样东西的作用分别是 mocha 和 should 在协作完成。
should 在 js 的 Object “基类”上注入了一个 #should 属性,这个属性中,又有着许许多多的属性可以被访问。
比如测试一个数是不是大于3,则是 (5).should.above(3);测试一个字符串是否有着特定前缀:'foobar'.should.startWith('foo');。should.js API 在:https://github.com/tj/should.js
should.js 如果现在还是 version 3 的话,我倒是推荐大家去看看它的 API 和 源码;现在 should 是 version 4 了,API 丑得很,但为了不掉队,我还是一直用着它。我觉得 expect 麻烦,所以不用 expect,对了,expect 也是一个断言库:https://github.com/LearnBoost/expect.js/ 。
回到正题,还记得我们 fibonacci 函数的几个要求吗?
* 当 n === 0 时,返回 0;n === 1时,返回 1;* n > 1 时,返回 `fibonacci(n) === fibonacci(n-1) + fibonacci(n-2)`,如 `fibonacci(10) === 55`;* n 不可大于10,否则抛错,因为 Node.js 的计算性能没那么强。* n 也不可小于 0,否则抛错,因为没意义。* n 不为数字时,抛错。
我们用测试用例来描述一下这几个要求,更新后的 main.test.js 如下:
var main = require('../main');var should = require('should');describe('test/main.test.js', function () {it('should equal 0 when n === 0', function () {main.fibonacci(0).should.equal(0);});it('should equal 1 when n === 1', function () {main.fibonacci(1).should.equal(1);});it('should equal 55 when n === 10', function () {main.fibonacci(10).should.equal(55);});it('should throw when n > 10', function () {(function () {main.fibonacci(11);}).should.throw('n should <= 10');});it('should throw when n < 0', function () {(function () {main.fibonacci(-1);}).should.throw('n should >= 0');});it('should throw when n isnt Number', function () {(function () {main.fibonacci('呵呵');}).should.throw('n should be a Number');});});
还是比较清晰的吧?
我们这时候跑一下 $ mocha,会发现后三个 case 都没过。
于是我们更新 fibonacci 的实现:
var fibonacci = function (n) {if (typeof n !== 'number') {throw new Error('n should be a Number');}if (n < 0) {throw new Error('n should >= 0');}if (n > 10) {throw new Error('n should <= 10');}if (n === 0) {return 0;}if (n === 1) {return 1;}return fibonacci(n-1) + fibonacci(n-2);};
再跑一次 $ mocha,就过了。这就是传说中的测试驱动开发:先把要达到的目的都描述清楚,然后让现有的程序跑不过 case,再修补程序,让 case 通过。
安装一个 istanbul : $ npm i istanbul -g
执行 $ istanbul cover _mocha
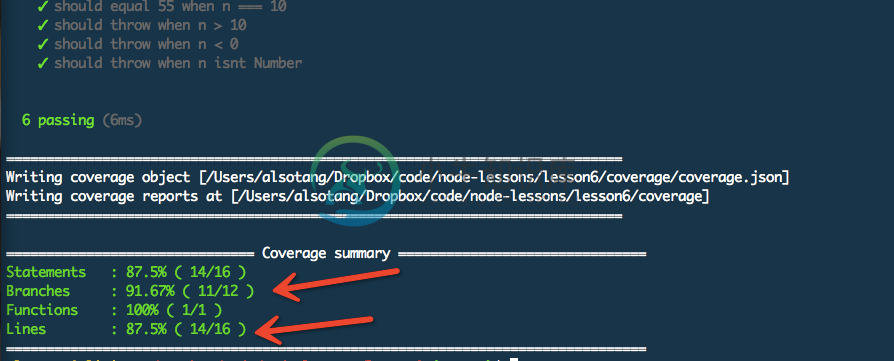
这会比直接使用 mocha 多一行覆盖率的输出,

可以看到,我们其中的分支覆盖率是 91.67%,行覆盖率是 87.5%。
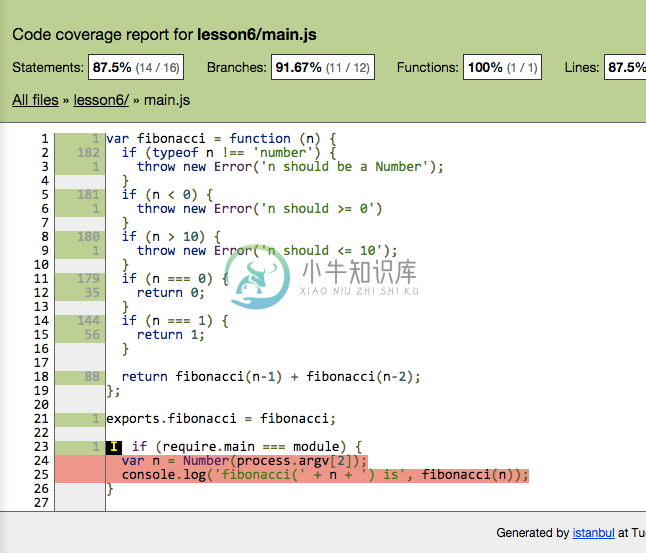
打开 open coverage/lcov-report/index.html 看看

其实这覆盖率是 100% 的,24 25 两行没法测。
mocha 和 istanbul 的结合是相当无缝的,只要 mocha 跑得动,那么 istanbul 就接得进来。
到此这门课其实就完了,剩下要说的内容,都是些比较细节的。比较懒的同学可以踩坑了之后再回来看。
上面的课程,不完美的地方就在于 mocha 和 istanbul 版本依赖的问题,但为了不引入不必要的复杂性,所以上面就没提到这点了。
假设你有一个项目A,用到了 mocha 的 version 3,其他人有个项目B,用到了 mocha 的 version 10,那么如果你 npm i mocha -g 装的是 version 3 的话,你用 $ mocha 是不兼容B项目的。因为 mocha 版本改变之后,很可能语法也变了,对吧。
这时,跑测试用例的正确方法,应该是
$ npm i mocha --save-dev,装个 mocha 到项目目录中去$ ./node_modules/.bin/mocha,用刚才安装的这个特定版本的 mocha,来跑项目的测试代码。
./node_modules/.bin 这个目录下放着我们所有依赖自带的那些可执行文件。
每次输入这个很麻烦对吧?所以我们要引入 Makefile,让 Makefile 帮我们记住复杂的配置。
test:./node_modules/.bin/mochacov test-cov:./node_modules/.bin/istanbul cover _mocha.PHONY: test cov test-cov
这时,我们只需要调用 make test 或者 make cov,就可以跑我们相应的测试了。
至于 Makefile 怎么写?以及 .PHONY 是什么意思,请看这里:http://blog.csdn.net/haoel/article/details/2886 ,左耳朵耗子陈皓2004年的文章。

