
oneinStack配置无域名网站

丌官嘉福
oneinStack配置无域名网站
- 首先上传项目至centos服务器
scp xxx.zip root@你的ip地址:/上传至服务器的路径
回车执行,再输入密码即可(注意:输入密码时,是看不到密码的,输完回车即可)
- 添加虚拟主机 添加虚拟主机
进入oneinstack目录
cd ~/oneinStack
继续在命令行输入./vhost.sh 回车

具体操作看一下图片

**1、注意:在第一步中,要选择无域名的,需要选择 “1” 选项**
What Are You Doing?
1. Use HTTP Only
2. Use your own SSL Certificate and Key
3. Use Let's Encrypt to Create SSL Certificate and Key
q. Exit
Please input the correct option: 1
**2、选择一个域名,这里就随意写,因为配置的是无域名的**
Please input domain(example: www.example.com): a.com
domain=a.com
**3、选择项目根目录(注意:要指向入口)**
(Default directory: /data/wwwroot/a.com): /data/wwwroot/learnTP5/
4、添加其他域名?
Do you want to add more domain name? [y/n]: n
5、是否设置防盗链?
Do you want to add hotlink protection? [y/n]: n
6、是否设置伪静态?
Allow Rewrite rule? [y/n]: n
7、是否记录访问日志?
Allow Nginx/Tengine/OpenResty access_log? [y/n]: y
出现以下画面表示创建成功
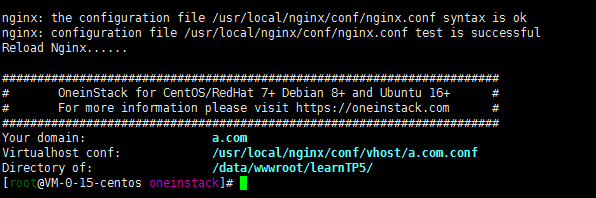
进入目录 /usr/local/nginx/conf/vhost/a,com.conf
到达上面目录后,编辑a.com.conf。 vim a.com.conf
server {
  listen 8082;
  listen [::]:80;
  server_name 127.0.0.1;
  access_log /data/wwwlogs/a.com_nginx.log combined;
  index index.html index.htm index.php;
  root /data/wwwroot/learnTP5/;

  include /usr/local/nginx/conf/rewrite/none.conf;
  #error_page 404 /404.html;
  #error_page 502 /502.html;

  location ~ [^/]\.php(/|$) {
    #fastcgi_pass remote_php_ip:9000;
    fastcgi_pass unix:/dev/shm/php-cgi.sock;
    fastcgi_index index.php;
    include fastcgi.conf;
  }

  location ~ .*\.(gif|jpg|jpeg|png|bmp|swf|flv|mp4|ico)$ {
    expires 30d;
    access_log off;
  }
  location ~ .*\.(js|css)?$ {
    expires 7d;
    access_log off;
  }
  location ~ /(\.user\.ini|\.ht|\.git|\.svn|\.project|LICENSE|README\.md) {
    deny all;
  }
}
	将 listen 80改为8082,需要监听的端口
	server_name 改为127.0.0.1
	保存即可
- 重启nginx
service nginx restart
- 在浏览器输入 你的ip地址:你监听的端口号
类似资料: