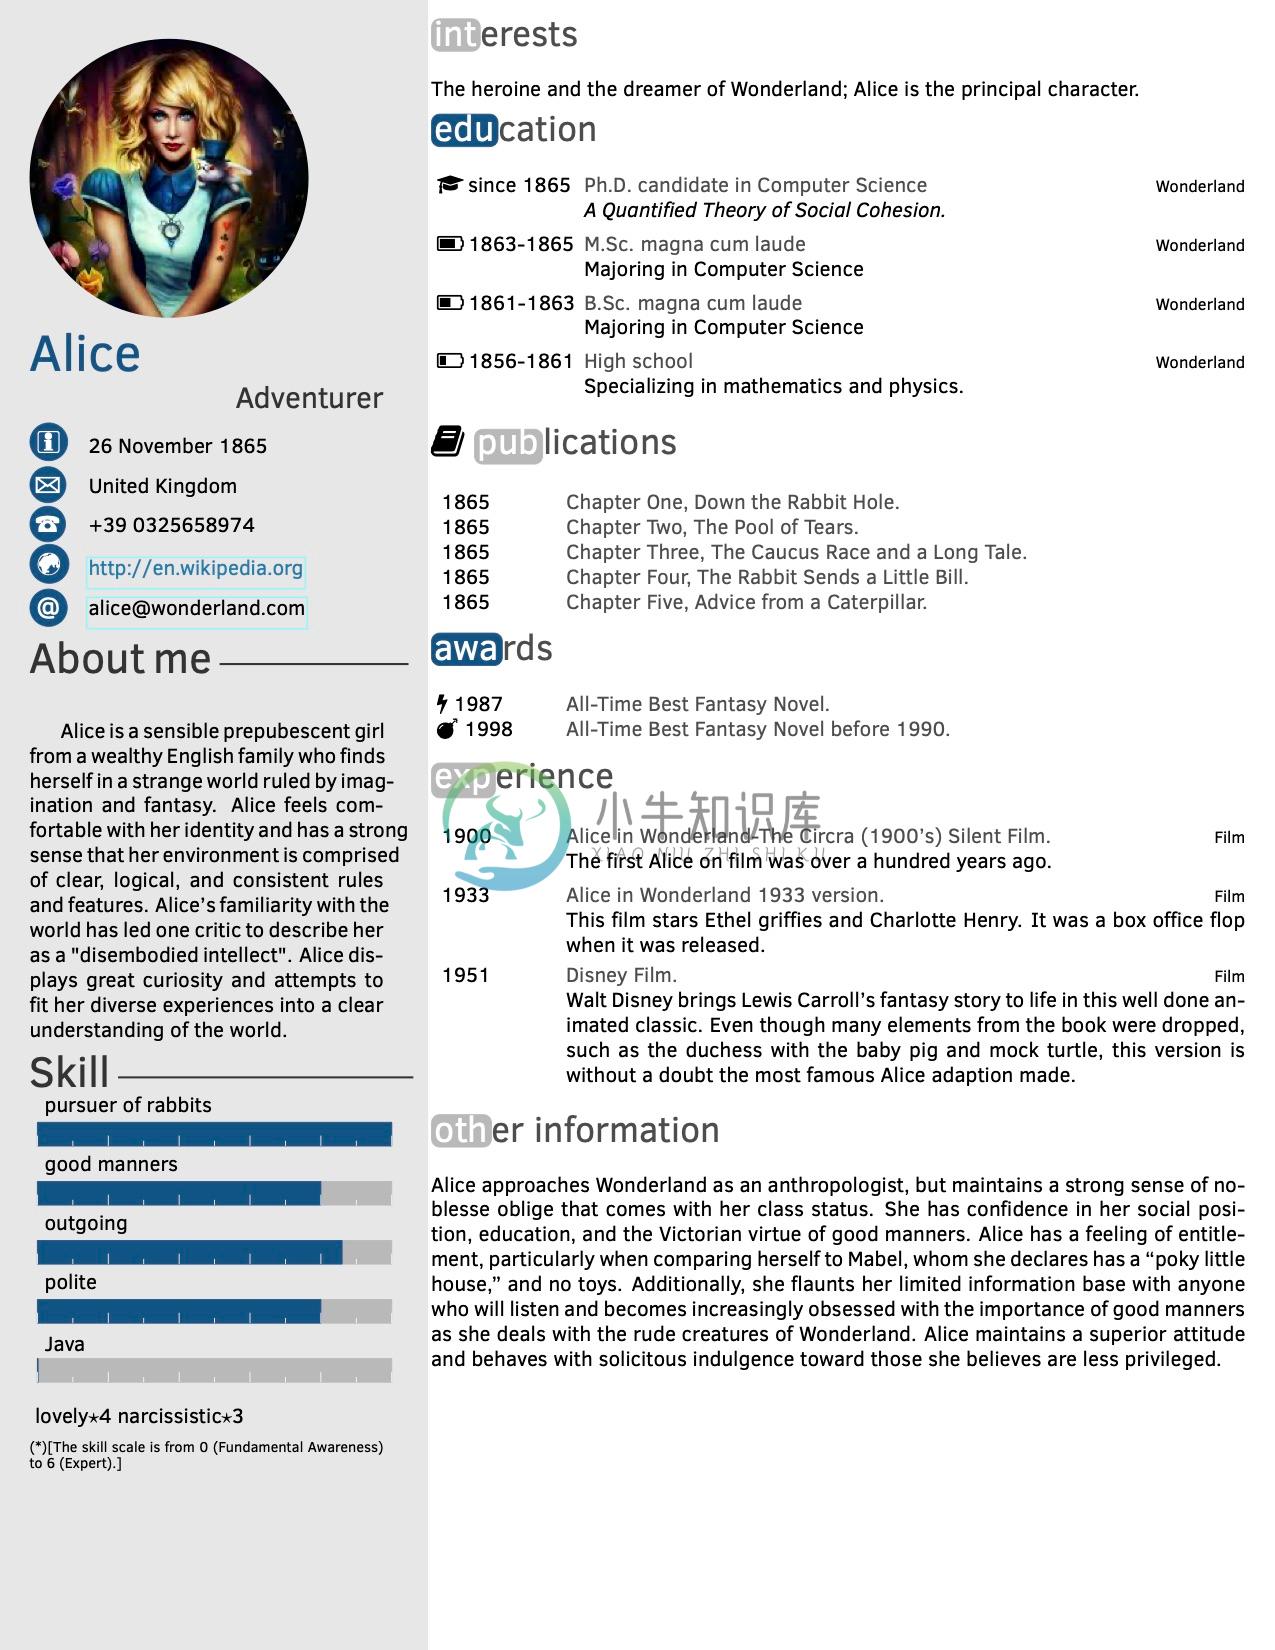
Twenty Seconds Curriculum Vitae in LaTex
HOT!
- Support Fontawesome Icons, new class option
\documentclass[icon]{twentysecondcv}, using the name of the icon available in the documentation of the package here. - The Fontawesome version requires the Fontawesome installed. Notice that the Fontawesome is already available on Overleaf.com.
- Section with Icon:
\sectionicon{icon-name}{section-name}
- Twenty icon items environment
\begin{twentyicon}
  \twentyitemicon
    {icon name}
    {year}
    {title}
    {place}
    {description}
\end{twentyicon}
- Twenty items icon short environment
\begin{twentyshorticon}
  \twentyitemshorticon
    {icon name}
    {year}
    {description}
\end{twentyshorticon}
Curricula Vitae - Résumés
A curriculum vitae, otherwise known as a CV or résumé, is a document used by individuals to communicate their work history, education and skill set. This is a style template for your curriculum written in LaTex. The main goal of this template is to provide a curriculum that is able to survive the résumés screening of "twenty seconds".
The author assumes no responsibility for the topicality, correctness, completeness or quality of the information provided and for the obtained résumés.
This is designed for computer scientists but there is no limitation to use it for résumés in other disciplines.
If you like this curriculum, please don't forget to leave a star, to help the development and improvement.
The basic idea is KISS - Keep It Simple, Stupid.
In a nutshell "It is vain to do with more what can be done with fewer" -- Occam's razor --
This template has been designed to create a "one-page" résumé and is therefore not suitable to create a curriculum of more than one-page.
Please do not try to create a curriculum with more than one-page.
How to describe your experiences?
There are many theories about the résumé screening process of "Big" companies.Resume screeners and the interviewers look in your résumé for:
- Are you smart?
- Can you code (act for what you apply)?
Anyway according to the guidelines of this template you should use a really simple form to describe each item in your résumé:
Accomplished <X> by implementing <Y> which led to <Z>
Here's an example:
Reduced object rendering time by 75% by applying Floyd's algorithm, leading to a 10% reduction in system boot time.
-- Cracking the Coding Interview, Book, Gayle Laakmann Mcdowell --
Toy Résumé with Fontawesome Icons (document class option icon)
Build
This guide will walk you through building your résumé.
Build requirements:
- LaTex installation.
- additionals packages:
- ClearSans, fontenc
- tikz
- xcolor
- textpos
- ragged2e
- etoolbox
- ifmtarg
- ifthen
- pgffor
- marvosym
- parskip
- additionals packages:
Build through GNU Make command
Clean your project résumé.
make clean
Build your project résumé.
make all
-- Alternately you can build through your favorite LaTex editor. --
Environment style and list of commands
The style is divided into two parts. The former is the left sidebar: which contains personal information, profile picture, and information about your professional skills. The second part is the body that should contain details about your academic studies, professional experiences and all the information that you want (remember the KISS principle).
The class is \documentclass[icon]{twentysecondcv}, the icon option enable to use Fontawesome package in sections and twenty items. In order to use the icon option, you need to install the Fontawesome package and use the Fontawesome icon name, available in the package documentation here.
Profile environment
These are the commands to set up the profile information.
Set up the image profile.
\profilepic{path_name}Set up your name.
\cvname{your name}Set up your job profile.
\cvjobtitle{your job title}Set up your date of birth.
\cvdate{date}Set up your address.
\cvaddress{address}Set up your telephone number.
\cvnumberphone{phone number}Set up your email.
\cvmail{email address}Set up your personal home page.
\cvsite{home page address}Set up a brief description of you.
\about{brief description}Set up the skills with chart style. Each skill has to be a
{name/value}pair, where the value is a floating-point value between0and6. This is an agreement for the graphics issues, the0correspond to a Fundamental awareness while6to an Expert awareness level.\skills{{name skill1/5.8},{name skill2/4}}Set up the skills with text style.
\skillstext{{name skill1/5.8},{name skill2/4}}
To create the profile, use the command:
\makeprofile
Body environment
The body document part is composed of sections.In the sections, you can use two kinds of list items.
The first (Twenty items environment) is intended for a list of detailed information with four parts: Data -- Title -- Place -- Description.
The second (Twenty items short environment) is intended for less information (you can customize this list more easily): Data -- Description.
Sections (also wiht icon)
Set up a new section in the body part.
  \section{sction name}
  \section{icon name}{section name}, require the icon option in the document declaration.
Twenty items environment (also wiht icon)
\begin{twenty}
  \twentyitem
    {year}
    {title}
    {place}
    {description}
\end{twenty}

\begin{twentyicon}
  \twentyitemicon
    {icon name}
    {year}
    {title}
    {place}
    {description}
\end{twentyicon}
Twenty items short environment (also wiht icon)
\begin{twentyshort}
  \twentyitemshort
    {year}
    {description}
\end{twentyshort}

\begin{twentyshorticon}
  \twentyitemshorticon
    {icon name}
    {year}
    {description}
\end{twentyshorticon}
Other commands
There are two other fun commands: \icon and \round; that enables to wrap the text in oval shape.
\icon{text}
	\round{text}{color}
Colors
The following colors are defined and used by this class:
-
问题内容: 我是一个大学时代的人,在我的大学里,要呈现任何形式的作业,必须有一个标准的封面(带有大学徽标,课程名称,教授的姓名,我的名字和bla bla bla)。 因此,我有一个.tex文件,该文件会生成我的标准封面pdf。它类似于: 因此,我想知道是否有一种方法可以制作一个Python脚本来询问我的作业标题,课程名称和其余字符串,并使用它们来生成封面。之后,它应编译.tex并使用给定的信息生成
-
本文向大家介绍latex 百合池,包括了latex 百合池的使用技巧和注意事项,需要的朋友参考一下 示例 可以通过lilypond-book命令将LilyPond注释雕刻机与LaTeX一起使用。首先,我们创建一个LaTeX文档(文件扩展名为.lytex),将我们的音乐嵌入到: 然后,我们创建我们的LilyPond文件(.ly),包括lilypond-book-preamble.ly文件(LilyP
-
本文向大家介绍latex基本参考书目(无包)(手动格式化),包括了latex基本参考书目(无包)(手动格式化)的使用技巧和注意事项,需要的朋友参考一下 例 请注意,除非您真的知道为什么,否则您可能不应该这样做。使用指定的软件包(请参见其他示例)是更可取的。
-
本文向大家介绍Android开发学习笔记之通过API接口将LaTex数学函数表达式转化为图片形式,包括了Android开发学习笔记之通过API接口将LaTex数学函数表达式转化为图片形式的使用技巧和注意事项,需要的朋友参考一下 本文将讲解如何通过codecogs.com和Google.com提供的API接口来将LaTeX数学函数表达式转化为图片形式。具体思路如下: (1)通过EditT
-
本文向大家介绍详解VScode 配置为 LaTeX 编辑器(IDE),包括了详解VScode 配置为 LaTeX 编辑器(IDE)的使用技巧和注意事项,需要的朋友参考一下 VScode 配置为 LaTeX IDE 在Windows中,配置VScode作为LaTeX的编辑器(IDE),并使用SumatraPDF预览PDF文件。主要是LaTeX Workshop扩展的设置,如果要使用外部的PDF阅读器
-
本文向大家介绍在Matplotlib图中插入LaTex公式实例,包括了在Matplotlib图中插入LaTex公式实例的使用技巧和注意事项,需要的朋友参考一下 Matplotlib可以无缝的处理LaTex字体,在图中加入数学公式 补充知识:matplotlib用tex写数学公式 废话不多说,直接看代码吧! 以上这篇在Matplotlib图中插入LaTex公式实例就是小编分享给大家的全部内容了,希望


