Flask Google Maps
Easy to use Google Maps in your Flask application
requires
- Jinja
- Flask
- A google api key get here
Contribute
To contribute with the project, clone it, create a virtualenv and install all of you need to dev, see below:
git clone https://github.com/flask-extensions/Flask-GoogleMaps.git
cd Flask-GoogleMaps
poetry use env 3.8  # just to create virtualenv at the first time
poetry shell # activate virtualenv
poetry install  # to install all for dev
pre-commit install # to install pre-commit hooks
Installation
To use in your project just use your dependency manager to install it, with pip is like this:
pip install flask-googlemaps
How it works
Flask-GoogleMaps includes some global functions and template filters in your Jinja environment, also it allows you to use the Map in views if needed.
registering
in your app
from flask import Flask
from flask_googlemaps import GoogleMaps

app = Flask(__name__)

# you can set key as config
app.config['GOOGLEMAPS_KEY'] = "8JZ7i18MjFuM35dJHq70n3Hx4"

# Initialize the extension
GoogleMaps(app)

# you can also pass the key here if you prefer
GoogleMaps(app, key="8JZ7i18MjFuM35dJHq70n3Hx4")
In template
{{googlemap("my_awesome_map", lat=0.23234234, lng=-0.234234234, markers=[(0.12,
-0.45345), ...])}}
That's it! now you have some template filters and functions to use, more details in examples and screenshot below.
Usage
- You can create the map in the view and then send to the template context
- you can use the template functions and filters directly
1. View
from flask import Flask, render_template
from flask_googlemaps import GoogleMaps
from flask_googlemaps import Map

app = Flask(__name__, template_folder=".")
GoogleMaps(app)

@app.route("/")
def mapview():
    # creating a map in the view
    mymap = Map(
        identifier="view-side",
        lat=37.4419,
        lng=-122.1419,
        markers=[(37.4419, -122.1419)]
    )
    sndmap = Map(
        identifier="sndmap",
        lat=37.4419,
        lng=-122.1419,
        markers=[
          {
             'icon': 'http://maps.google.com/mapfiles/ms/icons/green-dot.png',
             'lat': 37.4419,
             'lng': -122.1419,
             'infobox': "<b>Hello World</b>"
          },
          {
             'icon': 'http://maps.google.com/mapfiles/ms/icons/blue-dot.png',
             'lat': 37.4300,
             'lng': -122.1400,
             'infobox': "<b>Hello World from other place</b>"
          }
        ]
    )
    return render_template('example.html', mymap=mymap, sndmap=sndmap)

if __name__ == "__main__":
    app.run(debug=True)
Map() Parameters
- lat: The latitude coordinate for centering the map.
- lng: The longitude coordinate for centering the map.
- zoom: The zoom level. Defaults to
13. - maptype: The map type -
ROADMAP,SATELLITE,HYBRID,TERRAIN. Defaults toROADMAP. - markers: Markers array of tuples having (lat, lng, infobox, icon, label). Defaults to
None. - or markers: a list of dicts containing lat, lng, infobox, icon, label.
- or markers: Markers dictionary with icon urls as keys and markers array as values.
- varname: The instance variable name.
- style: A string containing CSS styles. Defaults to
"height:300px;width:300px;margin:0;". - identifier: The CSS ID selector name.
- cls: The CSS Class selector name. Defaults to
"map". - language: The map language. Defaults to
"en". - region: The map region. Defaults to
"US".
Also controls True or False:
- zoom_control
- maptype_control
- scale_control
- scale_control
- streetview_control
- rotate_control
- fullscreen_control
- scroll_wheel
- collapsible (map collapses by click on varname_collapse button)
- mapdisplay (show a collapsible map by default or not)
- center_on_user_location (using HTML5 Geolocation)
2. Template
<!DOCTYPE html>
<html>
  <head>
    {{"decoupled-map"|googlemap_js(37.4419, -122.1419, markers=[(37.4419,
    -122.1419)])}} {{mymap.js}} {{sndmap.js}}
  </head>
  <body>
    <h1>Flask Google Maps Example</h1>

    <h2>Template function centered, no marker</h2>
    {{googlemap("simple-map", 37.4419, -122.1419)}}

    <h2>Template filter decoupled with single marker</h2>
    {{"decoupled-map"|googlemap_html(37.4419, -122.1419)}}

    <h2>Template function with multiple markers</h2>
    {% with map=googlemap_obj("another-map", 37.4419, -122.1419,
    markers=[(37.4419, -122.1419), (37.4300, -122.1400)]) %} {{map.html}}
    {{map.js}} {% endwith %}

    <h2>First map generated in view</h2>
    {{mymap.html}}

    <h2>Second map generated in view</h2>
    <h3>Example for different icons in multiple markers with infoboxes</h3>
    {{sndmap.html}}
  </body>
</html>
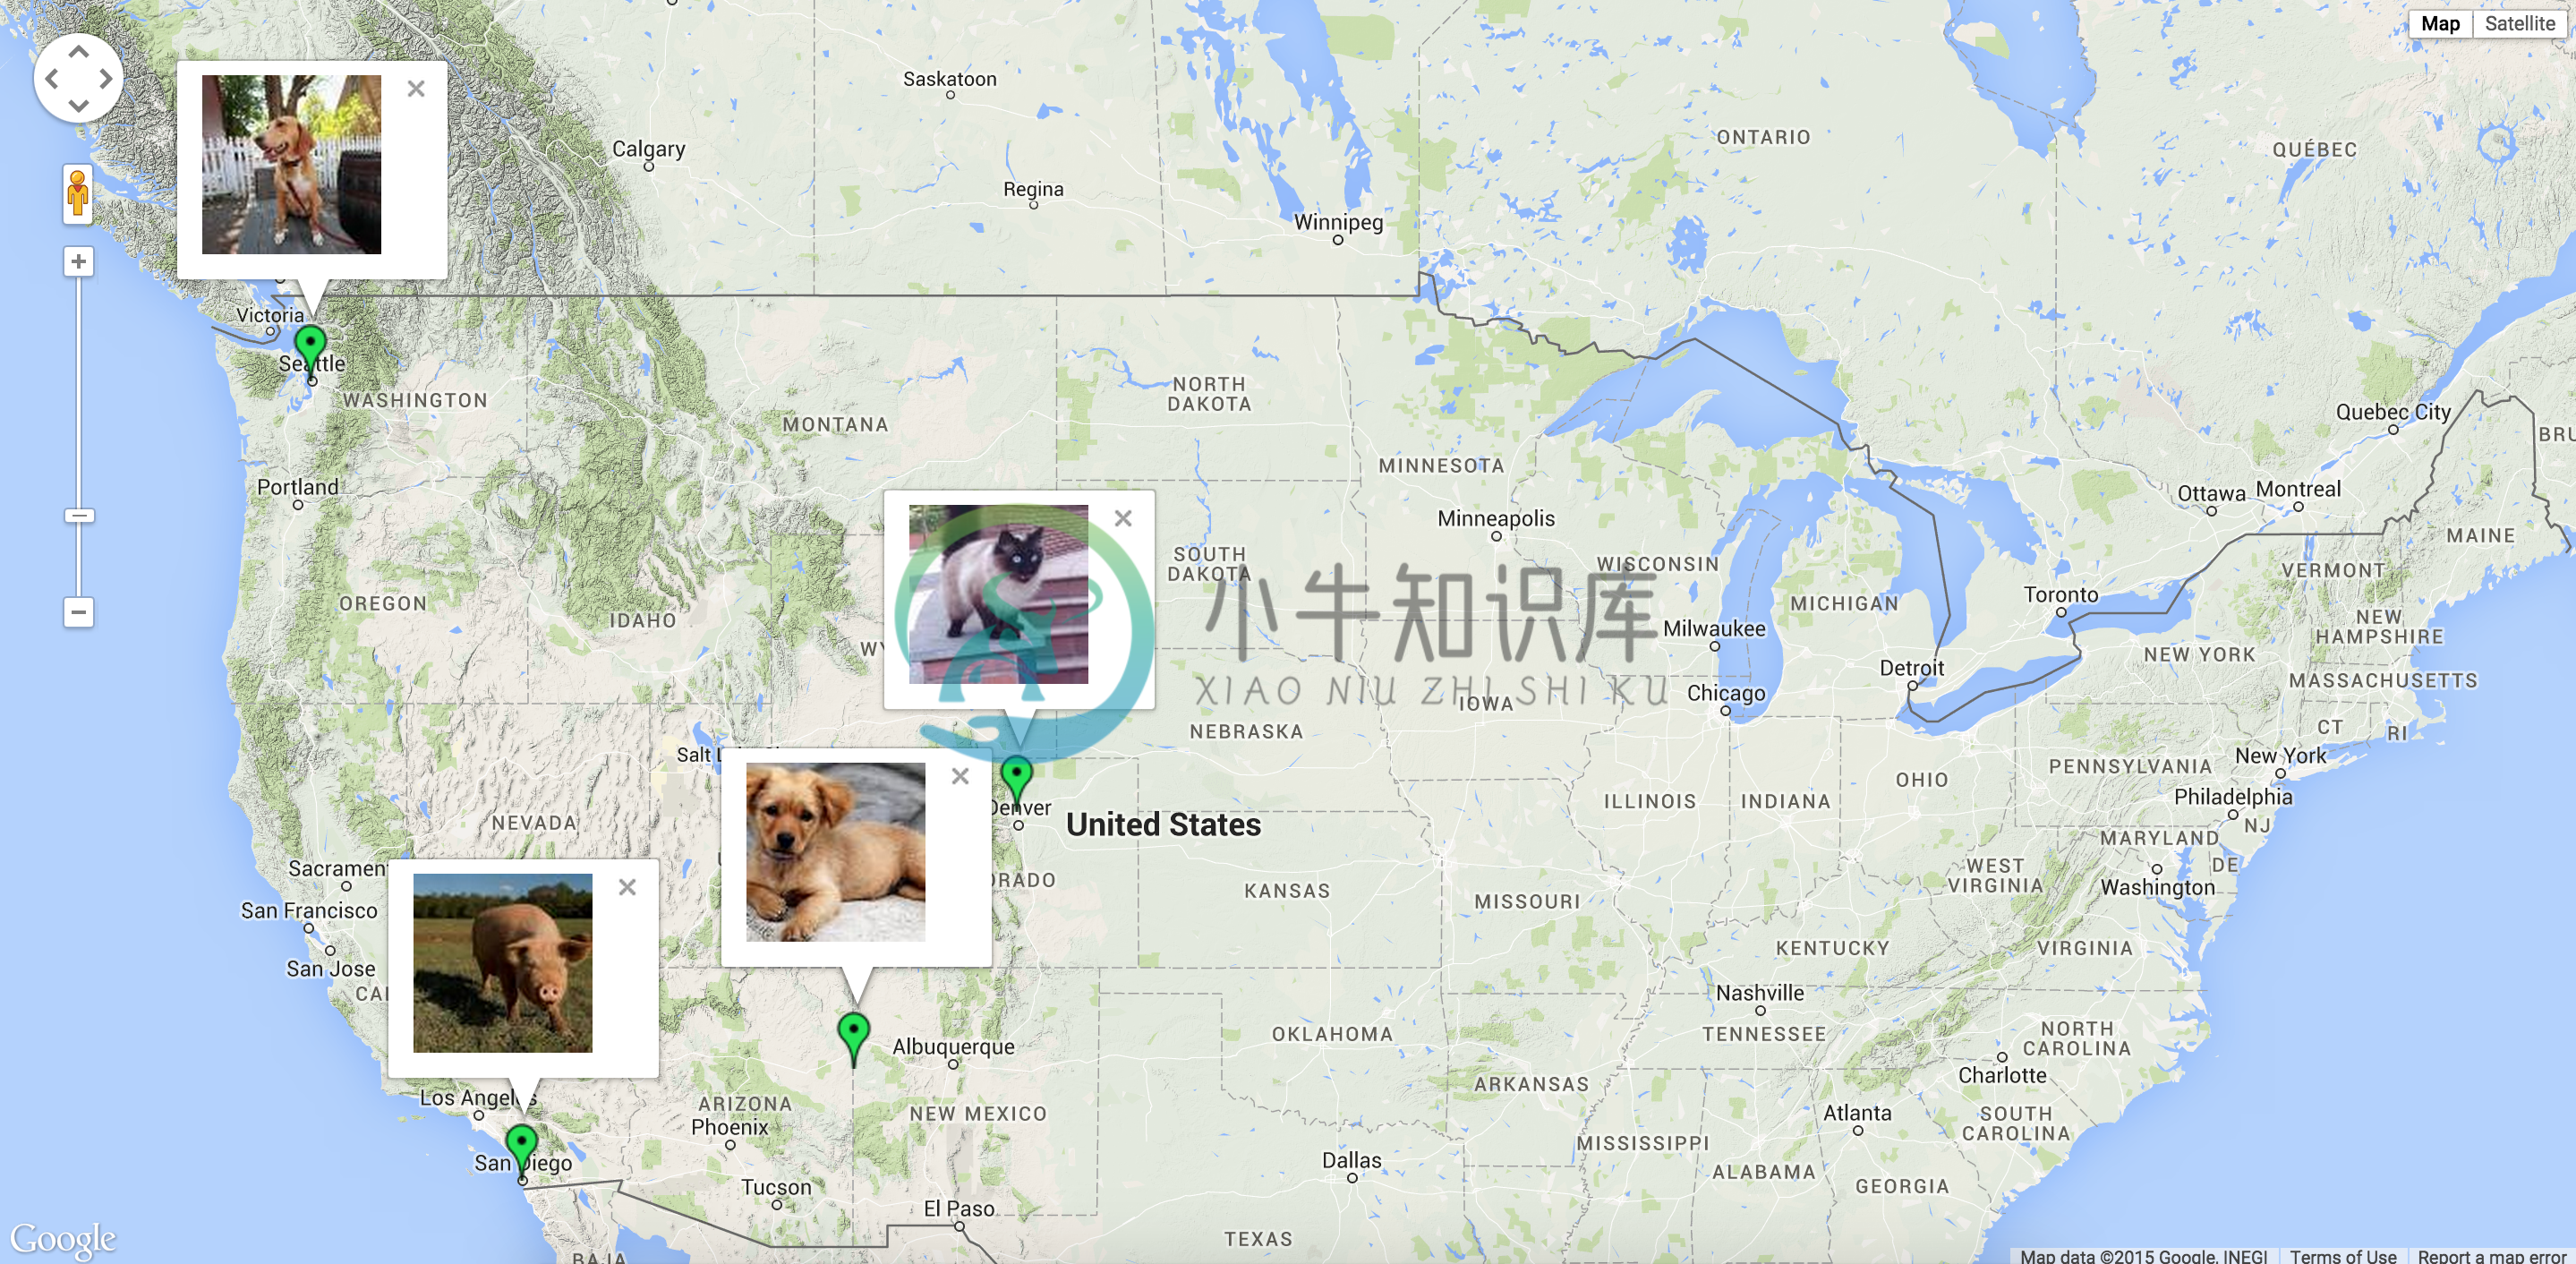
Infobox
Here's an example snippet of code:
Map(
        identifier="catsmap",
        lat=37.4419,
        lng=-122.1419,
        markers=[
            {
                'icon': 'http://maps.google.com/mapfiles/ms/icons/green-dot.png',
                'lat':  37.4419,
                'lng':  -122.1419,
                'infobox': "<img src='cat1.jpg' />"
            },
            {
                'icon': 'http://maps.google.com/mapfiles/ms/icons/blue-dot.png',
                'lat': 37.4300,
                'lng': -122.1400,
                'infobox': "<img src='cat2.jpg' />"
            },
            {
                'icon': 'http://maps.google.com/mapfiles/ms/icons/yellow-dot.png',
                'lat': 37.4500,
                'lng': -122.1350,
                'infobox': "<img src='cat3.jpg' />"
            }
        ]
    )
Which results in something like the following map:
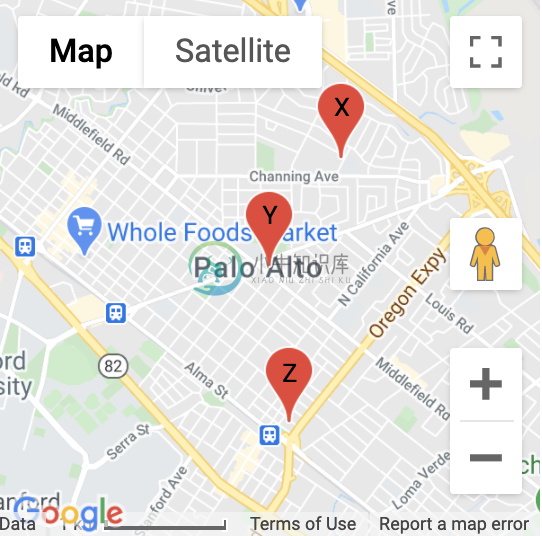
Label
Here's an example snippet of code:
Map(
        identifier="labelsmap",
        lat=37.4419,
        lng=-122.1419,
        markers=[
            {
                'lat': 37.4500,
                'lng': -122.1350,
                'label': "X"
            },
            {
                'lat':  37.4419,
                'lng':  -122.1419,
                'label': "Y"
            },
            {
                'lat': 37.4300,
                'lng': -122.1400,
                'label': "Z"
            }
        ]
    )
Which results in something like the following map:
Fit all markers within bounds
Allow users to easily fit all markers within view on page load
Without bounds
@app.route('/map-unbounded/')
def map_unbounded():
"""Create map with markers out of bounds."""
    locations = []    # long list of coordinates
    map = Map(
        lat=locations[0].latitude,
        lng=locations[0].longitude,
        markers=[(loc.latitude, loc.longitude) for loc in locations]
    )
    return render_template('map.html', map=map)
With bounds
@app.route('/map-bounded/')
def map_bounded():
"""Create map with all markers within bounds."""
    locations = []    # long list of coordinates
    map = Map(
        lat=locations[0].latitude,
        lng=locations[0].longitude,
        markers=[(loc.latitude, loc.longitude) for loc in locations],
        fit_markers_to_bounds = True
    )
    return render_template('map.html', map=map)
Geocoding and Reverse Geocoding
from flask_googlemaps import get_address, get_coordinates
API_KEY = 'YOUR API KEY'

#Reverse Geocoding: getting detailed address from coordinates of a location
print(get_address(API_KEY,22.4761596,88.4149326))
#output: {'zip': '700150', 'country': 'India', 'state': 'West Bengal', 'city': 'Kolkata', 'locality': 'Kolkata', 'road': 'Techno City', 'formatted_address': 'Sirin Rd, Mauza Ranabhutia, Techno City, Kolkata, West Bengal 700150, India'}


#Geocoding: getting coordinates from address text
print(get_coordinates(API_KEY,'Netaji Subhash Engineering College Kolkata'))
#output: {'lat': 22.4761596, 'lng': 88.4149326}
Run the example app
$ git clone https://github.com/flask-extensions/Flask-GoogleMaps
$ cd Flask-GoogleMaps/
If you have Poetry
$ poetry install
without poetry
$ pip install --upgrade pip
$ pip install -e .
$ pip install -r requirements.txt
Run it.
$ FLASK_GOOGLEMAPS_KEY="YourKeyHERE" FLASK_APP=examples/example.py flask run
running on localhost:5000 .....
Access: http://localhost:5000/ and http://localhost:5000/fullmap
Contribute with the Google Maps API
Please see this page developers.google.com/maps/documentation/javascript/tutorial and contribute!
-
运行项目 开始 Hello world 最简单的测试 from flask import Flask app = Flask(__name__) @app.route('/') def index(): return 'Hello World' if __name__ == '__main__': app
-
todo flask flask add_url_rule vs @app.route() g request app.app_context sqlalchemy db.create_all() can create table db.drop_all() can delete table sql flask sqlalchemy execute raw sql db.engine.execut
-
可以使用 flask --help 和 flask run --help 参考:http://www.weixueyuan.net/a/754.html Flask 环境变量 FLASK_APP 说明:https://foofish.net/flask_app.html
-
问题内容: 在官方的快速入门中,建议在使用单个 模块 时使用: 2. …如果您使用的是单个模块(如本例所示),则应使用,因为取决于它是作为应用程序启动还是作为模块导入,其名称将有所不同(与实际导入名称不同)。… 但是,在他们的API文档中,当我的应用程序为 软件包 时,建议进行硬编码: 因此,您在此处提供的内容很重要。如果使用单个模块,则始终为正确的值。但是,如果您使用的是包,通常建议在其中硬编码
-
在前面,我们介绍了 REST Web 服务,并使用 Flask 提供服务。这里,我们使用第三方库 Flask-RESTful,它使得在 Flask 中提供 REST 服务变得更加简单。 安装 使用 pip 安装: $ pip install flask-restful 使用 下面我们主要使用官方文档的例子进行说明。 Hello World 我们先来看一个简单的例子。 # -*- coding: u
-
Bootstrap 是 Twitter 开源的一个 CSS/HTML 框架,它让 Web 开发变得更加迅速,简单。要想在我们的 Flask 应用中使用 Boostrap,有两种方案可供选择: 第 1 种,在我们的 Jinja 模板中直接引入 Bootstrap 层叠样式表 (CSS) 和 JavaScript 文件,比如 bootstrap.min.css,bootstrap.min.js; 第
-
在 Web 应用中,我们经常需要保护我们的 api,以避免非法访问。比如,只允许登录成功的用户发表评论等。Flask-HTTPAuth 扩展可以很好地对 HTTP 的请求进行认证,不依赖于 Cookie 和 Session。本文主要介绍两种认证的方式:基于密码和基于令牌 (token)。 安装 使用 pip 安装: $ pip install Flask-HTTPAuth 基于密码的认证 为了简化
-
假设你的 Web 服务对于某些请求比较耗时,而该请求的返回结果在较短的时间内(比如 5 分钟内)都是足够有效的,这时你能想到什么方法去改善这种状况呢?缓存?对,至少这是一种提高性能的最简单的方法。 Flask 本身不提供缓存功能,但是作为 Flask 核心的 Werkzeug 框架则提供了一个简单的缓存对象 SimpleCache,它将缓存项存放在 Python 解释器的内存中。使用 Simple
-
MongoDB 是一个文档型数据库,是 NoSQL (not only SQL) 的一种,具有灵活、易扩展等诸多优点,受到许多开发者的青睐。MongoEngine 是一个用来操作 MongoDB 的 ORM 框架,如果你不知道什么是 ORM,可以参考 Flask-SQLAlchemy 一节。在 Flask 中,我们可以直接使用 MongoEngine,也可使用 Flask-MongoEngine


