YOLOv5
Documentation
See the YOLOv5 Docs for full documentation on training, testing and deployment.
Quick Start Examples
Install
Python>=3.6.0 is required with allrequirements.txt installed includingPyTorch>=1.7:
$ git clone https://github.com/ultralytics/yolov5
$ cd yolov5
$ pip install -r requirements.txt
Inference
Inference with YOLOv5 and PyTorch Hub. Models automatically downloadfrom the latest YOLOv5 release.
import torch

# Model
model = torch.hub.load('ultralytics/yolov5', 'yolov5s')  # or yolov5m, yolov5l, yolov5x, custom

# Images
img = 'https://ultralytics.com/images/zidane.jpg'  # or file, Path, PIL, OpenCV, numpy, list

# Inference
results = model(img)

# Results
results.print()  # or .show(), .save(), .crop(), .pandas(), etc.
Inference with detect.py
detect.py runs inference on a variety of sources, downloading models automatically fromthe latest YOLOv5 release and saving results to runs/detect.
$ python detect.py --source 0  # webcam
                            file.jpg  # image
                            file.mp4  # video
                            path/  # directory
                            path/*.jpg  # glob
                            'https://youtu.be/NUsoVlDFqZg'  # YouTube
                            'rtsp://example.com/media.mp4'  # RTSP, RTMP, HTTP stream
Training
Run commands below to reproduce resultson COCO dataset (dataset auto-downloads onfirst use). Training times for YOLOv5s/m/l/x are 2/4/6/8 days on a single V100 (multi-GPU times faster). Use thelargest --batch-size your GPU allows (batch sizes shown for 16 GB devices).
$ python train.py --data coco.yaml --cfg yolov5s.yaml --weights '' --batch-size 64
                                         yolov5m                                40
                                         yolov5l                                24
                                         yolov5x                                16

Tutorials
- Train Custom Data
�� RECOMMENDED - Tips for Best Training Results
☘️ RECOMMENDED - Weights & Biases Logging
�� NEW - Roboflow for Datasets, Labeling, and Active Learning
�� NEW - Multi-GPU Training
- PyTorch Hub
⭐ NEW - TorchScript, ONNX, CoreML Export
�� - Test-Time Augmentation (TTA)
- Model Ensembling
- Model Pruning/Sparsity
- Hyperparameter Evolution
- Transfer Learning with Frozen Layers
⭐ NEW - TensorRT Deployment
Environments
Get started in seconds with our verified environments. Click each icon below for details.
Integrations
| Weights and Biases | Roboflow -
|
|---|---|
| Automatically track and visualize all your YOLOv5 training runs in the cloud with Weights & Biases | Label and automatically export your custom datasets directly to YOLOv5 for training with Roboflow |
Why YOLOv5
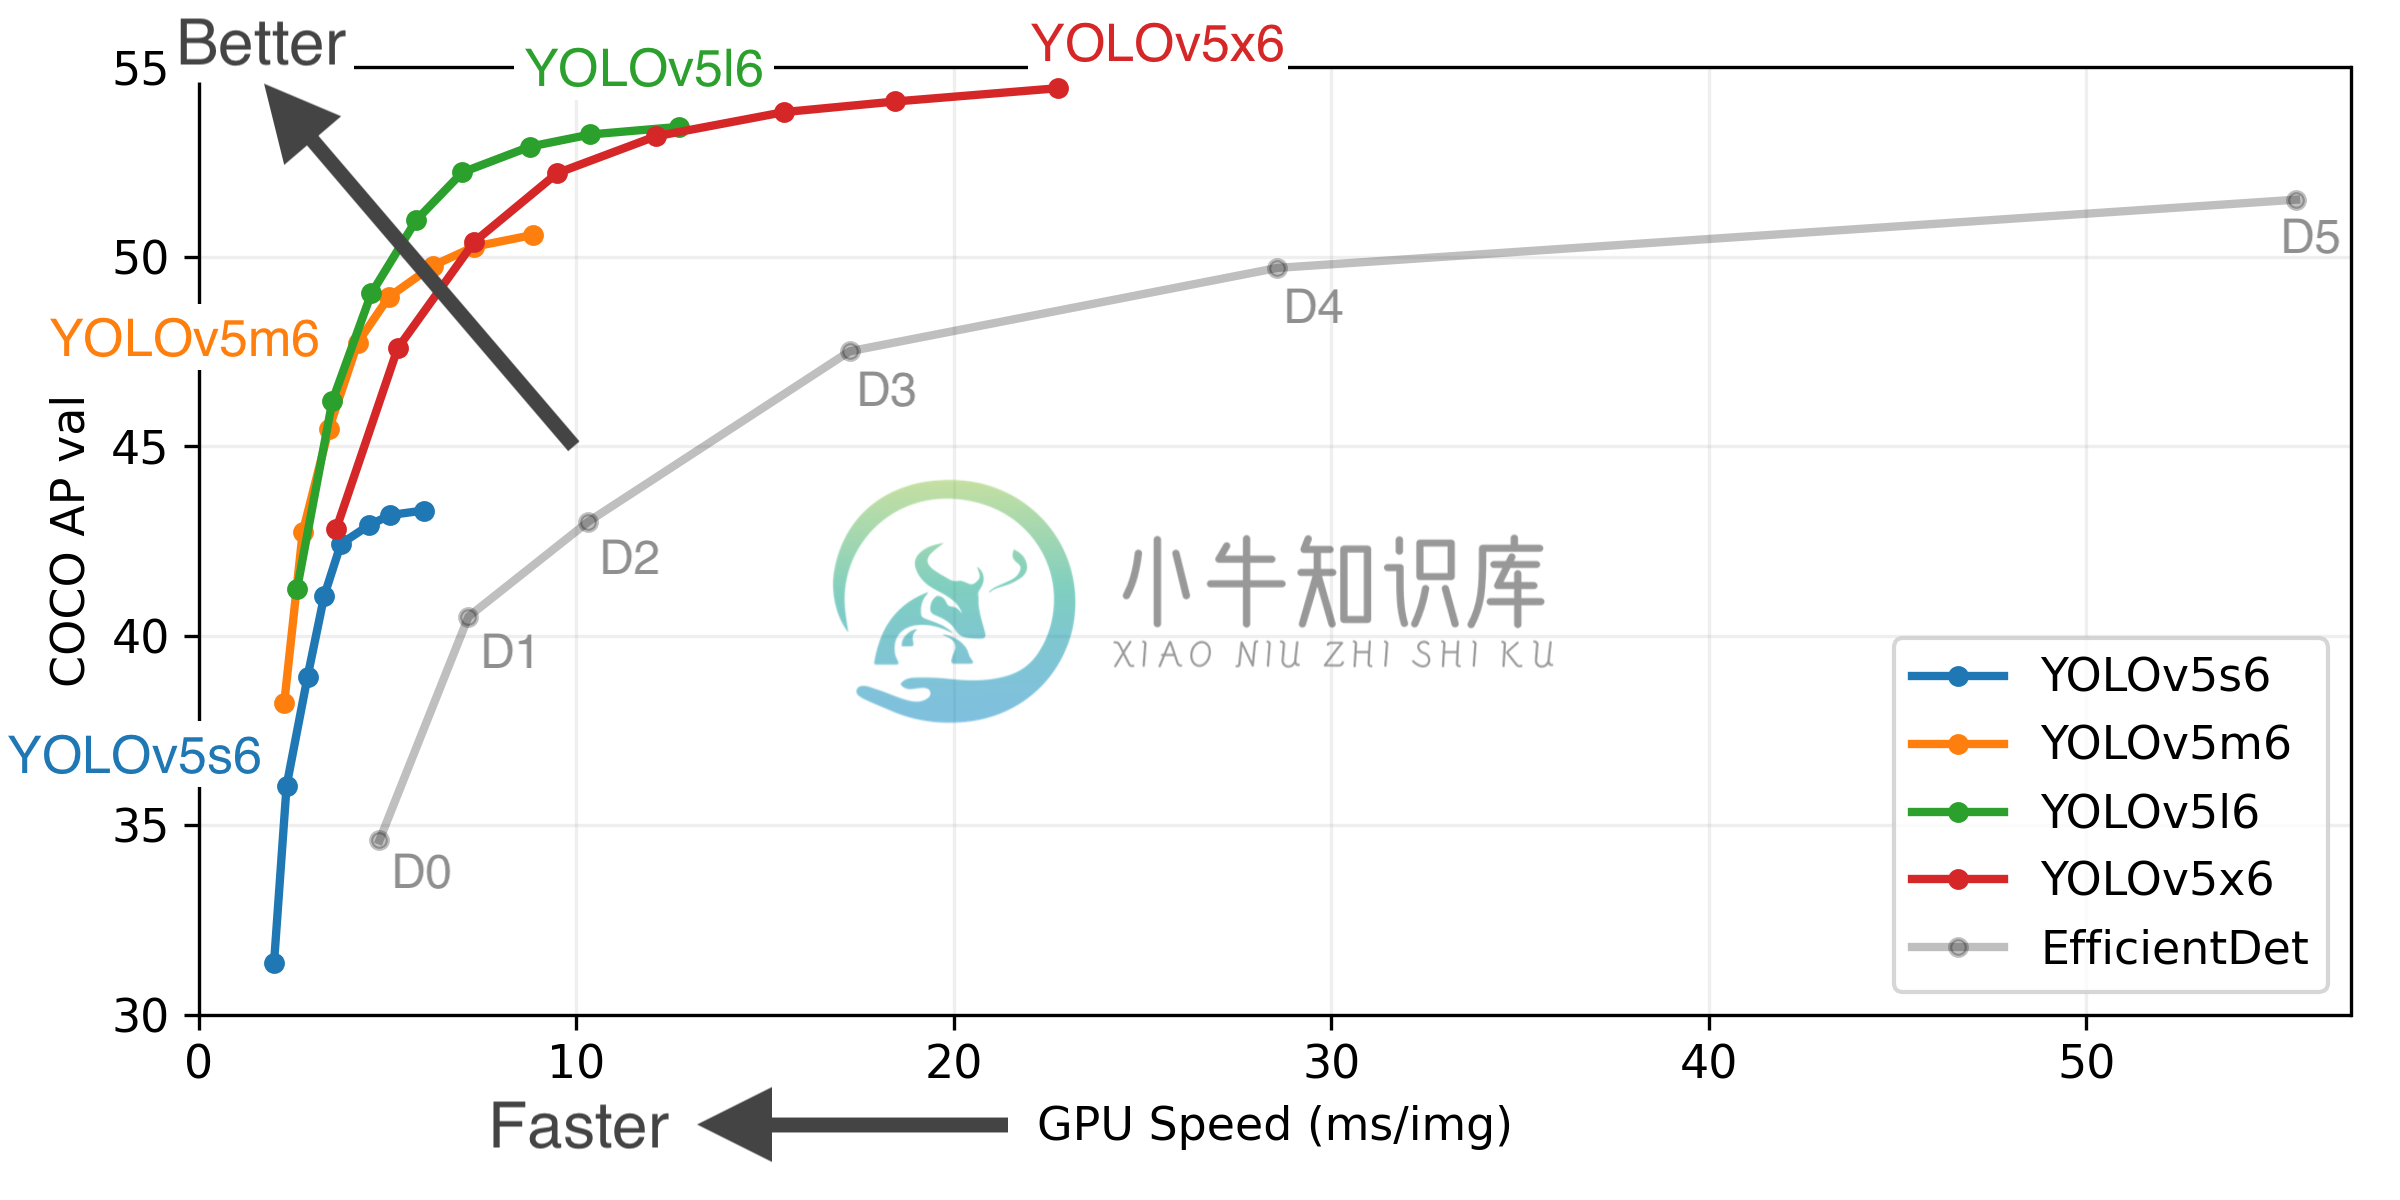
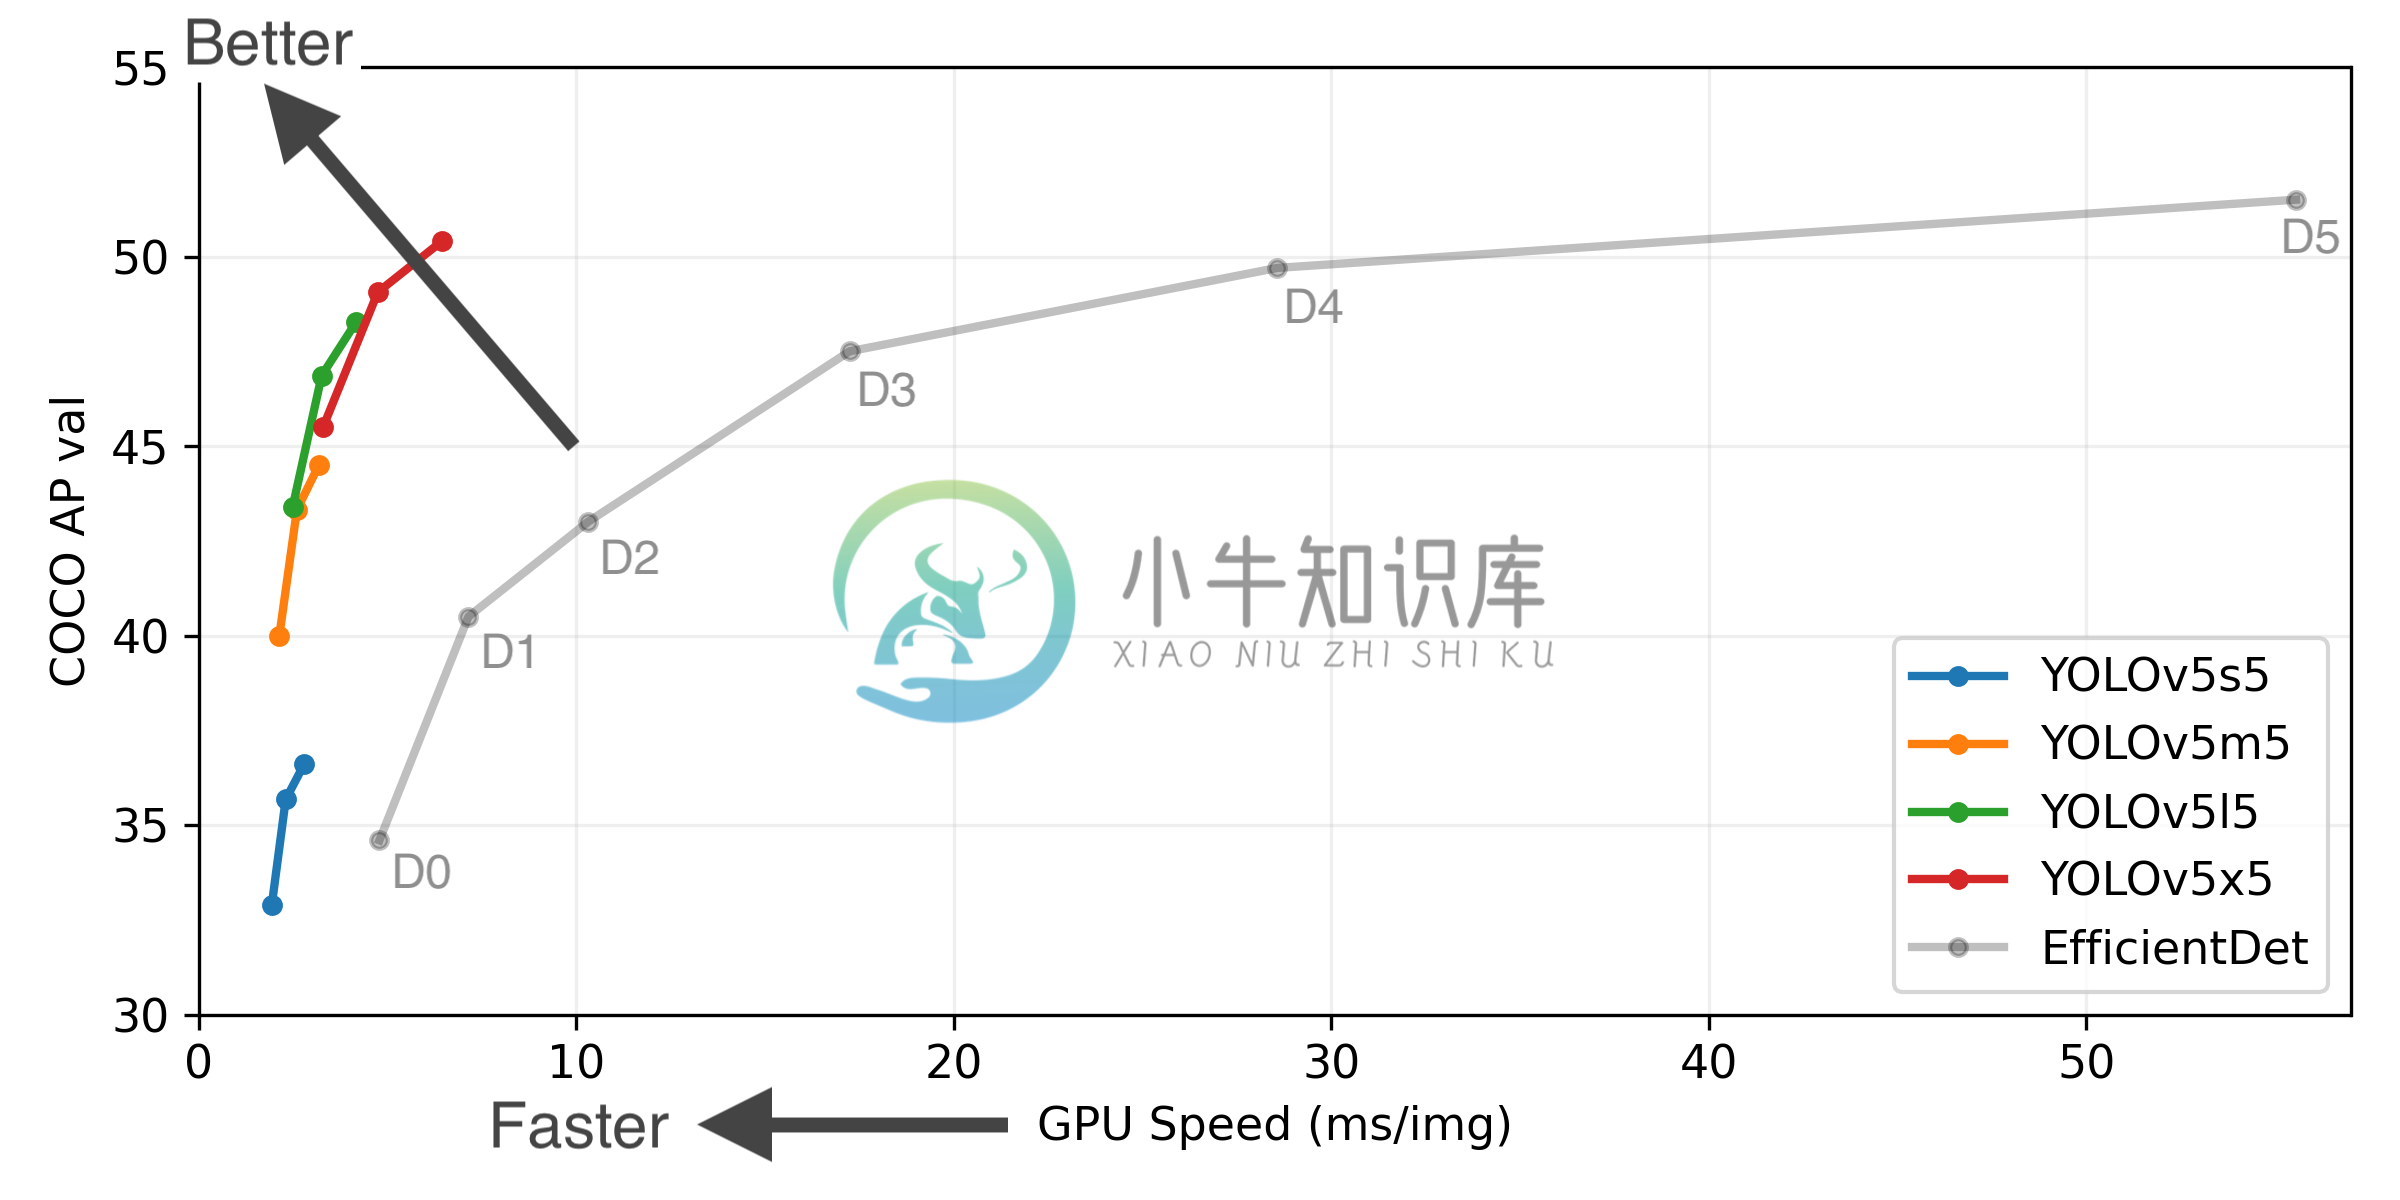
Figure Notes (click to expand)
- GPU Speed measures end-to-end time per image averaged over 5000 COCO val2017 images using a V100 GPU with batch size32, and includes image preprocessing, PyTorch FP16 inference, postprocessing and NMS.
- EfficientDet data from google/automl at batch size 8.
- Reproduce by
python val.py --task study --data coco.yaml --iou 0.7 --weights yolov5s6.pt yolov5m6.pt yolov5l6.pt yolov5x6.pt
Pretrained Checkpoints
| Model | size (pixels) |
mAPval 0.5:0.95 |
mAPtest 0.5:0.95 |
mAPval 0.5 |
Speed V100 (ms) |
params (M) |
FLOPs 640 (B) |
|
|---|---|---|---|---|---|---|---|---|
| YOLOv5s | 640 | 36.7 | 36.7 | 55.4 | 2.0 | 7.3 | 17.0 | |
| YOLOv5m | 640 | 44.5 | 44.5 | 63.1 | 2.7 | 21.4 | 51.3 | |
| YOLOv5l | 640 | 48.2 | 48.2 | 66.9 | 3.8 | 47.0 | 115.4 | |
| YOLOv5x | 640 | 50.4 | 50.4 | 68.8 | 6.1 | 87.7 | 218.8 | |
| YOLOv5s6 | 1280 | 43.3 | 43.3 | 61.9 | 4.3 | 12.7 | 17.4 | |
| YOLOv5m6 | 1280 | 50.5 | 50.5 | 68.7 | 8.4 | 35.9 | 52.4 | |
| YOLOv5l6 | 1280 | 53.4 | 53.4 | 71.1 | 12.3 | 77.2 | 117.7 | |
| YOLOv5x6 | 1280 | 54.4 | 54.4 | 72.0 | 22.4 | 141.8 | 222.9 | |
| YOLOv5x6 TTA | 1280 | 55.0 | 55.0 | 72.0 | 70.8 | - | - |
Table Notes (click to expand)
- All checkpoints are trained to 300 epochs with default settings and hyperparameters.
- APtest denotes COCO test-dev2017 server results, all other AP resultsdenote val2017 accuracy.
- mAP values are for single-model single-scale unless otherwise noted.
Reproduce bypython val.py --data coco.yaml --img 640 --conf 0.001 --iou 0.65 - Speed averaged over 5000 COCO val2017 images using aGCP n1-standard-16 V100 instance, andincludes FP16 inference, postprocessing and NMS.
Reproducebypython val.py --data coco.yaml --img 640 --conf 0.25 --iou 0.45 --half - TTA Test Time Augmentation includes reflection and scale.
Reproduce bypython val.py --data coco.yaml --img 1536 --iou 0.7 --augment
Contribute
We love your input! We want to make contributing to YOLOv5 as easy and transparent as possible. Please seeour Contributing Guide to get started, and fill outthe YOLOv5 Survey to providethoughts and feedback on your experience with YOLOv5. Thank you!
Contact
For issues running YOLOv5 please visit GitHub Issues. For business orprofessional support requests please visit https://ultralytics.com/contact.
-
1、前言 YOLOv5项目地址:ultralytics/yolov5 项目自发布以来,直到现在仍然在不断改进模型、项目。作者的更新频率很大,很多问题都能够及时解决,当然问题也很多!到写稿此时,项目的device参数仍然无法正常工作,查看源码,作者的代码写的GPU设备控制比较复杂,修改源码也没有解决,可能我里解决就差一步了吧!在项目提交bug后,得到作者的及时回应,但是最后仍然没有解决。难道使用
-
tensorrt检测加跟踪: YoloV5_JDE_TensorRT_for_Track:基于张量的多目标跟踪库-源码_jde多目标跟踪-其它代码类资源-CSDN下载 关于tensorboard: 安装: torch1.8.0以上,自带tensorboard 低版本可能没有,单独安装: pip install tensorboardX 调用: from tensorboardXimport Sum
-
yolov5中anchors的保存/读取 训练样本不同时,yolov5可能会重新计算anchors,这些anchors将保存在模型权重文件中,直接使用detect.py输出时会自动加载计算,但在某些任务(如进行板端后处理过程中),还是需要获取到这些anchors值。 如何快速查看 可以运行detect.py,运行到pre=model()前,查看model.model.state_dict()的值,
-
0 1 2 3 4 5 6 7 8 9 person bicycle ‘car’ ‘motorcycle’ ‘airplane’ ‘bus’ ‘train’ ‘truck’ ‘boat’ ‘traffic light’ 10 11 12 13 14 15 16 17 18 19 ‘fire hydrant’, ‘stop sign’, ‘parking meter’, ‘bench’, ‘bird
-
tfcoreml TensorFlow (TF) to CoreML Converter Dependencies tensorflow >= 1.5.0 coremltools >= 0.8 numpy >= 1.6.2 protobuf >= 3.1.0 six >= 1.10.0 Installation Install From Source To get the latest versi
-
ONNX,即 Open Neural Network Exchange ,是微软和 Facebook 发布的一个深度学习开发工具生态系统,旨在让 AI 开发人员能够随着项目发展而选择正确的工具。 ONNX 所针对的是深度学习开发生态中最关键的问题之一,在任意一个框架上训练的神经网络模型,无法直接在另一个框架上用。开发者需要耗费大量时间精力把模型从一个开发平台移植到另一个。因此,如何实现不同框架之间
-
Since iOS 11, Apple released Core ML framework to help developers integrate machine learning models into applications. The official documentation We've put up the largest collection of machine learnin
-
ONNX Runtime 是一个跨平台的推理和训练机器学习加速器。 ONNX Runtime 推理可以实现更快的客户体验和更低的成本,支持PyTorch和TensorFlow/Keras等深度学习框架的模型,以及scikit-learn、LightGBM、XGBoost等经典机器学习库。ONNX运行时与不同的硬件、驱动程序和操作系统兼容,并通过利用硬件加速器(如适用)以及图形优化和转换,提供最佳性
-
Kaldi-ONNX 是一个将 Kaldi 的模型文件转换为 ONNX 模型的工具。 转换得到的 ONNX 模型可以借助 MACE 框架部署到 Android、iOS、Linux 或者 Windows 设备端进行推理运算。 此工具支持 Kaldi 的 Nnet2 和 Nnet3 模型,大部分 Nnet2 和 Nnet3 组件都已支持。此外,针对 Nnet3, 这个工具也支持将部分描述符(Descr
-
译者:冯宝宝 本教程将向您展示如何使用ONNX将已从PyTorch导出的神经模型传输模型转换为Apple CoreML格式。这将允许您在Apple设备上轻松运行深度学习模型,在这种情况下,可以从摄像机直播演示。 什么是ONNX ONNX(开放式神经网络交换)是一种表示深度学习模型的开放格式。借助ONNX,AI开发人员可以更轻松地在最先进的工具之间移动模型,并选择最适合它们的组合。ONNX由合作伙伴
-
译者:冯宝宝 在本教程中,我们将介绍如何使用ONNX将PyTorch中定义的模型转换为ONNX格式,然后将其加载到Caffe2中。一旦进入Caffe2,我们就可以运行模型来仔细检查它是否正确导出,然后我们展示了如何使用Caffe2功能(如移动导出器)在移动设备上执行模型。 在本教程中,你需要安装onnx和Caffe2。您可以使用pip install onnx获取onnx的二进制版本。 注意: 本
-
最近在搞国产 GPU 的适配 用的 GPU 是 ascend310 遇到一个问题,网上说的都是什么离线模型使用 但是,我想知道的是这个 om 可以用 python 调用推理吗? 比如 onnx 模型可以用 onnxruntime 包调用推理 但是华为的 om 模型怎么用 python 调用?


