NativeScript WebView Utils plugin
Add request headers to a NativeScript WebView. Perhaps more utils later.
For NativeScript versions older than 7, use a plugin version older than 4.0.0.
Installation
From the command prompt go to your app's root folder and execute:
tns plugin add nativescript-webview-utils
Usage
Demo app (XML + TypeScript)
You can run the demo app from the root of the project by typing npm run demo.ios or npm run demo.android.
API
addHeaders
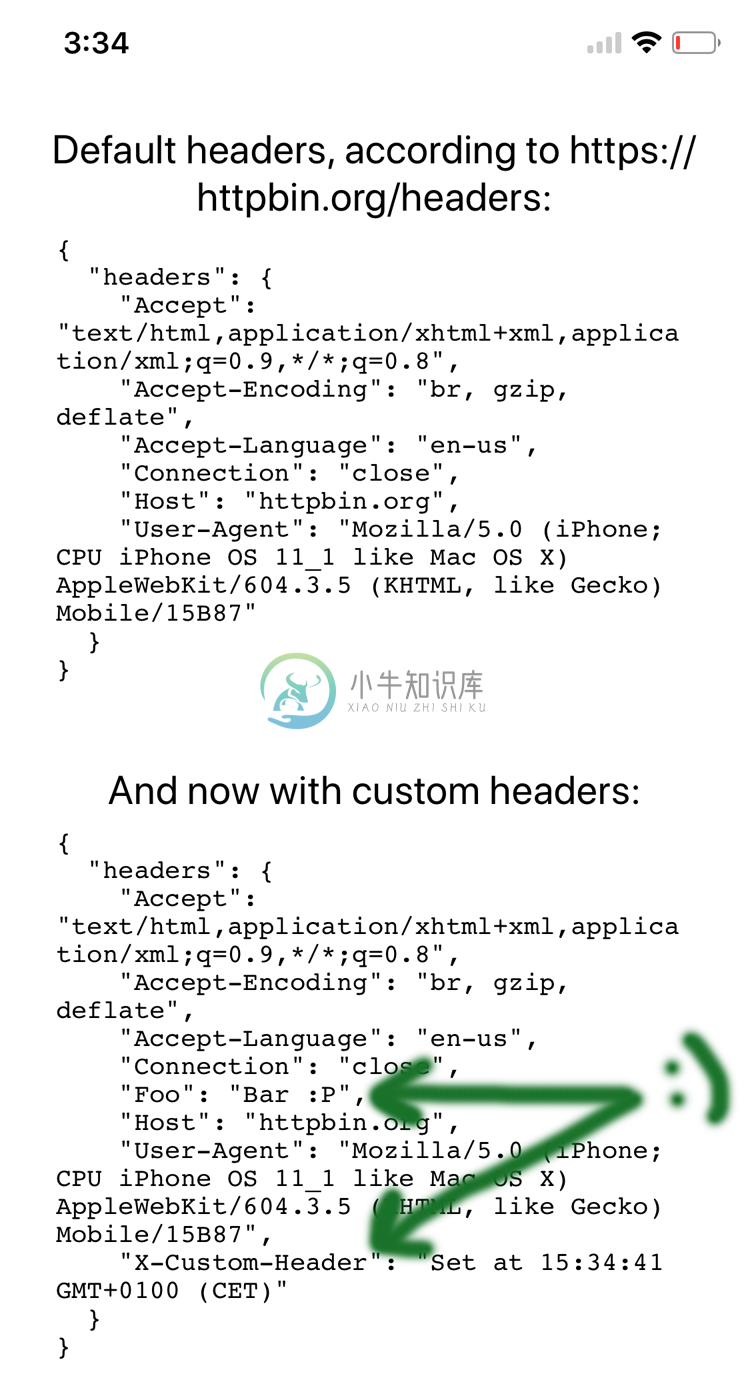
If you're loading a page that requires you to send additional headers (for security perhaps),this function allows you to dynamically inject those to any links within the webview.
NativeScript with Angular
<WebView [src]="someSource" (loaded)="webViewLoaded($event)"></WebView>
import { EventData } from "tns-core-modules/data/observable";
import { WebView } from "tns-core-modules/ui/web-view";
import { WebViewUtils } from "nativescript-webview-utils";

export class MyComponent {
  someSource: string = "https://httpbin.org/headers";

  webViewLoaded(args: EventData): any {
    const webView: WebView = <WebView>args.object;
    const headers: Map<string, string> = new Map();
    headers.set("Foo", "Bar :P");
    headers.set("X-Custom-Header", "Set at " + new Date().toTimeString());
    WebViewUtils.addHeaders(webView, headers);
  }
}
NativeScript with XML
<WebView id="webviewWithCustomHeaders" loaded="webViewLoaded" height="360" src="https://httpbin.org/headers"/>
// then add a few headers in the associated JS / TS file like this:
import { WebViewUtils } from 'nativescript-webview-utils';
import { WebView } from 'tns-core-modules/ui/web-view';
import * as observable from 'tns-core-modules/data/observable';

export function webViewLoaded(args: observable.EventData) {
  const wv: WebView = <WebView>args.object;
  const headers: Map<string, string> = new Map();
  headers.set("Foo", "Bar :P");
  headers.set("X-Custom-Header", "Set at " + new Date().toTimeString());
  WebViewUtils.addHeaders(wv, headers);
}
setUserAgent
This method was removed in 2.0.0 because it caused bugs when addHeaders was used as well.
You should now use addHeaders and set the User-Agent header:
import { WebViewUtils } from 'nativescript-webview-utils';
import { WebView } from 'tns-core-modules/ui/web-view';
import * as observable from 'tns-core-modules/data/observable';

export function webViewForUserAgentLoaded(args: observable.EventData) {
  const wv: WebView = <WebView>args.object;
  const headers: Map<string, string> = new Map();
  headers.set("User-Agent", "My Awesome User-Agent!"); // this line!
  WebViewUtils.addHeaders(wv, headers);
}
Credits
Quite some code was borrowed from this repo.
-
先在项目中安装: yarn add react-native-webview 或者 npm install --save react-native-webview ios下可能有如下错误: Invariant Violation: requireNativeComponent: "RNCWebView" was not found in the UIManager 去ios文件夹下,执行 po
-
native与H5的交互 1、JS与native的交互 JS与native的交互需要用到WebViewJavascriptBridge来交互,其实底层就是WebView。 //JS端 <script> Var utilBridge = “”; function connectWebViewJavascriptBridge(callback) { if (window.WebV
-
前言 最近在使用React-Native开发一个App,遇见一个问题,Webview组件根据url来加载页面,但是这样导致的一个问题页面加载的时间有点长,我想优化一下,因为页面只要是一些内容展示,我想将html放在本机上渲染,这样就减少了网络请求带来的延迟。但由于之前并没有学习过Android和Ios的知识,所以在解决这个问题的时候还是花了点时间的,当初用rn也是被他的宣传给唬了,不懂点原生的还是
-
可以通过本地文件、url等方式。 NSString *htmlPath = [[NSBundle mainBundle] pathForResource:@"index" ofType:@"html"]; NSURLRequest *request = [NSURLRequest requestWithURL:[NSURL fileURLWithPath:htmlPath]]; [self.web
-
react-native WebView组件使用本地html时候,一般都是这样使用 var source = require('../html/my.html') : <WebView source={source} /> 在debug模式下,android和ios是没有问题的 然而,在release模式下,也就是打包的时候,安卓会无法读取到html路径,导致无法加载成功! 在网上查找一番资
-
setContentView (R .layout .activity_main); mWebView = (WebView )findViewById (R.id.wv); WebSettings ws = mWebView . getSettings (); ws . setJavaScriptEnabled (true);
-
一、首先简单的布局文件main.xml,主要有两个控件我们主要研究webview控件: <RelativeLayout xmlns:android="http://schemas.android.com/apk/res/android" xmlns:tools="http://schemas.android.com/tools" android:layout_width="matc
-
Android的webview研究 收藏 转载自: http://chroya.javaeye.com/blog/667116,感谢chroya! ----------------------------------------------------------------------------------------------------------------------------
-
在介绍jsbridge之前,先和大家一起回顾一下JavaScript与Android是如何互相调用的。 (1)在WebView中调用Js的基本格式如下: webView.loadUrl("javascript:methodName(parameterValues)"); 首先是一段Js代码: function javacalljs(arg){document.getElementById("con
-
记得 要先给权限能够访问网络 在AndroidManifest.xml 中加入 <uses-permission android:name="android.permission.INTERNET"/> 就可以了 MainActivity.java package com.example.webview; import android.os.Bundle; import android.a
-
NativeScript Advanced Webview An advanced webview using Chrome Custom Tabs on Android and SFSafariViewController on iOS. Installation To install execute: NativeScript 7+: ns plugin add nativescript-ad
-
Nativescript-WebView-Interface Nativescript Plugin for bi-directional communication between WebView and Android/iOS Installation From the terminal, go to your app's root folder and execute: tns plugin
-
webview标记用于在您的Electron应用中嵌入“来宾”内容,例如网页。 此内容包含在webview容器中。 应用内的嵌入式页面控制着如何显示此内容。 webview在与您的应用程序不同的进程中运行。 为确保恶意内容的安全性,webview与您的网页没有相同的权限。 这可以确保您的应用免受嵌入内容的侵害。 您的应用与嵌入页面之间的所有互动都将是异步的。 让我们考虑一个示例来了解在我们的Ele
-
Extends Widget A widget that can display a web page. Since this widget requires a lot of resources it’s recommended to have no more than one instance at a time. Import this type with “const {WebView}
-
组件 触发字符 mui.open(打开新页面) mopen mui.currentWebview (当前页面) mcurrent mui.back()(关闭窗口) mback mui.backFunction()(重写返回逻辑) mbackfunction mui.backDouble()(双击退出应用) mbackDouble mui.backTast(双击进入后台) mbacktast mui
-
webview 模块提供了一系列的 <web> 组件操作接口,例如 goBack、goForward 和 reload,一般与 <web> 组件一起使用,在 Weex 页面内渲染 web 页面。 var webElement = this.$el('webview'); var webview = weex.requireModule('webview'); webview.goBack(webE


