ASN Lookup Tool and Traceroute Server
Quick jump:
- Description
- Screenshots
- Installation
- Usage (as a command line tool)
- Usage (as a lookup & traceroute server)
Description
ASN / RPKI validity / BGP stats / IPv4v6 / Prefix / ASPath / Organization / IP reputation & geolocation lookup tool / Web traceroute server.
This script serves the purpose of having a quick OSINT command line tool at disposal when investigating network data, which can come in handy in incident response scenarios as well.
It can also be used as a web-based traceroute server, by running it in listening mode and launching lookups and traces from a local or remote browser (via a bookmarklet or custom search engine) or terminal (via curl, elinks or similar tools). Click here for more information about server mode functionality.
Features:
- It will lookup relevant Autonomous System information for any given AS number, including:
- Organization name
- IXP Presence (Internet Exchange facilities where the AS is present)
- BGP statistics (neighbours count, originated v4/v6 prefix count)
- Peering relationships separated by type (upstream/downstream/uncertain), and sorted by observed path count, to give more reliable results (so for instance, the first few upstream peers are most likely to be transits).
- Announced prefixes aggregated to the most relevant less-specific
INET(6)NUMobject (actual LIR allocation).
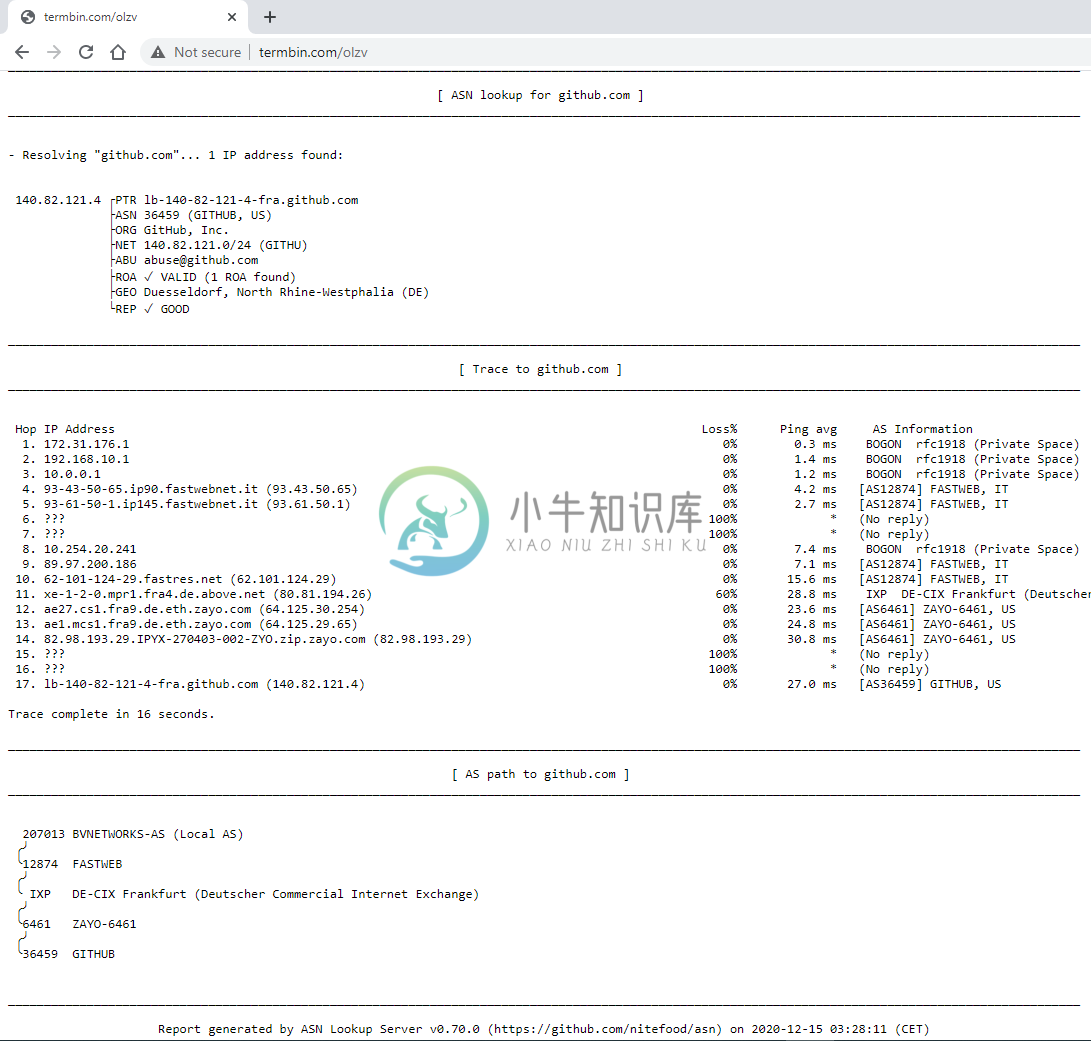
- It will perform an AS path trace (using mtr and retrieving AS data from the results) for single IPs or DNS results, optionally reporting detailed data for each hop, such as RPKI ROA validity, organization/network name, geographic location, etc.
- It will detect IXPs (Internet Exchange Points) traversed during the trace, and highlight them for clarity.
- It will attempt to lookup all relevant abuse contacts for any given IP or prefix.
- It will perform RPKI validity lookups for every possible IP. Data is validated using the RIPEStat RPKI validation API. For path traces, the tool will match each hop's ASN/Prefix pair (retrieved from the Prefix Whois public server) with relevant published RPKI ROAs. In case of origin AS mismatch or unallowed more-specific prefixes, it will warn the user of a potential route leak / BGP hijack along with the offending AS in the path (requires
-doption, see below for usage info). - It will perform IP geolocation lookups according to the logic described below.
- It will perform IP reputation, noise classification and in-depth threat analysis reporting (especially useful when investigating foreign IPs from log files).
- It will perform IP type identification (Anycast IP/Mobile network/Proxy host/Hosting provider/IXP prefix) for target IPs and individual trace hops.
- It will also identify bogon addresses being traversed and classify them according to the relevant RFC (Private address space/CGN space/Test address/link-local/reserved/etc.)
- It is possible to search by organization name in order to retrieve a list of IPv4/6 network ranges related to a given company. A multiple choice menu will be presented if more than one organization matches the search query.
- It is possible to search for ASNs matching a given name, in order to map the ASNs for a given organization.
Screenshots for every lookup option are below.
The script uses the following services for data retrieval:
- Team Cymru
- The Prefix WhoIs Project
- PeeringDB
- ipify
- RIPEStat
- RIPE IPmap
- ip-api
- StopForumSpam
- IP Quality Score
- GreyNoise
It also provides hyperlinks (in server mode) to the following external services when appropriate:
Requires Bash v4.2+. Tested on:
- Linux
- FreeBSD
- Windows (WSL2, Cygwin)
- MacOS (thanks Antonio Prado and Alessandro Barisone)
Screenshots
Generic usage
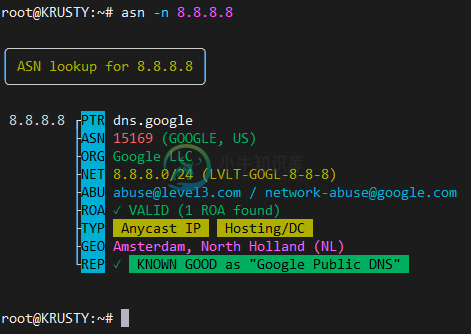
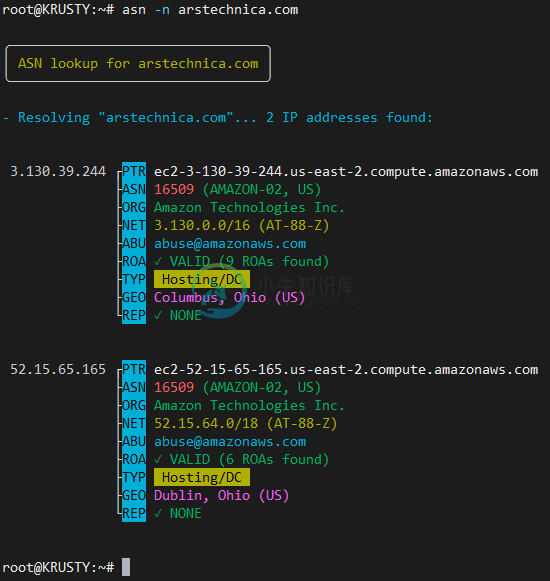
- IPv4 lookup with IP type detection (Anycast, Hosting/DC) and classification as known good
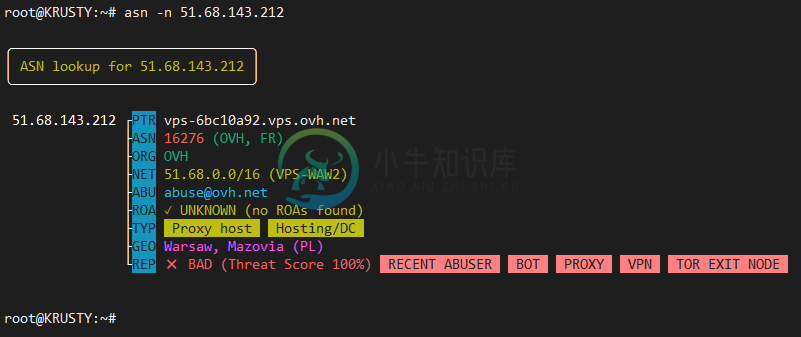
- IPv4 lookup (bad reputation IP) with threat analysis and scoring
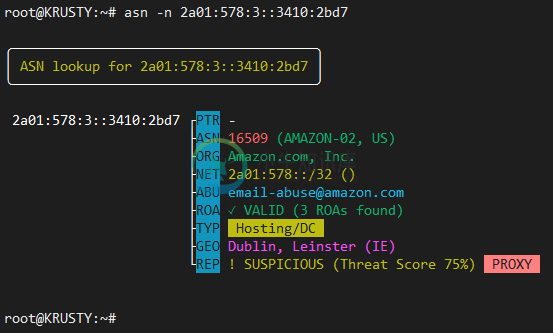
- IPv6 lookup
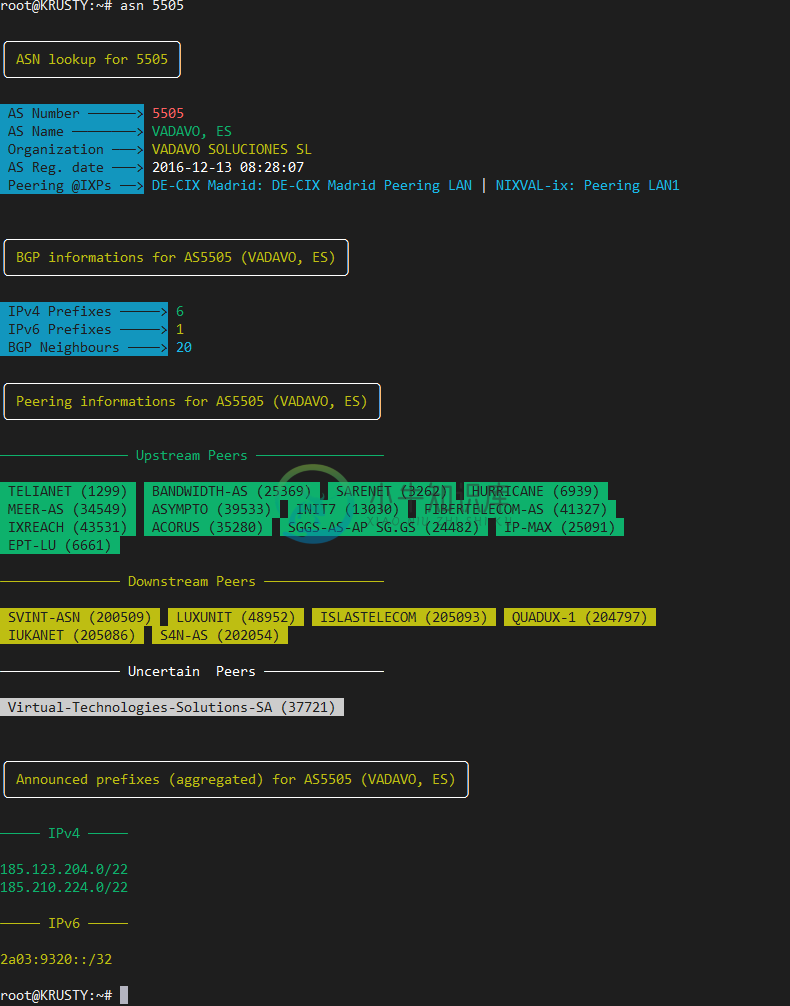
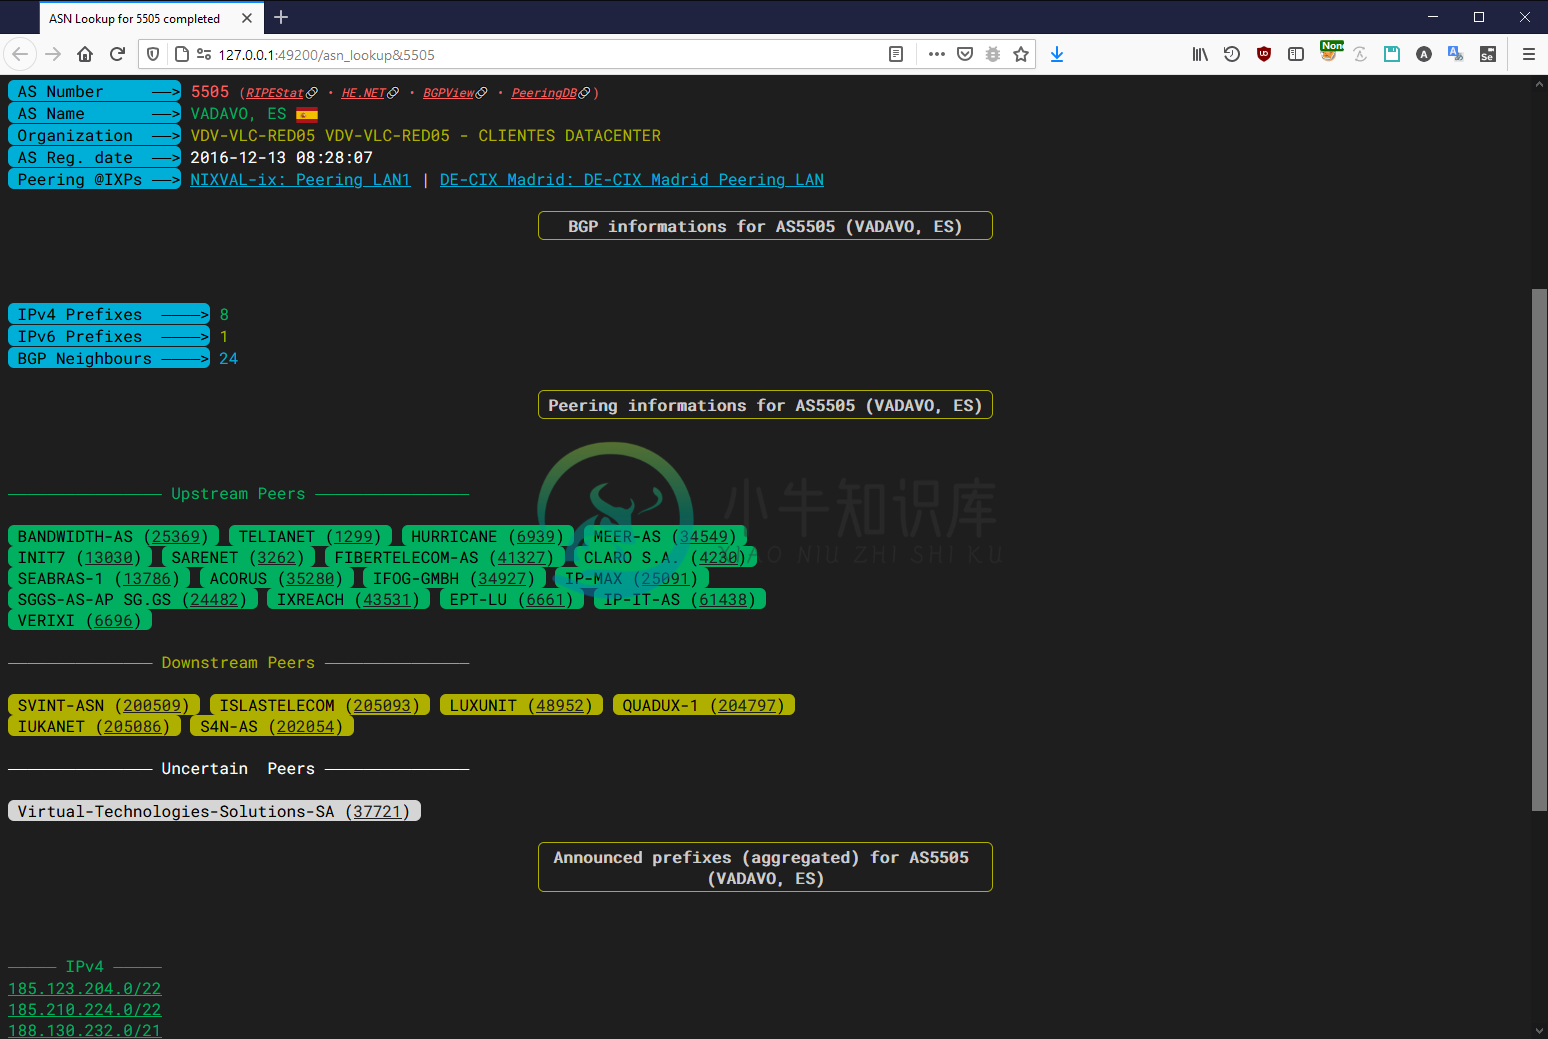
- Autonomous system number lookup with BGP stats, peering and prefix informations
- Hostname lookup
AS Path tracing
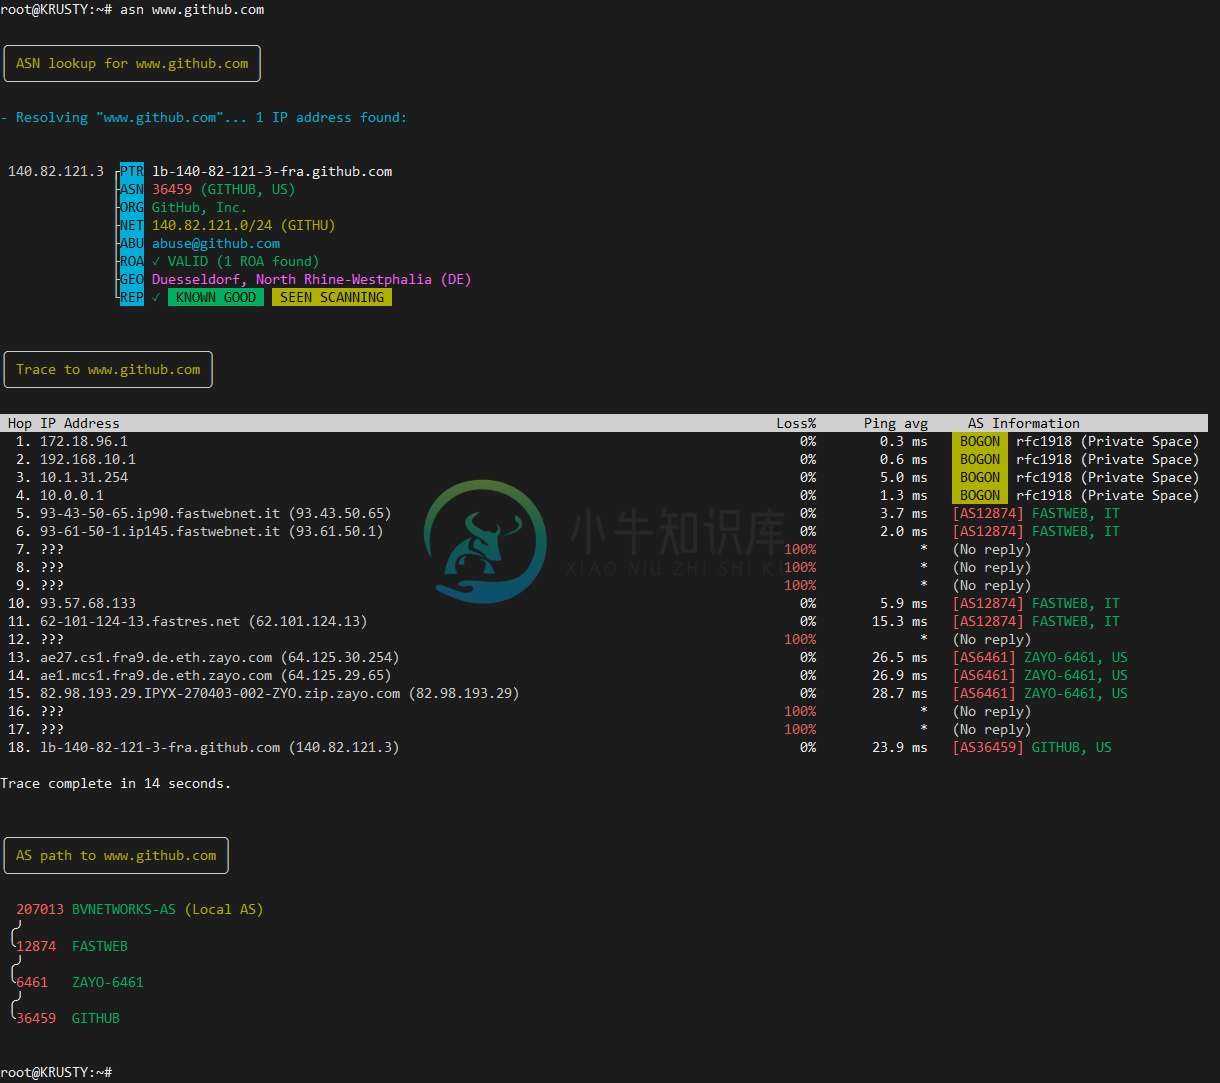
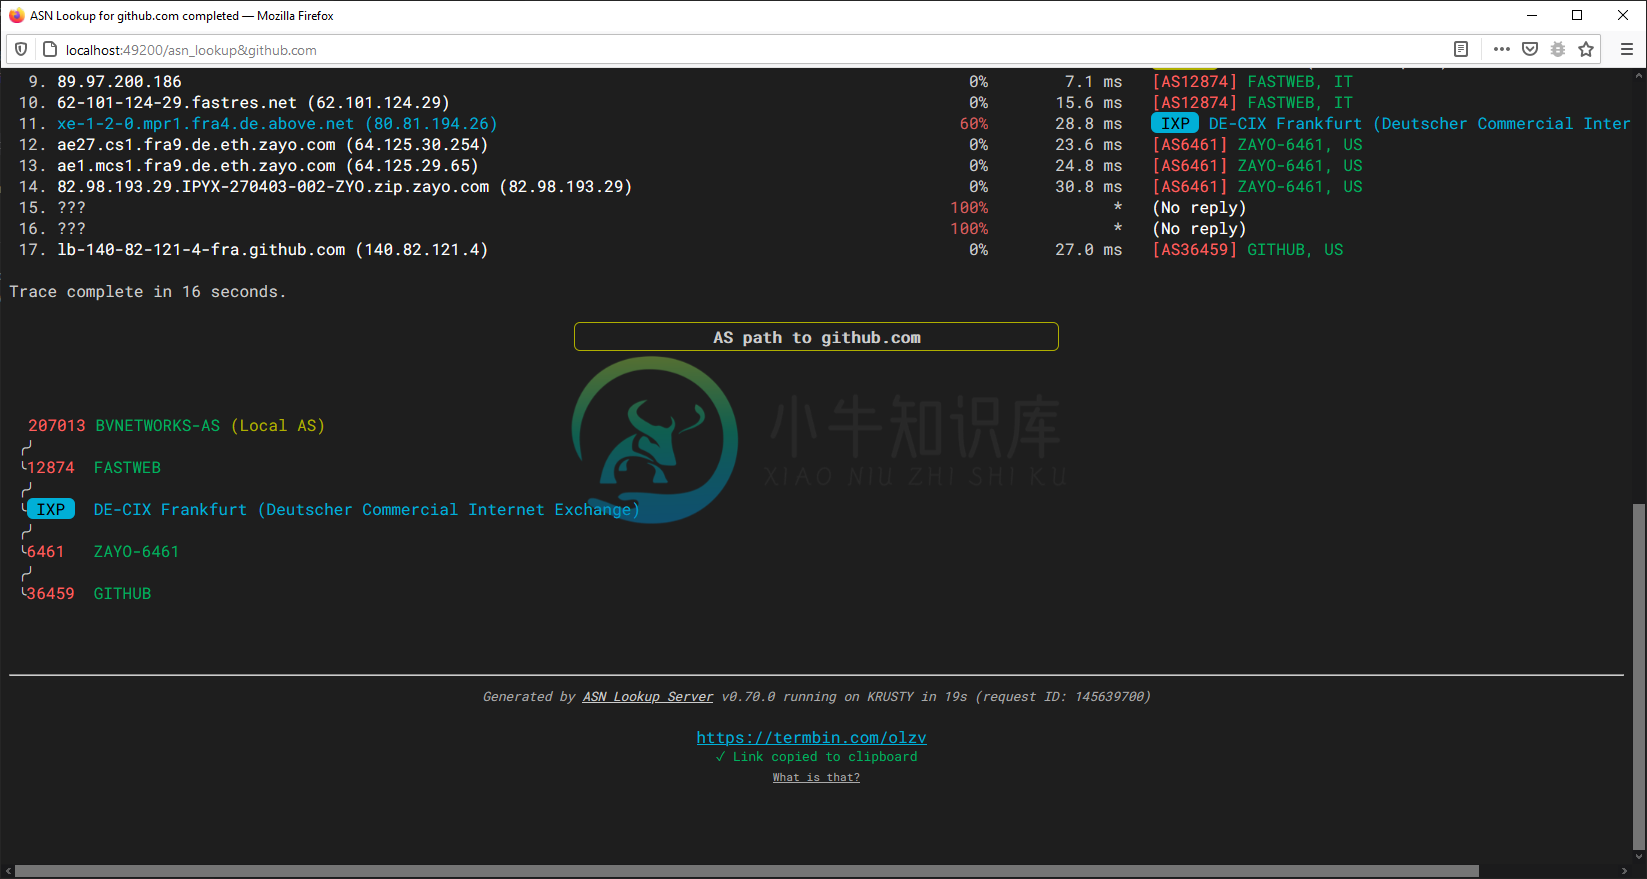
- ASPath trace to www.github.com
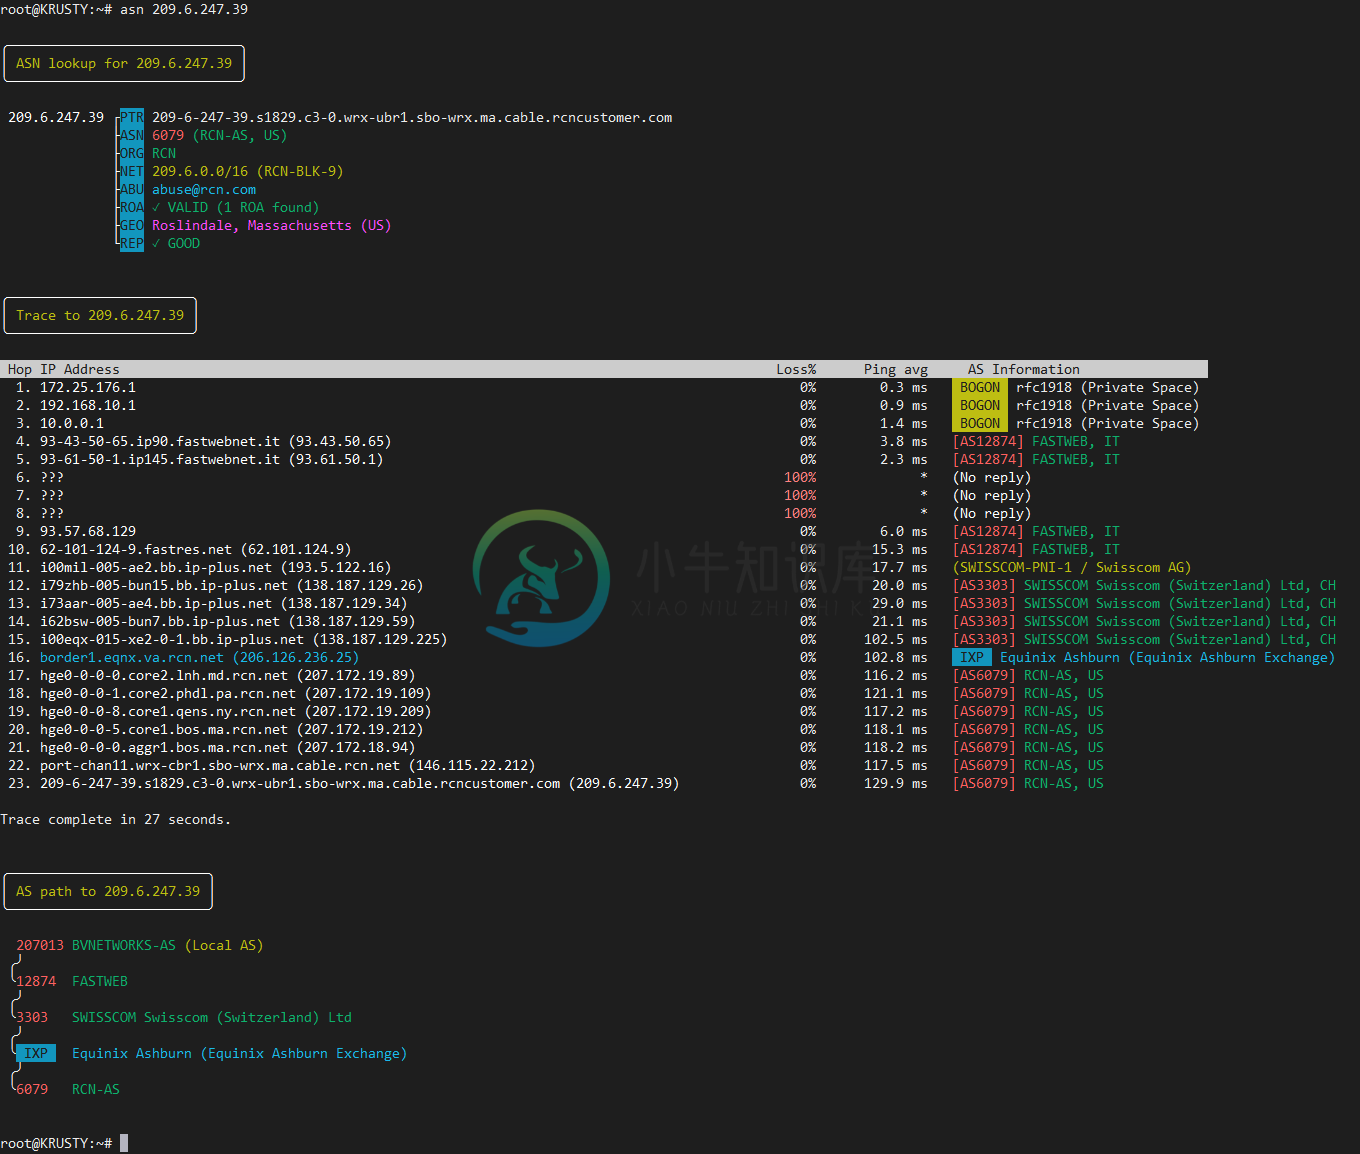
- ASPath trace traversing both an unannounced PNI prefix (FASTWEB->SWISSCOM at hop 11) and an IXP (SWISSCOM -> RCN through Equinix Ashburn at hop 16)
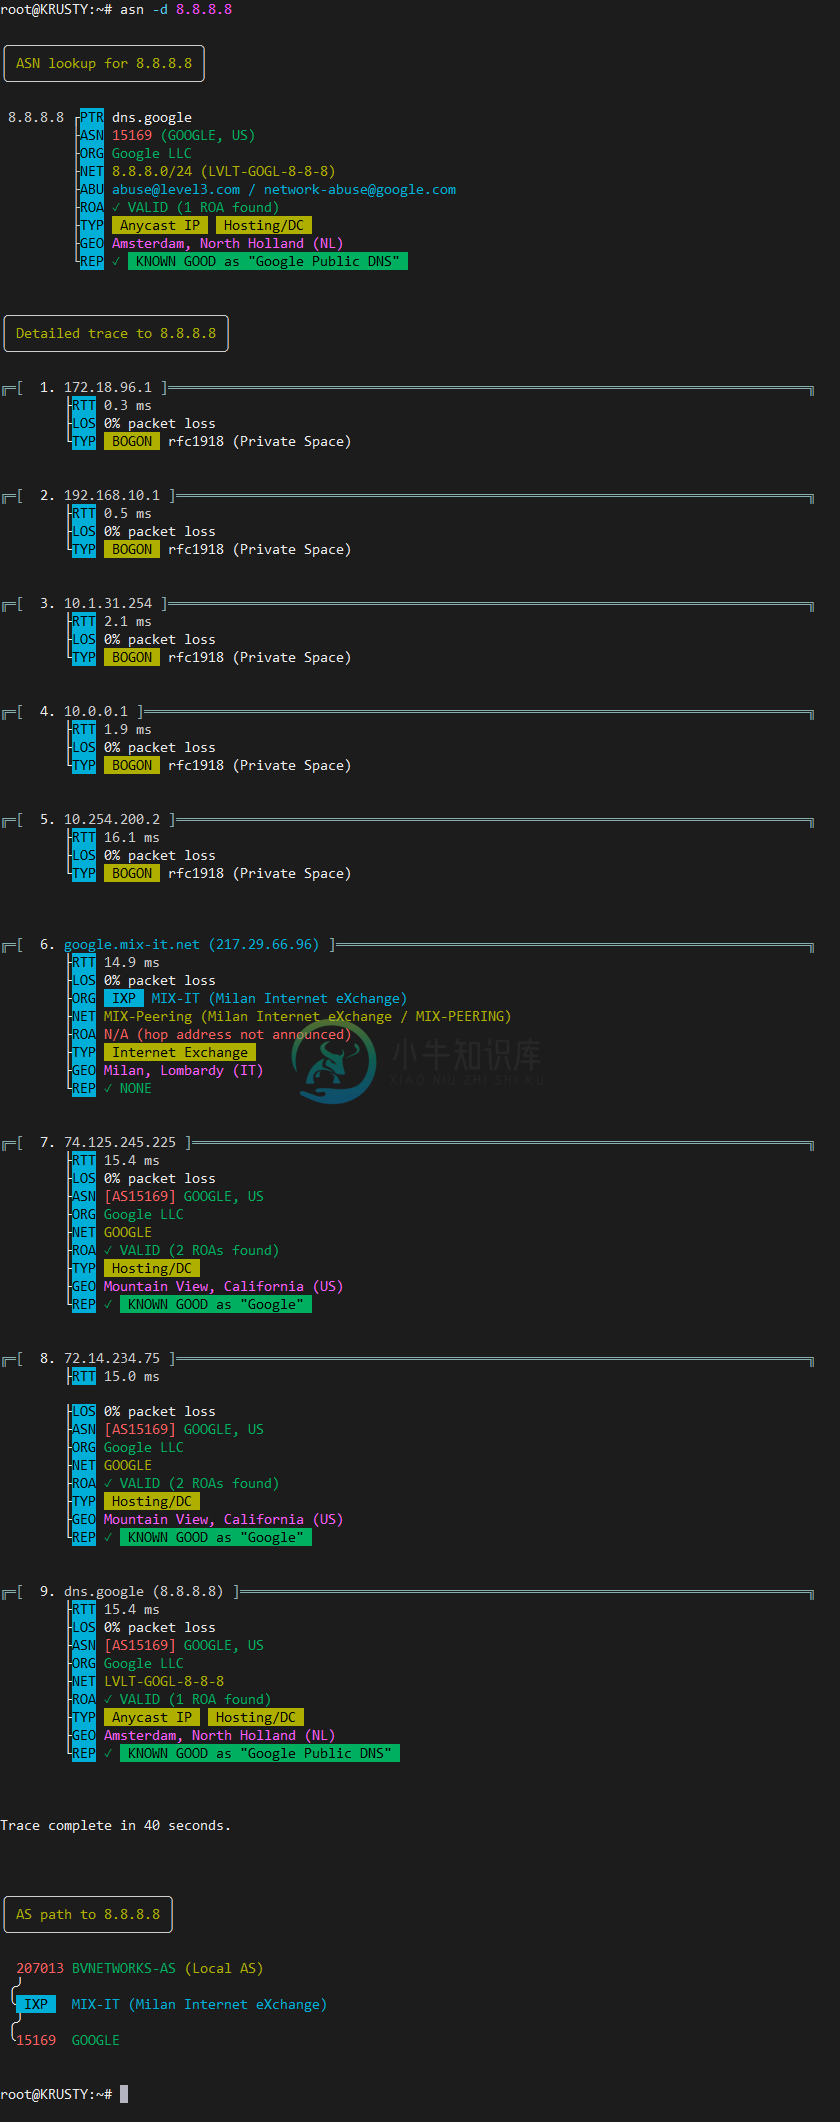
- Detailed ASPath trace to 8.8.8.8 traversing the Milan Internet Exchange (MIX) IXP peering LAN at hop 5
Network search by organization
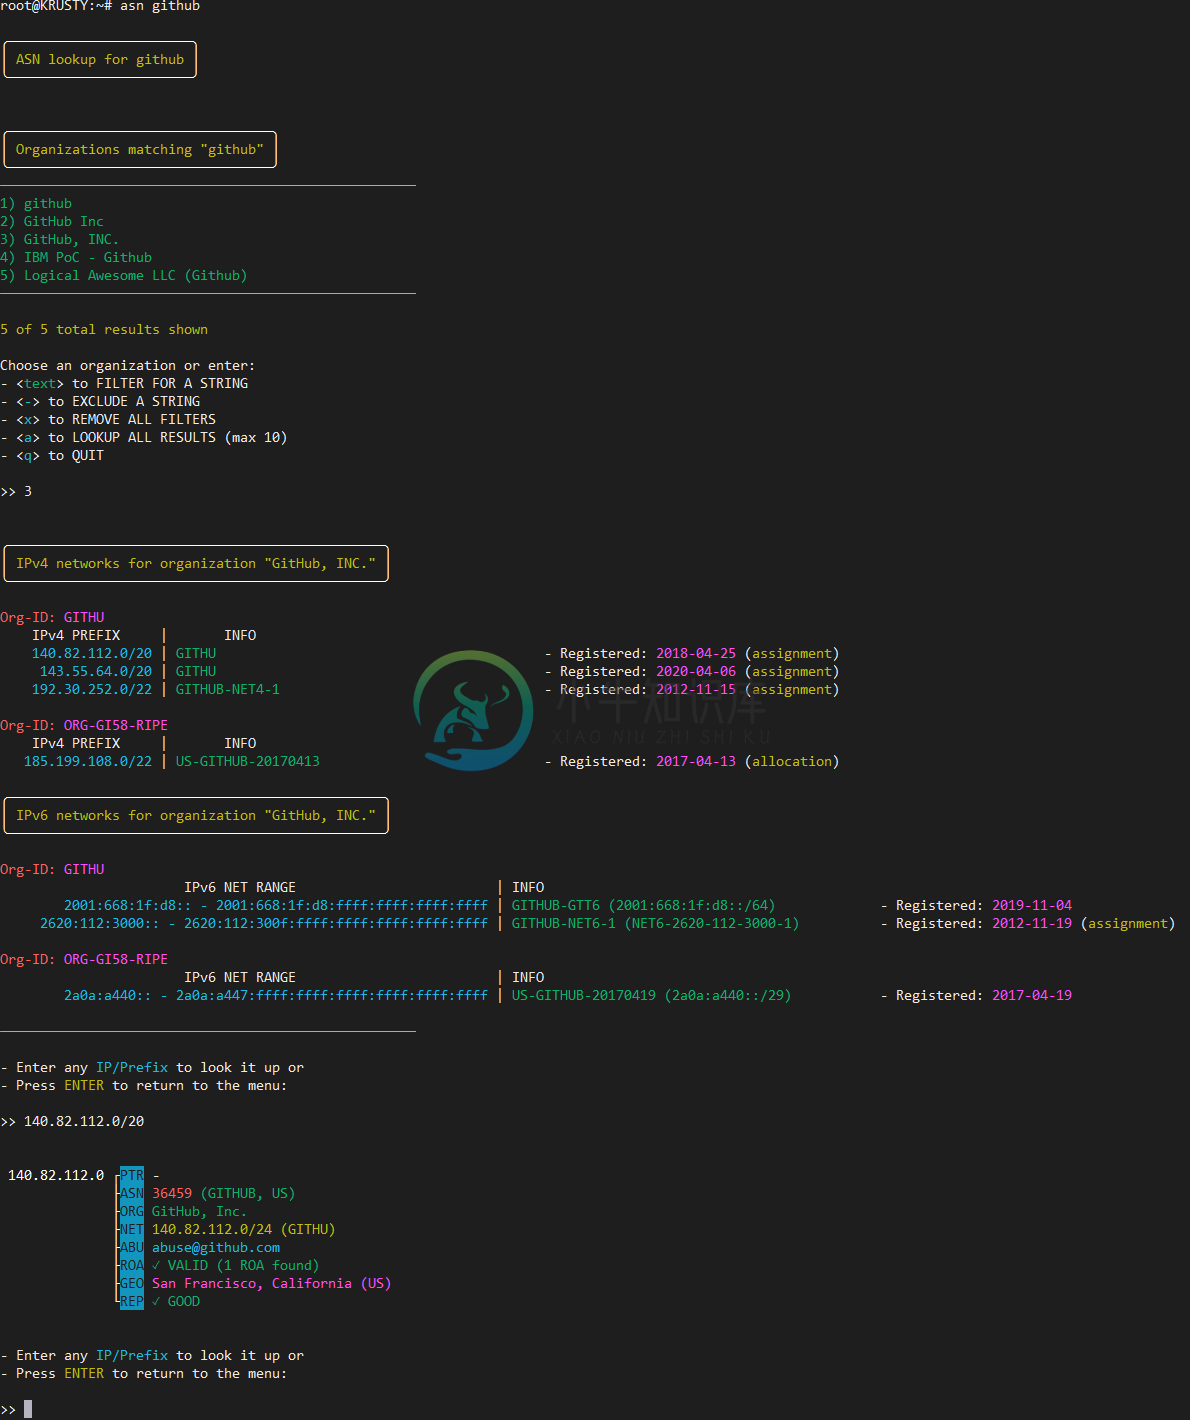
- Organization search for "github"
Suggested ASNs search
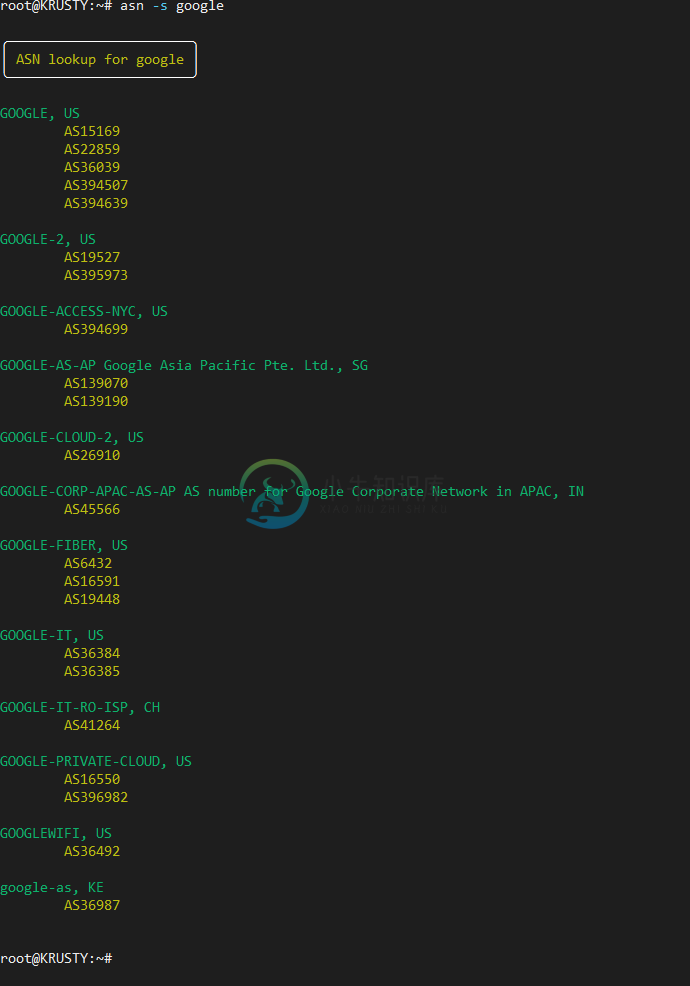
- Suggested ASNs for "google"
Installation
Prerequisite packages
This script requires BASH v4.2 or later. You can check your version by running from your shell:
bash -c 'echo $BASH_VERSION'
Some additional packages are also required for full functionality:
Debian 10 / Ubuntu 20.04 (or newer):
apt -y install curl whois bind9-host mtr-tiny jq ipcalc grepcidr ncat ahaDebian 9 / Ubuntu 18.04 (or older):
apt -y install curl whois bind9-host mtr-tiny jq ipcalc grepcidr nmap git gcc make && \
git clone https://github.com/theZiz/aha.git && \
make install -C aha/
CentOS 8:
yum -y install curl whois bind-utils mtr jq nmap-ncat ipcalc && \
rpm -ivh http://rpmfind.net/linux/opensuse/tumbleweed/repo/oss/x86_64/grepcidr-2.0-1.1.x86_64.rpm \
http://rpmfind.net/linux/epel/8/Everything/x86_64/Packages/a/aha-0.5.1-1.el8.x86_64.rpm
Manjaro/Arch Linux:
yay -S asn-gitFreeBSD:
env ASSUME_ALWAYS_YES=YES pkg install bash coreutils curl whois mtr jq ipcalc grepcidr nmap ahaMacOS (using Homebrew):
brew install bash coreutils curl whois mtr jq ipcalc grepcidr nmap aha && brew link mtrNotes for MacOS users:
- If
mtrstill can't be found after running the command above, this may help to fix it. - Homebrew has a policy not to install any binary with the setuid bit, and mtr (or actually, the mtr-packet helper binary that comes with it) requires to elevate to root to perform traces (good explanations for this can be found here and here). If mtr (and therefore
asn) traces are not working on your system, you should either runasnas root using sudo, or set the proper SUID permission bit on the mtr (or better, on the mtr-packet) binary.
- If
Windows:
using WSL2 (recommended):
Install Windows Subsystem for Linux (v2) by following Microsoft's guide. On step 6, choose one of the Linux distributions listed above (Ubuntu 20.04 LTS is recommended).Once your WSL2 system is up and running, open a Linux terminal and follow the prerequisite installation instructions above for your distribution of choice.
Note for WSL2 users:
- systemd is not currently available in WSL2, so you won't be able to run the asn server in daemon mode as described below (if you want server mode you'll have to launch it manually using
asn -l). An alternative could be to run it as a background process (optionally also usingnohup), or using Windows' own task scheduler to start it at boot.
- systemd is not currently available in WSL2, so you won't be able to run the asn server in daemon mode as described below (if you want server mode you'll have to launch it manually using
using Cygwin:
Most of the prerequisite packages listed above for Debian 10 / Ubuntu 20.04 (or newer) are obtainable directly with Cygwin's own Setup wizard (or through scripts like apt-cyg). You will still have to manually compile (or find a suitable third-party precompiled binary) the mtr, grepcidr and aha tools. Instructions on how to do so can be found directly on the respective projects homepages.
Script download and installation
Afterwards, to install the asn script from your shell to /usr/bin:
curl "https://raw.githubusercontent.com/nitefood/asn/master/asn" > /usr/bin/asn && chmod 0755 /usr/bin/asn
You can then use the script by running asn.
Installing the asn server as a system service
Note: this step is optional, and these instructions are only for systemd-based Linux systems (most current major distributions).
To control the asn server with utilities like systemctl and service, and to enable it to automatically start at boot, follow these steps:
create a new file called
/etc/systemd/system/asn.servicewith the following content (make sure you edit the ExecStart line to match your installation path and desired startup options):[Unit] Description=ASN lookup and traceroute server After=network.target StartLimitIntervalSec=0 [Service] Type=simple Restart=always RestartSec=1 User=nobody ExecStart=/usr/bin/asn -l 0.0.0.0 [Install] WantedBy=multi-user.targetEnable the CAP_NET_RAW capability for the mtr-packet binary:
setcap cap_net_raw+ep $(which mtr-packet)Explanation: this will allow mtr-packet to create raw sockets (and thus perform traces) when launched as an unprivileged user (we're setting up the service to run as user nobody for added security), without the requirement of the setuid-root bit and without having to invoke mtr as root. A thorough explanation for this can be found here.
Now you can refer to standard systemd utilities to perform service operations:
- To start the service:
systemctl start asn - To stop the service:
systemctl stop asn - To check its status and latest logs:
systemctl status asn - To follow its logging in real time:
journalctl -f -u asn - To start the service automatically on boot:
systemctl enable asn - To disable automatic start on boot:
systemctl disable asn
- To start the service:
IP reputation API token
The script will perform first-level IPv4/v6 reputation lookups using StopForumSpam, and in case of a match it will perform a second-level, in-depth threat analysis for targets and trace hops using the IPQualityScore API. The StopForumSpam API is free and requires no sign-up, and the service aggregates a huge amount of blacklist feeds.
Still, in order to use the IPQualityScore API for in-depth threat reporting, it's necessary to sign up for their service (it's free) and get an API token (it will be emailed to you on sign-up), which will entitle you to 5000 free lookups per month.
Once obtained, the api token should be written to one of the following files (parsed in that order):
$HOME/.asn/iqs_token or/etc/asn/iqs_token
The /etc-based file should be used when running asn in server mode. The $HOME-based file takes precedence if both files exist, and is ideal for user mode (that is, running asn interactively from the command line).
In order to do so, you can use the following command:
User mode:
TOKEN="<your_token_here>"; mkdir "$HOME/.asn/" && echo "$TOKEN" > "$HOME/.asn/iqs_token" && chmod -R 600 "$HOME/.asn/"
Server mode:
TOKEN="<your_token_here>"; mkdir "/etc/asn/" && echo "$TOKEN" > "/etc/asn/iqs_token" && chmod -R 700 "/etc/asn/" && chown -R nobody /etc/asn/
Either way, asn will pick up your token on the next run (no need to restart the service if running in server mode), and use it to query the IPQualityScore API.
Usage
Syntax
asn [OPTIONS] [TARGET]
asn [-v] -l [SERVER OPTIONS]
where TARGET can be one of the following:
- AS number -- lookup matching ASN and BGP announcements/neighbours data. Supports "as123" and "123" formats (case insensitive)
- IPv4/IPv6/Prefix -- lookup matching route(4/6), IP reputation and ASN data
- Hostname -- resolve the host and lookup data (same as IPv4/IPv6 lookup. Supports multiple IPs - e.g. DNS RR)
- URL -- extract hostname/IP from the URL and lookup relative data. Supports any protocol prefix, non-standard ports and prepended credentials
- Organization name -- search by company name and lookup network ranges exported by (or related to) the company
Options:
[-d]- enables detailed mode (more info below)
[-n]- disables path tracing and only outputs lookup info
[-o]- forces a Search-By-Organization lookup and skip all target identification checks
[-s]- enable ASN suggestion mode. This will search for all ASNs matching a given name.
[-h]- Show usage information.
[-l]- Launch the script in server mode. See Server Options below
Server Options:
BIND_ADDRESS- IP address (v4/v6) to bind the listening server to (e.g.
asn -l 0.0.0.0)
- IP address (v4/v6) to bind the listening server to (e.g.
BIND_PORT- TCP Port to bind the listening server to (e.g.
asn -l 12345)
- TCP Port to bind the listening server to (e.g.
BIND_ADDRESS BIND_PORT- IP address and port to bind the listening server to (e.g.
asn -l ::1 12345)
- IP address and port to bind the listening server to (e.g.
-v- Enable verbose output and debug messages in server mode
--allow host[,host,...]- Allow only given hosts to connect to the server
--allowfile file- A file of hosts allowed to connect to the server
--deny host[,host,...]- Deny given hosts from connecting to the server
--denyfile file- A file of hosts denied from connecting to the server
-m, --max-conns <n>- The maximum number of simultaneous connections accepted by the server. 100 is the default.
Note: Every option in server mode (after -l) is passed directly to the ncat listener. Refer to man ncat for more details on the available commands.Unless specified, the default IP:PORT values of 127.0.0.1:49200 will be used (e.g. asn -l)
Default behavior:
- The script will attempt to automatically identify the
TARGETtype, if invoked with-d,-nor without options, - AS path tracing is enabled by default for all lookups involving an IP or hostname. In case of multiple IP results, the script will trace the first IP, with a preference for IPv6 if possible on the user's host.
Detailed mode (-d)
Detailed hop info reporting and RPKI validation can be turned on by passing the
[-d|--detailed]command line switch. This will enable querying the public pWhois server and the RIPEStat RPKI validation API for every hop in the mtr trace. Relevant info will be displayed as a "tree" below the hop data, in addition to Team Cymru's server output (which only reports the AS name that the organization originating the prefix gave to its autonomous system number). This can be useful to figure out more details regarding the organization's name, the prefix' intended designation, and even (to a certain extent) its geographical scope.Furthermore, this will enable a warning whenever RPKI validation fails for one of the hops in the trace, indicating which AS in the path is wrongly announcing (as per current pWhois data) the hop prefix, indicating a potential route leak or BGP hijacking incident.
Organization search (-o)
- The script will try to figure out if the input is an Organization name (i.e. if it doesn't look like an IP address, an AS number or a hostname).In order to force an organization search (for example for Orgs containing
.in their name), pass the[-o|--organization]command line switch.
ASN suggest (-s)
- The script will try to find ASNs matching the given search string, using the RIPEStat API. This mode can be used to map all the autonomous systems related to a given company.
Server mode (-l)
- The script will start up a webserver allowing the user to run remote lookups and traceroutes directly from the browser.The web server is actually an ncat listener waiting for requests, responding to browsers querying through the HTTP protocol. This interface makes for a straightforward integration into user workflow and no need to download any client-side tools.By simply using a Javascript bookmarklet or custom search engine, it will be possible to launch remote traces and lookups without ever leaving the browser.Refer to the this section for more information.
Notes
Organization data, IP Reputation and noise classification
- Organization data is taken from pWhois
- IP reputation data is taken from StopForumSpam and IpQualityScore
- Reputation is also enriched with IP noise classification (addresses that have been observed scanning the Internet, and very likely to appear in your logs), taken from GreyNoise. This will also help identify known-good IPs (e.g. Google networks, CDNs, etc.) from aggressive, known-malicious scanners.
Geolocation
The script will perform IP and trace hop geolocation with this logic:
- Using the RIPE IPmap service as a primary source of geolocation data. It offers extremely precise latency-based geolocation data and is extremely reliable
- Using the ip-api service as a fallback source of geolocation data
- Using the Prefix Whois service as a last-resort source of geolocation data
IP Classification
The script will use the ip-api, RIPE IPmap and PeeringDB services to classify target IPs and trace hops into these categories:
- Anycast IP
- Mobile network
- Proxy host (TOR exit node/VPN/etc)
- Hosting network (datacenter/hosting provider/etc)
- IXP network
IXP detection and unannounced prefixes
- The script will detect IXPs traversed during path traces by matching them with PeeringDB's comprehensive dataset of IXP prefixes.
- The script will also attempt a best-effort, fallback generic
whoislookup when Team Cymru, pWhois and PeeringDB have no info about the IP address or prefix. This is usually the case with some PNI prefixes, and will give better insight into the path taken by packets.
Running lookups from the browser
Prerequisite tools for server mode
Server mode requires two tools for its functionality: ncat and aha. Specifically, aha (the ANSI->HTML converter) v0.5+ is required. The ncat tool is contained inside the nmap package on older distributions (e.g. Ubuntu 18.04, Debian 9), while it is packaged as a standalone tool on newer ones.
Please refer to the installation section and run the appropriate commands to install the required packages for your operating system, and optionally to install the asn server as a systemd service.
Advantages of server mode
The main advantage of running lookups from the browser, is that every IP address and AS number gets converted into a hyperlink, allowing to perform subsequent lookups by simply clicking on them.
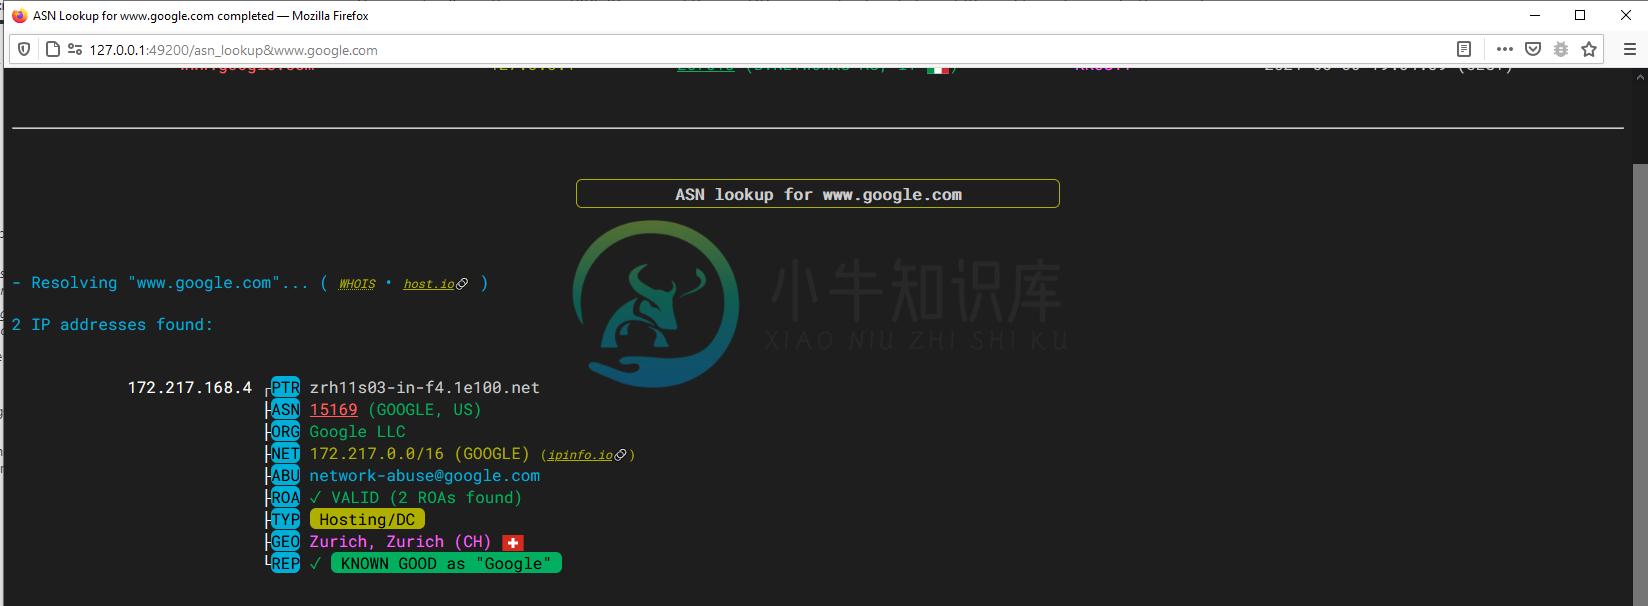
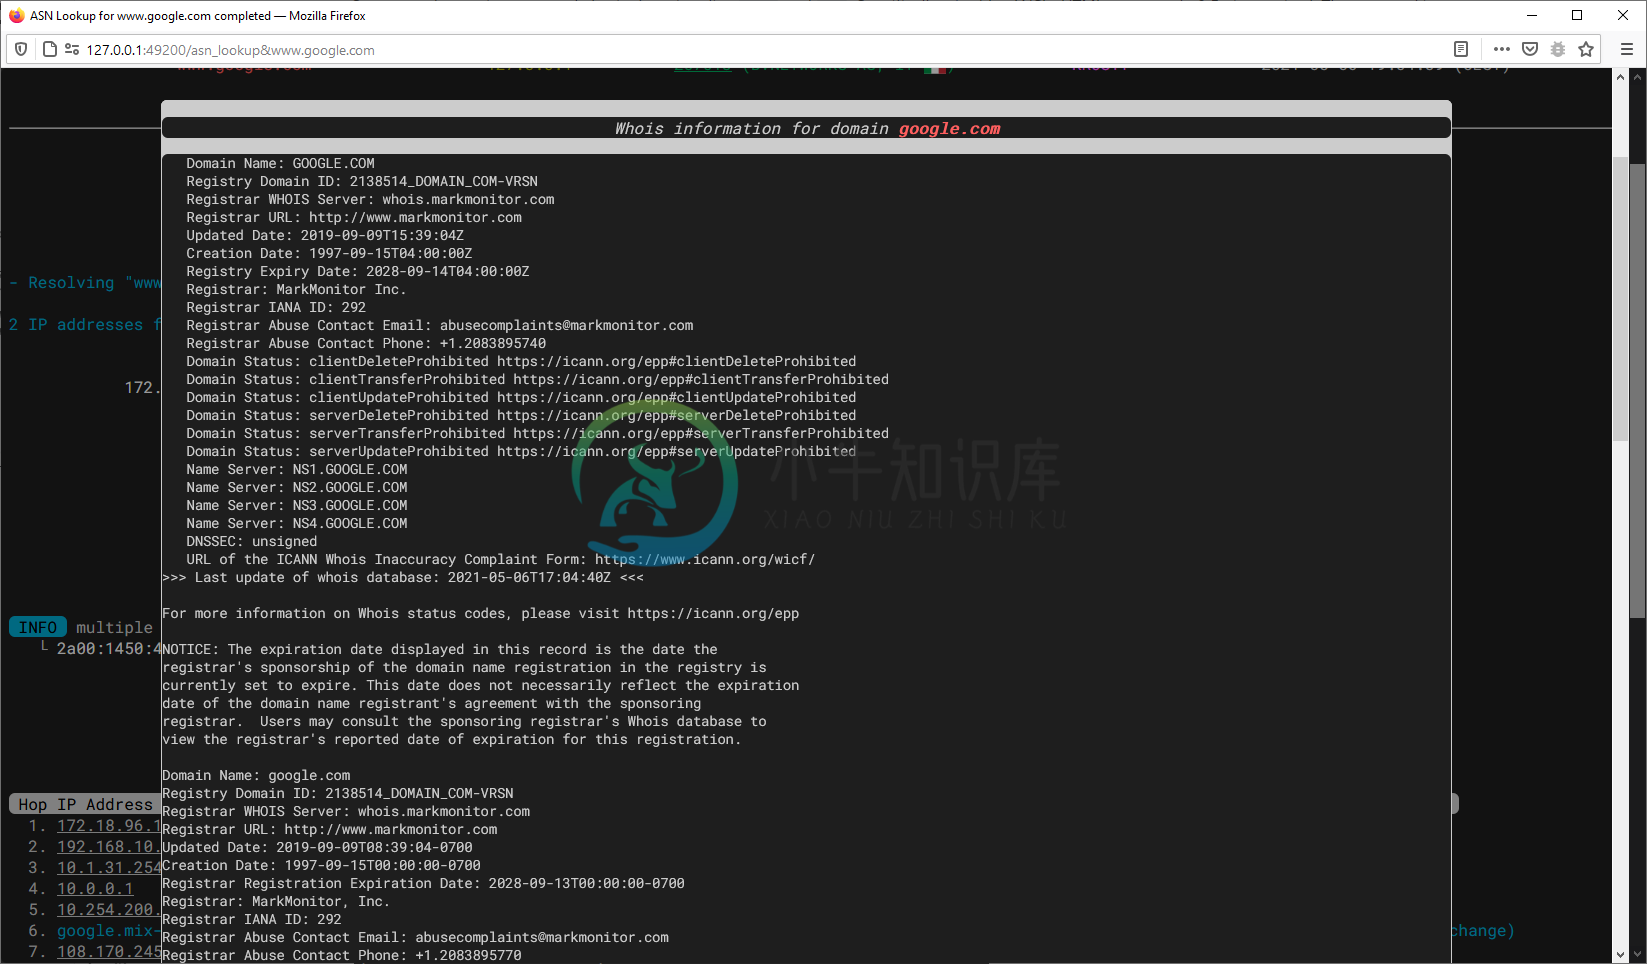
When looking up an URL/hostname/domain, quick WHOIS info and links to relevant external resources will be available in the results.
When looking up an AS number, all peering ASNs will be clickable. Also, if an AS peers at a public facility, PeeringDB info for that facility will be linked directly. Furthermore, additional external BGP information sources will be linked, directly for the target ASN.
Here are some examples:
Server side
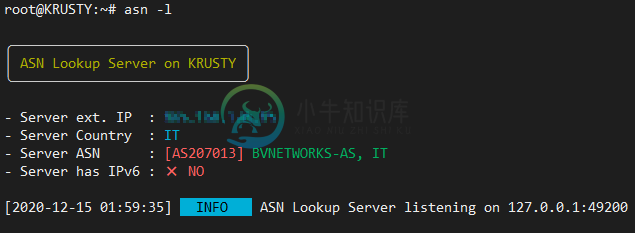
Once started in server mode, asn will spin up a custom webserver waiting for browser requests. This is what the server-side console looks like:
The server is now ready to accept browser requests (only from the local machine, in this case - since I've launched it with no command line switches, which defaults to listening on 127.0.0.1:49200. Refer to the usage section for more information about the available server options).
Client side
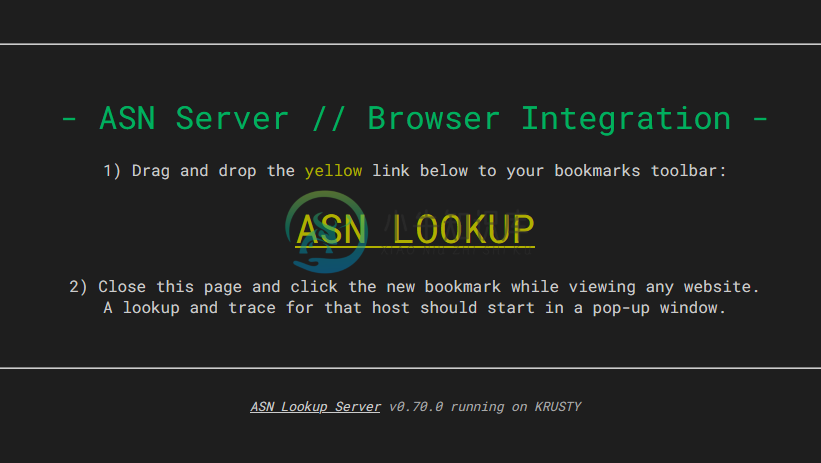
Visit this page in your browser and follow the instructions to copy the bookmarklet to your bookmarks toolbar:
How it works
The bookmarklet is actually a small piece of Javascript code which will grab the hostname of the website you're currently visiting in the browser, and pass it to the server through a simple HTTP GET request. The server then proceeds to perform the lookup and traceroute (from its own viewpoint, just like it does when ran interactively from the command line), and feed the results to your browser through an HTML page, mimicking the effect of a scrolling terminal.
The link you drag to the bookmarks bar is actually a minified (i.e.: compacted) version of the source javascript code, but for reference, here's the full source:
javascript:(function () {
    var asnserver = "localhost:49200";
    var target = window.location.hostname;
    var width = screen.width - screen.width / 7;
    var height= screen.height - screen.height / 4;
    var left = window.innerWidth / 2 - width / 2;
    var top = window.innerHeight / 2 - height / 2;
    window.open("http://" + asnserver + "/asn_lookup&" + target, "newWindow", "width=" + width + ",height=" + height + ",top=" + top + ",left=" + left);
})();
If you want to "un-minify" the actual bookmarklet code, you can refer to this site.
Once the trace is finished, an option to share the output on termbin is given to the user. This makes for quick sharing of the traceroute or lookup output with other people:
Search engine setup
In order to take full advantage of having asn inside the browser, it is possible to configure it as a custom search engine for the browser search bar. This allows to leverage the server to search for ASNs, URLs, IPs, Hostnames, and so on, depending on the search string.
Generally speaking, this implies instructing the browser that when a certain keyword is prepended to a search, the following characters (the actual search string, identified by %s) have to be passed to a certain URL. The URL is then composed according to this logic, and opened just like a normal webpage.
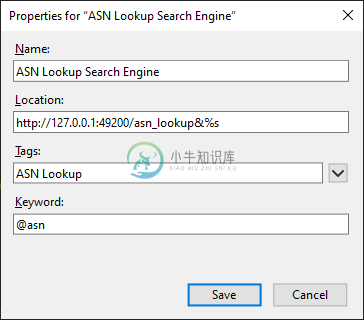
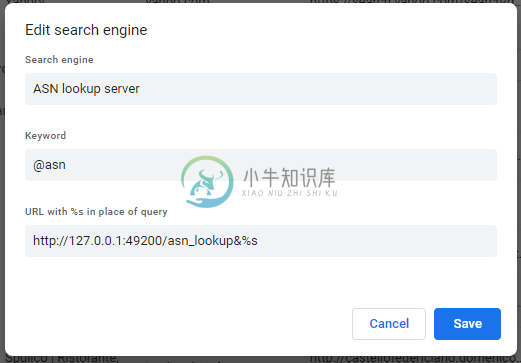
I've used @asn for my keyword, but anything would do. In order to speed up things, one could very well use a shorter tag (e.g. #) that, when used in the address bar, automatically switches your search engine to the ASN Lookup server.Note that the leading @ sign is not mandatory, just handy since it doesn't get in the way of normal searches, but there's much freedom with that.
For quick reference, the location URL string to enter (for both Firefox and Chrome) is: http://127.0.0.1:49200/asn_lookup&%s. Of course that sends lookup requests to the locally running ASN server.
Here's how to add a search engine in Firefox and Chrome:
Firefox:
Simply create a new bookmark and fill its details like this:
Afterwards, you will be able to run queries and traceroutes by simply entering, for example,
@asn 8.8.8.8in the browser's location bar.
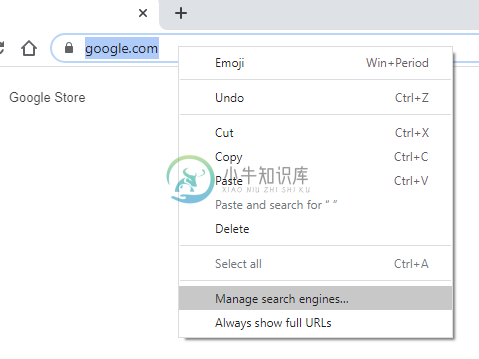
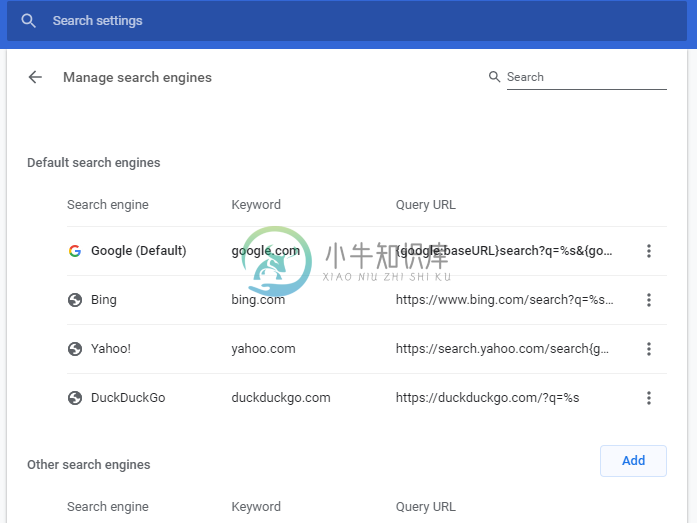
Chrome:
Right click the location bar and select Manage search engines...
2.Click Add:
3.Fill in the details as shown below:
As usual, the keyword is entierly customizable to your preference.
Other browsers:
- You may want to follow this post to search for instructions on how to add a custom search engine for your browser of choice.
Running the server on an external host
Port forwarding
In order to access the server remotely, beside binding to 0.0.0.0 (or any other relevant IP address for your scenario), if the host is behind a NAT router, you'll need to forward the listening port (BIND_PORT) from the host/router outside IP to the actual machine where the ASN server is running on.It is a single TCP port (by default TCP/49200), and you can change it via the command line parameters (see Usage).
Textual browser client
It is possible to launch remote traces from another command line, and view the results directly in the terminal. All it takes is a compatible text browser, for example elinks (but you can download results for later reviewing even using curl or really anything else).
The script makes use of 8-bit ANSI colors for its output, so the command to launch a remote trace using elinks would be something like this:
elinks -dump -dump-color-mode 3 http://<ASN_SRV_IP>:49200/asn_lookup&8.8.8.8
Security considerations
The server logic in itself is very simple: the script implements a basic web server entirely in BASH, leveraging the fact that it can talk to a browser using the HTTP protocol and the HTML language, in a reasonably simple way.
The core behind it revolves around ncat, a very robust and stable netcat-like network tool. This is the actual "server" listening for incoming connection, and spawning connection handlers (that is, 'single-purpose' instances of the asn script itself) as clients connect.
If you decide to open it to the outside (i.e.: binding it to something that is not localhost, and launching traces from outside your local machine), please bear in mind that there is no authentication mechanism (yet) integrated into the code, so theoretically anybody with the right URL could spawn traceroutes from your server and view the results (bear in mind however that the server sanitizes user input by stripping any dangerous characters).
To contrast that, fortunately ncat implements a robust allow/deny logic (based both on command line parameters and files, a la /etc/hosts.allow and hosts.deny). The script supports passing parameters directly to ncat, therefore it's possible to make full use of its filtering capabilities and lock the server to a restricted range of trusted IPs.
The available options, and some usage examples, can be viewed by running asn -h.
Note: if you plan to run the server somewhere else than your local machine, remember to change the bookmarklet code and the custom search engine URL values to reflect the actual IP of the asn server. It is naturally possible to have multiple bookmarklets and search engine keywords to map to different ASN server instances.
For the bookmarklet, you'll need to change this value at the very beginning: var asnserver="localhost:49200" and make it point to the new address:port pair. No further change is required in the remaining JS code.
Thanks
An initial version of this script was featured in the Security Trails blog post "ASN Lookup Tools, Strategies and Techniques". Thank you Esteban!
Thanks Massimo Candela for your support and excellent work on IPmap, BGPlay and TraceMON!
Feedback and contributing
Any feedback or pull request to improve the code is welcome. Feel free to contribute!
-
** ASN.1 我是如何接触到ASN.1的? 是在查看ECC椭圆曲线签名算法ECDSA的go源代码的时候,发现其是使用ASN.1编码格式的。 ** ASN.1抽象语法标记(Abstract Syntax Notation One) ASN.1是一种 ISO/ITU-T 标准,描述了一种对数据进行表示、编码、传输和解码的数据格式。它提供了一整套正规的格式用于描述对象的结构,而不管语言上如何执行及这
-
1.ASN.1概述 抽象语法表示(标记)ASN.1(Abstract Syntax Notation One )一种数据定义语言,描述了对数据进行表示、编码、传输和解码的数据格式。网络管理系统中的管理信息库(MIB)、应用程序的数据结构、协议数据单元(PDU)都是用ASN.1定义的。 ASN.1优点: 通过如下的独立: ⑴独立于机器; ⑵独立于程序语言; ⑶独立于应用程序的内部表示,用
-
ASN即预先发货清单(Advanced Shipping Note) 预先发货清单是生产厂家或者批发商在发货时利用电子通信网络提前向零售商传送货物的明细清单。这样零售商事前可以做好货物进货准备工作,同时可以省去货物数据的输入作业,使商品检验作业效率化。购买商也可以凭借此清单核对订单交货数量、剩余数量等,及时更正数量上的错误。 SKU=Stock Keeping Unit(库存量单位) 即库存
-
问题内容: 我已经生成了一个RSA密钥对(公共和私有)。现在出于测试目的,我试图将表示形式的公钥导入到一个供Android项目中使用的公钥中,以便将RSA中的加密消息发送到远程服务器,该服务器随后将使用私钥对其进行解密。 问题在于这将返回以下异常: 异常指向此行: 为什么返回此异常以及如何解决?谢谢。 问题答案: 需要DER编码的数据,而不是PEM编码的数据。如果您仅丢弃“ BEGIN”和“ EN
-
我有下一个关系(只是示例)用户0/1-*故事当我想获得包含用户的故事列表时,我会进行下一个查询。 我注意到ef向db发出了额外的请求以获取用户(但这不应该是因为我使用了include)。没有AsNoTrack(),一切都很好。 看起来这是一个可为null的关系问题,因为不允许为null的关系可以很好地工作。 有人有类似的问题吗?可能是“允许空”关系的预期行为。
-
我如何做到这一点?还是我理解了一些根本错误的东西? 后果 预期结果
-
我有一个包含公钥的字节数组和一个包含ASN.1格式签名的字节数组。使用ECDSA P-256。 以下代码加载公钥: 以下代码验证签名: 但它总是写假的。可能出了什么问题? 在 .NET Core 上使用 BouncyCastle.NetCore 1.8.3。
-
Im使用OpenSSL的< code>dgst命令执行ECDSA签名,如下所示: 然而,我在这个SO答案中读到,它首先对data_file进行SHA256哈希处理,ASN.1在签名之前对哈希进行编码。 我想创建数据的SHA256哈希,并让ECDSA只对该哈希的原始字节进行签名。(由于这是ECDSA签名,我不能使用如上述SO答案中所述。) 如何使用OpenSSL实现这一点?
-
我有一个96字节长的ecdsa签名,由原始格式的智能卡使用sha384算法创建。它由两个 48 字节长的整数 r 和 s 组成。蜕皮蜕皮质特征位于sign_ptr所指向的缓冲区中。我正在使用以下函数(C)将原始格式签名转换为ASN1格式的buf_out: } 我想知道是否有一个等效的openssl函数可以帮助我以更优雅的方式做到这一点?我确实看了许多d2i函数(d2i_ASN1_xxxx、ASN1
-
我正在尝试使用.NET(CNG提供商)的现有ECDSA密钥,以便使用Bouncy Castle对数据进行签名,然后在两种签名格式(P1363和ASN.1)之间进行转换。然而,我总是得到不同的签名。我不太确定转换是否不正确,或者我是否使用了不正确的方法来使用Bouncy Castle读取.NET密钥。 由于某些原因,和已经不同,我假设问题甚至可能在转换之前就出现了。我已经看过许多StackOverf
-
这是我生成RSA密钥的代码 现在我想转换DER/ASN.1编码字节,也知道使用Java JCE API生成RSA密钥时使用的默认编码格式是什么。


