Homebridge Raspberry Pi Image
This project provides a free Raspbian based Raspberry Pi image with Homebridge and Homebridge Config UI X pre-installed.
- Works on all Raspberry Pi models
- Built on Raspbian Lite (no desktop)
- Simple WiFi Setup
- Includes
ffmpegpre-compiled with audio support (libfdk-aac) and hardware decoding (h264_omx) - Includes a user friendly, easy to use web based GUI to configure Homebridge and monitor your Raspberry Pi
- Visual configuration for over 400 plugins (no manual config.json editing required)
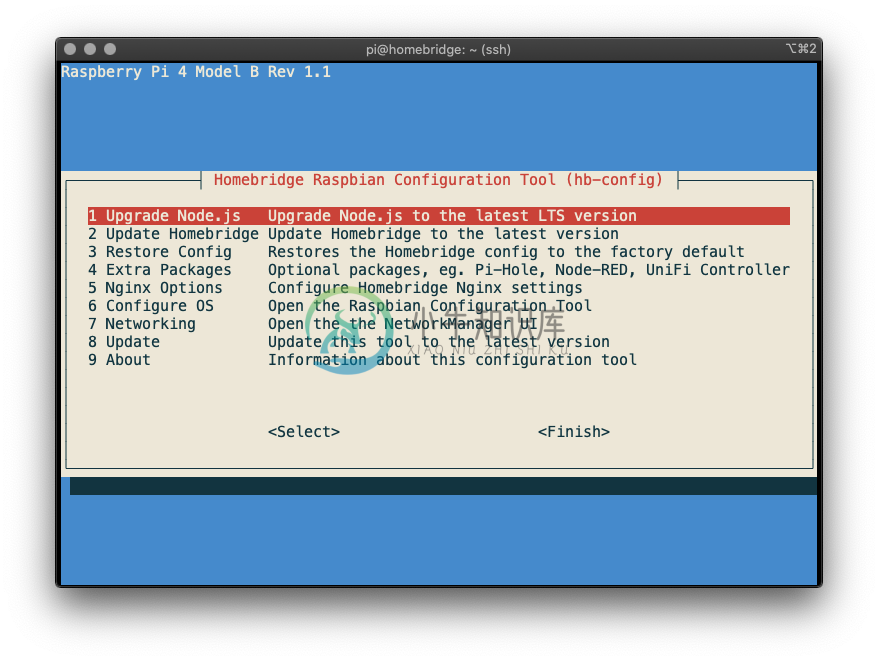
This image also provides a command called hb-config which helps you keep Node.js up-to-date, perform maintenance on your Homebridge server, and install additional optional software such as Pi Hole, deCONZ, Node-RED and the UniFI Controller.
The Homebridge service is installed using the method described in the official Raspberry Pi Installation Guide on the Homebridge project wiki.
Download and Flash to SD Card
The Homebridge Raspberry Pi Image is completely free (no sign up required).
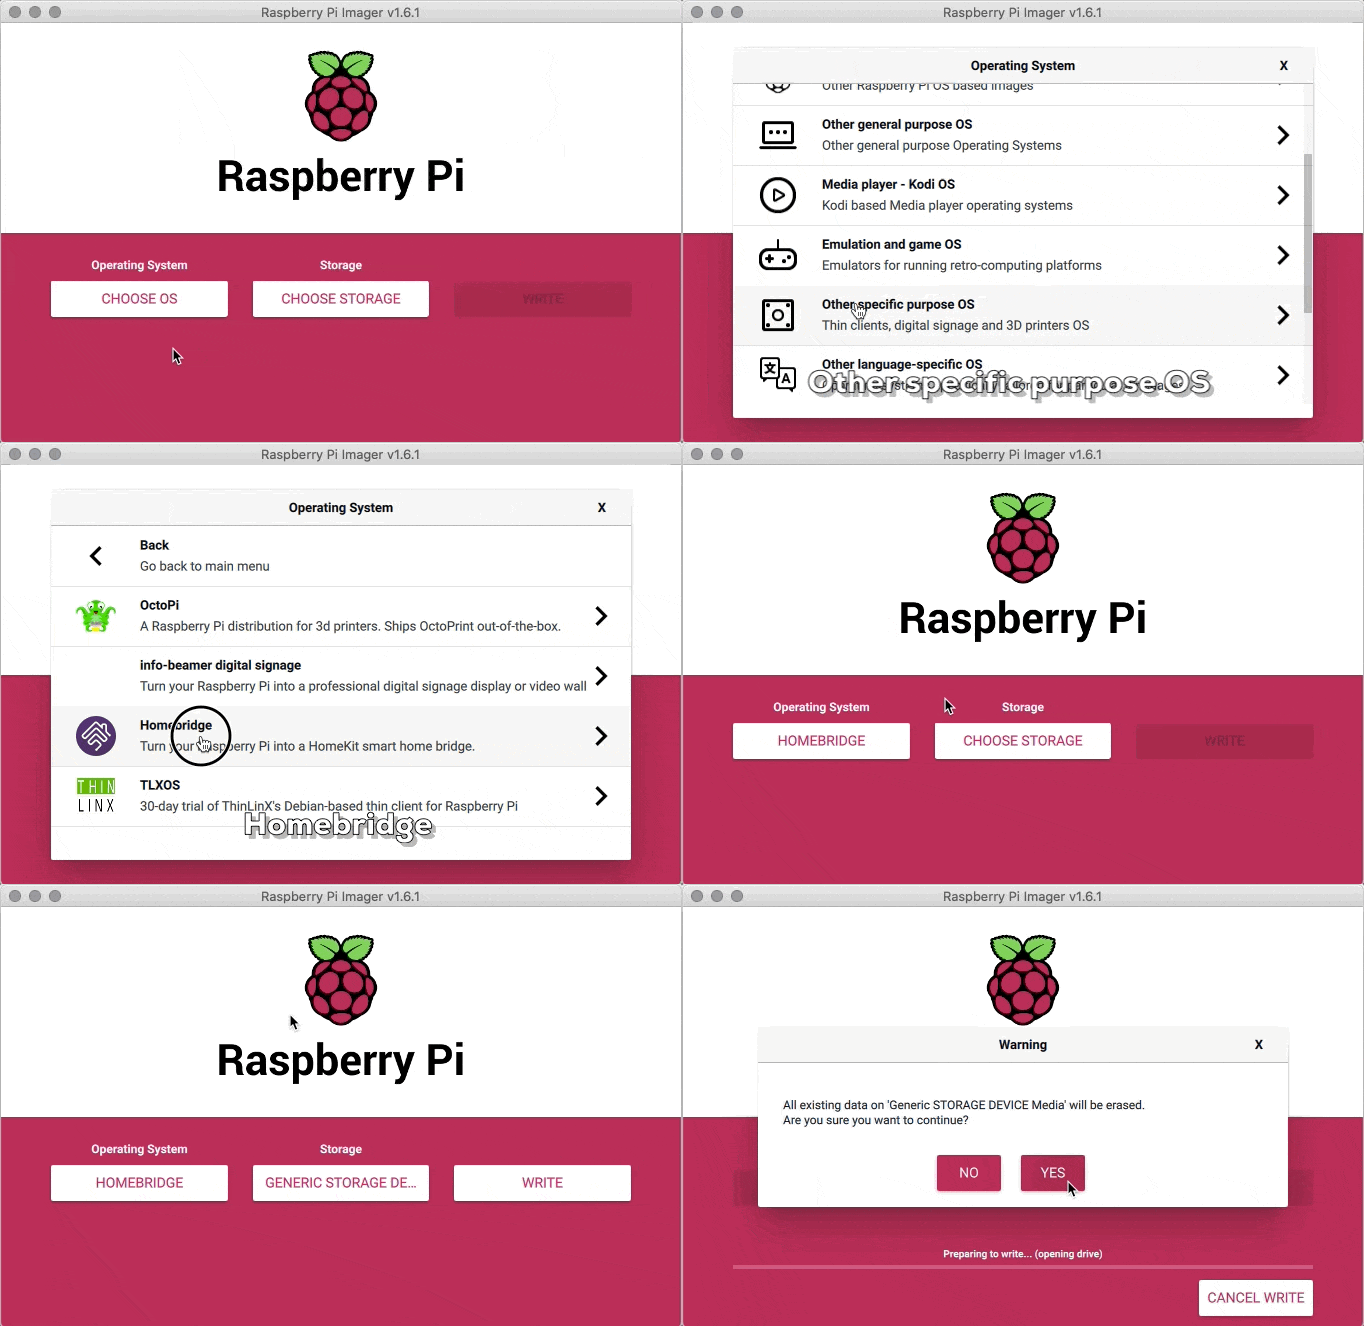
The easiest way to flash the Homebridge Raspberry Pi Image to your SD card is to use the Raspberry Pi Imager.
- Download and install the latest version of Raspberry Pi Imager.
- Open the Raspberry Pi Imager application.
- Click Choose OS.
- Scroll down and select the Other specific purpose OS category.
- Select Homebridge, then choose the latest Homebridge image.
- Click Choose Storage and select your SD card.
- Click Write.
Raspberry Pi Imager will now download and flash the latest version of the Homebridge Raspberry Pi Image to your SD card, this may take several minutes depending on the speed of your internet connection and SD card.
Advanced users:
If you wish to use another tool such as Etcher or dd to flash the Homebridge Raspberry Pi Image, you can manually download the image from our releases page:
Download Latest Version
First Boot / Network Setup
Now that you have flashed your SD card, you can insert it into your Raspberry Pi.
Before powering on your Raspberry Pi decide if you want to use Ethernet or WiFi to connect to your network.
Ethernet
If you have decided to connect your Raspberry Pi using ethernet, do so before you power on your device for the first time.
WiFi Setup
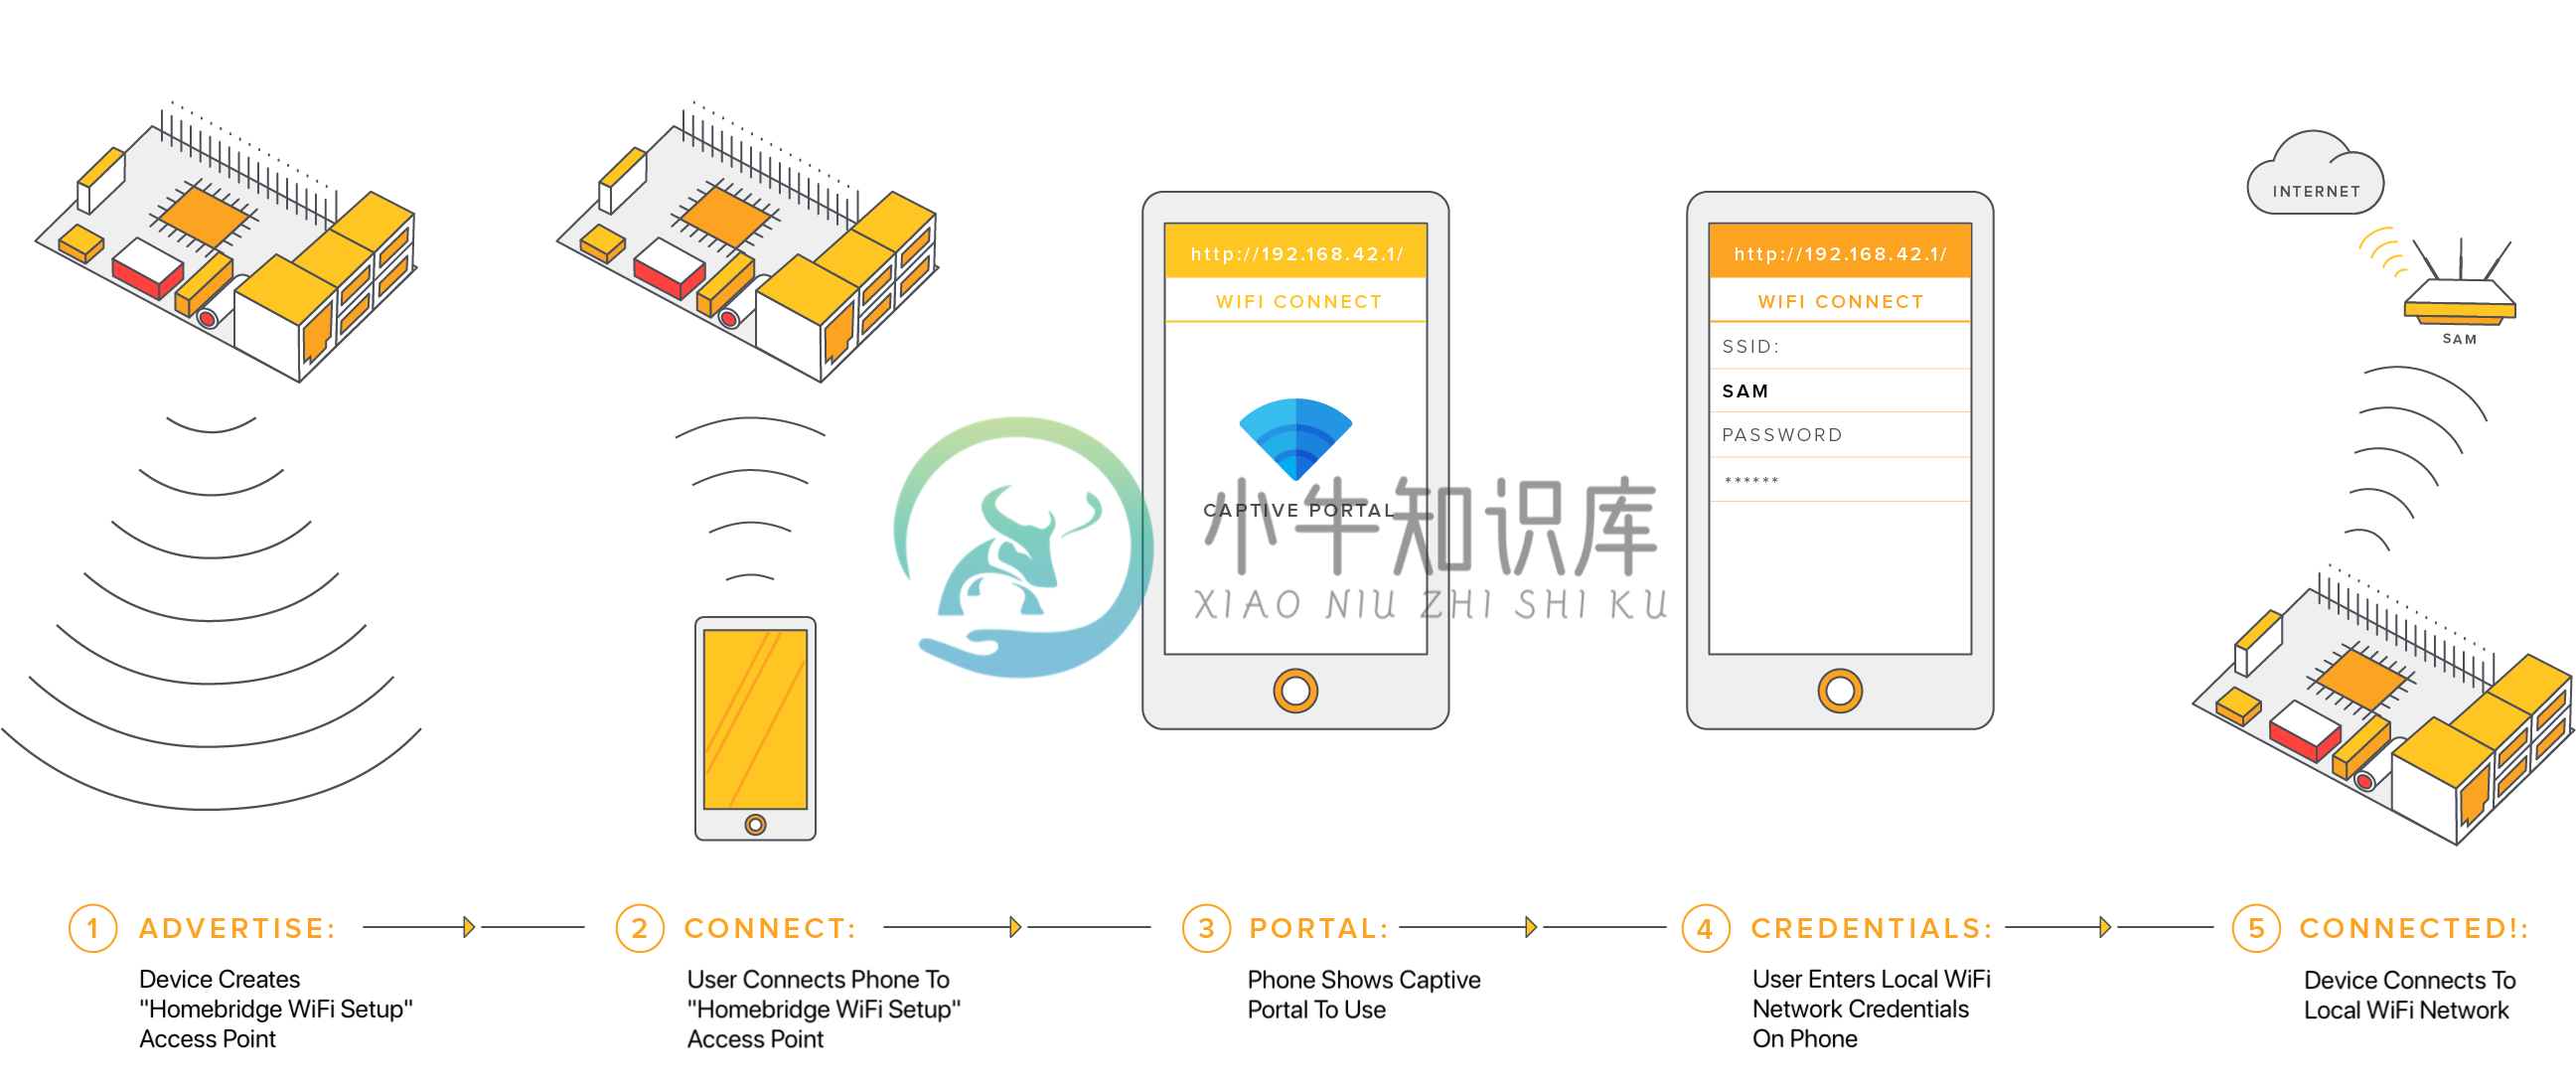
Follow these steps to connect your device to WiFi:
- Power on your device without an Ethernet cable attached.
- Wait 1-2 minutes
- Use your mobile phone to scan for new WiFi networks
- Connect to the hotspot named Homebridge WiFi Setup
- Wait a few moments until the captive portal opens, this portal will allow you to connect the Raspberry Pi to your local WiFi network.
If you enter your WiFi credentials incorrectly the Homebridge WiFi Setup hotspot will reappear allowing you to try again.
Managing Homebridge
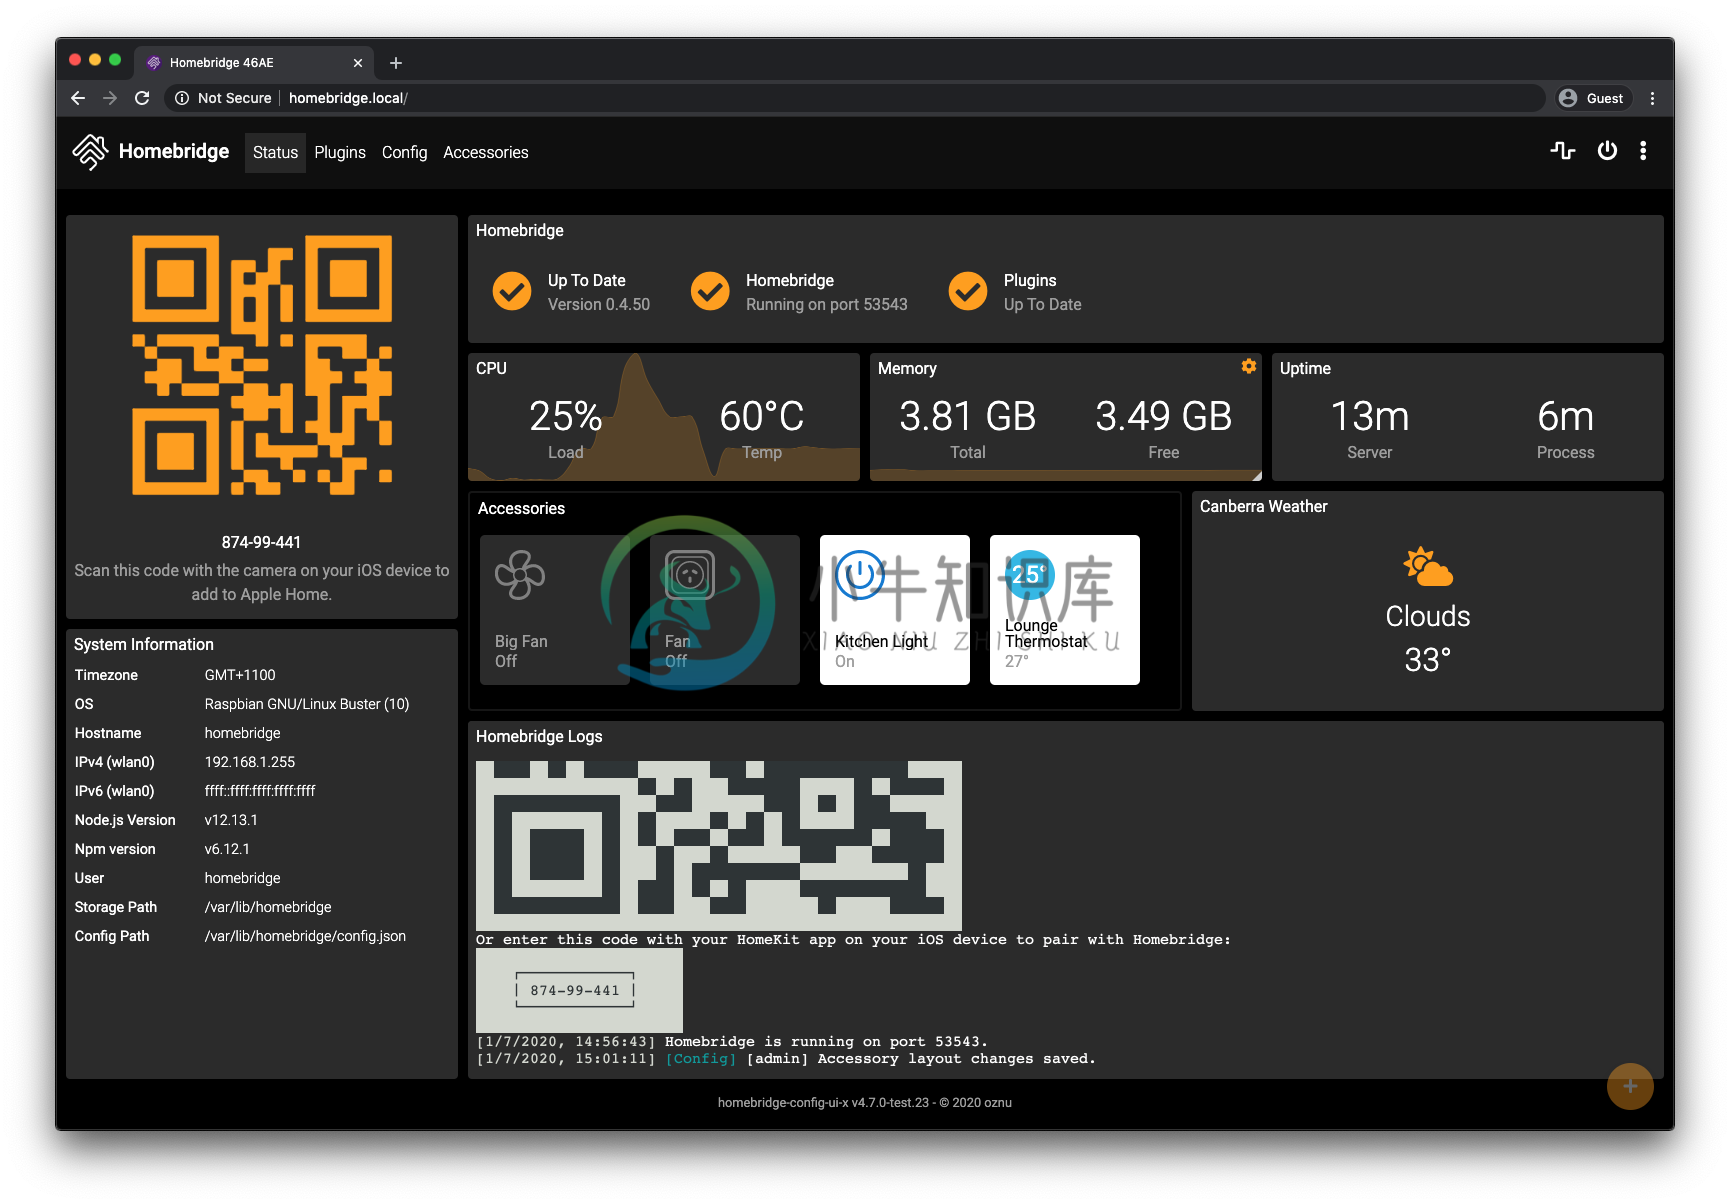
The Homebridge Config UI X web interface will allow you to install, remove and update plugins, and modify the Homebridge config.json and manage other aspects of your Homebridge service.
The default user is admin with password admin.
If you're using macOS or a mobile device, you should be able to access the UI via http://homebridge.local.
If you're using Windows, or http://homebridge.local does not work for you, you will need to find the IP address of your Raspberry Pi another way:
- Login to your router and find the "connected devices" or "dhcp clients" page to find the IP address that was assigned to the Raspberry Pi.
- Use an iPhone to access
http://homebridge.local, once you login using the default username and password (admin/admin) you can find the IP address under System Information. - Download the Fing app for iOS or Android to scan your network to find the IP address of your Raspberry Pi.
- As a last resort, if you plug a monitor into your Raspberry Pi, the IP address will be displayed on the attached screen once it has finished booting.
Once you've found your IP address, login to the web interface by going to http://<ip address of your server>.
You should take a moment to review the Configuration Reference at the bottom of this guide.
Updating Node.js
To update Node.js run sudo hb-config and select Upgrade Node.js.
This will ensure your Raspberry Pi is running the latest LTS version of Node.js.
SSH Access
SSH is enabled by default. The default username is pi with password raspberry.
Security and Privacy
- Privacy: The Homebridge Raspbian Image, as well as the Homebridge and Homebridge Config UI X software components, do not contain any analytics, call home, or similar features that would allow the project maintainers to track you or the usage of this image.
- Security: The Homebridge Raspbian Image is kept up-to-date with the latest official Raspbian builds. To find out more, or to report a security issue or vulnerability, please see the project's SECURITY policy.
- Transparency: The Homebridge Raspbian Image project is open source and each image is built using the public GitHub Action runners. The build logs for each release are publicly available on the project's GitHub Actions page and every release contains a SHA-256 checksum of the image you can use to verify the integrity of your download.
Community
The official Homebridge Discord server and Reddit community are where users can discuss Homebridge and ask for help.
Configuration Reference
This table contains important information about your setup. You can use the information provided here as a reference when configuring or troubleshooting your environment.
| File Location / Command | |
|---|---|
| Config File Path | /var/lib/homebridge/config.json |
| Storage Path | /var/lib/homebridge |
| Restart Command | sudo hb-service restart |
| Stop Command | sudo hb-service stop |
| Start Command | sudo hb-service start |
| View Logs Command | sudo hb-service logs |
| Manage Homebridge Server | sudo hb-config |
| Systemd Service File | /etc/systemd/system/homebridge.service |
| Systemd Env File | /etc/default/homebridge |
| Default Hostname | homebridge.local |
| Default SSH Username | pi |
| Default SSH Password | raspberry |
| Default Web Username | admin |
| Default Web Password | admin |
The Homebridge Raspberry Pi Image wiki contains more information and instructions on how to further customise your install:
https://github.com/homebridge/homebridge-raspbian-image/wiki
-
原生 Raspbian 系统 方法一:All-in-one 一键安装(失效) 注意 此安装方法已停止维护,不保证对 0.55.0 及之后 Home Assistant 的可用性。 安装方法 下载并烧录 官方 Raspbian 系统,推荐新手使用带有图形化操作界面的 Raspbian with Desktop。 如需使用无线网,请在初次启动前,将 TF 卡接入电脑。在 boot 目录下新建 wpa_
-
地址 https://mirrors.ustc.edu.cn/raspbian/ 说明 Raspbian 软件源 系统架构 armhf 收录版本 jessie (oldoldstable) stretch (oldstable) buster (stable) bullseye (testing) 使用说明 警告 操作前请做好相应备份 将 /etc/apt/sources.list 文件中默认的源
-
Raspbian 简介 Raspbian 是专门用于 ARM 卡片式计算机 Raspberry Pi® “树莓派”的操作系统, 其基于 Debian 开发,针对 Raspberry Pi 硬件优化。 Raspbian 并非由树莓派的开发与维护机构 The Raspberry Pi Foundation “树莓派基金会” 官方支持。其维护者是一群 Raspberry Pi 硬件和 Debian 项目
-
Homebridge 是一个轻量级 NodeJS 服务器,它模拟 iOS HomeKit API,提供从 HomeKit 到“智能家居”设备制造商提供的各种第三方 API 的基本桥接。通过 Homebridge 的桥接,可以让 Siri 控制完全不支持 HomeKit 的设备。 此外 Homebridge 支持插件。
-
Homebridge VM Boot Image A minimal ISO image that runs Homebridge. ⚠️ For use in virtual machines only, do not boot this ISO in a machine with access to a disk containing data you care about. Usage Cl
-
homebridge-vsx homebridge-vsx is a plugin made for homebridge,which allows switching on and off your Pioneer AV receiver. All AV receivers (VSX and SC),which work with the iControl AV5 App are support


