slop
slop (Select Operation) is an application that queries for a selection from the user and prints the region to stdout.
Features
- Hovering over a window will cause a selection rectangle to appear over it.
- Clicking on a window makes slop return the dimensions of the window, and it's ID.
- OpenGL accelerated graphics where possible.
- Supports simple arguments:
- Change selection rectangle border size.
- Select X display.
- Set padding size.
- Force window, or pixel selections with the tolerance flag.
- Set the color of the selection rectangles to match your theme! (Even supports transparency!)
- Remove window decorations from selections.
- Supports custom programmable shaders.
- Move started selection by holding down the space bar.
Practical Applications
slop can be used to create a video recording script in only three lines of code.
#!/bin/bash
slop=$(slop -f "%x %y %w %h %g %i") || exit 1
read -r X Y W H G ID < <(echo $slop)
ffmpeg -f x11grab -s "$W"x"$H" -i :0.0+$X,$Y -f alsa -i pulse ~/myfile.webm
You can also take images using imagemagick like so:
#!/bin/bash
slop=$(slop -f "%g") || exit 1
read -r G < <(echo $slop)
import -window root -crop $G ~/myimage.png
Furthermore, if you are adventurous, you can create a simple script to copy things from an image itself, unselectable pdf, or just VERY quick rectangular selection or for places where there is no columnar selection (very useful for dataoperators)
You need to have tesseract with support for the specific language, xclip and others are nice if you just want them in clipboard.
#!/bin/env bash

imagefile="/tmp/sloppy.$RANDOM.png"
text="/tmp/translation"
echo "$imagefile"
slop=$(slop -f "%g") || exit 1
read -r G < <(echo $slop)
import -window root -crop $G $imagefile
tesseract $imagefile $text 2>/dev/null
cat $text".txt" | xclip -selection c
If you don't like ImageMagick's import: Check out maim for a better screenshot utility.
Lets see some action
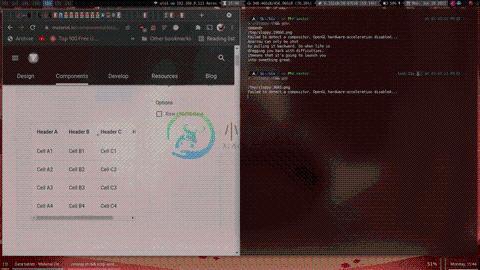
Ok. Here's a comparison between 'scrot -s's selection and slop's:
You can see scrot leaves garbage lines over the things you're trying to screenshot!While slop not only looks nicer, it's impossible for it to end up in screenshots or recordings because it waits for DestroyNotify events before completely shutting down. Only after the window is completely destroyed can anything take a screenshot.
how to install
Install using your Package Manager (Preferred)
- Arch Linux: community/slop
- Void Linux: slop
- FreeBSD: x11/slop
- NetBSD: x11/slop
- OpenBSD: graphics/slop
- CRUX: 6c37/slop
- Gentoo: x11-misc/slop
- NixOS: slop
- GNU Guix: slop
- Debian: slop
- Ubuntu: slop
- Fedora: slop
- Ravenports: slop
- Alpine Linux: testing/slop
- Please make a package for slop on your favorite system, and make a pull request to add it to this list.
Install using CMake (Requires CMake)
Note: Dependencies should be installed first: libxext, glew, and glm.
git clone https://github.com/naelstrof/slop.git
cd slop
cmake -DCMAKE_INSTALL_PREFIX="/usr" ./
make && sudo make install
Shaders
Slop allows for chained post-processing shaders. Shaders are written in a language called GLSL, and have access to the following data from slop:
| GLSL Name | Data Type | Bound to |
|---|---|---|
| mouse | vec2 | The mouse position on the screen. |
| desktop | sampler2D | An upside-down snapshot of the desktop, this doesn't update as the screen changes. |
| texture | sampler2D | The current pixel values of slop's frame buffer. Usually just contains the selection rectangle. |
| screenSize | vec2 | The dimensions of the screen, where the x value is the width. |
| position | vec2 attribute | This contains the vertex data for the rectangle. Only contains (0,0), (1,0), (1,1), and (0,1). |
| uv | vec2 attribute | Same as the position, this contians the UV information of each vertex. |
The desktop texture is upside-down because flipping it would cost valuable time.
Shaders must be placed in your ${XDG_CONFIG_HOME}/slop directory, where XDG_CONFIG_HOME is typically ~/.config/. This folder won't exist unless you make it yourself.
Shaders are loaded from the --shader flag in slop. They are delimited by commas, and rendered in order from left to right. This way you can combine multiple shaders for interesting effects! For example, slop -rblur1,wiggle would load ~/.config/slop/blur1{.frag,.vert} and ~/.config/slop/wiggle{.frag,.vert}. Then render the selection rectangle twice, each time accumulating the changes from the different shaders.
Enough chatting about it though, here's some example shaders you can copy from shaderexamples to ~/.config/slop to try out!
The files listed to the right of the | are the required files for the command to the left to work correctly.
slop -r blur1,blur2 -b 100|~/.config/slop/{blur1,blur2}{.frag,.vert}
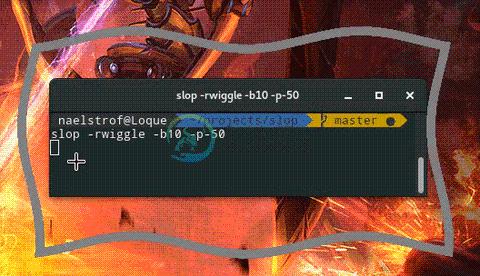
slop -r wiggle -b 10|~/.config/slop/wiggle{.frag,.vert}
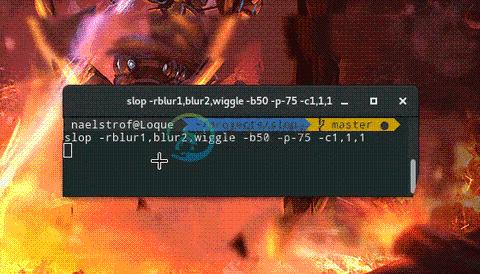
And all together now...
slop -r blur1,blur2,wiggle -b 50 -c 1,1,1|~/.config/slop/{blur1,blur2,wiggle}{.frag,.vert}
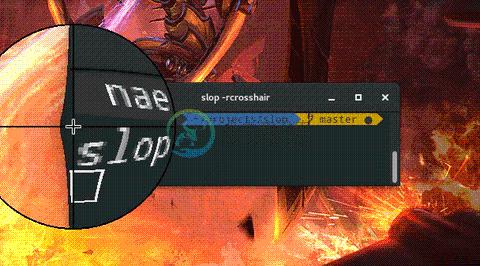
Finally here's an example of a magnifying glass.
slop -r crosshair|~/.config/slop/crosshair{.frag,.vert}
It's fairly easy to adjust how the shaders work by editing them with your favourite text editor. Or even make your own!
-
本文翻译自Elasticsearch官方指南的Proximity Matching一章。 邻近匹配(Proximity Matching) 使用了TF/IDF的标准全文搜索将文档,或者至少文档中的每个字段,视作"一大袋的单词"(Big bag of Words)。match查询能够告诉我们这个袋子中是否包含了我们的搜索词条,但是这只是一个方面。它不能告诉我们关于单词间关系的任何信息。 考虑以下这些
-
对Lucene PhraseQuery的slop的理解 所谓PhraseQuery,就是通过短语来检索,比如我想查“big car”这个短语,那么如果待匹配的document的指定项里包含了"big car"这个短语,这个document就算匹配成功。可如果待匹配的句子里包含的是“big black car”,那么就无法匹配成功了,如果也想让这个匹配,就需要设定slop,先给出slo
-
主要知识点: slop的含义(内在原理) slop的用法 一、slop的含义是什么? query string(搜索文本)中的几个term,要经过几次移动才能与一个document匹配,这个移动的次数,就是slop 举例如下:一个query string经过几次移动之后可以匹配到一个document,然后设置slop 假如有如下一句话:hello world, java is ve
-
18_ElasticSearch 基于slop参数实现近似匹配 更多干货 分布式实战(干货) spring cloud 实战(干货) mybatis 实战(干货) spring boot 实战(干货) React 入门实战(干货) 构建中小型互联网企业架构(干货) python 学习持续更新 ElasticSearch 笔记 概述 slop的含义 query string,搜索文本,中的几个ter
-
问题内容: 问题1: 在Lucene(或ElasticSearch)中,的确切含义是什么?是将两个匹配的单词分隔开的单词数,还是将分隔的单词数加1? 例如,假设您的索引文本为: 哪些查询会匹配这样的文字:,, 我希望第一个不匹配,最后一个不匹配。但是中间呢? 问题2: 现在是第二个更复杂的必然问题:如果存在两个以上的搜索子句,该如何处理?它适用于 每 对子句还是 任何 对子句。 例如,假设您构建一
-
我们将沿用第二章中编写的Python类,重复的代码我不在这里赘述。输入的数据是这样的: users2 = {"Amy": {"Taylor Swift": 4, "PSY": 3, "Whitney Houston": 4}, "Ben": {"Taylor Swift": 5, "PSY": 2}, "Clara": {"PSY": 3.5, "Whitn
-
还有一种比较流行的基于物品的协同过滤算法,名为Slope One,它最大的优势是简单,因此易于实现。 Slope One算法是在一篇名为《Slope One:基于在线评分系统的协同过滤算法》的论文中提出的,由Lemire和Machlachlan合著。这篇论文非常值得一读。 我们用一个简单的例子来了解这个算法。假设Amy给PSY打了3分,Whitney Houston打了4分;Ben给PSY打了4分
-
Slope Ninja Backend This repository hosts the backend source code (API, resort data parser and the notification workers) that powers https://slope.ninja, Slope Ninja iOS and Slope Ninja Android apps.


